Filed under: Canvas Master Craftsman Program, Embroidery Guild of America, Steps 1-6
One more post about the EGA Master Craftsman Program for Canvas! I decided that I wanted all 6 pieces in one post. I began the EGA program in the fall of 2019 and completed all 6 steps by the spring of 2023.
EGA has eight Master Craftsman Programs. Briefly, the programs “are designed to promote excellence in embroidery by providing the accomplished needleworker the opportunity to demonstrate skills and become certified as a “master” in her or his area of expertise. Each program area consists of six steps that test the ability and workmanship of the candidate.” To obtain further details about each program online, you must be a member of EGA. Judging is usually twice per year but you can take up to 2 years to complete each step.

Step 1 has you demonstrate that you can transfer a design and execute 10 stitches (no more and no less). The fabric type (18 count monocanvas), type of threads (stranded cotton), and color scheme are specified. I used 5 monochromatic values in what DMC calls Golden Yellow. I used lighter colors and smaller stitches to have certain elements recede. I turned the stitch on the right fish’s fin to add movement. I employed thread blending in some manner on all 3 fish. Documentation in an Artist’s Statement must include stitches used, source of stitches used, and threads (including 4” samples of any threads used).

For Step 2, you demonstrate that you can transfer a design, execute 21 stitches (including Turkey Work), and compensate using an analogous (Yellow, Yellow-Green, and Green) colorway. EGA supplied the geometric pattern again. It had to be done in an analogous colorway in cotton floss. I selected Yellow, Yellow-Green, and Green for my analogous colorway (which is 3 adjacent colors on the color wheel including a primary color; tints and shades allowed).
As I did the Turkey Work from bottom to top, the nap of the threads were pressed downward. So, I didn’t notice that the coverage wasn’t as full as I expected when it was fluffed up. I used 2 strands in the left side of the photo and 6 strands (as Mary Corbet suggests in her YouTube video) in the right photo. Much better! At least the stitching was easy to remove from the backside.

Step 3 has you use at least 4 diaper patterns in a split complementary color combination (mine is yellow-orange, blue-green, and blue-violet). Diaper patterns create strong visual diagonals in both directions. After studying the extremely thorough book, Diaper Patterns, by Ann Strite-Kurz, I decided to make this a diaper sampler by incorporating the eight basic pattern networks (square, diamond, brick, half-drop, triangle, hexagon, scale, and ogee) into a design. Networks moving clockwise from top left are: Scale, Brick, Half-drop, Diamond, Square, Hexagon, Brick, Half-drop, Triangle, and Square on the Diagonal with an Ogee in the center.

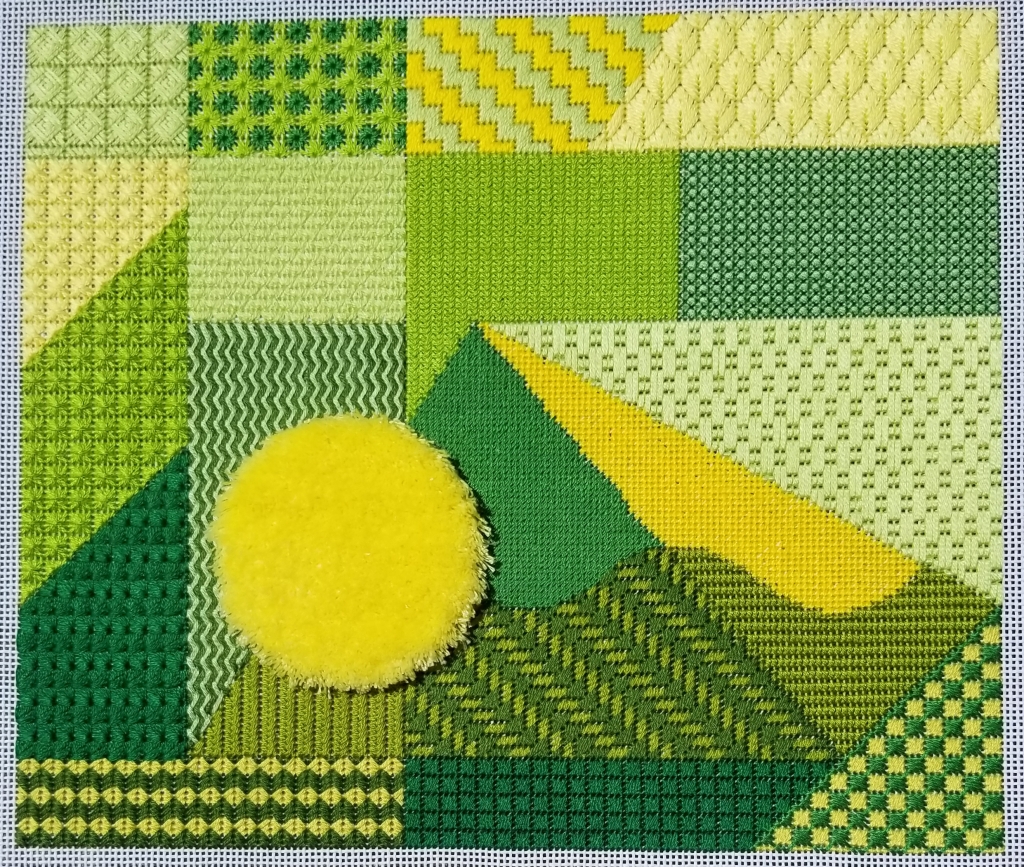
Step 4 has you incorporate 8 different bargello patterns but not into a “sampler”. However, each pattern must touch another Bargello pattern in the design. Any color combination was allowed. I selected a tetrad that are two sets of complements: yellow-orange (browns), yellow-green, blue-violet, and red-violet.

Step 5 has you place a canvas applique of a smaller size count canvas onto a larger size count canvas (my wings are 24 count placed onto 18 count). Pictured are my 2nd and 3rd practice wings. This is the only step that took me a year (thinking, planning, and practicing). I’d never done applique before. At least one applique has to be an irregular shape and greater than 1” square. I started this piece shortly after seeing the article Tale of Two Stitchers in the Needle Pointers (Mar 2021) regarding the 2 painted canvases of owls “Who Gives a Hoot” although mine doesn’t look like them. At first, I was going to make the round eyes the applique until I realized that a circle is not irregular! So, I switched to making the wings the appliques which actually made better sense since they should be in front of the body anyway. I would have padded it but the instructions didn’t say you could pad it. After my submission, they changed their instructions to clearly state that padding is allowed.

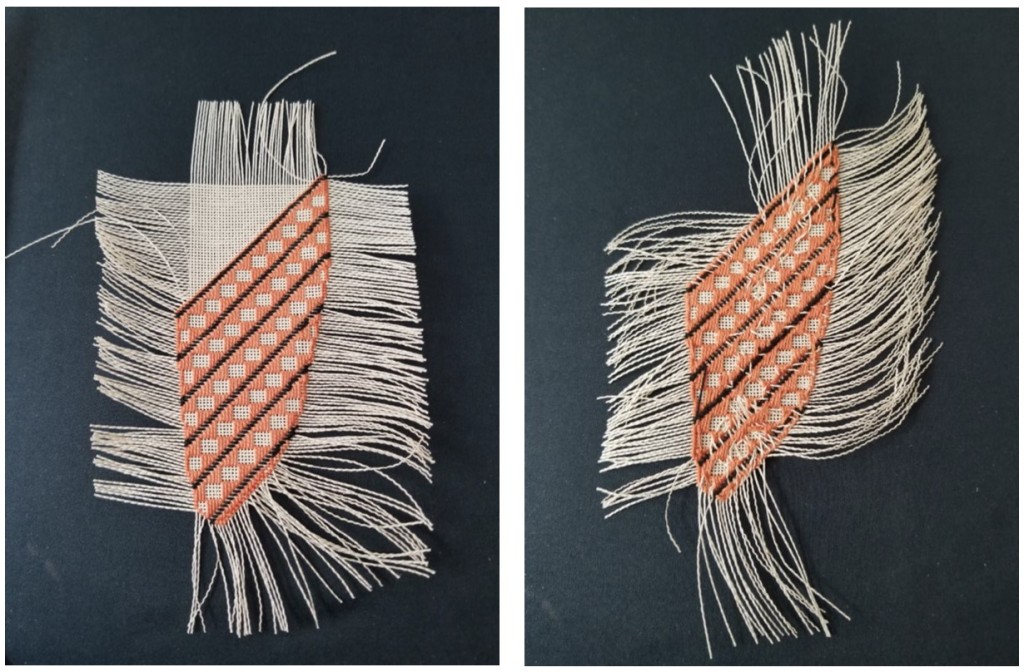
In a nutshell, Step 1 of making a canvas applique is to pull threads out to the stitched piece (in progress in left photo). Step 2 buries some threads on the back of the applique (right photo). The rest of the threads are pulled to the back and buried in the surrounding stitched area. It is time consuming.
Step 6 had to be an original design utilizing previous steps. This was an opportunity to redo a piece I designed years ago after taking First Steps by Nanette Costa. I learned 30+ stitches through my first ANG Correspondence Course and used those stitches in this fireplace. I especially wanted to make the design area taller instead of square and change the candles and background. This has well over 30 different stitches most requiring compensation. Bargello for the flames and a diaper pattern for the background. The rug employed a 21-step thread blending formula to move from light to dark using DMC Floss 842, 841, 840, 839, 838 (5 strands).

At least one of the judges felt the white in the flames was a little strong but that the ThreadworX overdyed was a perfect choice for the sooted walls inside the fireplace. The diaper pattern wallpaper recedes (as it should) and adds just enough texture to add interest. Different values of the bricks and logs add dimension as do the Smyrna cross stitches around the large Jessica. The glow on the rug is lovely and well-executed. I provided the 21-step thread blending formula to move from light to dark using 5 strands of 5 brown DMC Flosses in the Artist’s Statement.
I enjoyed the challenge, highly recommend the program, and thank the panel of three judges who thoughtfully reviewed each piece.
11 Comments so far
Leave a comment

Congratulations, Melita! Well done.
Comment by lindam55 May 18, 2023 @ 12:18 pmThanks Linda M!
Comment by melitastitches4fun May 18, 2023 @ 12:45 pmCongratulations, Melita! It is awesome to see all of these pieces in one post! Thanks for sharing your adventure!
Comment by rosielunde May 18, 2023 @ 1:05 pmThanks Rosie! It was quite an experience.
Comment by melitastitches4fun May 18, 2023 @ 2:56 pmThis is a fascinating post! Thank you for sharing the steps, your thought process, and your lovely stitching with us.
Comment by Cheryl May 18, 2023 @ 3:47 pmI saw your owl at Woodlawn this year, but it was rather high on the wall for my short self, so I’m happy to get a closer look and hear more about how you executed it.
Congratulations and well done on your certification!
Thanks Cheryl. Yeah, it’s a shame some pieces are placed so high.
Comment by melitastitches4fun May 18, 2023 @ 4:30 pmMelita,
<
div>Congratulations ‼️‼️ I started the progr
Comment by stitchlady May 18, 2023 @ 3:52 pmCongrats Melina! Well done. It’s wonderful to seeing your work in one post. Thanks for bringing us along in your journey.
Comment by Joyce Pugh May 21, 2023 @ 9:10 amThanks Joyce. Yeah, it seemed like the journey deserved a recap!
Comment by melitastitches4fun May 21, 2023 @ 12:04 pmCongratulations!!! Enjoyed reading about all the pieces you stitched for this program in one place. Can appreciate the challenge each level gave you and you managed all beautifully.
Comment by brendasneedlepointstudioblog May 22, 2023 @ 8:55 amThanks Brenda.
Comment by melitastitches4fun May 22, 2023 @ 9:53 am