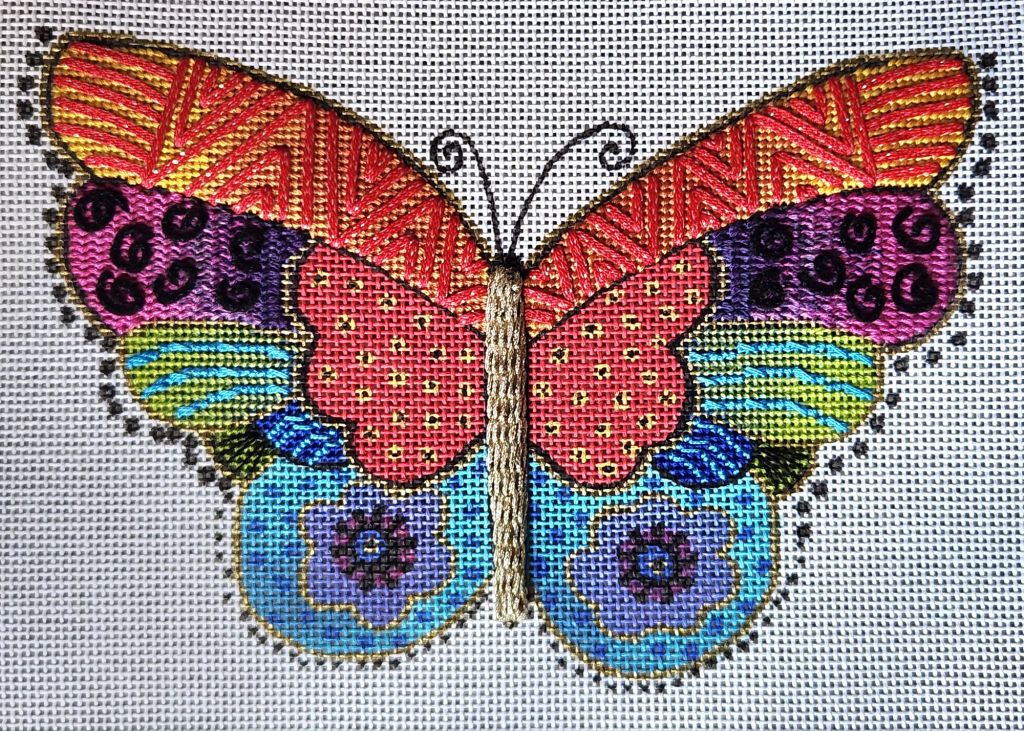
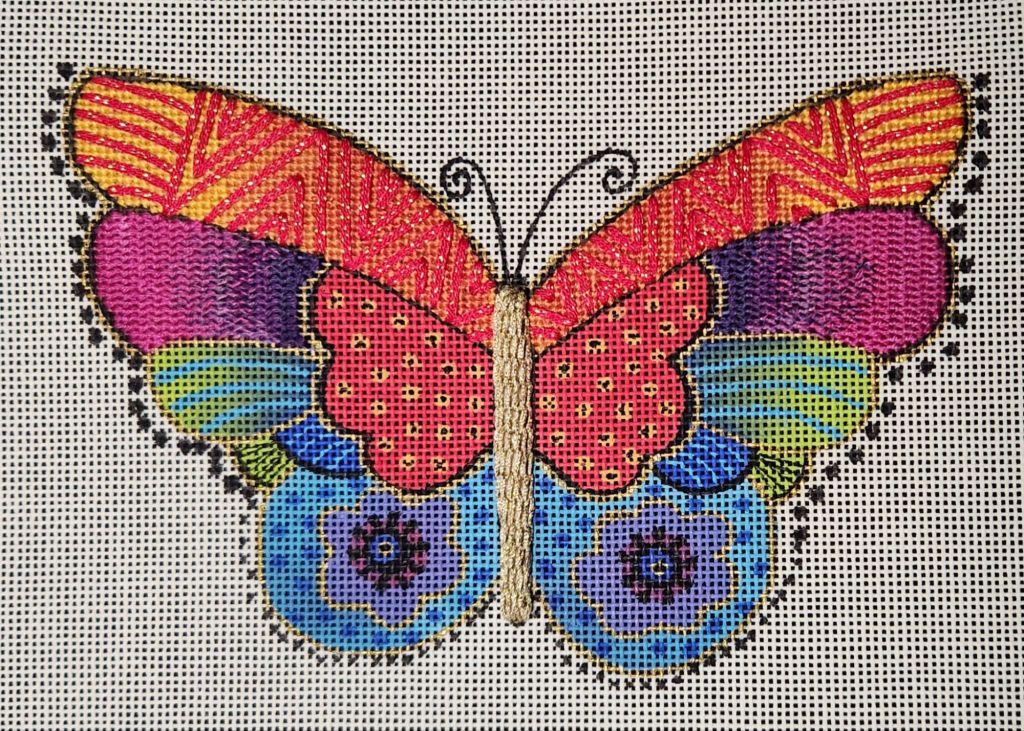
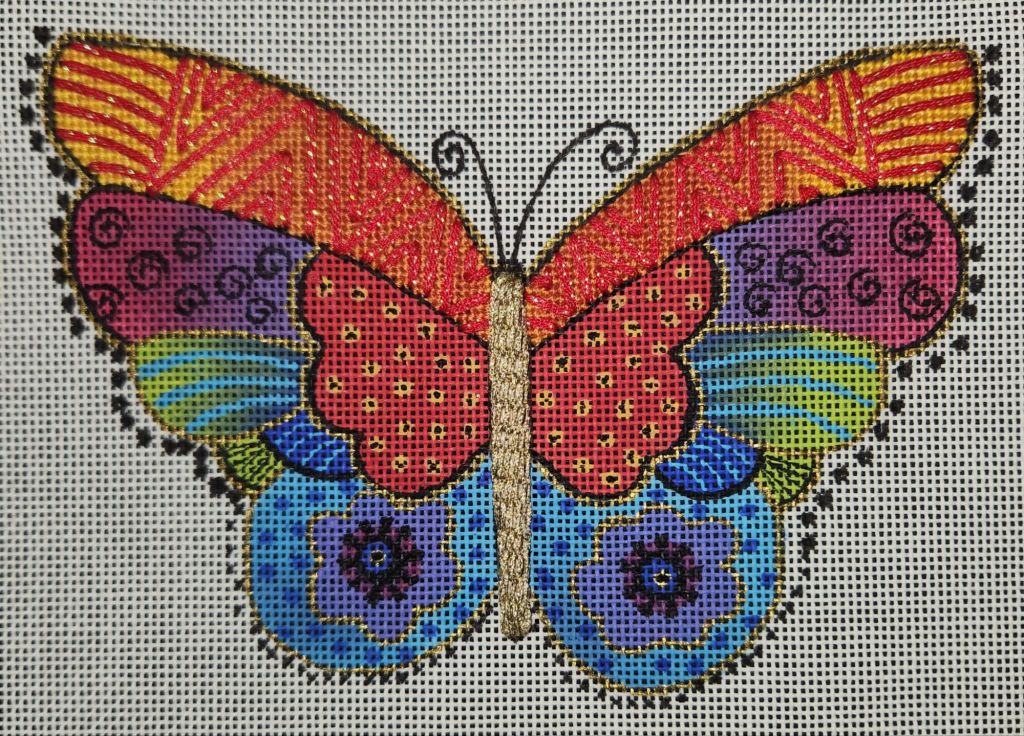
Filed under: ANG Main Line Stitchers Chapter, Laurel Burch Rainbow Butterfly by Danji
The background from my Sharon G Vases with Curly Bamboo used the T stitch and a very light blue floss because it appears very delicate almost invisible. She did not want to detract from the vases. I, too, did not want distract from the butterfly. So, that’s what I used to create the appearance of it flying in the sky. I used an overdyed thread with a slight color change. Don’t ask me what thread I used – I didn’t make a note about it and don’t see anything in my stash that matches! I’m slipping.
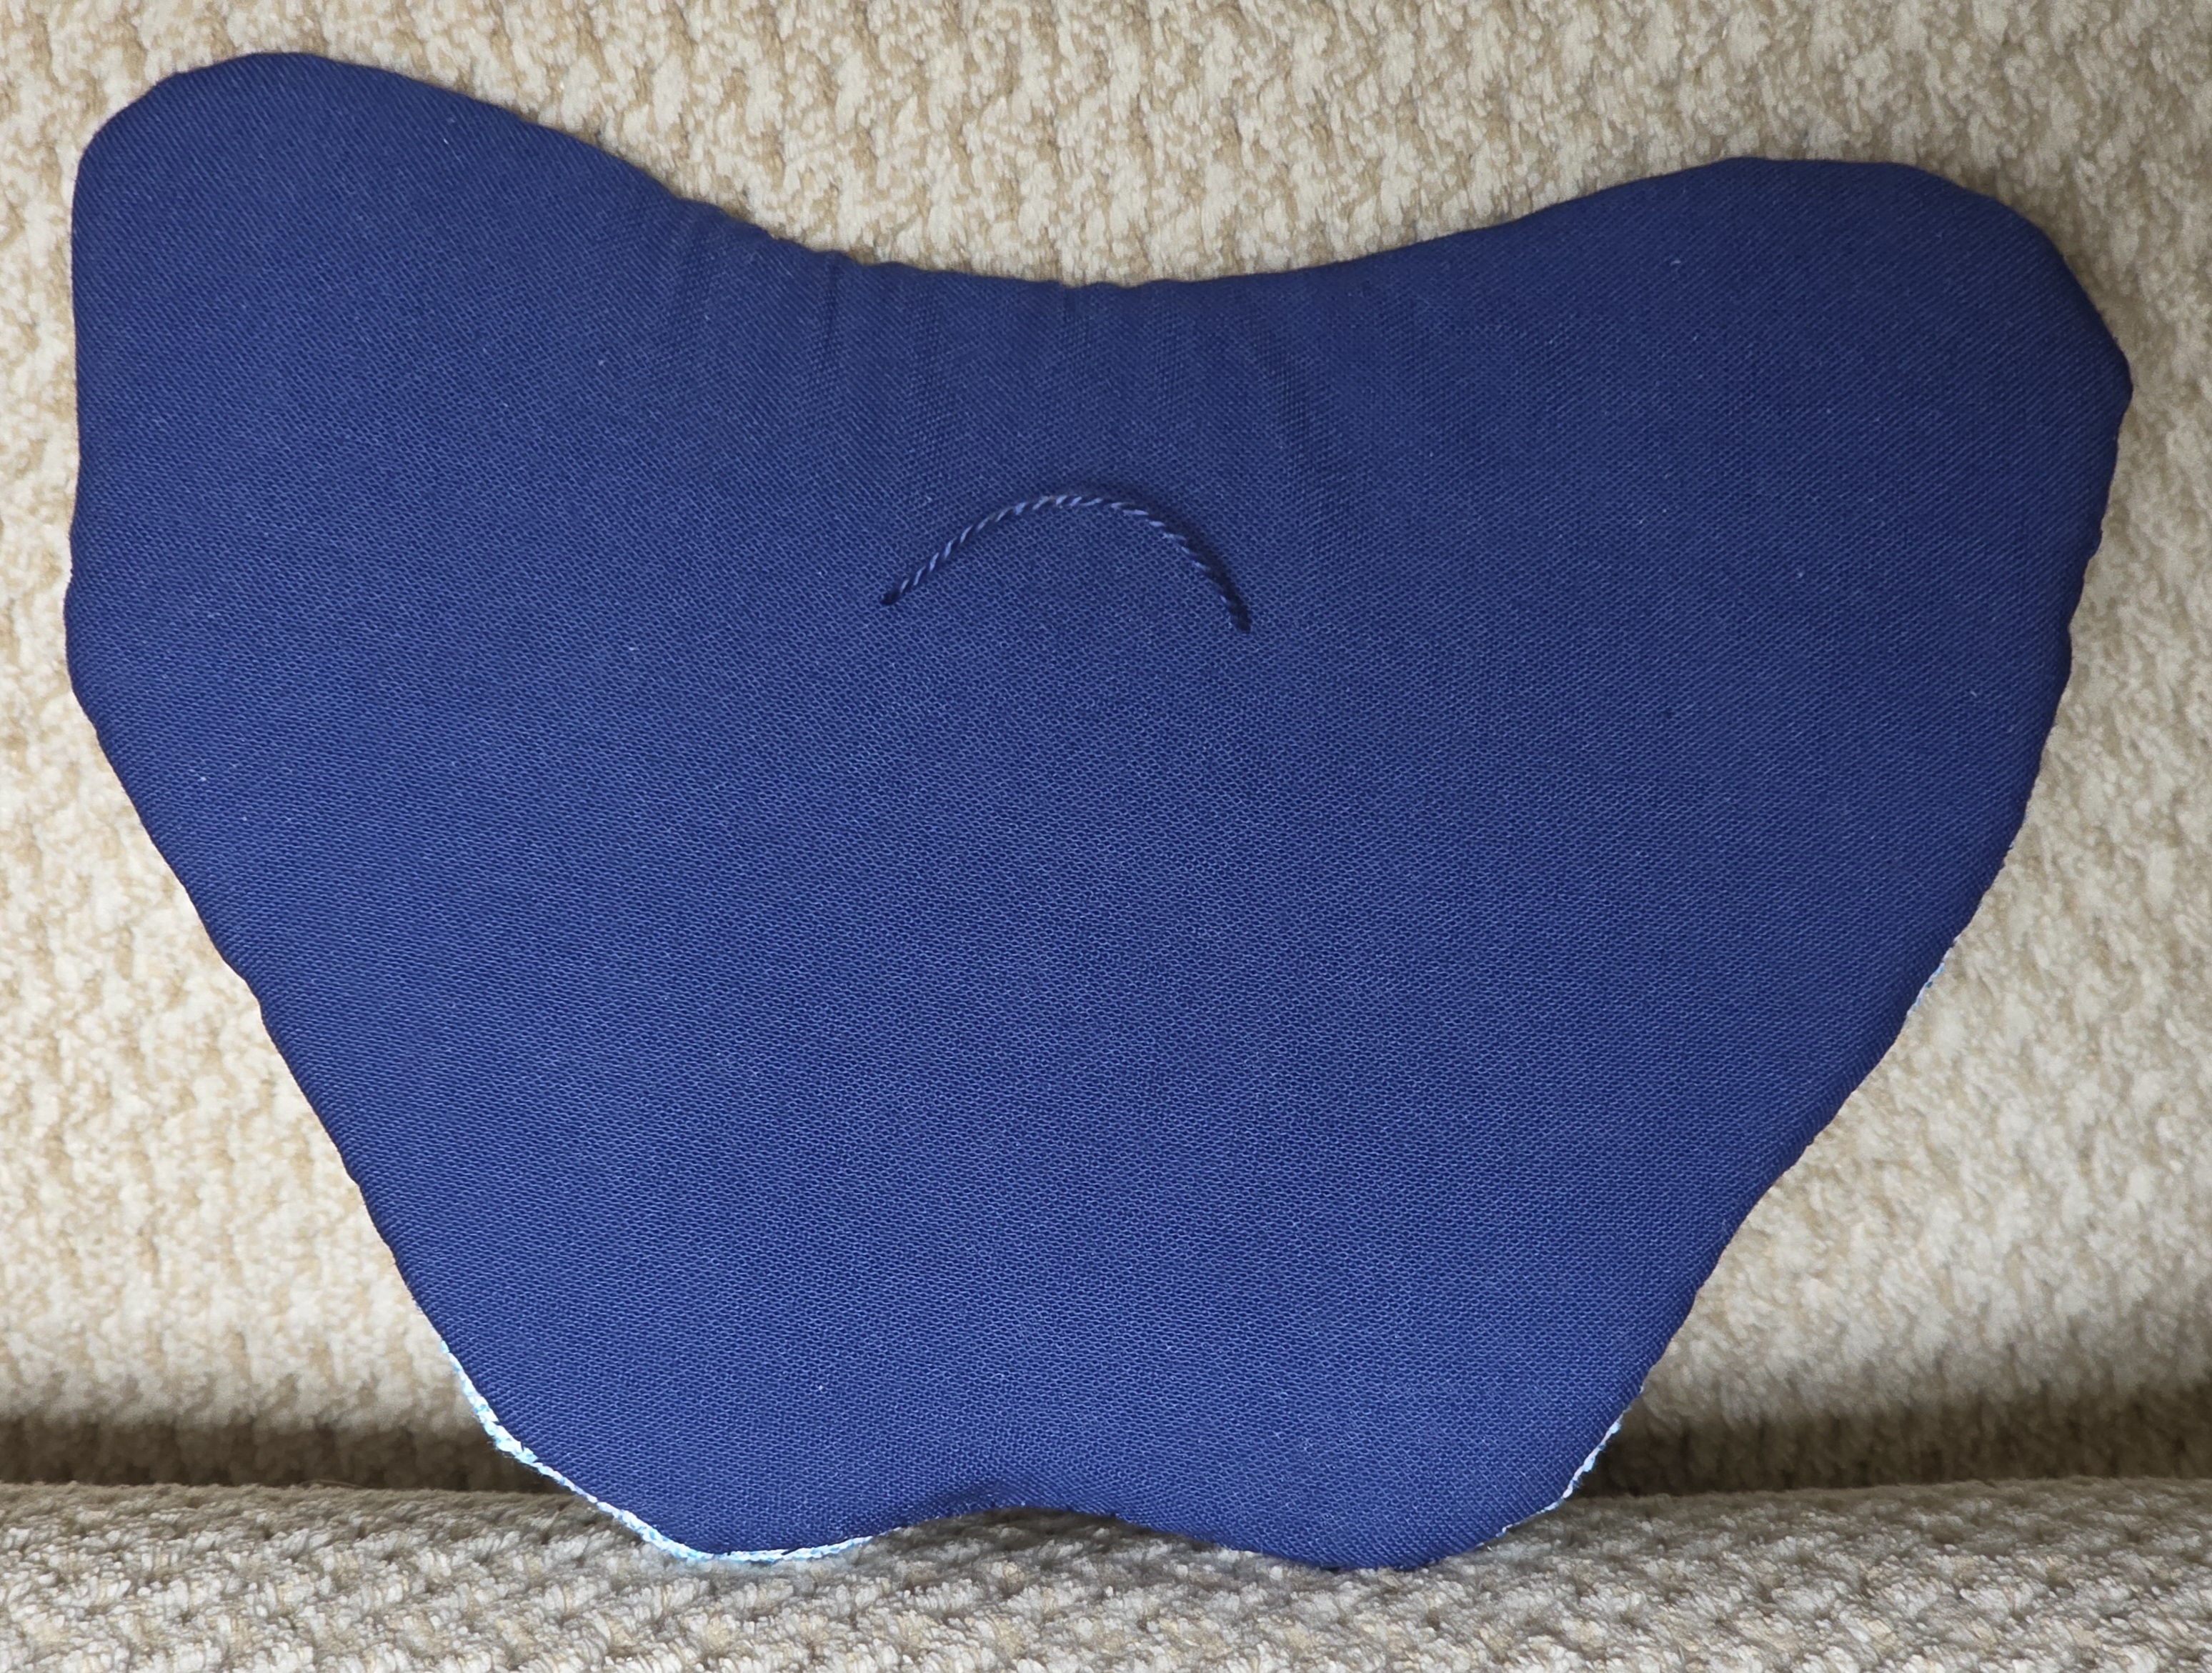
I made an outline on Velum (stiff tracing paper) of where I wanted the outer edge and used it to trace the shapes for the upholstery batting (obtained from Fireside Stitchery as recommended by Sue Parsons for finishing on the front side – it is fluffy on one side and thicker than the Pellon sew-in stabilizer) that I used for the fabric backing. A piece of magazine board was placed in between the front and back for some stiffness but it remains light and the single loop I placed on the back is sufficient.

Goal # 2 for 2025 is done!
Filed under: ANG Main Line Stitchers Chapter, Laurel Burch Rainbow Butterfly by Danji
This post is out of order. I wanted to share how I stitched the lower areas. I started with a 3×3 Jessica and placed a couple of stitches in the center to help raise the center sequin and black bead.
There are black daisy stitches couching a short length of the Waterlilies African Sunset (all 12 strands).
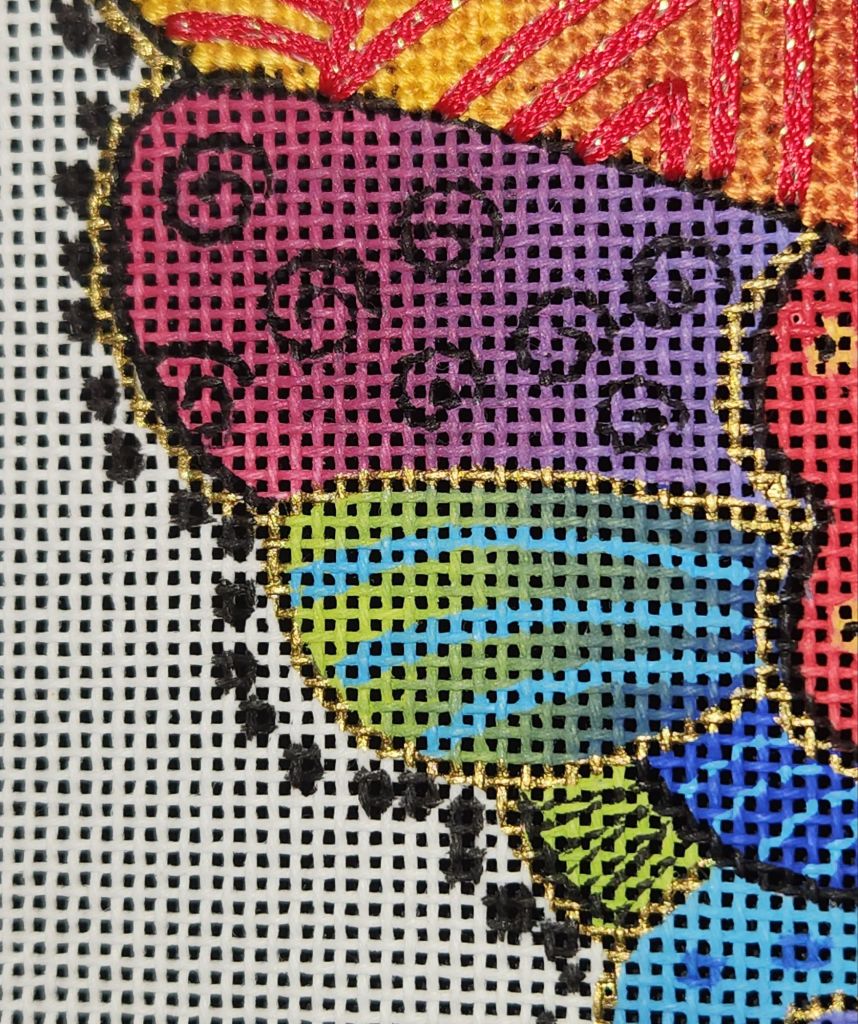
I ignored the dark blue painted area and stitched the light blue Planet Earth Silk 8 ply Azure 1233 (3 strands) in a Hesitation Stitch (Painted Canvas Embellishment An Idea Book by Carole Lake and Michael Boren, pg 65) leaving room for a dark blue bead (Seed Beads, 14/0). The beads are from Beads by Blanche in Bergenfield, NJ, which closed after 27 years in May 2024. A few years ago, several of us from the ANG Keystone Garden chapter benefited from Trish Vine’s downsizing. I have a 30 gm tube of these tiny blue beads. I needed to diagram the Hesitation Stitch before stitching it to see if it would work.

A buttonhole stitch with 2 strands of Silk Lame Braid Petite (SP174) surrounds the center sequin and bead.

Filed under: ANG Main Line Stitchers Chapter, Laurel Burch Rainbow Butterfly by Danji
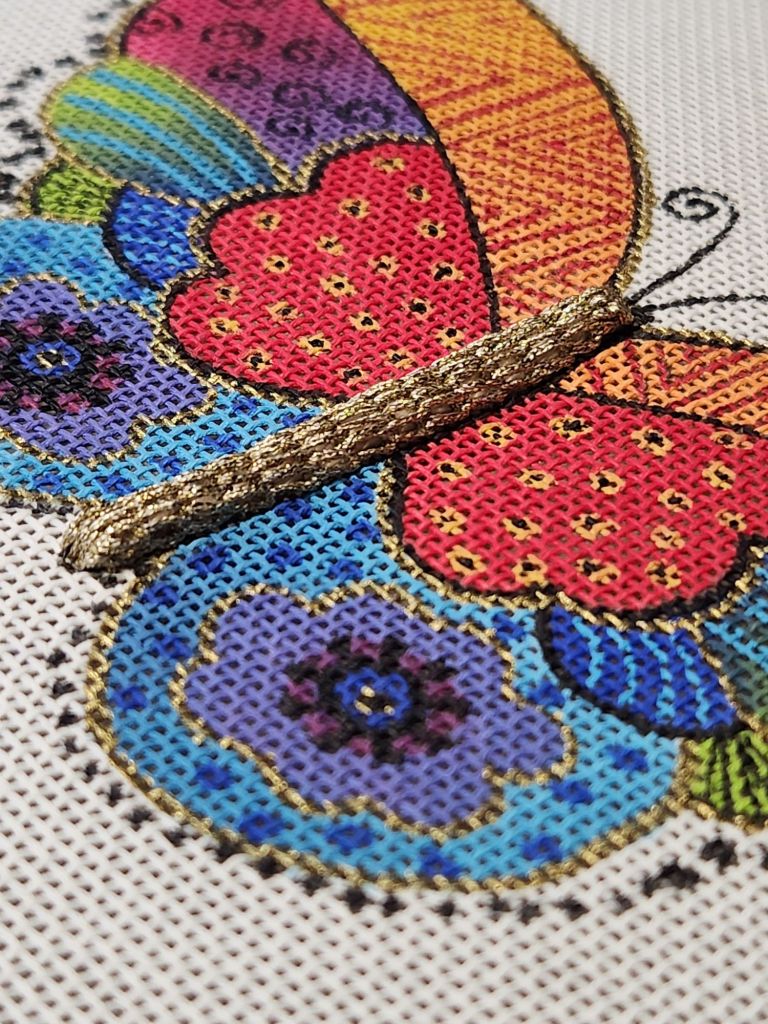
The final steps (antennae, outlines, and beads) of my Rainbow Butterfly by Danji.
I wanted the antennae to be more substantial than the black outlines, so I used Kreinik Facets and Petite Facets, respectively. These were all couched into place with Kreinik #4 Braid in matching 005 Black. I had to make the starting and ending holes pretty large to sink the Facets. Wrapping the thread with tape and making a pointed end allowed me something to grab and nudge through the enlarged hole, which I then tacked into place.
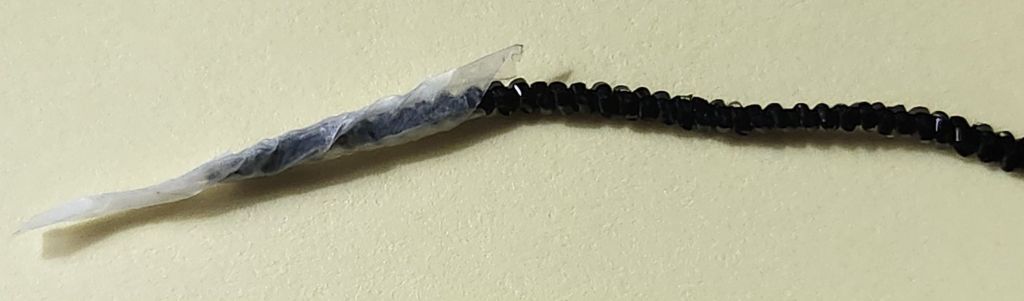
I planned my path with the Petite Facets to minimize the number of starting and ending holes. One long piece goes from the top left side of the yellow-orange wing down and around the body and across to the top right side. Two shorter pieces follow along the top of the fuchia-purple area. I made the “tape needle” again to start each side but used a large eye needle to finish.
The Kreinik Petite Facets 002 Gold looked more gold than the Kreinik #16 Braid 002 Gold that I had used for the body, and it was too thick, especially considering how much was getting outlined. I couldn’t have gone to #12 Braid because I needed the thicker #16 Braid to cover the width of the outline. I couched with #4 Braid 002 again. I also used #4 Braid to outline the edge of the small green and blue areas.

I often refer to Marilyn Owen’s article in the ANG Needle Pointers May/June 2021 issue for beading techniques. I used 2 different methods to attach the same size bead with 2 strands of black DMC floss. Both methods orient the beads vertically, but one is over 2 canvas threads and the other over 1 canvas thread. This allowed the same size beads to appear larger on the top half compared to the bottom, which is how the canvas was painted. I used Mill Hill Antique Glass Beads 11/0 (03040).

I’ll wait to share the background until it’s fully finished.
Filed under: ANG Main Line Stitchers Chapter, Laurel Burch Rainbow Butterfly by Danji
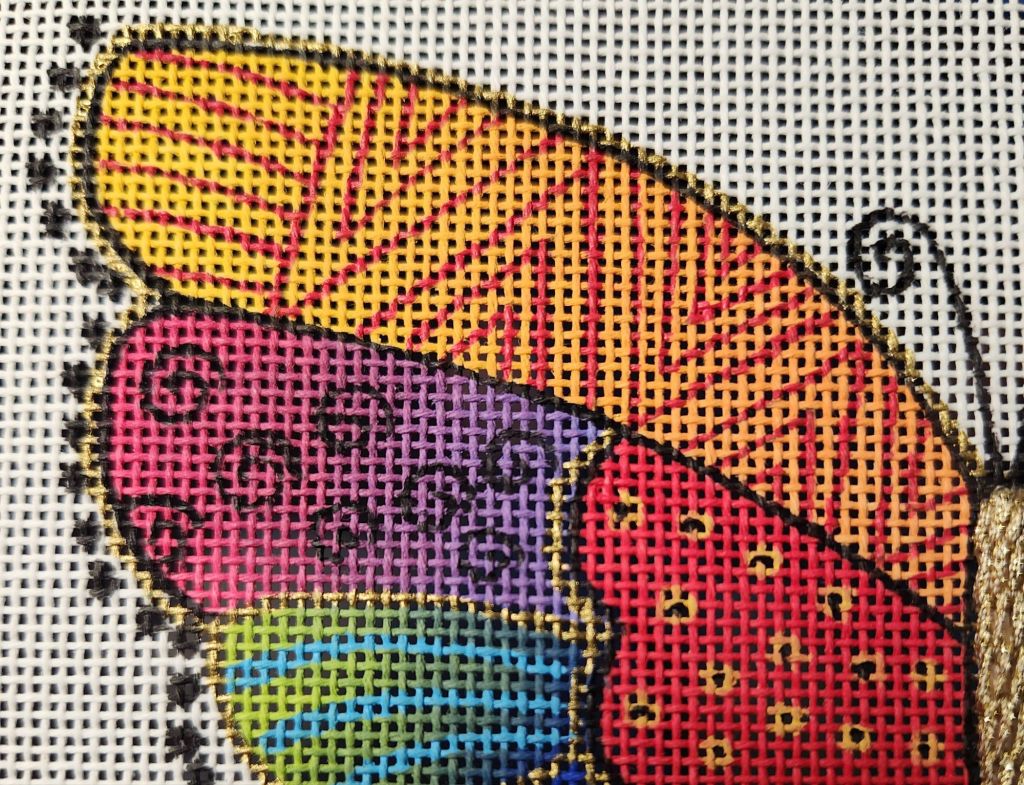
It probably would have made sense to work the center red areas before the outer center areas on my Rainbow Butterfly (by Danji, Laurel Burch Artwork). But, it worked out ok.
I stitched over the red painted area with 3 strands of Planet Earth Silk, Fury 1005 using a Climbing Stitch located in Painted Canvas Embellishment: An Idea Book by Carole Lake and Michael Boren (in the section appropriated labeled Wings 2).
I ignored the painted placement of the Sundance Sequins (SQ216) and placed a few extra in the area which are held in place by Miyuki Delica Beads 11/0 (DB-0310, Matte Black). Again, the sides are uneven (the left side is larger than the right side).

Filed under: ANG Main Line Stitchers Chapter, Laurel Burch Rainbow Butterfly by Danji
These 3 areas in the outer center area will be the only areas where I will let your eyes “rest” (a little) anywhere on my Rainbow Butterfly (by Danji, Laurel Burch Artwork). Did you know? Butterflies “roost” at night and avoid the rain. The raindrops can be devastating for a butterfly, and so they seek shelter.
The combination blue and green area used a couple of stitch ideas from Painted Canvas Embellishment: An Idea Book by Carole Lake and Michael Boren. The blue crosses are my variation to fit my space of theirs from page 68 on Wings 2 (Planet Earth Silk Ply, Azure 1233). The green is alternating rows of tent stitch going in different directions to change the reflection of light (Planet Earth Silk Ply, Fiddlehead 1056 – love that thread name). The canvas does have shading with it getting dark towards the center. So, I used one strand of the Planet Earth Silk in order to see some of the coloration of the canvas show through.
I did basketweave in the other areas with 2 strands Planet Earth Silk. I didn’t want it heavier than the blue and green area. One strand of the black worked fine for the lines.
Working this out on my computer before stitching it was very helpful. The sides are not perfectly identical. Did you know? Asymmetrically-winged butterflies are called chimera [ky-mee-ra] butterflies.

Filed under: ANG Main Line Stitchers Chapter, Laurel Burch Rainbow Butterfly by Danji
Next up was the fuchsia-purple area. This is another area with a lovely color shift from fuchsia to purple. I found Waterlilies 084 African Sunset in my stash and got Waterlilies 286 Aubergine (means eggplant).
Top left.
Top right.

I started with 4 strands of fuchia, then thread blended with purple in 3 steps (3+1, 2+2, 1+3), and finished with 4 strands of purple using a knitting stitch variation from Desert Island Stitches, Volume 1, pg 46.
Again, relying on my photos, I couched black Velour Yarn Fine Mesh by Fleur de Paris with one strand of DMC Floss 310 black. Instead of the 8 swirls, I only made 7 of them because of the odd number rule. Although, looking at the painted canvas, I see them grouped as 5 and 3, which looks fine too.

I couldn’t pass up the butterfly magnet by Accoutrements. They are pretty and strong.
Kristen used a fuchsia-purple overdyed and let the colors fall as they came. It was an excellent and less complicated option.
Filed under: ANG Main Line Stitchers Chapter, Laurel Burch Rainbow Butterfly by Danji
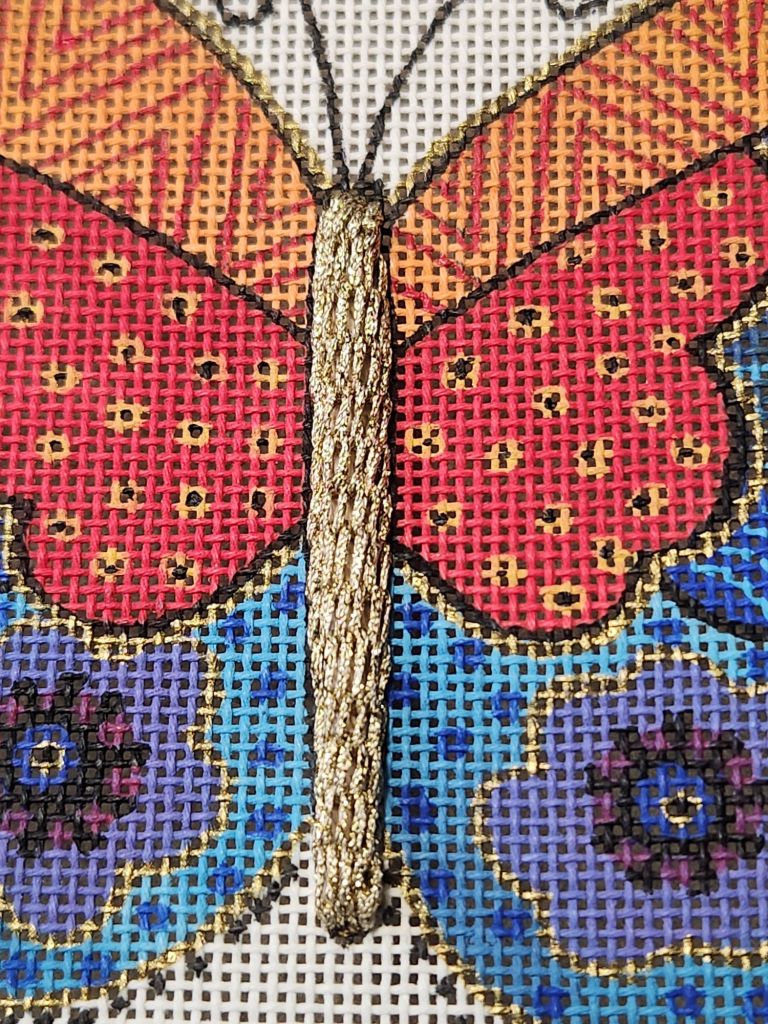
Back in August, I posted about the padded raised stem stitch that I used for the body (https://melitastitches4fun.com/2024/08/16/raised-stem-stitch-for-rainbiw-butterfly/).
I’ve been working on it while Kristen from my ANG Main Line Stitchers chapter has been working on hers. We each selected our own stitches and threads without sharing ideas. We both got done for this month’s chapter meeting. So, we revealed the progress photos and discussed choices as the program topic. I’ll post by area over the next few days.
For the top part of the wing on my Rainbow Butterfly by Danji, I found Waterlilies 280 Casabasa that has a color change from yellow to orange that very closely matches the colors on the canvas.
Left wing.
Right wing.

I decided to basketweave, which meant I would cover the red lines. I’ve never tried covering an area so completely to stitch on top of before, so I took close-up photos.
There was about 24″ left of the Waterlilies left because I had to cut lengths that moved from yellow to orange.
Kristen did basketweave, too, with an overdyed that created repeats of the yellow to orange color changes for a more banded effect. I’m sure hers was easier and looked great, especially since the red lines covered some of the area.

By carefully following the photos, I was able to place lines of Sparkle Rays (SR29) where they were meant to go. It’s probably not going to be something I do too often, but these were straight lines in a small enough area to give it a try. I just love that sparkle in Sparkle Rays. Kristen used a Kreinik Braid very effectively.
I decided to match the right side to that of the left partly because Sparkle Rays is a flat ribbon slightly wider than the painted lines. The inter wrapping triangle on the right wing had bothered me anyway. So, I followed the left side mostly. It’s not painted as widely as the left side, and so it does differ slightly.
Filed under: ANG Main Line Stitchers Chapter, Laurel Burch Rainbow Butterfly by Danji
Based on what I learned about Calalguidi embroidery and/or a padded, raised stem stitch, I decided it would be perfect for the body in my Rainbow Butterfly by Danji, Laurel Burch Artwork.
Cross stitches in the center to raise the middle.

Long stitches along the length of the body to make it more raised and to be perpendicular to the bars needed to make the wraps.

Straight stitches for the horizontal bars every 3rd canvas thread.
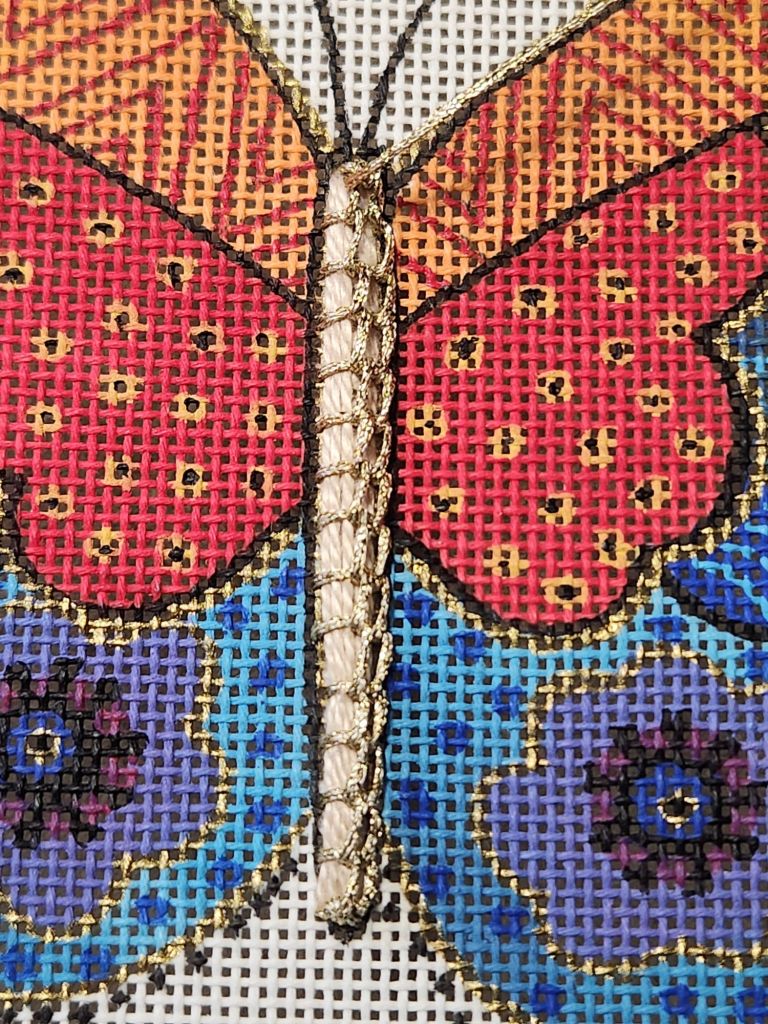
Rows of the raised stem stem stitch, squishing them close together on one side. I’m very happy with how it turned out.
Filed under: ANG Main Line Stitchers Chapter, Laurel Burch Rainbow Butterfly by Danji, Serendipity - Stitching Club with Ellen Johnson
I fell in love with this canvas at NJ Needle Fest a couple of years ago, and Linda had it in her stash and gave hers to me for my birthday! Thanks again, Linda. I’m finally getting to it. Kristen has the canvas, too, and we are going to stitch it for discussion at our ANG Main Line Stitchers chapter meetings. I introduced the canvas at our Monday night meeting earlier this month.
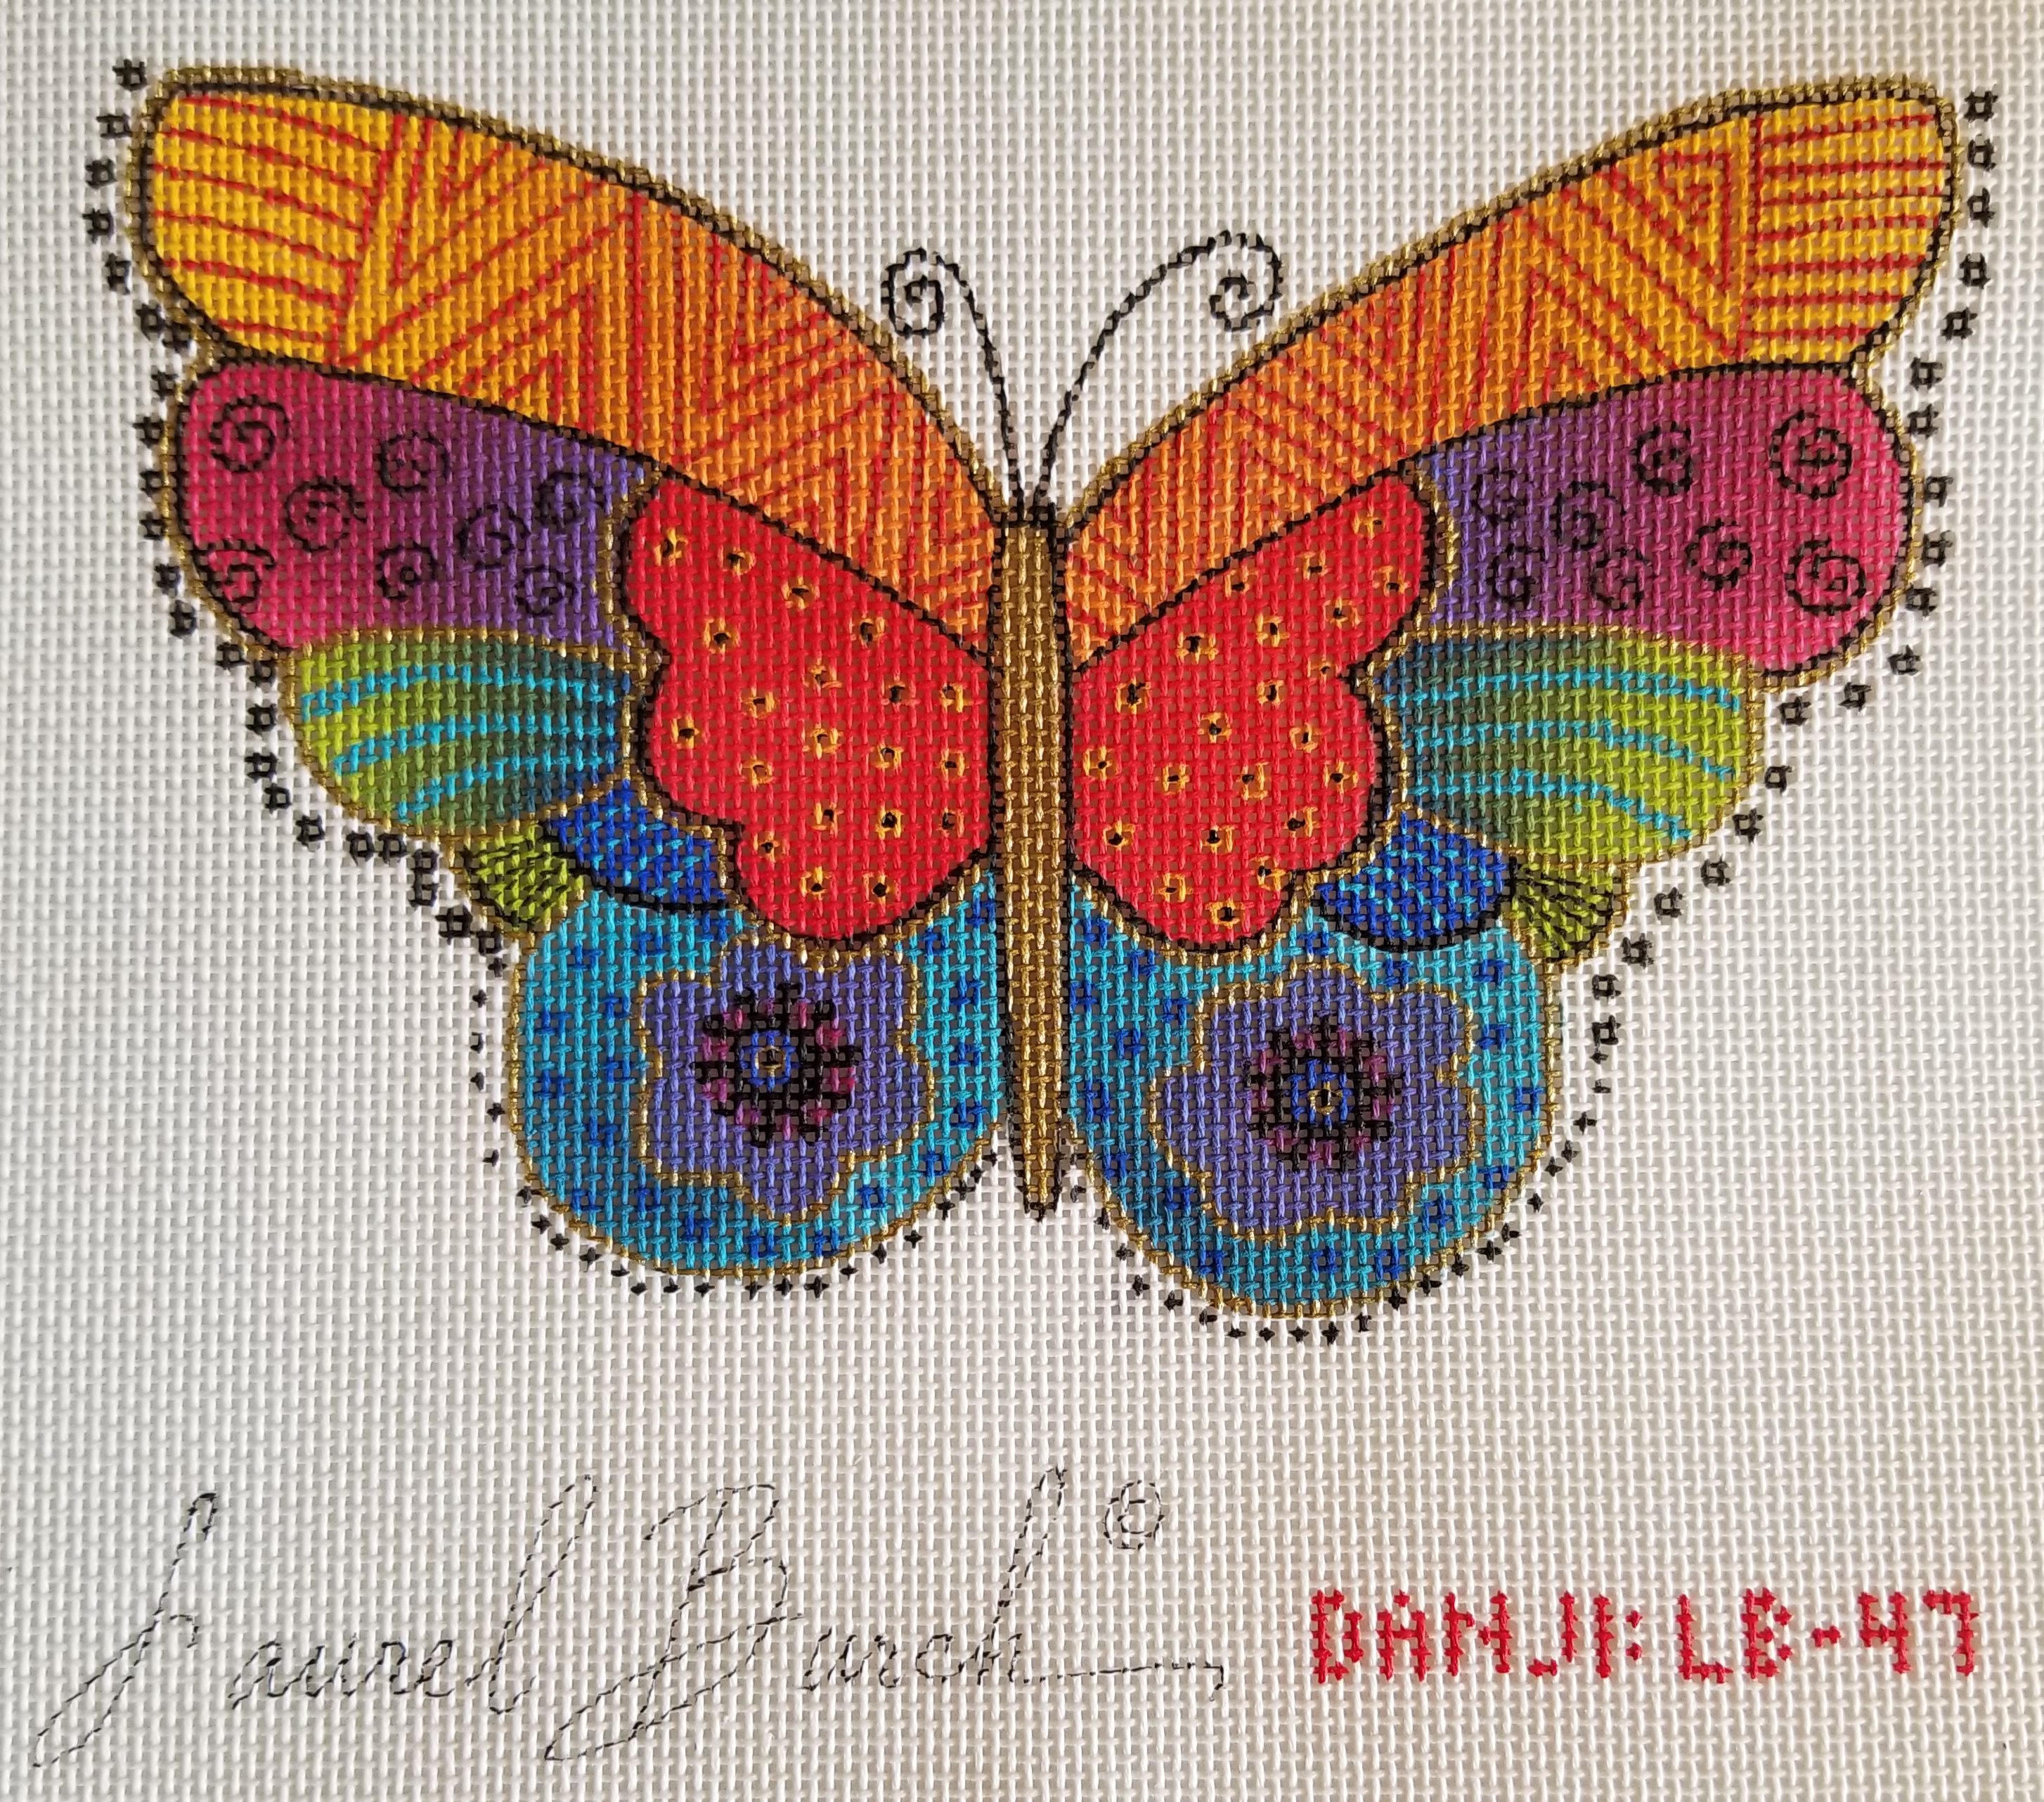
There is so much going on this 6.5″ wide x 4.5″ tall canvas that it is kind of tough to decide where to start. I joined Ellen Johnson’s Stitching Club where she has amassed a series of videos on “Evaluating Your Canvas”. I went through them and immediately knew that I was learning to read my canvas better.
I want this to be a flat ornament hanging at an angle like it is flying.
I decided the focal is the red and orange portions on the wings – not the whole butterfly as I thought initially. Those areas contrast in temperature (warmest) and are completely outlined in black compared to the transition area where red changes to purple (warmer to cooler) and which is partially outlined in black. The opening along the bottom takes you into the cooler portions of the lower part of the wings.
I also read up on butterflies. Butterflies have 4 wings – not 2 wings as I thought initially! The 2 top wings are the forewings and the 2 lower are the hindwings.
The body may be the entry point that takes you to the antennae, which leads you to the wings. It may be a focal point, too.
There is balance within the design. The right and left sides are symmetrical (alike on left and right sides) but there is also some asymmetrical balance between the larger forewings on the top and the smaller hindwings below because of the large flower motifs.
My research also found that there is texture to the butterfly’s wings – not smooth and flat as I initially thought. The wings are covered in tiny scales that possess a microscopic texture that can produce iridescent colors by reflective interference. That sounds like what we see when stitching alternating scotch or cashmere with silks.
Possible textured stitches include Rhodes, French Knots, couching, surface embroidery, beading, and sequins. Possible thread suggestions from members of my chapter included memory wire, Petite Facets, and fuzzy threads. Kristen expects hers will be so embellished it will be too heavy to fly!
For the body, possible ideas include stuffing beads inside Flair, chipping with goldwork (would look good but would tarnish), and padding with kid leather.
I’ll be selecting threads tomorrow at our chapter’s monthly Saturday Stitch-in and the first time at Fireside Stitchery!
Filed under: ANG Main Line Stitchers Chapter, Laurel Burch Rainbow Butterfly by Danji
This lovely Laurel Burch design by Danji, Rainbow Butterfly, caught my eye at NJ Needle Fest but Linda told me not to get because it was in stock at Linda’s Boutique (as I fondly call it). And today at our Stitch-in, Linda gave it to me as a birthday gift! I had forgotten about it but sure am glad Linda didn’t. Aren’t the colors lovely!
I think it’ll be fun to see what everyone suggests at chapter meetings especially since Linda and Kristen are our resident butterfly experts having worked on the larger Rainbow Butterflies Laurel Burch design by Danji (with Imagine written in the upper left corner). They used some threads and stitches from a Tony Minieri stitch guide and some of their own options.

But, I have to finish the Orchid and Bamboo JP canvas first. Hopefully, I will finish that by the the end of July.
