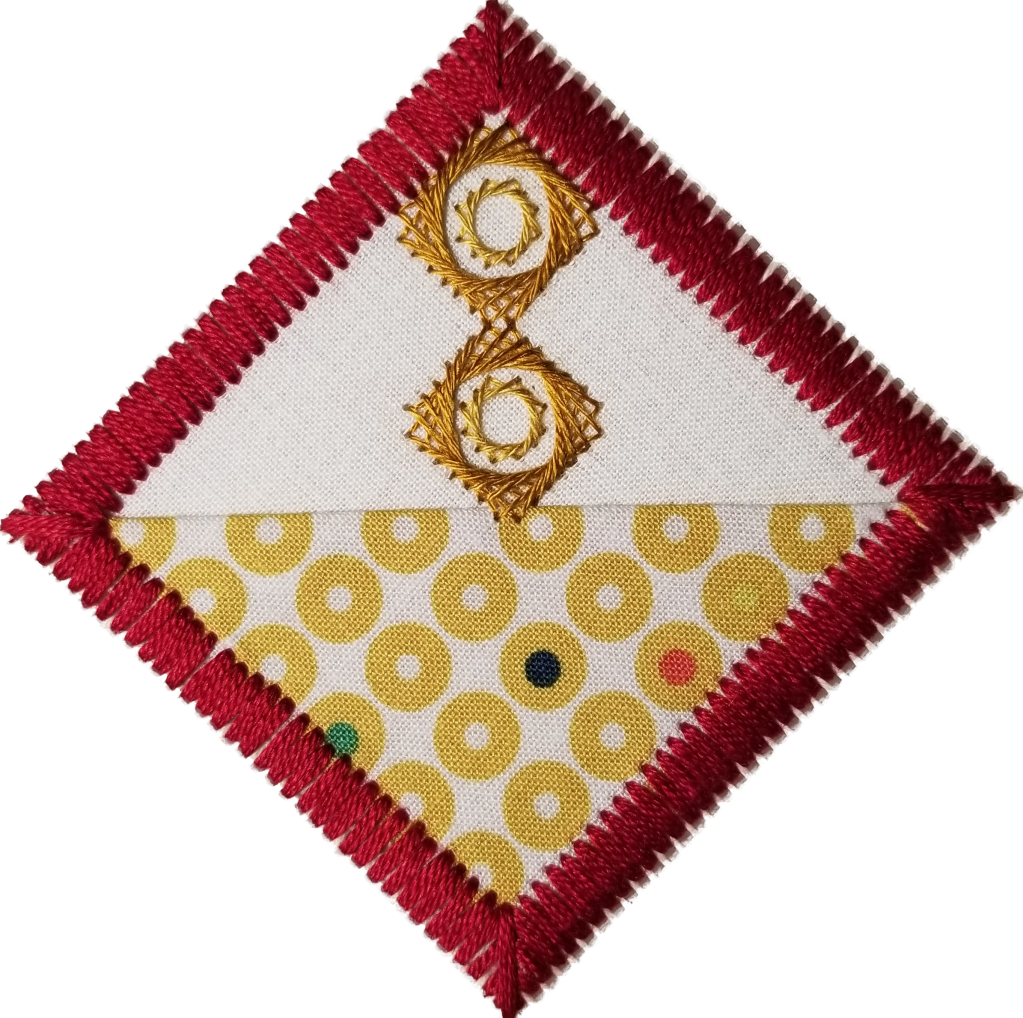
I decided to make the Or Nue Flag into a needle minder by stitching a row of tent stitches around the border first with Kreinik#8 Braid in matching 002HL. I placed two round magnets inside and two on the outside of a piece of the top edge of canvas and folded it down to meet and tuck under an upturned bottom edge. I cut the sides right up to the stitched sides which probably wasn’t the best way. The magnets won’t come out but those sides will wear faster than the top or bottom edges. I did a cinching kind of running stitch with Kreinik #4 Braid 002HL along the 4 sides. Not a pretty finish on the back but I’ll be looking at the front!
It is about the right size to be made into a pin but I’ll get more use out of a needle minder.


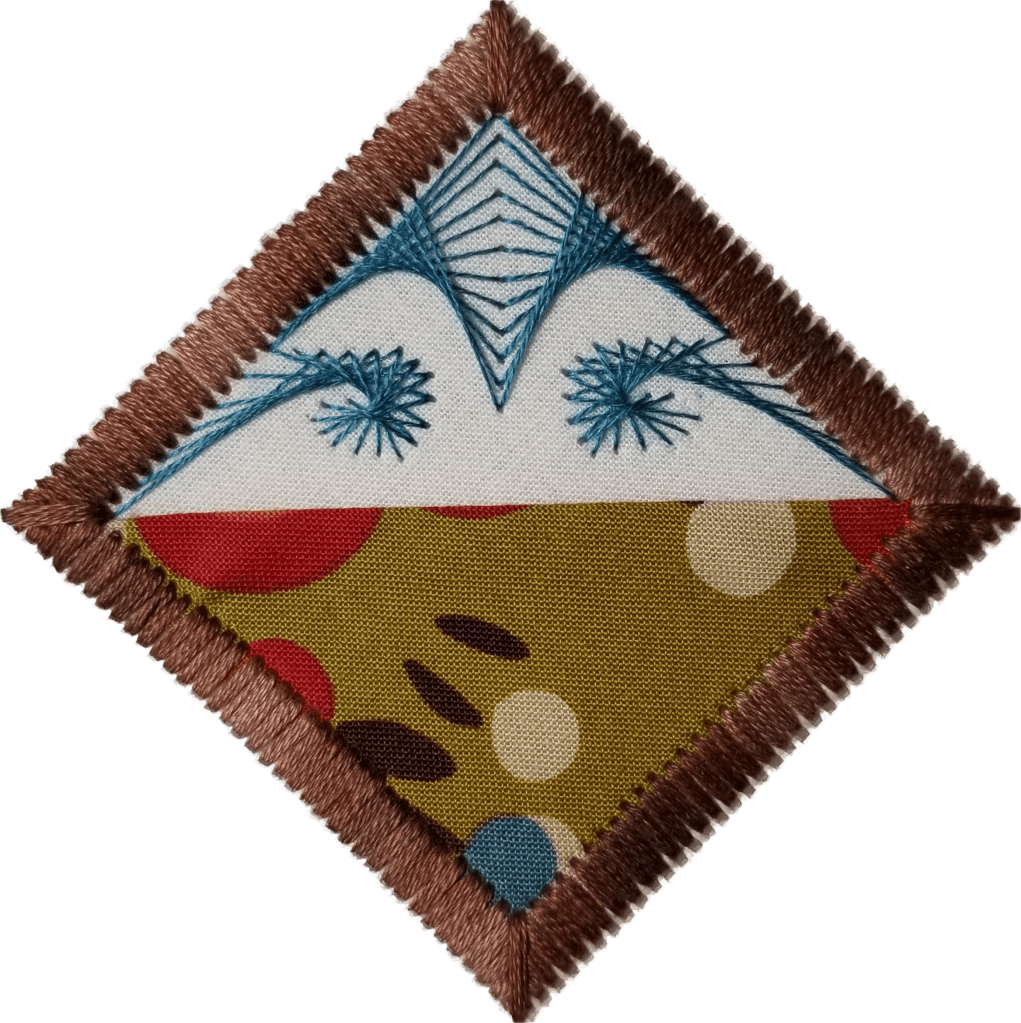
This Tuesday I will discuss the 2 pieces of goldwork and an Or Nue piece I’ve stitched for the folks at the Needlework and Textile Guild of Media’s monthly meeting. Then, I will demo Or Nue with a 1.5″ x 1″ flag. I have materials and instructions to give anyone willing to give it a try.
I’m using Kreinik and flosses on canvas not real gold threads to at least give a sense of how it is accomplished.
While preparing a resource document, I discovered that couching 2 gold threads would be a more authentic technique. Also, I’ve seen the couching thread go over the gold thread only, over the gold thread and one canvas thread, and over 2 canvas threads and the gold thread (which is what I have done). Working on monocanvas is less authentic than a linen ground. So, maybe there is no “correct” way on monocanvas. Anyone have any thoughts?

Join us at The Media Arts Council (11 East State Street in Media) at 7 pm on Tuesday July 11. It’s always the second Tuesday of the month.
Several weeks ago, after a few months hiatus, I finally made it back to a meeting of The Needlework and Textile Guild of Media.
My Show and Tell was all six Steps of my EGA Master Craftsman program for canvas. Everyone was quite interested. It was fun to see them all together! The fireplace is at the framer getting ready to go to Boston. I digress.
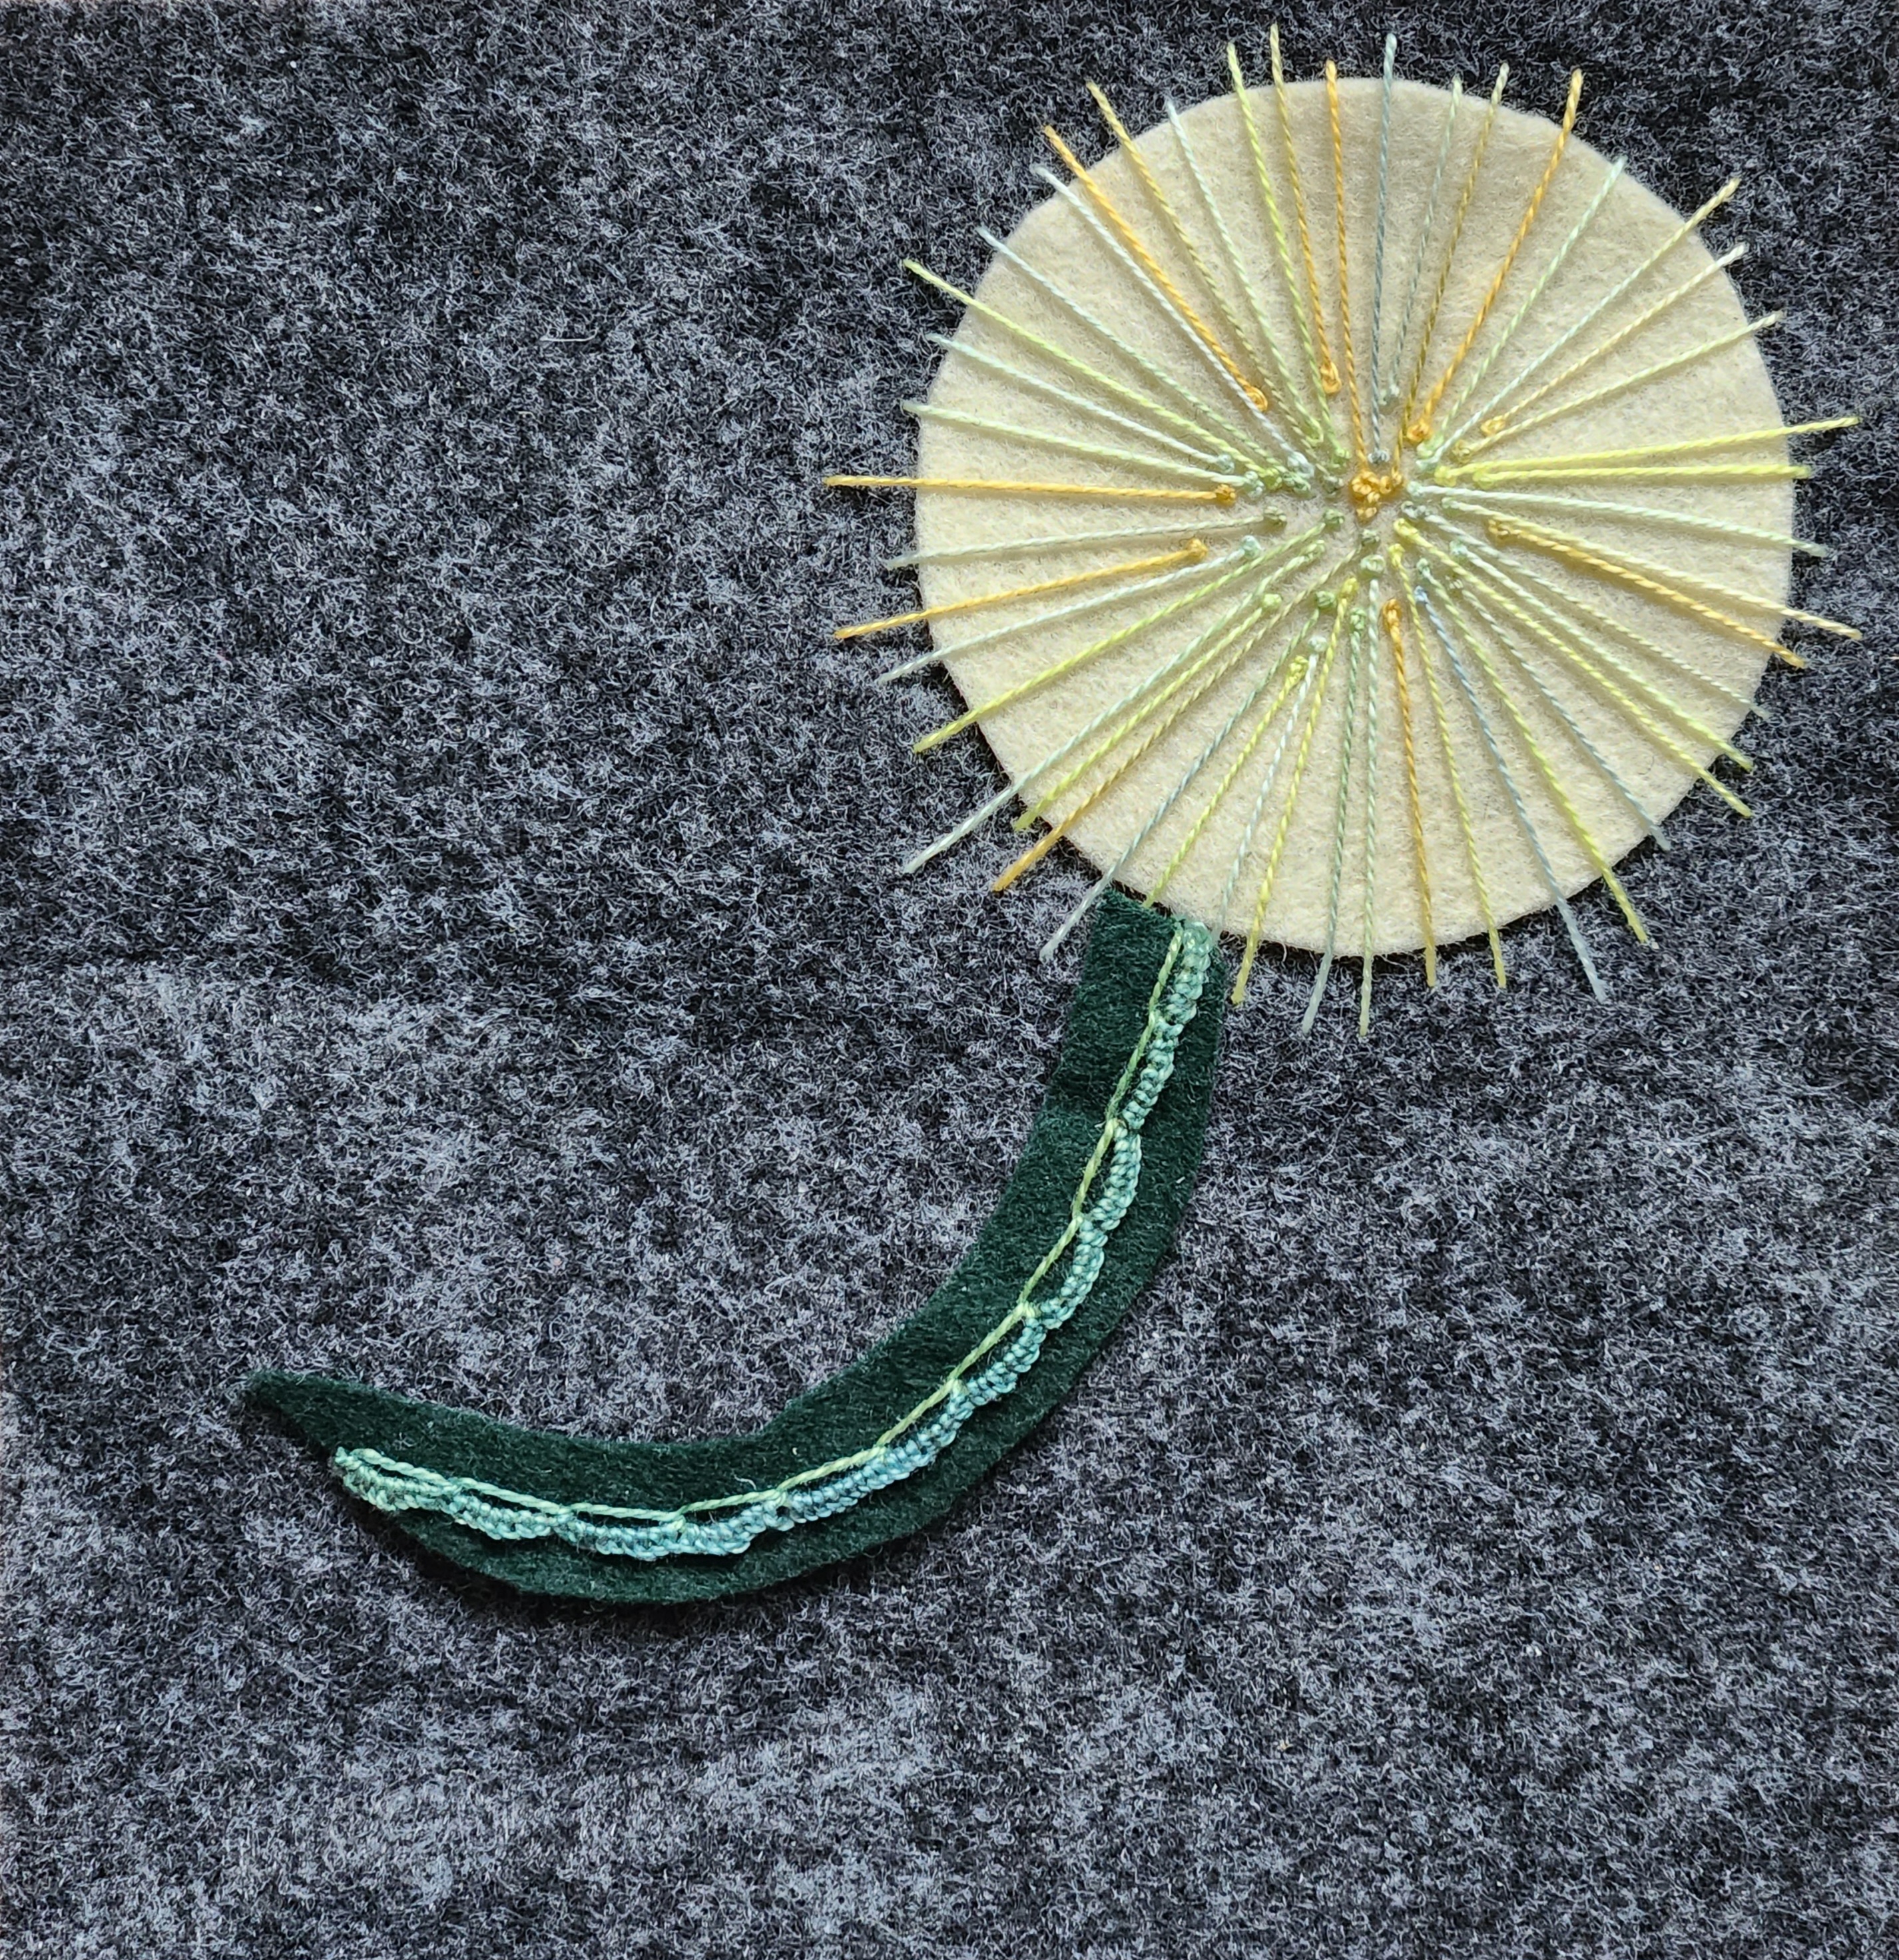
The demo portion of the evening came from Merril who showed us her felt applique pieces. Then, we selected 6 pieces of varying colored felt shapes and threads. She gave a handout with whipstitch (hidden and visible), blanket stitch, running stitch, and backstitch to use to attach the shapes to a 6″ square gray piece of felt.
I played with the shapes until I got an arrangement I liked. How would you have arranged them?

Then, I attached each shape with a different stitch.

Since we were given 2 large square bases, I made a second piece rather than use it as a backing for a small potpourri pillow.
I came up with the second design to allow me the opportunity to practice the French Knot technique taught by Judy Jerow. I learned that all felt is not created equal. I had to switch to a denser felt because the French Knots were sinking into the fluffier felt. Her French Knots are the tiniest! I used Wildflowers 027 Lemon N Lime for the flower. And, I wanted to try a scalloped buttonhole described by Mary Corbet (https://www.needlenthread.com/2013/04/stitch-fun-scalloped-buttonholed-chain-stitch.html). For that, I used Wildflowers 066 Jade. Very nice effect.
They are a perfect size for trivits. So, I ordered 2 of them from YarnTree. They withstand up to 350 degrees. The felt was just as thick as what would fit.

Join us at The Media Arts Council (11 East State Street in Media) at 7 pm on Tuesday June 13. It’s always the second Tuesday of the month. On July 11, I will share my limited experience with goldwork.
Last month (October) at the Needlework and Textile Guild of Media, Sally (also in ANG Main Line Stitchers chapter) did a demo of designing and sizing images for a needlepoint belt. It was really engaging and very informative. We learned how to choose and adjust images for different sized projects. Sally’s excellent handout gives step-by-step instructions for calculating image size and placement. On reflection, we realize that this approach will work for translating images into many types of projects, such as knitting, crocheting, cross stitch, and more. Way to go, Sally!
Our take home project based on Sally’s demo was creating our own image on a square of plastic canvas. Since the canvas was 7 count, I didn’t want a complicated design. I had this Penn State cookie (more as a decoration) sitting on a shelf. So, I held it under the canvas and used a blue marker to outline the mountain lion.
It probably could have handled 3 strands because the holes are so large but I used 2 strands and had just enough Silk & Ivory, color 01 natural and color 10 classic navy. It is done in basketweave except for the white ear and blue mouth (straight stitches). It wasn’t hard and definitely looks like the model.
Step 1 is find your design. Shrink or enlarge on a copier to fit your space. I didn’t have to do anything to the size.

Outline the image (don’t use Copic markers on plastic canvas unless you want blue fingers). Rough as it was, Bill knew instantly that this was his alma mater’s Nittany Lion.

Stitch the design. Keep looking at the original since this was not “stitch painted” and adjust as needed.

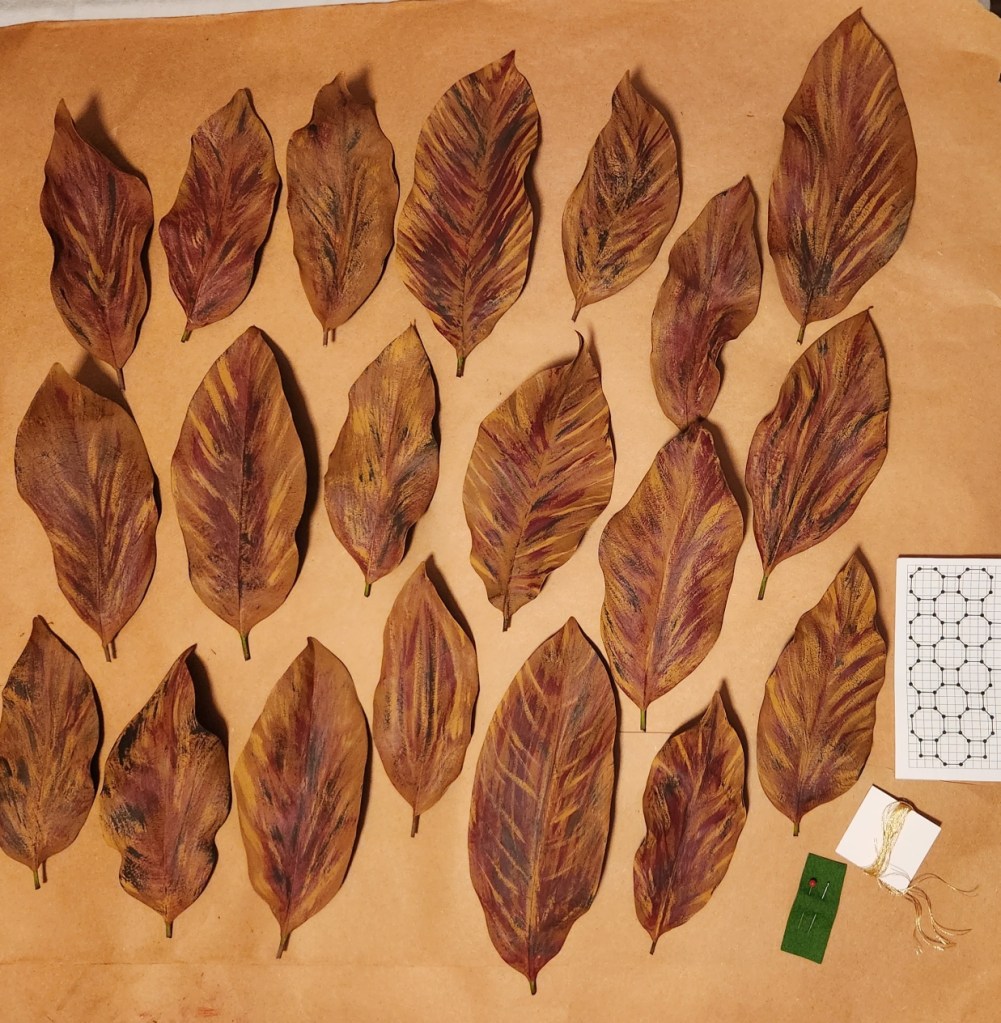
I showed my leaf from Catherine Jordan’s class, Nature’s Palette, to members of my Fiber Guild last month and this month they are going to try it.
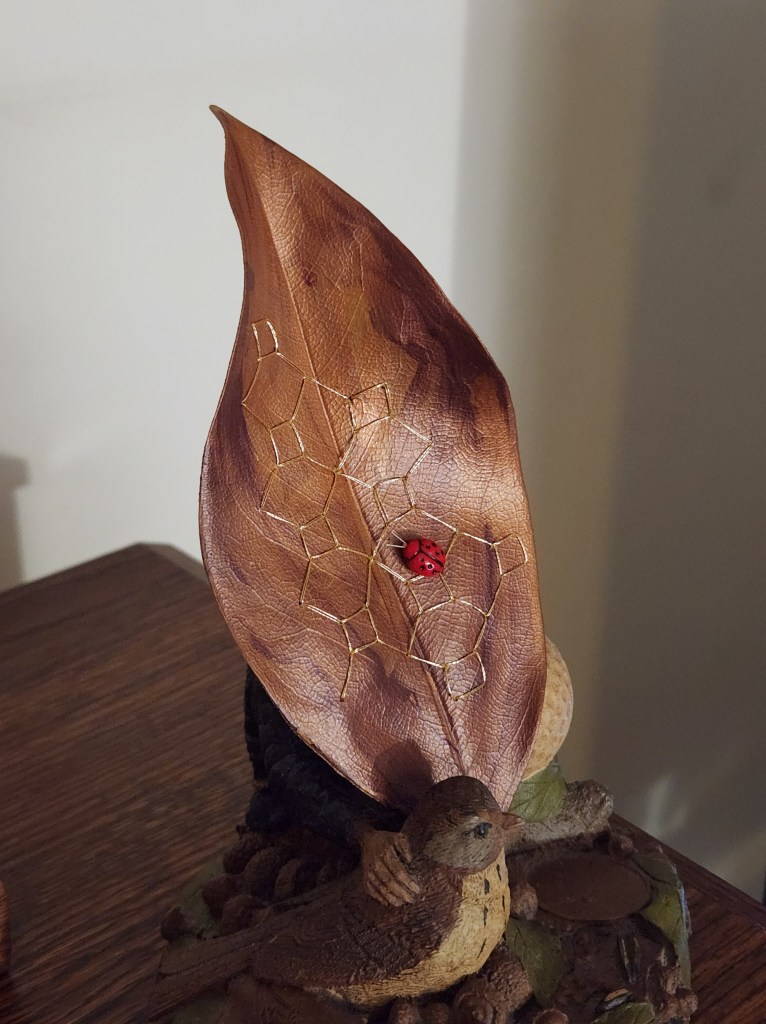
After I got the correct acrylic paint (do not use acrylic textile paint on anything other than fabric), I painted Magnolia leaves for members of the Needlework and Fiber Guild of Media. Much better.
I am not handing out Catherine’s instructions because they are not an EGA chapter and they don’t need to make it reversible. I am giving them verbal instructions, a pattern I worked up, a pin, needle, gold thread, and a painted leaf.
I’m quite happy with how the leaves turned out! My husband’s favorite is the large one on the top center row.
We meet at the Media Arts Council on the second Tuesday of the month at 7 pm. So, this month we meet on election night, November 8. Be sure to vote first and join us for something fun. If you use any kind of fiber, then you will find this an interesting mix of artists sharing, learning, and inspiring each other.
Filed under: Ottawa Quillwork on Birchbark
While in Tucson, we wandered into a bookstore and I found a book on Ottawa Quillwork on Birchbark. It looks like needlepoint doesn’t it!

Examples of this craft in the book were found almost exclusively in Emmet County, Michigan. The Native population of Ottawa created these pieces. Birchbark contains an alcohol making it antiseptic and resistant to microorganisms. The containers were therefore used for storage of food or other perishables. But, most of the examples show pieces used for decoration.
Layer in the week I found an example of the craft. That’s an inner lining on the upper left corner – not sure what is the purpose of the liner.

Filed under: Needlework and Textile Guild of Media
Thanks to a demo last month at The Needlework and Fiber Guild of Media at the Media Arts Council in Media, PA, I decided to give English Paper Piecing a try. This will be a coaster. It was going to be a pair of coasters but I don’t think so now. More on that later.
I picked up a few supplies after watching Tula Pink’s instructional videos (thanks to Linda for telling me about her).
Joann Fabrics didn’t have any micro serrated scissors so I stopped at Early Girl Quilt Company in Audubon, NJ and they recommended Karen Kay Bradley. The 6″ felt more comfortable than the 4″. The serrated edge prevents frayed edges. It comes with a plastic shield for the pointed end which allows me to store them safely. Very nice! Early Girl Quilts also had Aurifil 50 weight cotton thread (orange top) and a Sewline glue pen. I found out after I bought them that I’ll need the scissors for my fabric applique needlepoint class at the ANG Seminar. That was fortuitous.
I didn’t find Hiroshima Tulip Applique #10 Big Eye Needle but the Fons & Porter Hand Quilting Needles with assorted sizes 7, 9, and 10) appear to have a big enough eye. Plenty big enough to thread the needle without licking the thread. Tula is against that practice because the thread end expands as it dries. Make sense. But, you could also moisten, thread the needle, pull extra through and cut that end off. But, the eye of the needle is big enough to not moisten it anyway.
I got the needles at JoAnn’s along with some fabric with a simple pattern. I didn’t want to waste good fabric practicing but why I picked such light colors for coasters is beyond me! That is why this is now a single coaster turned doily for some knickknack around the house.
All the supplies fits in my Bargello Bag from Woodlawn! Well, not the fabric. I found out a week after this post that the purse was designed by Pat Mazu for her journeyman level Master Teacher Program and named it Flowers on a Trailing Vine. Pat taught it 3 times, once in the Potomac/Washington DC area. No wonder I fell in love with it. Pat’s designs are amazing!

I “fussy cut” the fabric which means selecting a specific part of the design from the fabric. I needed 6 hexagons to go around a center white hexagon. Now that I lay them out, I see they aren’t exactly the same all around the edge. Of the 8, you should be able to spot the really odd one of the group. You don’t have to iron them even though you might have cut on a fabric fold line which I did on one to see for myself that you’ll never see the fold after you glue it to the paper. Yes, glue. That’s what Tula recommends. I thought it would be hard to get the paper out after you stitch them together but it wasn’t. That seems faster than basting the fabric in place and allows for a crisper corner.

Answer: The swirl is moving counterclockwise on the upper left hexagon. I need 6 alike to make this pattern with the swirl moving clockwise.

However, I did not succeed at my first attempt. I sewed the wrong edges to the center and my corners are not lined up great. Unlike most needlepoint mistakes, these are not something that I will unstitch because the edges probably will be weakened. This gets tossed. Plus, I have way more fabric than I need.

With attempt number 2, I took more care about where I cut my 6 pieces. They are aligned and sewn the way I wanted. See how the swirl starts in the same place now. This is much better.
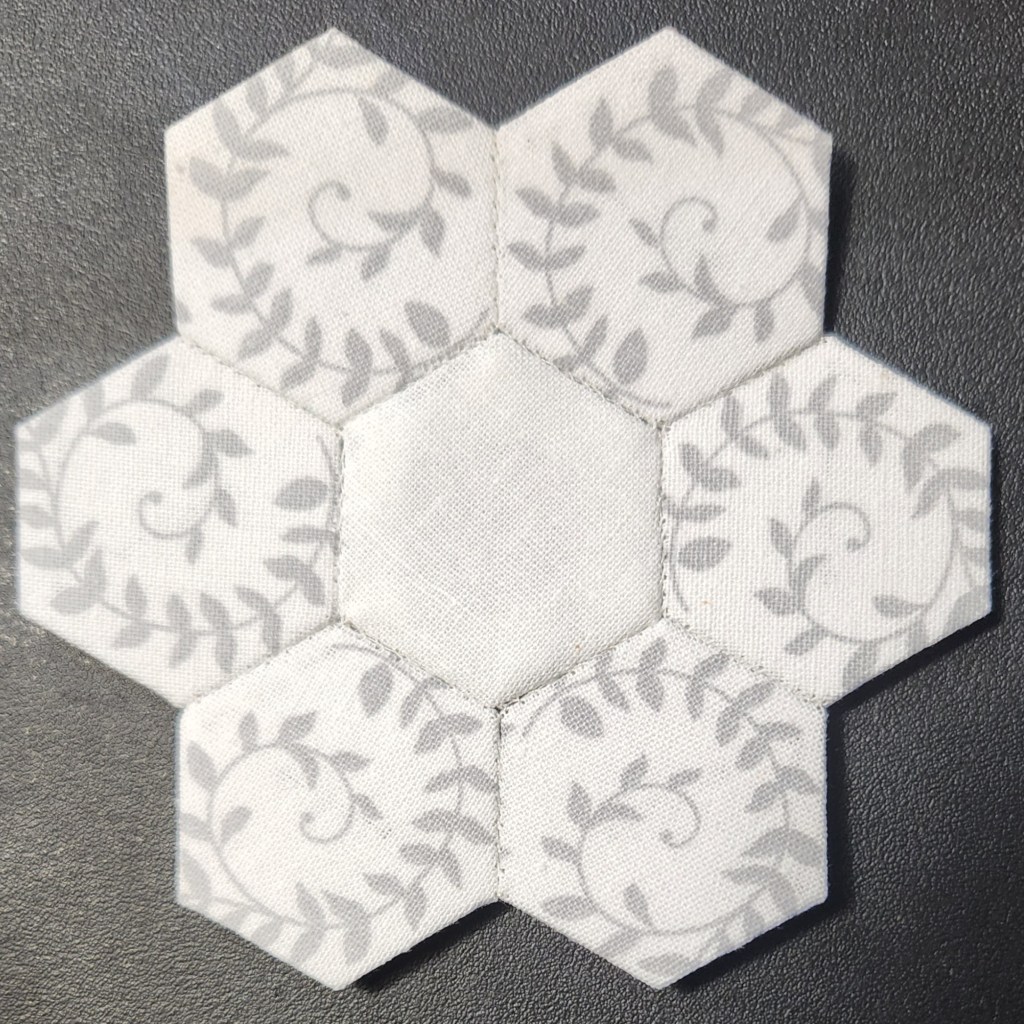
The center white hexagon allows the background to show. So, I cut another small hexagon and placed it inside the center without sewing – just pushed it into place. Then, I pulled out my fusible fabric and ultrasuede. I cut the fusible fabric slightly smaller than the shape, and basted it in place. I am not getting that stuff on my iron again!! Placed that on top of the ultrasuede and ironed for 15 seconds. Lastly, I cut away the edges just slightly smaller than the shape. I will not take the time to sew the edges. That fusible fabric works and I have other things to get to!!

Having a variety of colors would be fun to play with. But, I didn’t see a particular project that called to me. It boggles my mind to think of doing a quilt with 5,000+ pieces like Mary Corbet is doing (google mary corbet paper piecing). I’m glad I tried it though. And, I would not be adverse to doing more of it (especially with Linda’s scraps – hint hint – she has beautiful fabrics). For now, I would prefer to do another weaving piece over English Paper Piecing.
So, judge Melita scores Darning 2, English Paper Piecing 7, Tapestry Weaving 8, and the winner and still undisputed top preferred craft, Needlepoint!
This will be my Show & Tell item along with my finished tapestry at Tuesday’s 7 pm meeting of the Needlework & Fiber Guild of Media at the Media Arts Council (11 E State Street) in Media, PA. I’ll also demo needle felting on canvas and walk people through the Orna Willis and ANG Main Line Stitchers needlepoint exhibit. Join us if you are in the area.
Filed under: Needlework and Textile Guild of Media
Last month, we took home some unfinished quilt squares. I thought we were to use them as we wanted. However, they were intended to be used in our own visible mending projects to show in June. Well, even though I bought the darning loom, I don’t do mending! So, this is what I did with my fabric pieces. Sally made a key ring out of hers. We were the only 2 to give it a go.
This turned into a lesson using Pellon Wonder-Under Transfer Fusing Web. It “turns any fabric into a fusible fabric”. It also turns your iron into a mess if it touches a hot iron directly. Learned that the hard way. But, Magic Eraser cleaned it up. So, I cut the fusing web slightly smaller than the quilt squares and placed the fusing web between the canvas (14 count) and the quilt square and then applied heat for 15 seconds. And, it worked great.
I stitched gobelin stitches around the edge. And, I added nested Jessicas on one and a corner Amadeus with crescents on the other. Stitching without seeing the holes was a challenge. That’s why I started them on the edges. I’ll probably finish them into ornaments. There is a stack of ornaments building up for me to finish. I’ll have to block out a few days.
Update February 2024: The reds had bled from the moisture of our glasses in the year and a half we’ve been using them as coaster. So, we tossed them in favor of newer stitched needlepoint coasters. Why is throwing stuff away so hard for me?
Filed under: Needlework and Textile Guild of Media
The ANG definition of needlepoint is “Counted or free stitchery worked by hand with a threaded needle on a readily counted ground.” That is my preference but I do like to try other crafts occasionally.
Next craft to try is weaving on a loom. I signed up for a beginning class (https://www.athomemodern.com/coursesandworkshops) in June in Philadelphia.
And, I am joining the Needlework and Textile Guild of Media. We met for the first time last month and about 2 dozen folks showed up.
Here is the list of what everyone is doing and/or would like to do.
- Quilting
- Knitting
- Braid weaving
- Braiding
- Visible mending/sashiko
- Weaving
- Crocheting
- Sewing
- Embroidery
- Rug making
- French wire work
- Beading
- Needlepoint
- Hand weaving
- EPP crochet
- Fibers
- Macrame
- Felting
- Icording
- Paper piecing
- Collaging
- Lace making
- Applique
- Darning
- Repurposing
- Needle felting
There will be a demo on invisible and visible mending for the May 10 meeting at 7 pm at the Media Arts Council (11 E State St in Media). If you’re in the area, please join us.
I saw a darning loom advertised on Facebook and decided that I should try it. Not bad for a first attempt. I practiced on a sock. My husband has a favorite sweater that needs a new elbow. Hopefully, I’ll be able to save it.
Step 1 is place the hole over the wooden disc and attach to the loom.

Step 2 is to hook the yarn vertically over the hole.

Step 3 is to weave the thread back and forth.

I took the loom off here but should have added several more horizontal lines of thread.

It made attaching the ends more visible with such large loops so I weaved 2 more lines without the hooks but they weren’t tight enough.

Step 4 was to whip stitch the loops to secure them and tie off loose threads on the back.
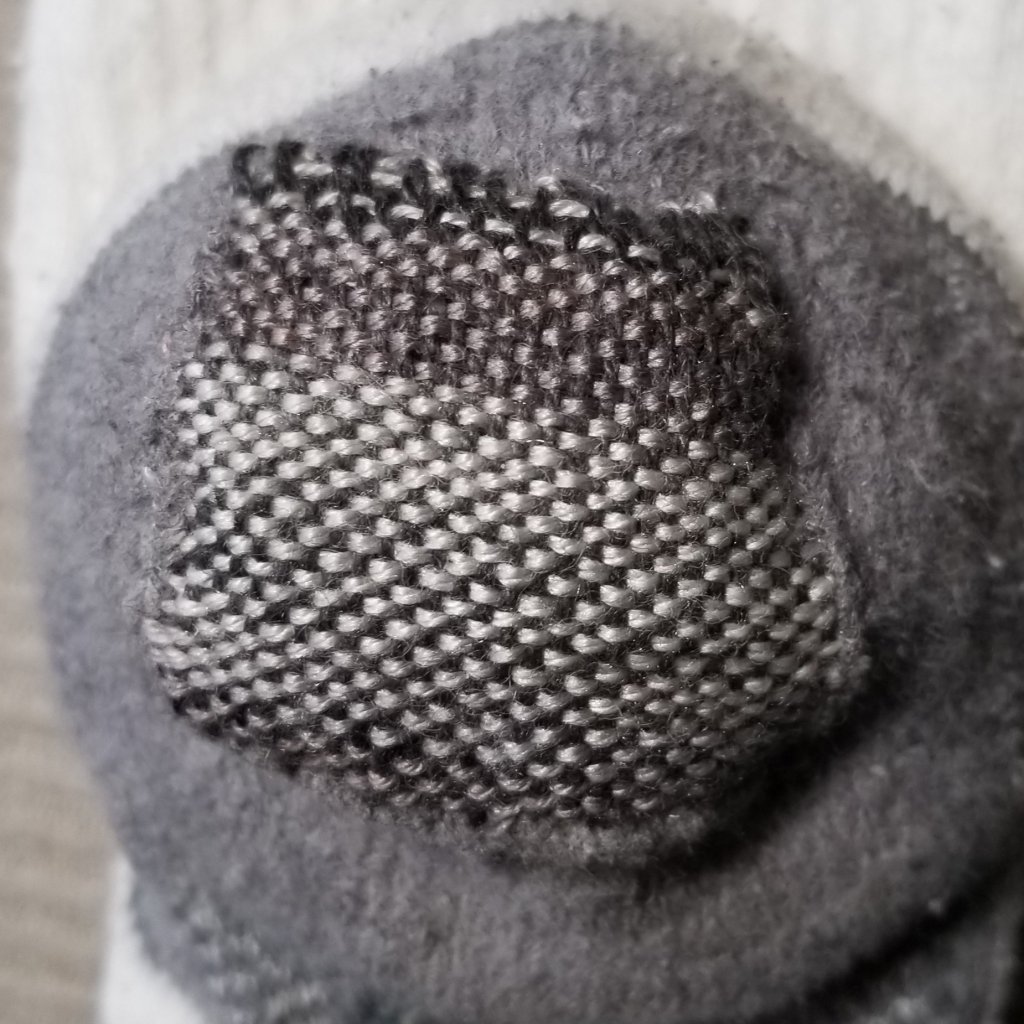
This is a “Speedweaving” darning loom but the name is not accurate. It took me most of the evening as we watched the Philadelphia 76ers basketball team bounce back (pun intended) with a win because our “big” Embid was back on the court. Any number of colors of thread could be used to make a multi colored patch.
I’ll take this to the Tuesday night meeting.
Busy week! Monday night is my ANG Main Line Stitchers chapter meeting. And, Friday and Saturday is the NJ Needle Fest.
