The Needlework and Fiber Guild of Media met last night and we all really enjoyed making these icicles. Although not a fiber project, Kristen picked a lovely project to lead. We each got three kits if we wanted. The materials came from Solid Oak Inc and the instructions for these crystal/gold icicles are clear and easy to follow. There are 4 patterns you can follow. Six bead types were provided. Each one took about 10 minutes to create as advertised on their website which has lots of cute projects. I didn’t explore long enough to find something else I had to try!
Each ornament was individually kitted by Kristen with assistance from her husband to cut wires. I look forward to having them join my other icicle themed ornaments.

The Craftery PA in Perkasie (1 hour north of Philadelphia) has an event on June 14 (forgot to post this for the April event). They feature carefully curated, artisan handmade items, antique and vintage finds, fresh flowers, original art and more.

The Mid-Atlanic Fiber Association (MAFA) 2025 Conference will be held at Millersville University, Millersville, PA in June (26-29). https://mafafiber.org/conferences/mafa2025/ In the meantime, they are active online (classes, movies, book club, and more).

Maker Festivals featuring Bead Fest returns to Lancaster, PA August 1-3, 2025, along with a fiber arts community! The festival lineup will have thousands of fiber artists, and jewelry makers! https://www.makerfestivals.com

Save time in September for two Fiber Festivals in Pennsylvania. The front and back of the brochures are below. More on their websites.
September 6 – 7 in New Milford, PA for the Endless Mountains Fiber Fest. That’s about 3 hours north of Philadelphia.
September 20 – 21 in Allentown, PA for the Lehigh Valley Fiber Festival. That’s about 1.5 hours north of Philadelphia.


November TBD, 2025 (Fri, Sat, and Sun): Jockey Hollow Weavers Annual Show and Sale in Brookside, NJ (about 1.75 hours north of Philadelphia). Unique, one-of-a-kind handmade gifts, scarves, shawls, yarn, baskets, towels — lots to enjoy.
https://www.jockeyhollowweavers.org/annual-guild-sale
Filed under: General comments, Needlework and Textile Guild of Media, Punch Needle, Punch Needle Demo
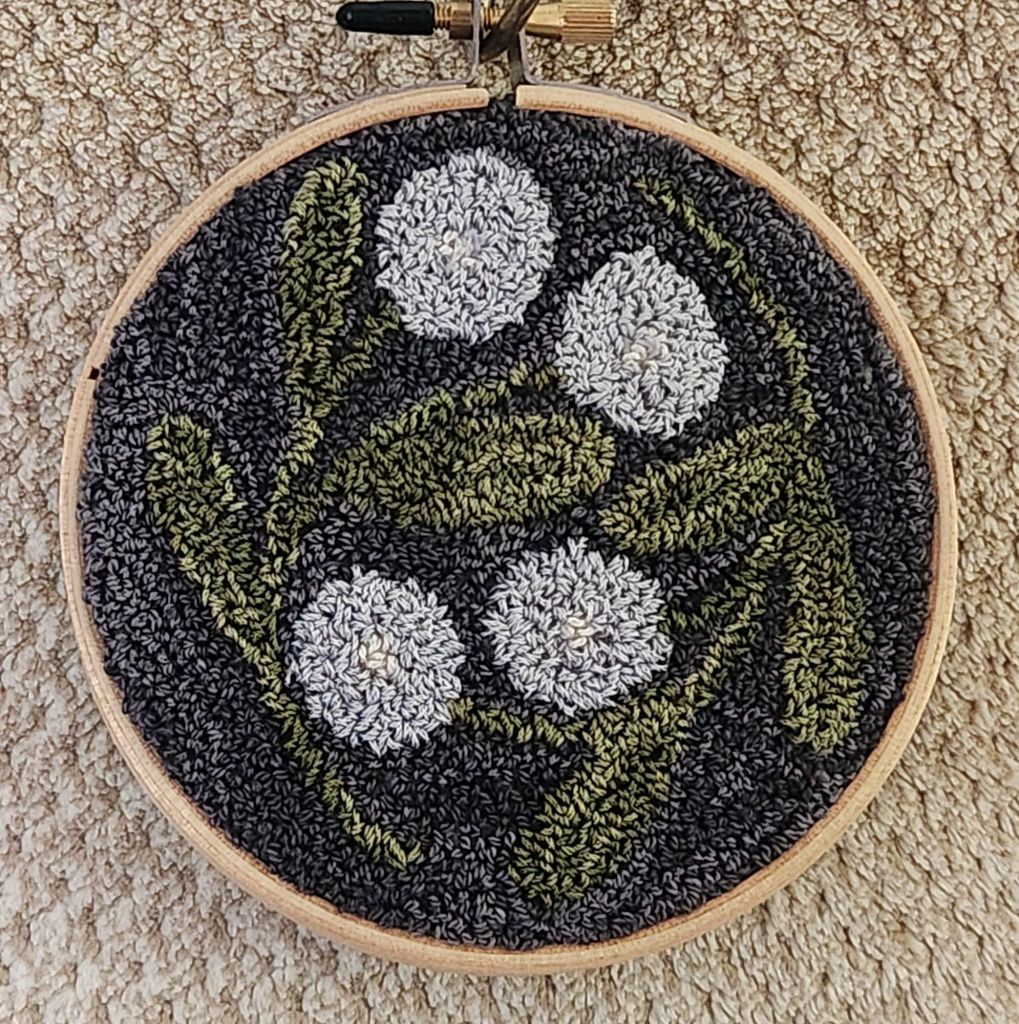
The Needlework and Fiber Guild of Media continues to meet monthly and have demonstrations by various members and occasionally a speaker or road trip. This month, I volunteered to show what I learned about punch needle from a class in November 2024 with Katie Kriner, Author, Fibert Artist, Shop Owner of The Bee & The Bear in Hereford, PA. I hadn’t worked on the project since then.
Meghan brought a punch needle pillow to the meeting done with chunky yarn and a big needle. She described hers, and it was probably very similar to the Oxford Punch.
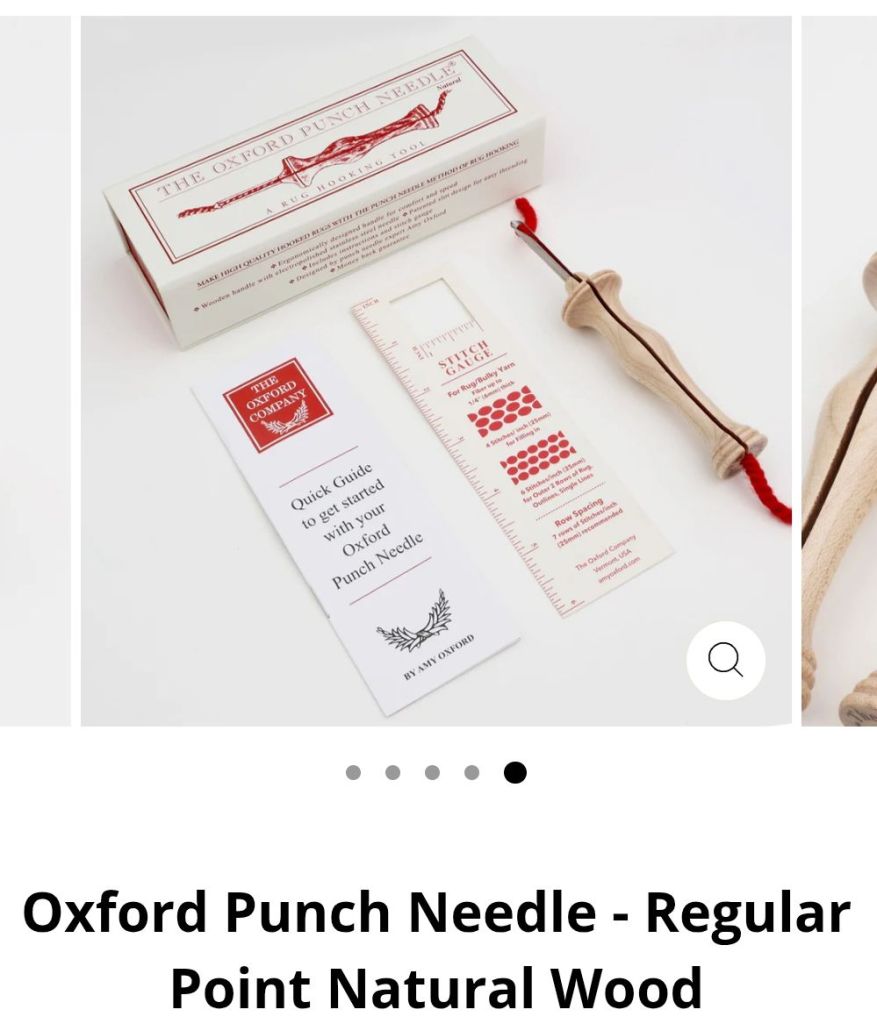
I’m using the Ultra Punch needle, which seems to be the gold standard in punch needle for projects using embroidery threads. It has 12 heights to vary the length of the loops as you punch.
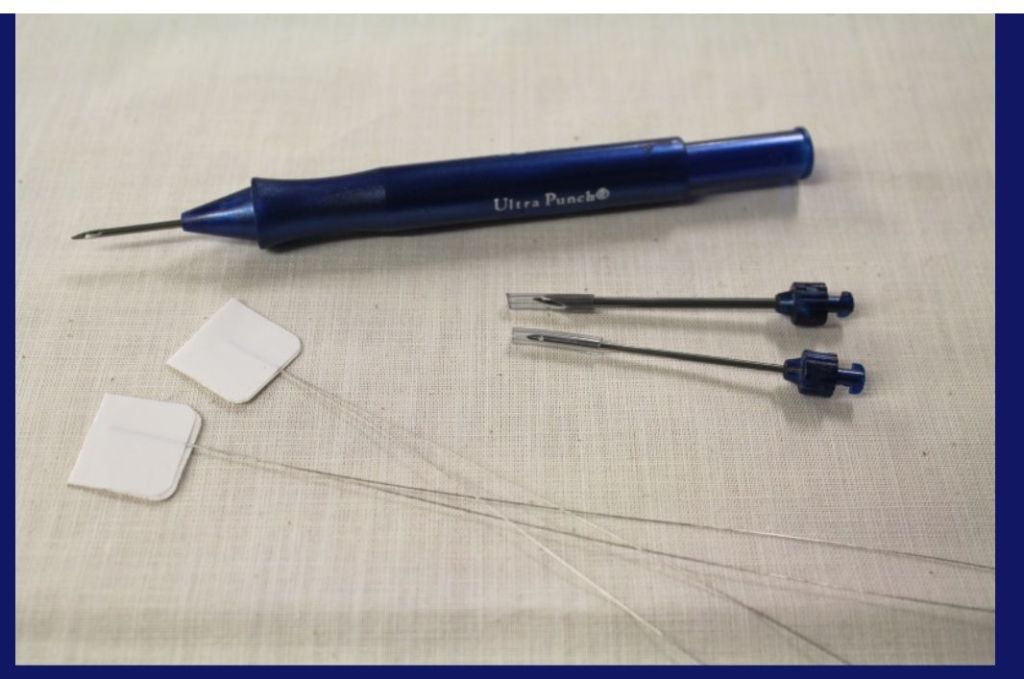
This design is done at level 2, which creates a higher loop than the background, which was done at level 1 and creates depth in the design. You can’t see in the photos, but you can in person and feel it.
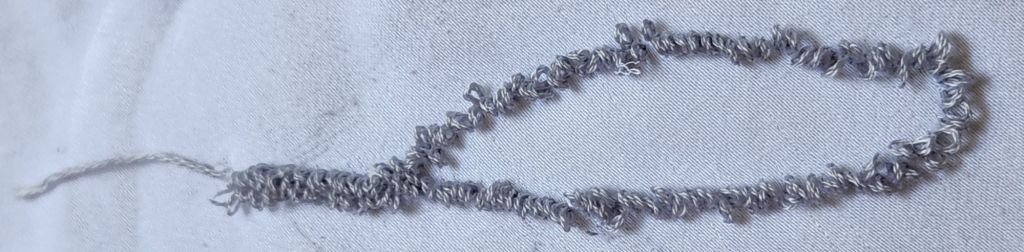
Since I only have evenweave fabrics (weavers cloth was supplied with the kit), I cut a piece from an old sheet for me to practice on. After watching a YouTube video, I realized that I had not loaded the punch needle properly (that sample was not photographed). After that, I got the hang of it quick enough (photographed below). Following a line is tougher than you think! Once the areas get filled in, it looks smoother.
Needlepoint stitchers might find it odd that you cut ends of threads from the front. It just blends into the loops.
If you pull the thread, it can all come undone. Kristen suggested applying fusible fabric to the back would help prevent that. But I don’t think I’ll be touching it to have that happen.
The design is drawn on the back of the fabric (not photographed), and that’s where you punch as the design appears on the front (as seen in the photos). The overdyed green and light gray threads are Valdani balls of 3 stranded floss (worked as supplied, not stranded). Placing the thread balls in a small jar allows the thread to continuously feed through the needle and not roll away. You don’t cut the thread into multiple lengths as we do in needlepoint.
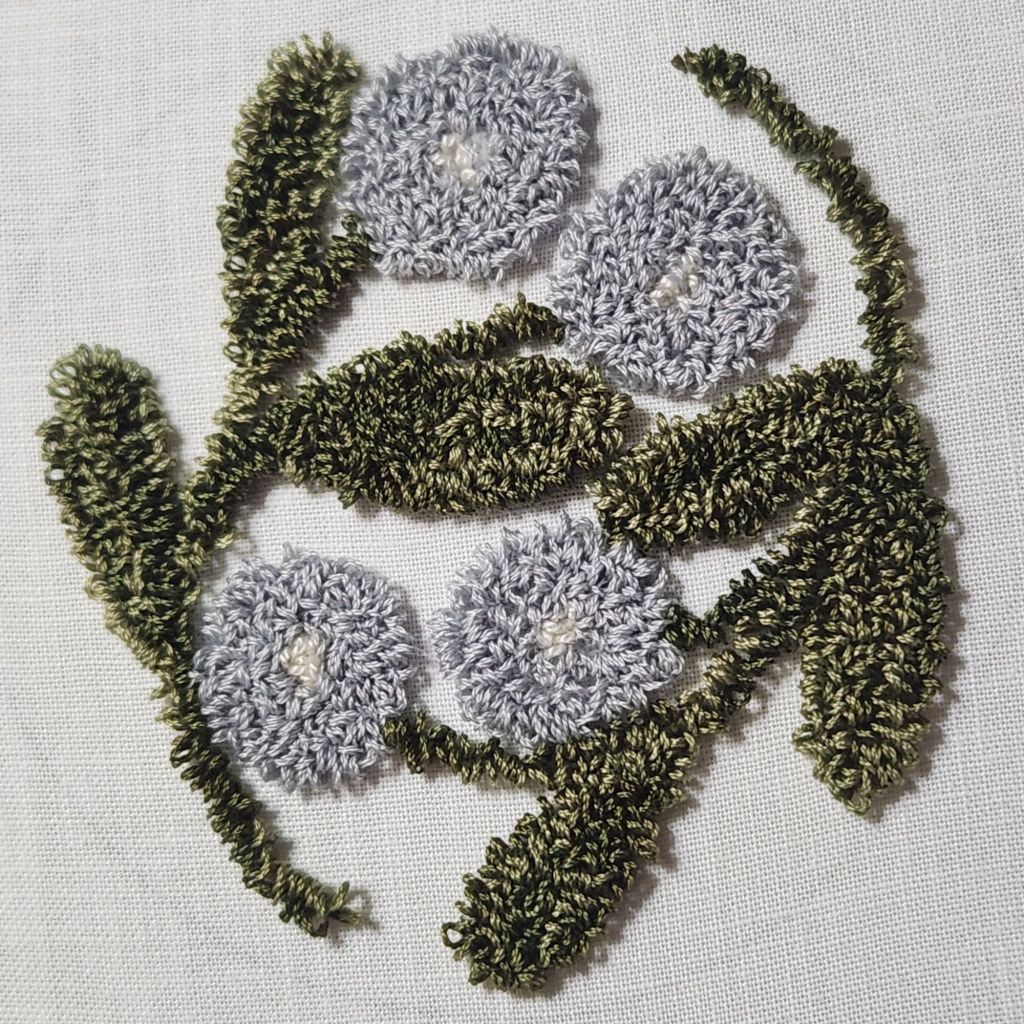
The overdyed dark gray for the background is Valdani #8 perle cotton.
I never expected to get this done before our meeting, and I didn’t get much of anything else done, but I finished the punching in 2 days.
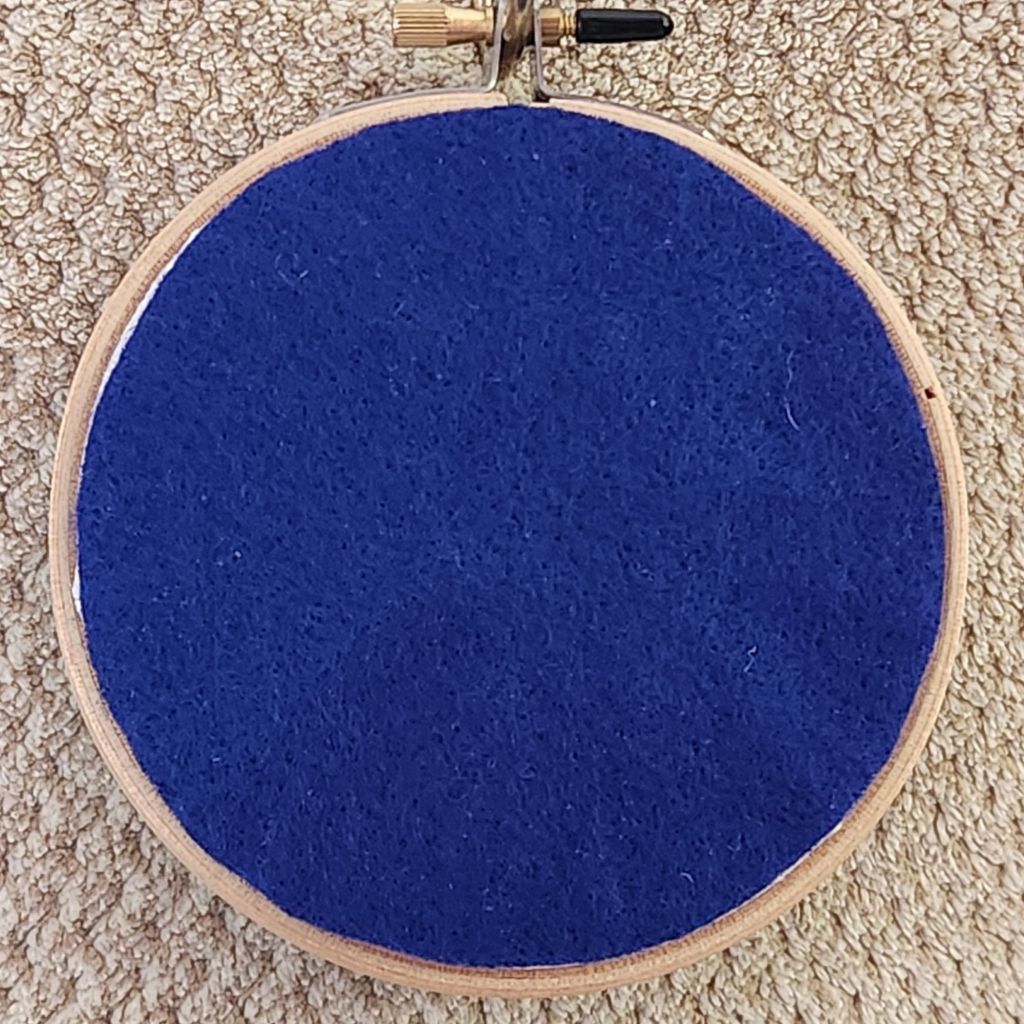
The kit included the display hoop and a piece of felt to cover the back. I did a running stitch along the inside edge to gather the fabric, cut away the excess fabric, filled the width of the hoop with the excess fabric and batting, covered with magazine board, gathered the fabric, laced it flat, and glued a piece a felt on the back that came with the kit. I placed Aleene’s Fabric glue on the weavers cloth and simply pressed the felt down. It was dry in no time.
Thanks to the deadline of the demo, this completes Goal #8 for 2025!
I was asked if I plan to punch again. And, I would if I happened to see a cute design, but I don’t feel the desire to seek it out. The repetition of punching reminds me of basketweave. But, I prefer basketweave because of the lack of precision with punch needle. The loop height in punch needle has some variation, and getting stitches close enough is an issue, although both would probably improve with practice. There is also the concern that it could unravel.
Kristen said the tool has been used for Turkey work. Again, I would be concerned about unraveling.
All said, I will keep my punch needle!
The Needlework and Textile Guild of Media meet in the Media Bourough Hall in Media, PA on the 2nd Tuesday at 7 pm.
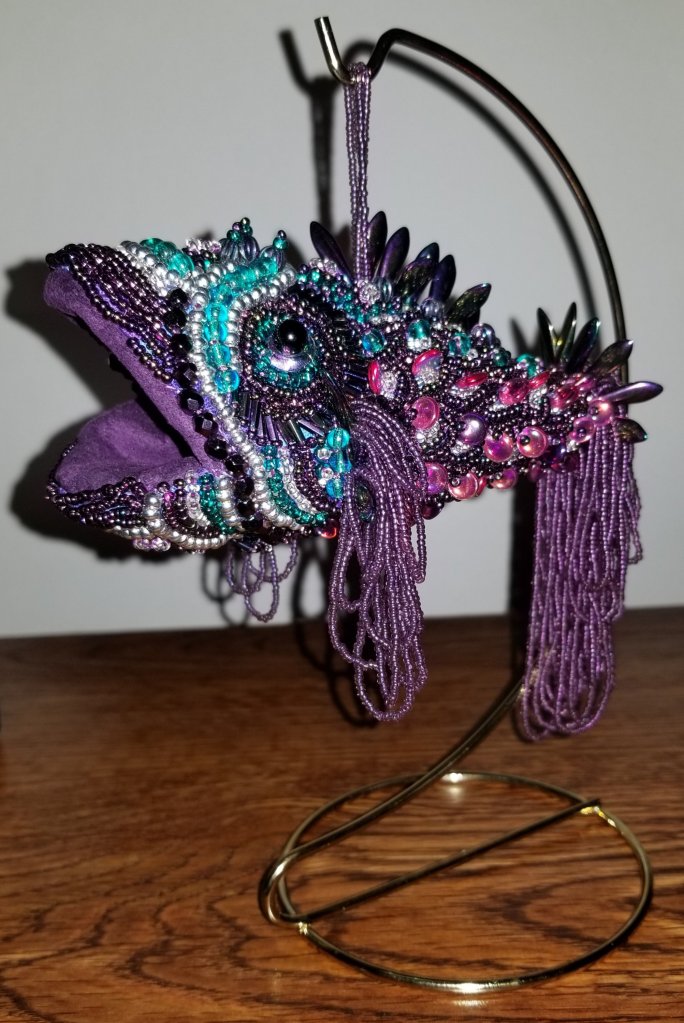
Back in November, Karen showed us how to add beaded fringe. Tuesday night, she showed us a different way than before. I also played with the spacing on the diagonal row.
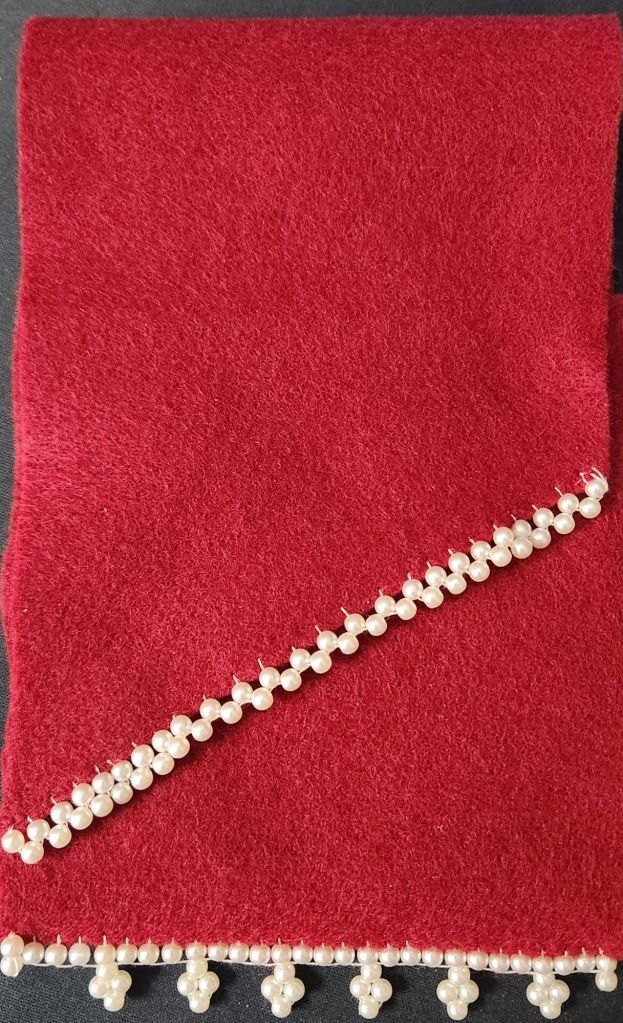
Sally and I were surprised that the thread lays on the outer portion of the 3 side by side beads. But that’s what the pattern calls for.
Filed under: Needlework and Textile Guild of Media, Other People's Designs, Susan Portra, The Cabochons, Faith, Susan Portra, The Cabochons, Love, Susan Portra, The Cabochons, Peace, Susan Portra, The Cabochons, Rapture, Tiny Weaving
One of my Christmas presents this year was a Susan Portra design, one of The Cabochons, called Peace.
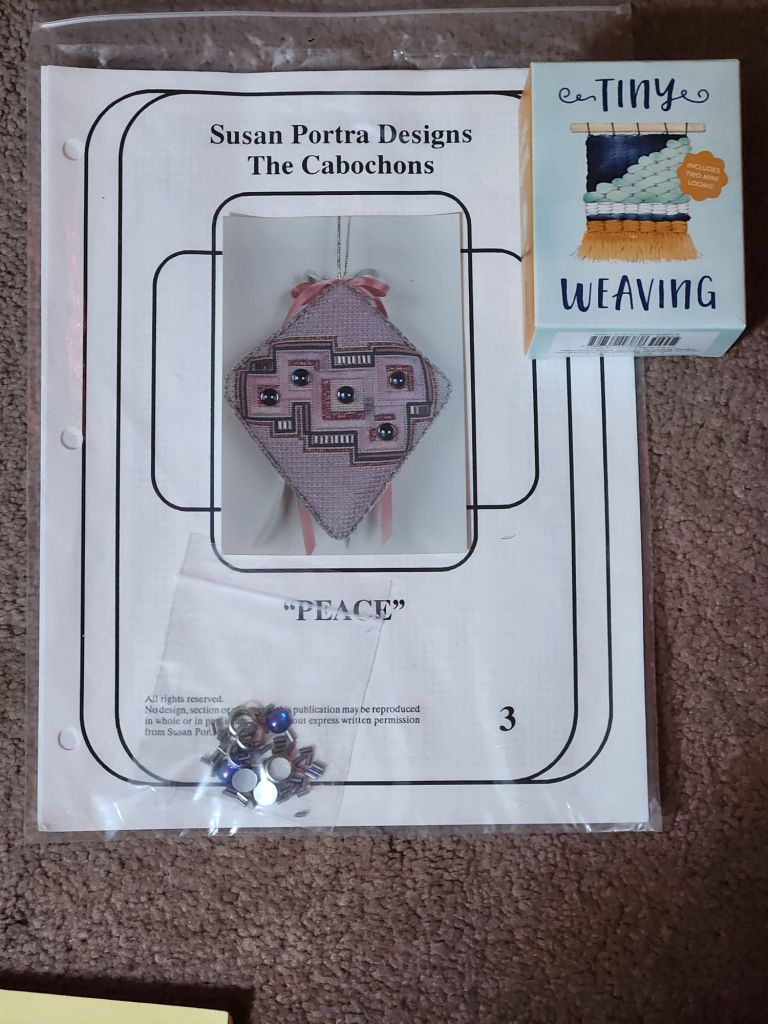
It joins 3 more in the series that are in my stash, including Rapture, Love, and Faith.
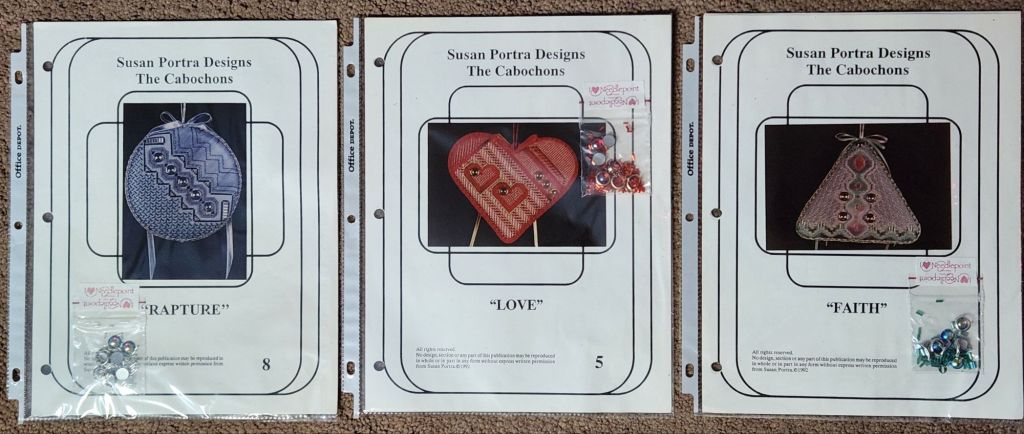
And, the Tiny Weaving kit comes complete to create 2 different types of woven tapestries. But, more on that another time.
I didn’t quite finish stitching Bill’s card case. Hopefully, tomorrow.
I don’t think that I mentioned that the Needlework and Textile Guild of Media moved to the Media Bourough Hall in Media, PA. We still meet on the 2nd Tuesday at 7 pm.
Karen taught us how to bead a felt purse. Her favorite book on the topic is Fine Embellishment Techniques by Jane Conlon. She has taken a few plain shirts and added beads around the neck to dress them up. Very nicely done. Karen usually attaches them with a single strand of polyester sewing thread because it’s stronger than cotton. She has used invisible thread but finds it difficult to see. I hear that!! She puts the shirts in the washer, no special care.

I used the Coral stitch on the sides. I skipped the strap because I won’t use it as a purse.

I will put a beading project that was inspired by seeing Jan Huling’s beaded pieces in person. Her magnificent dress was not in the exhibit. Thanks to Sue C for suggesting that we see that exhibit earlier this year. I thought my Edward Scissorfish was a lot of beads!
Filed under: General comments, Needlework and Textile Guild of Media, Technique Issues
I gave a talk about picking stitches to the members of The Needlework and Fiber Guild of Media earlier this month and here are my takeaway thoughts. I covered a lot in 40 minutes, but since then, I added a couple of more thoughts. I want to know where to find these when I need them and will be adding to this periodically as I come across any gems.
The non-stitchers in the guild (they do all sorts of various crafts such as needle felting, sewing, knitting, quilting, spinning wool, bookbinding, etc) were asking if we’re going to do a group project based on what they learned! I think a simple landscape would work well. This is a very creative group without the types of classes I’ve taken. So, I did stress technique is important although without a desire to become a Master Craftsman or plans to enter into a juried exhibit, it really is about enjoying what you do. If people want to work needlepoint in hand (I used to until I found out about bars), that is entirely fine with me. I’ve told them why I don’t. Some of this is applicable regardless of the medium.
Key Tips and Technique Issues (in no particular order):
• Basketweave area allows for a place for your eyes to rest.
• Color of thread: Light threads appear further away compared to dark threads that appear closer.
• Size of stitches: Small stitches appear further away compared to large stitches that appear closer.
• Odd rule is that odd numbered motifs (1, 3, 5, etc) in a design are more pleasing to the eye.
• Different stitches and threads can create varied texture (bumpy, ridged, smooth, etc).
• Direction of a stitch creates a different effect (water on a lake is typically horizontal; river flowing down a hill with a gradual slope probably has stitches at angles of 30° or less; a waterfall with a steep slope probably has vertical stitches or are 60° or more).
• Area should allow for repeats of 3 units or more (6 wide allows for mosaic and cashmere stitches but not Scotch).
• Companion stitches help create depth by using a smaller stitch such as Serendipity for further away areas, Criss Cross Hungarian for middle ground, and the larger Woven Trellis Variation for the closest areas.

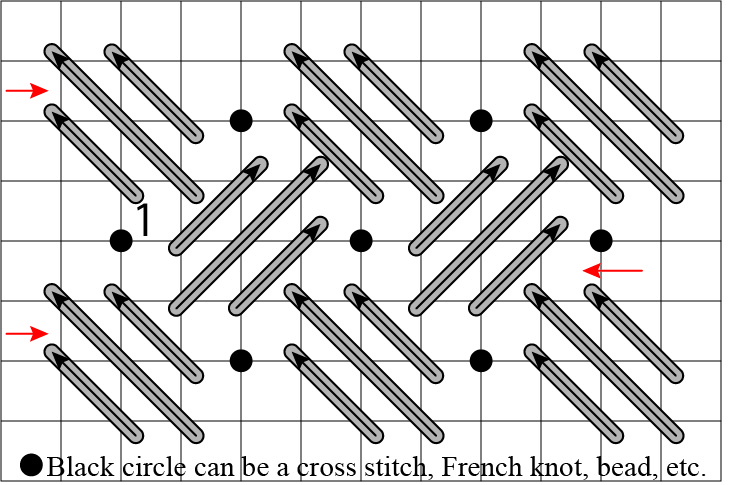

• Composite stitches combine different types of stitches such as straight and cross stitches.
• If a stitch is fancy, use a simple thread; if a thread is fancy, use a simple stitch.
• Stitch diagonal stitches first if they will be next to straight stitches.
• Stitches are worked opposite of the direction you are moving (to get the proper pull). If a diagonal stitch is worked bottom left to upper right, then work towards the left. If a diagonal stitch is worked bottom right to upper left, then work towards the right.

• The direction of a stitch can be changed. In one color, the front of the canvas will look the same but done in two different colors or an overdyed thread, there will be differences.


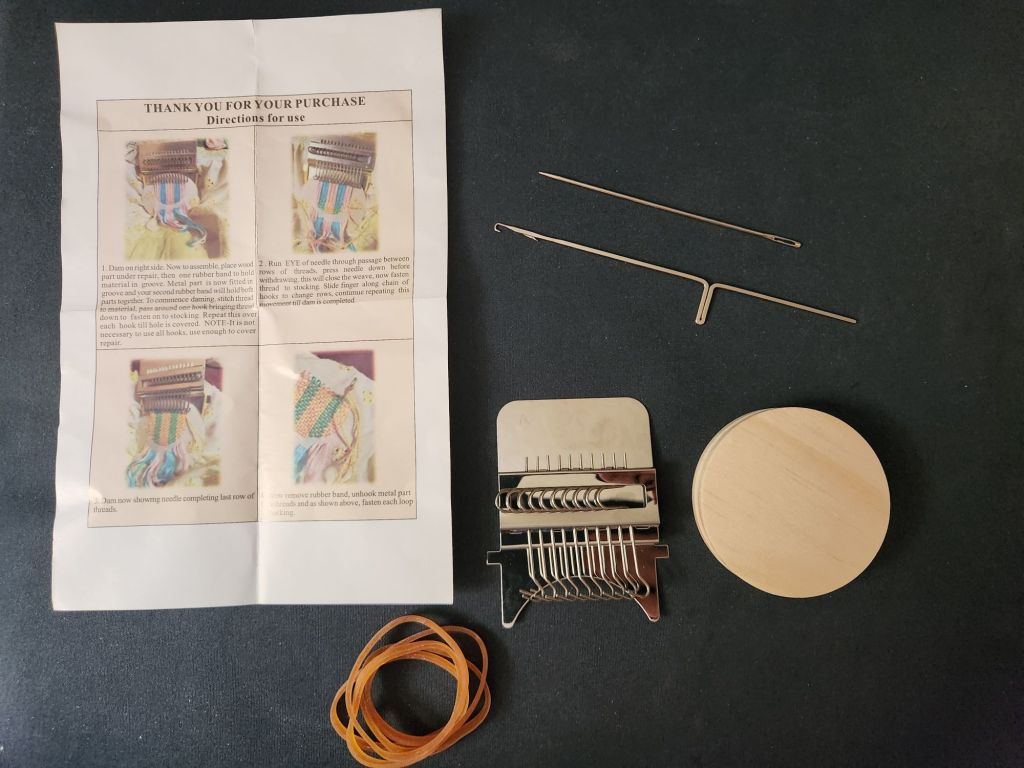
My sister gave me this darning Loom for me to have fun with. It’s similar to the one that I have, but the long metal piece with the hook on the end is quite a mystery. It is called a loom pick tool. But that’s as far as I got on YouTube and the internet. Why is the metal sticking out near the middle? The needle is nice and long. It’s very handy as I don’t have one anywhere near as long as that one. Between readers of my blog and folks at the Needlework and Textile Guild of Media, I am sure I’ll get some help. I think the loom brand is Quirzx Darning Loom Speedweve Type Weave Tool.
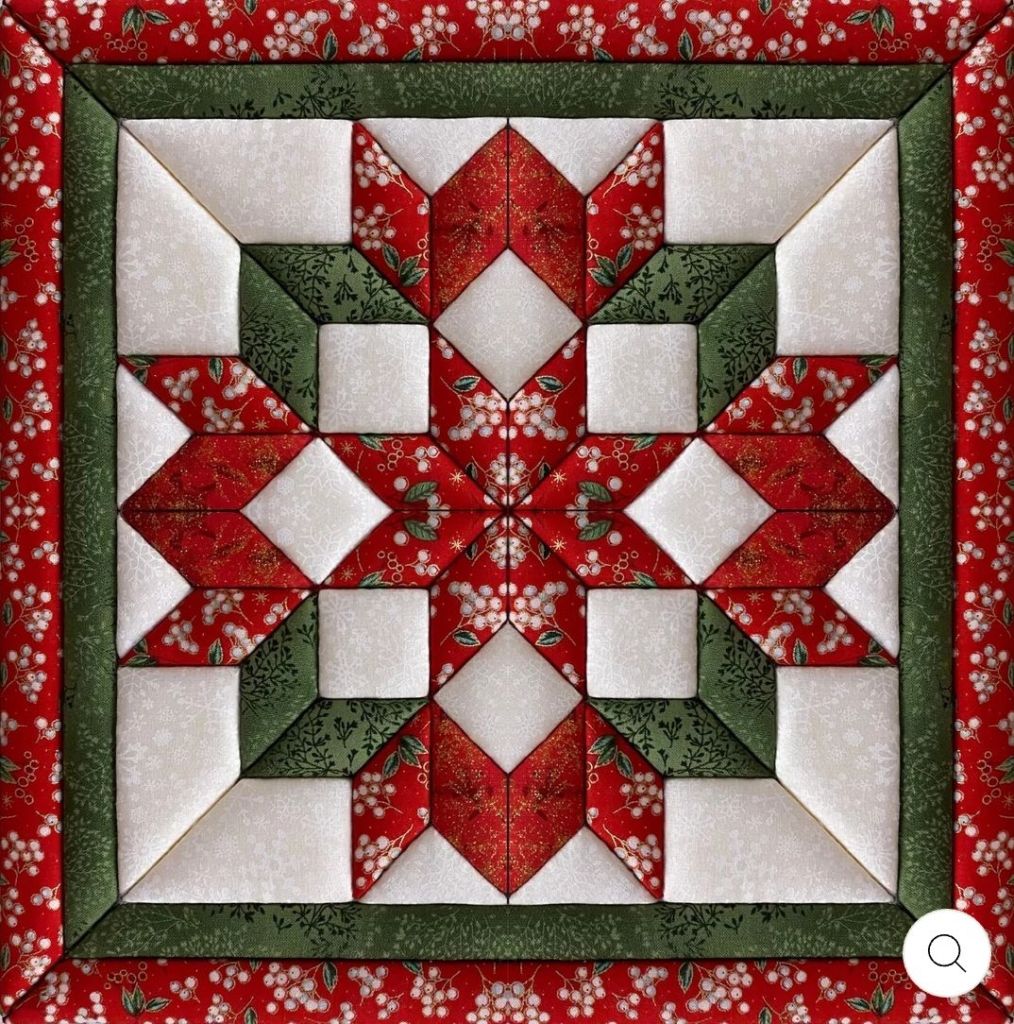
Filed under: Needlework and Textile Guild of Media, Quilt Magic Poinsettia
Santa brought me Mary Maxim Quilt Magic Kit of a Poinsettia.

My sister got a more traditional pattern, a Christmas Star Quilt. Since too many miles separate us, Santa got each one our own. She couldn’t have all the fun!!
While Bill enjoyed another 9 holes of golf, I opened my no-sew, no glue wall hanging. That’s when I discovered that I have to cut 52 pieces of fabric!! I was hoping to be done before Bill got home. It seems unlikely since Step 1 took me quite some time. The mitered corners were tricky. You tuck the fabric into the foam cuts.

The gold sides went easier except they didn’t say how to cut the pieces. Pinning the pattern seemed like puckering might be a problem. So, I cut the paper and traced it with my purple pen. I’ll need a new purple pen to trace all these shapes!
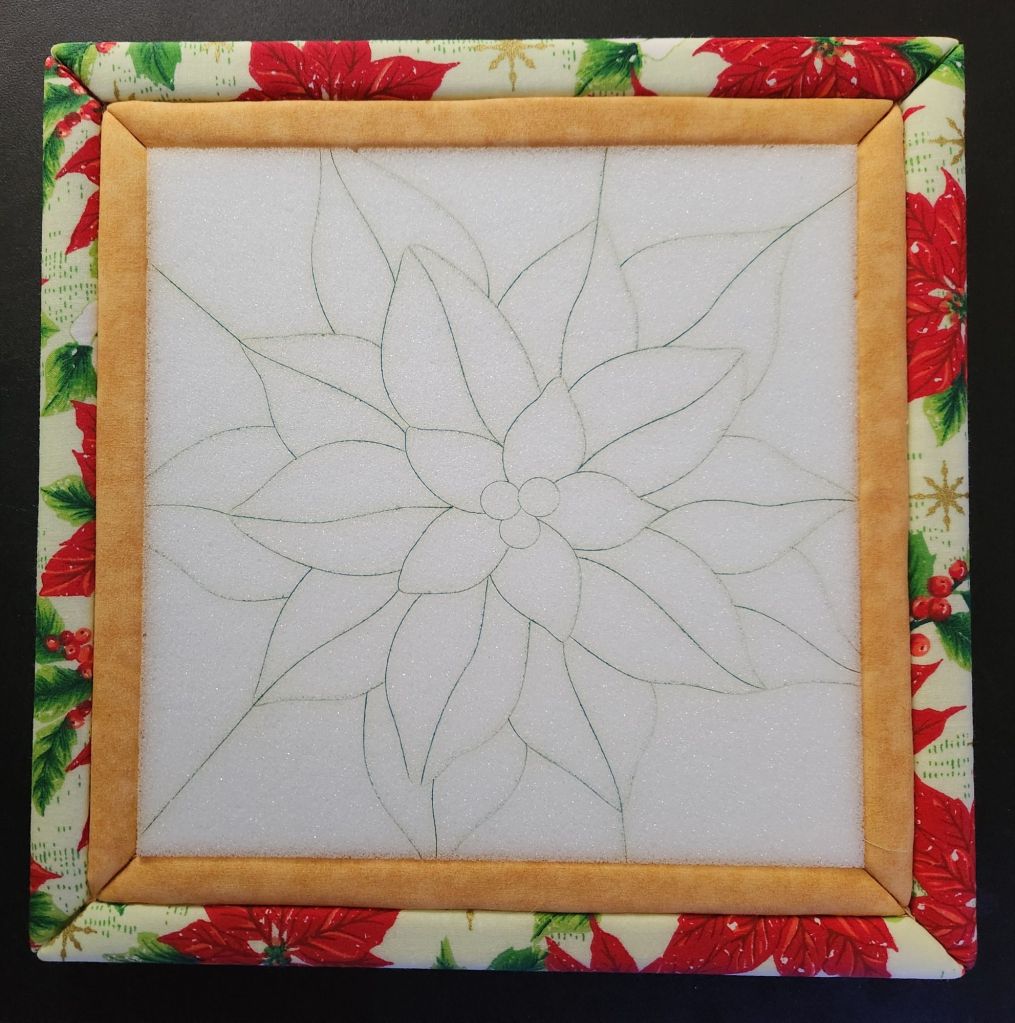
With that, Bill came home. More another day.
Filed under: Fabric Cinnamon Stick Ornament, Needlework and Textile Guild of Media
I had to try the Cinnamon Stick Fabric Ornaments that I had seen at The Festive of Trees yesterday.
It took some phone calls to locate long cinnamon sticks and a knowledgeable customer service guy at Wegmans who directed me to Williams and Sonoma.
Eventually, I tied left over right alternating with right over left. And, some of the strips were long enough to tie, wrap around, and tie again.
I think the type of fabric I saw used yesterday was different from what I had in my limited fabric stash. But, I made a few for the friends whom we are meeting for a holiday dinner get together tomorrow night.

One YouTube video shows tieing the strips like I did but cutting them in the shape of a Christmas tree 🎄 and gluing a star on the top.
