Ellen of Serendipity challenged us to stitch the Trellis Cross stitch in 2 different ways and compare results.
In this stitch sample, I used a pink Neon Rays+ as Step 1 for the large cross. For Step 2, I used dark purple DMC Perle #8 over the Neon Rays+ intersections. Then, on the top half, I filled in with blue and purple Kreinik Braid #8 which added too many colors, too much sparkle and left exposed canvas. If this was a painted canvas, exposed canvas might look better. On the bottom half, I used 4 strands of Splendor in a light purple. So, using 2 purples looks better to me. And, there is less exposed canvas which looks better too. Zooming in on the stitching shows more canvas than looking at it at a normal distance.
I thought I could handle the transfers (Bill and I have to upgrade together) but it took maybe 2 hours on the phone (and I was following instructions quickly) and a short second phone call to complete both phones! I had a very helpful young lady on the first call. These phones better last for a long time. I don’t need to do that again any time soon. I might just reshoot some (all?) of my needlepoint pieces some rainy day.
Some explanations have come in from someone more technically savvy than I:
Optical zoom means they have added another lens so that the light is bent (in complicated ways) on its way to the camera sensor to provide the additional detail.
Each of the little circles on the back of my phone is a different camera and lens. The phones don’t really have “zoom”, but rather 2 to 5 separate cameras. My old phone only had 3 cameras. There are options for 0.6X, 1X, 2X, 3X, 5X, 10X, 30, and 100 magnification that the various cameras provide. As soon as I use my fingers to zoom between sizes, I go back to digital zoom. That would be better to do in Photoshop.
Wow. That’s so much great info!
Here’s I took a photo at 30X. The one with the new phone I already posted was at 2X or 3X. According to the megapixels I discovered in the details of the photo, this new 30X one has 10MP while the other one has 6MP and the old phone had 5MP. It should be even better. The lighting is different and my hand may not have been asked steady.
Ellen at Serendipity is having a Spring Stitch Challenge. I’d stitched Day 1 through Day 4 stitches previously. So, I was sharing photos of the finished pieces instead of stitching 1″ samples to share. My blog is my stitch journal!
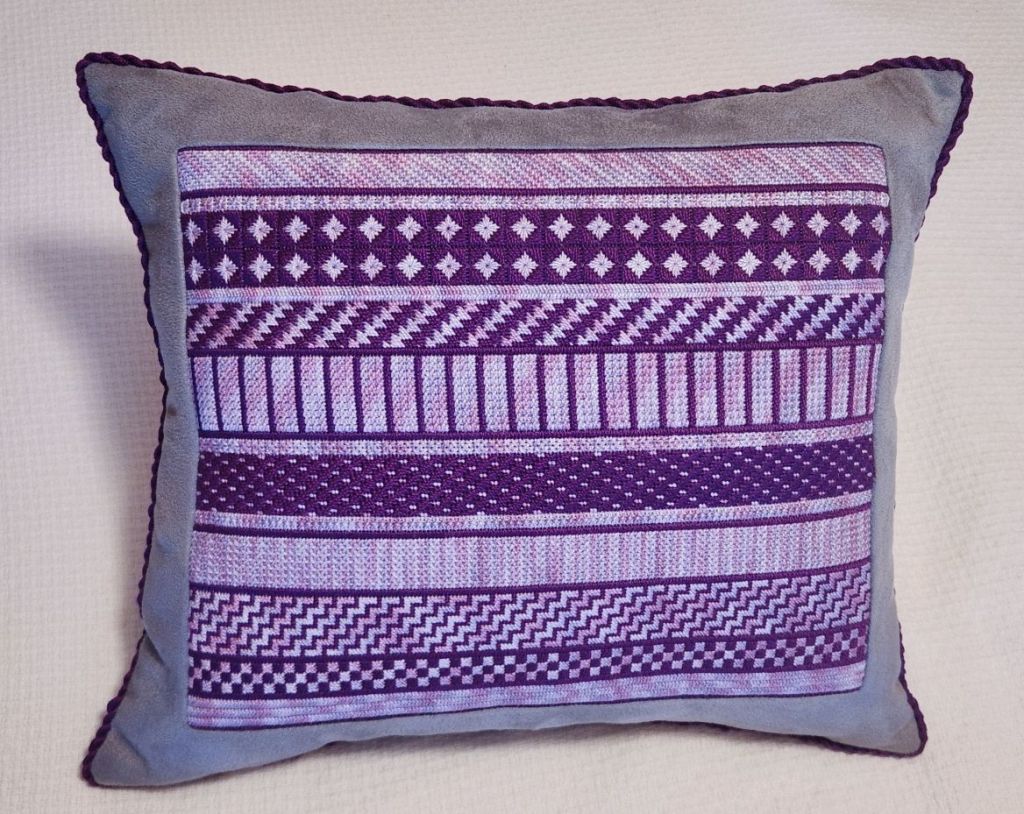
But, I didn’t have any pieces to share that used the Stardust stitch on Day 5. I came close in Rainbow Ribbons by Kam Wenzloff (Nov/Dec 2019 issue of Needlepoint Now) that used the Souffle Stitch. It’s 6 bands up from the bottom in my pillow.
Rainbow Ribbons Pillow
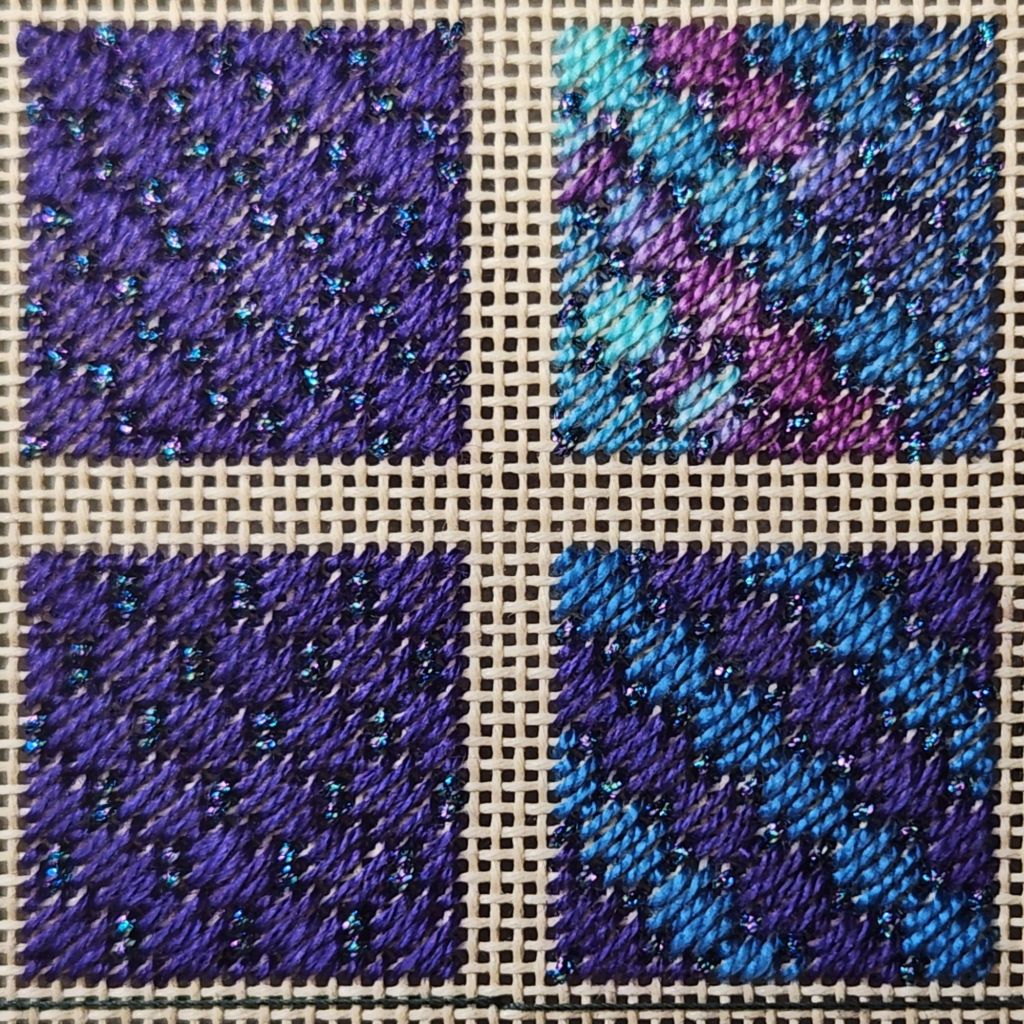
So, I tried the Stardust Stitch. Compensation is tough! I tried it with Wildflowers, an overdyed thread, and Kreink (upper right corner), all solid Impressions with Kreinik (upper left), and two solids, Impressions and Perle #8 with Kreinik (bottom right). Then, just to see the differences, I did the Souffle in solid Impressions with Kreink (bottom left). Souffle is easier to compensate but not by much. They share the same basic pattern but the relationship to the previous row differs.
Stardust and Souffle Stitches
They would make good companion stitches in a piece where you want something similar but different. Both stitches are in Painted Canvas Embellishment: An Idea Book by Carole Lake and Michael Boren.
I added a basketweave border, a buttonhole edge, and cut it out (3.25″ square). I got some peel and stick black felt by Creatology given to me recently. I simply cut it to a 3. 25″ square and applied it to the stitching. I will use it as a bookmark for one of my stitch books. Craftex would have made it too thick for a bookmark.


Filed under: General comments, Serendipity - Stitching Club with Ellen Johnson, Spring Stitch Challenge, Tips
Ellen of Serendipity challenged us to stitch the Trellis Cross stitch in 2 different ways and compare results.
In this stitch sample, I used a pink Neon Rays+ as Step 1 for the large cross. For Step 2, I used dark purple DMC Perle #8 over the Neon Rays+ intersections. Then, on the top half, I filled in with blue and purple Kreinik Braid #8 which added too many colors, too much sparkle and left exposed canvas. If this was a painted canvas, exposed canvas might look better. On the bottom half, I used 4 strands of Splendor in a light purple. So, using 2 purples looks better to me. And, there is less exposed canvas which looks better too. Zooming in on the stitching shows more canvas than looking at it at a normal distance.
Here’s the photo with my old phone.
Here’s the photo with the new phone.
I don’t pretend to understand the specs they list but the new Samsung S25 Ultra has optical zoom vs the old digital zoom (S22+) which is what I have been using. They explain it at: https://www.samsung.com/uk/mobile-phone-buying-guide/samsung-galaxy-s25-camera-specs-explained/
Quite a difference in clarity!
I thought I could handle the transfers (Bill and I have to upgrade together) but it took maybe 2 hours on the phone (and I was following instructions quickly) and a short second phone call to complete both phones! I had a very helpful young lady on the first call. These phones better last for a long time. I don’t need to do that again any time soon. I might just reshoot some (all?) of my needlepoint pieces some rainy day.
Some explanations have come in from someone more technically savvy than I:
Optical zoom means they have added another lens so that the light is bent (in complicated ways) on its way to the camera sensor to provide the additional detail.
Each of the little circles on the back of my phone is a different camera and lens. The phones don’t really have “zoom”, but rather 2 to 5 separate cameras. My old phone only had 3 cameras. There are options for 0.6X, 1X, 2X, 3X, 5X, 10X, 30, and 100 magnification that the various cameras provide. As soon as I use my fingers to zoom between sizes, I go back to digital zoom. That would be better to do in Photoshop.
Wow. That’s so much great info!
Here’s I took a photo at 30X. The one with the new phone I already posted was at 2X or 3X. According to the megapixels I discovered in the details of the photo, this new 30X one has 10MP while the other one has 6MP and the old phone had 5MP. It should be even better. The lighting is different and my hand may not have been asked steady.