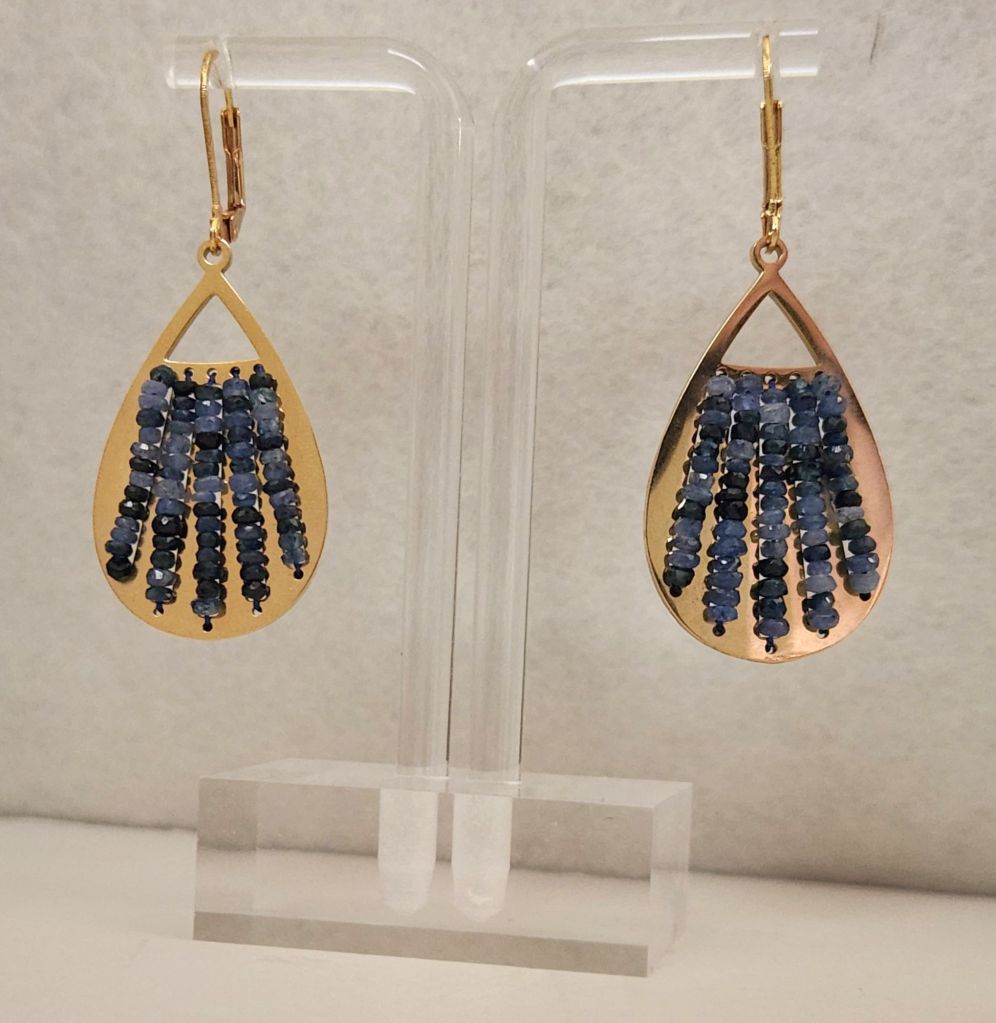
These are natural, hand-faceted, rondelle gemstones similar to ones used in the Royal Blue Sapphire earrings (https://melitastitches4fun.com/2025/05/01/royal-blue-sapphire-teardrop-earrings/).
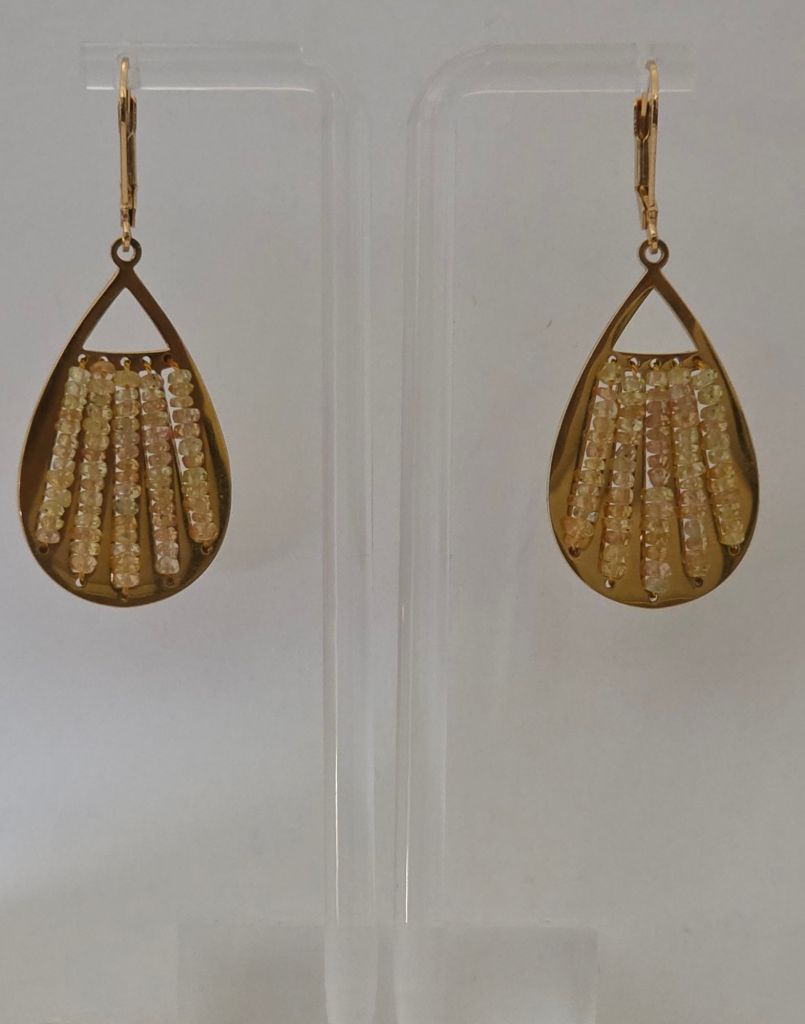
These are Yellow Sapphire for Debbie and Ruby for Mona, our Delaware friends.

I’m not done yet! I’ve not used all the small gemstones or touched the medium and large gemstones yet. But, I have to find a different bead frame for the larger ones. They sparkle in the sunlight. I’m very happy how they turned out. And, there are Emerald gemstones to use too!
After Lori, from my ANG Main Line Stitchers Chapter, taught us how to make a bracelet in 2011, I made the mistake of going to a Bead Expo. I bought natural, hand-faceted, rondelle gemstones in small (around 400), medium (around 100), and large (24) in each of these colors: Royal Blue Sapphire, Yellow Sapphire, Ruby, and Emerald to make the bracelet in all these wonderful colors for Christmas presents. The gemstones did not work like the beads Lori supplied. So, they all went in a box and have been waiting for me to figure out what to do with them!
I tried using the gemstones on the earrings that I sent to NAN’s exhibit, but they didn’t work in that design either because none of my beading needles once threaded would fit through the small gemstones. So, I used regular seed beads in the NAN earrings. When I was in the jewelry aisle of Michael’s buying the lever-backs earring hook findings for the NAN earrings, these bead frames appeared to be something that I could work with. I just needed to string the gemstones.

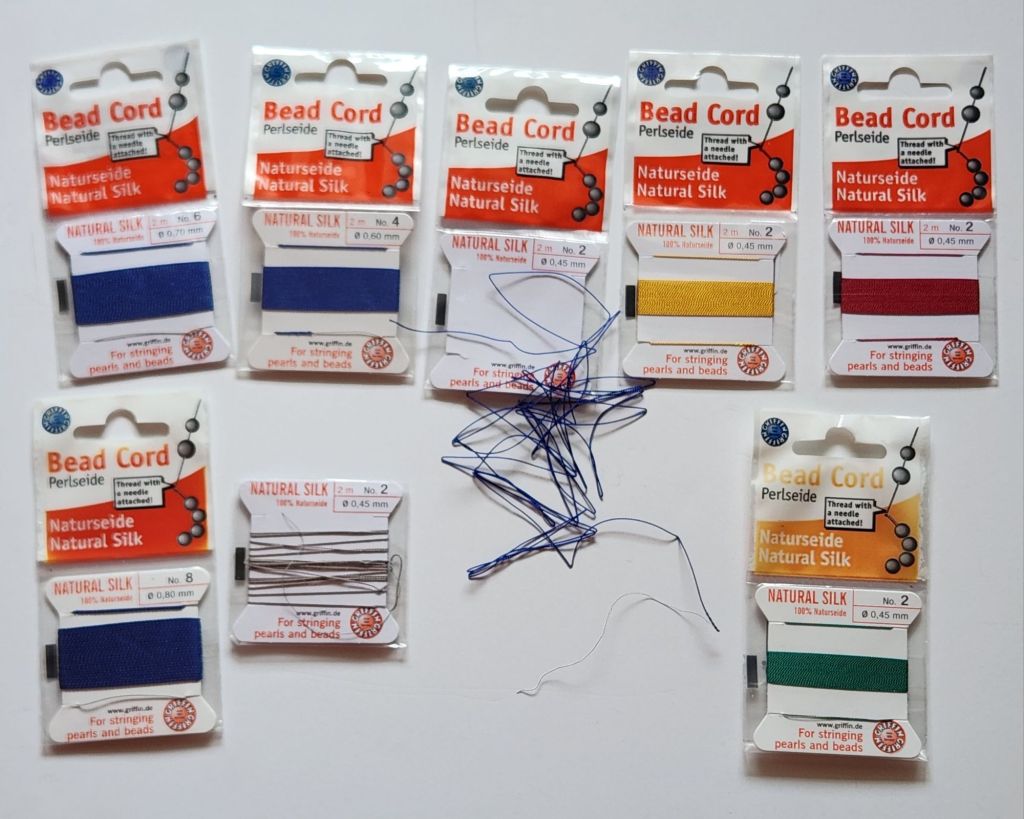
Around this same time, I went to Blue Santa Beads for something and was looking around and found Griffin Bead Cord Perlseide Natural Silk. It’s thread with a needle attached. The needle is more of a wire (as long as it works, I don’t care what it’s called). The thread is 2 meters long. It comes in 4 weights, and I bought one card of the thinnest thread to test it. I did find out that the thread needs to be stretched before you use it. I must have stretched it too much because when I tied a knot in the middle of making the first earring, the thread broke, but not where the needle was connected. My knots were large, and the color of the thread didn’t match the beads, but I went ahead with the second earring, and it went better, but it just didn’t seem secure. So, I put the gemstones aside again until I could get back to Blue Santa Beads to buy the colors I needed to match the gemstones and one card of the larger sizes for the larger gemstones.
Fortunately, their bead teacher/jewelry designer was there, and Bill got talking with her. Next thing I know, she and he are going looking for something. Come to find out, he’s gotten her to make him a simple leather bracelet with a magnetic closure. We discussed the glue she used to connect the closure to the leather. She doesn’t like E6000 because it cracks over time. She uses “Super NEW GLUE” by Euro Tool in all her jewelry and it dries clear. I explained my issues, and she said to reinforce the knots with the glue. So, I bought one bottle. It’s in a dropper bottle. I use a toothpick to get even less of a drop. She also suggested lightly wetting the thread to stretch it and letting it dry before using it. You use the whole length from the non-needle end until you use it up. I don’t know how the thread is attached to the wire but it is.
This time, I successfully made the pair using about 140 of the small gemstones. It’s a start on using up those gemstones!
Old camera.
New camera.

I am surprised that about 70 of the small gemstones won’t fit onto the smallest bead cord. Yes, I tested all of them. That’s about 20% of what I purchased of the small blue sapphires.
Lesson 1: Don’t go crazy over something after just one class!
Lesson 2: Don’t give up! I am so happy with these earrings. Using these beads is actually what Goal #13 for 2025 was meant to accomplish. I’ve got more lots more beading to do.
Filed under: 2022 Christmas in Williamsburg, Needlepoint Shops, Needleworkers Delight, Silver Needleminders and Earrings
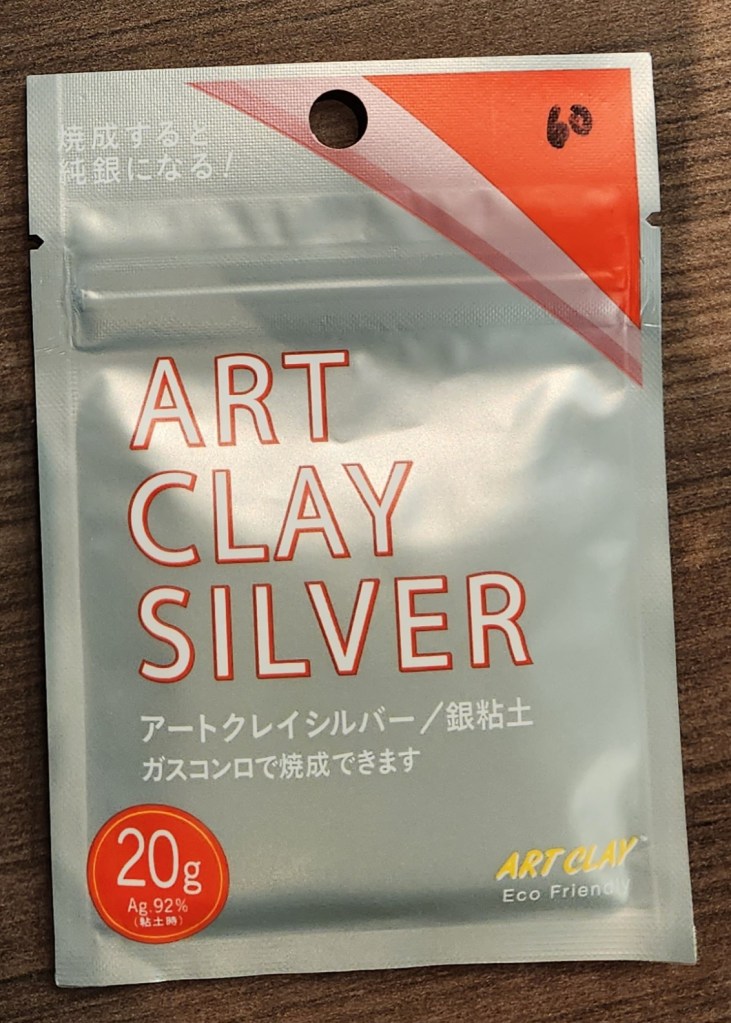
I took 2 classes with Michele Arsenault to make silver pieces and forgot to take pictures of my Day 1 class where I made 3 needle minders. So, here will be the photos of my Day 2 pieces before firing and polishing. She takes them home and finishes the process and mails them to us.
Believe it ot not, the “silver clay” is 99.99 silver content. The clay burns off in a kiln leaving the silver particles which bond together.
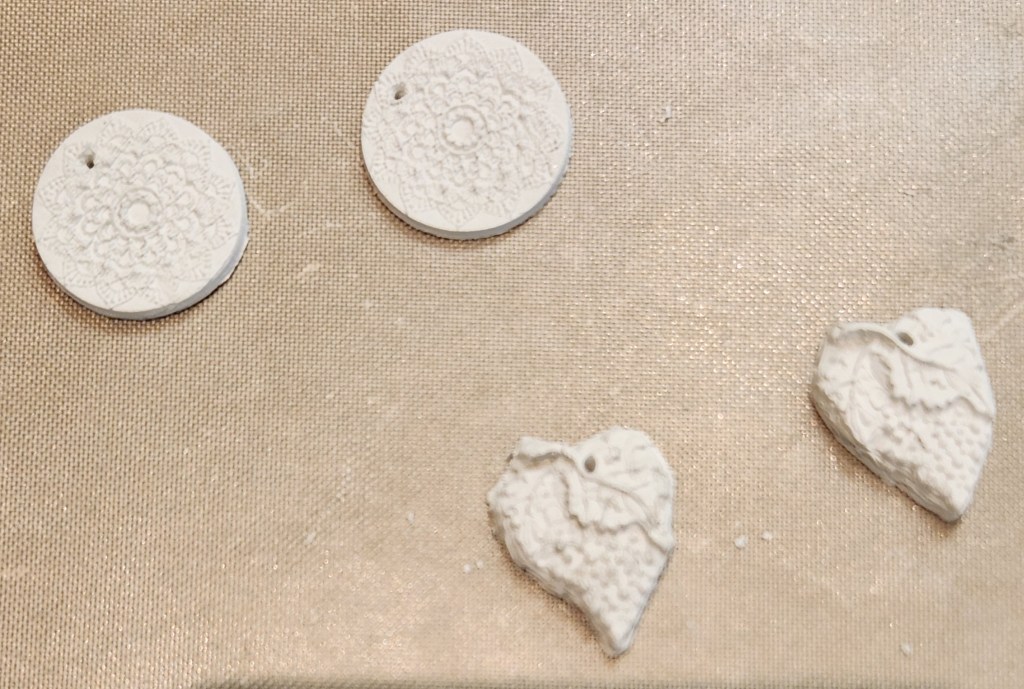
The clay gets pressed into the molds. Then, you pop it out of the mold. I used a cookie cutter-like piece to cut out the round pair and a different tool to carve around the other. Besides Michele describing the process, the longest part of class is going through her molds to find what you want. She has hundreds of them.
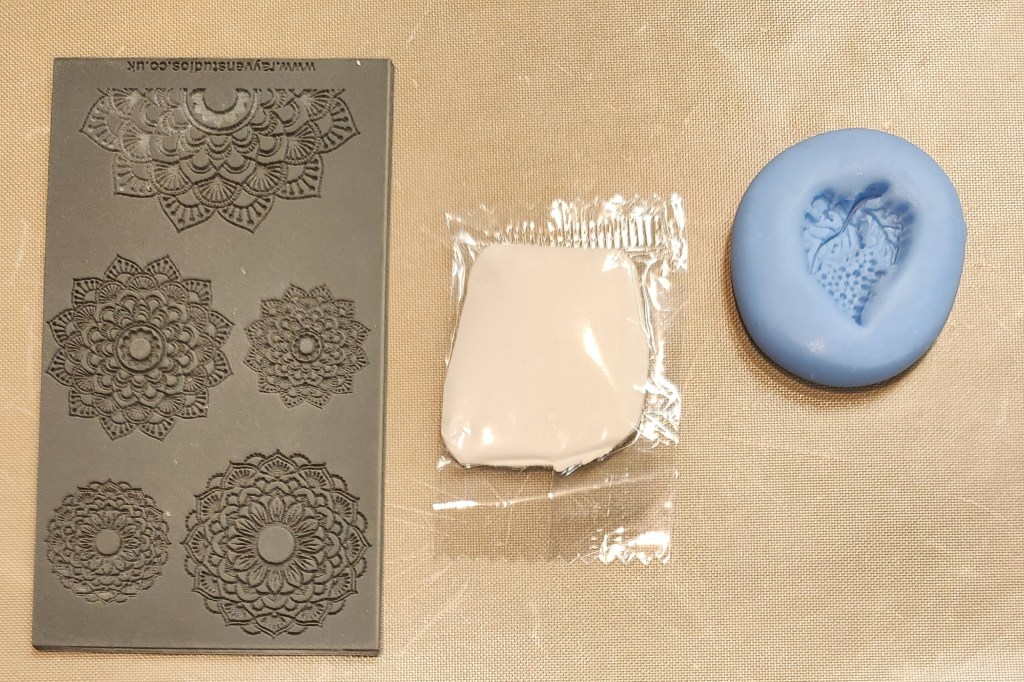
For the first class we worked with 10 grams and second class was 20 grams. So, I made 2 pairs of earrings and poked a hole near the top so that Michele can make them into earrings. The Day 2 class was more in depth than Day 1. And, if I were to take the Day 3 class, I could try making a ring which offers the opportunity to join 2 pieces together. But, I’ll pass. I’m good with what I have now. More pictures once these are returned.
I finally got around to finishing my Kumihimo bracelet. I needed help with attaching the clasp on each end. Thanks to the ladies at The Bead Garden in Havertown, PA – they have everything! I figured out how to create the pattern all by myself. Generally, I do prefer symmetry over randomness. That does take more time but I like the effect. Of course, sometimes you’ve got to be wild and crazy!

What can you do with these supplies?

All I used were those 2 glues (one for fabric and another for metal), two paper clips, 2 earring hooks, and one 40″ thread of Vineyard Silk Shimmer (S-515, Toffee) to make these earrings:

I cannot take credit for the idea! One of the women from work shared the link with me (http://evie-s.com/news/2011/02/10/art-from-everyday-objects-paperclips-string/. Great way to use up your stash & make something unique, not expensive – just in time for holiday gift giving! They turned out nice.

Filed under: Earrings, General comments, Jewelry, Organization
As a reminder, these natural, hand-faceted, rondelle gemstones in small (around 400), medium (around 100), and large (24) in each of these colors: Royal Blue Sapphire, Yellow Sapphire, Ruby, and Emerald were obtained at the Bead Expo in 2011. It took me awhile to find a bead cord that would work with them.
The teardrop ones I made (https://melitastitches4fun.com/category/jewelry/gemstone-earrings/) used about 140 small gemstones (5 columns), these used about 100 (4 rows), and there are still about 70 left! And, I haven’t used the medium or large ones yet at all although I have experimented with some options!
This pair of earrings used the Royal Blue Sapphire beads on Perlseide blue #2 bead cord (natural silk thread with a needle attached from Blue Santa Beads) on a silver round bead frame (from Michael’s).
These were my hand made gift to Linda for Christmas. She was very happy with them.
And, I am thrilled with the ByAnnie Travel Essentials Organizer in a fabric that matches the Bowl Me Over Bag from 2023 that Linda made for me.
It’s great and is perfect for storing my cords and fabrics for finishing. The A Place for Everything ByAnnie bag was filled to the max! So, now I have them in here with the duplicate cords in the other bag. I love it!
I enjoyed getting organized since I have several pieces to finish – hopefully, I can find time this weekend or next week.