Peace from the Cabochon series by Susan Portra is coming along nicely. I counted the tent stitch blue border in advance of our Saturday Stitch-in because it requires concentration.
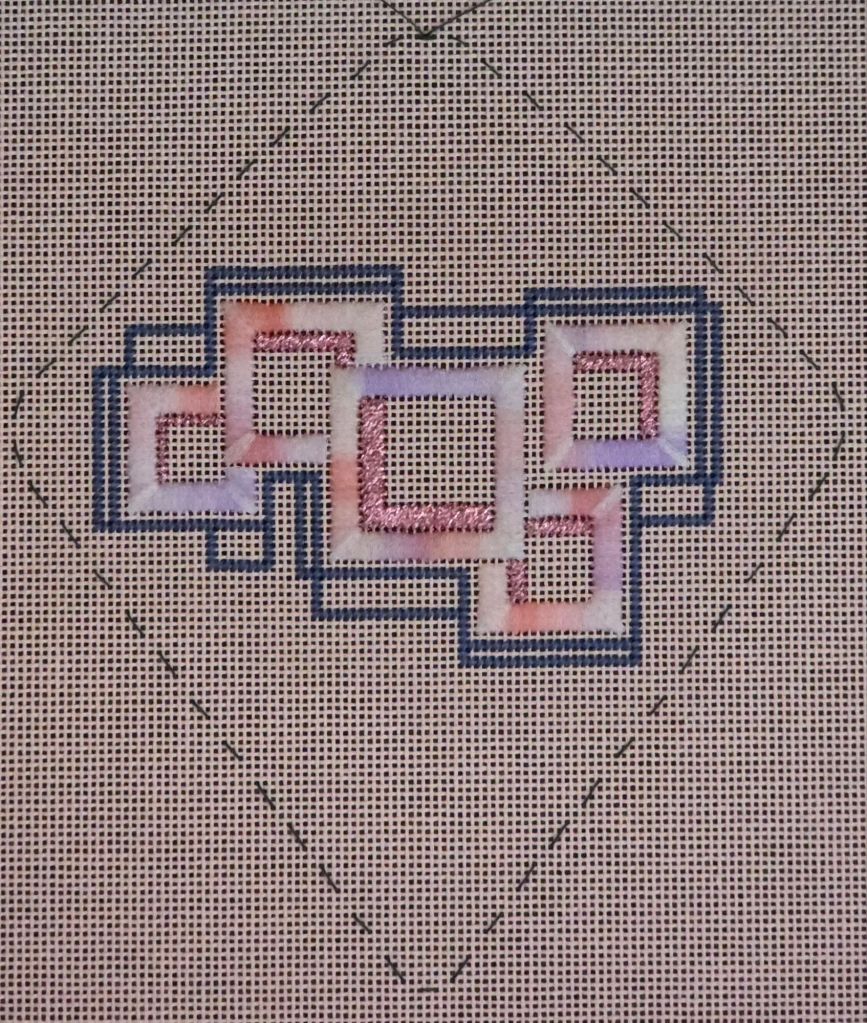
I added the pink Fyre Werks outline during the Stitch-in yesterday.
As in a previous cabochon, I substituted French Knots with cross stitches of various lengths (over 4, 3, 2, and/or 1) depending on the number of available intersections. I got the idea from Painted Canvas Embellishment: An Idea Book by Carole Lake and Michael Boren (Bands and Borders Over One).

Not wanting to start anything more difficult later that night, I added the bugle beads and all the long laid diagonal stitches. There were no instructions to stitch one row and then couch. So, I laid all the threads. Hopefully, I won’t regret that! I do have enough in case I need the remove it but I should be ok.
I am contemplating a T-stitch for the cabochon squares. The instructions leave them unstitched. Thoughts?
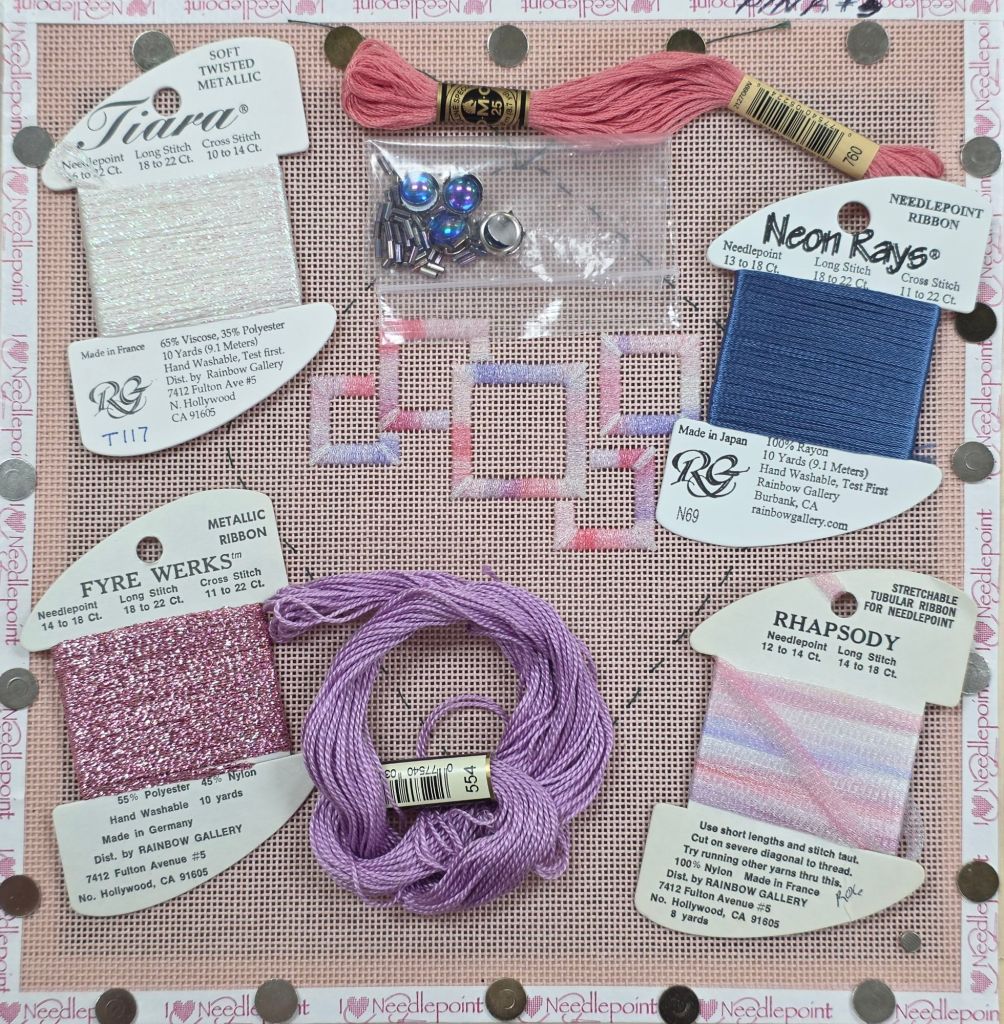
Peace is the third in The Cabochons series by Susan Portra. It’s on a light pink canvas but the blue and purple save it from being too pink.
I forgot to get a photo of the threads first. So, you see the Rhapsody boxes.
Our ANG Main Line Stitchers chapter Stitch-in was Saturday at Fireside Stitchery. There were 3 men stitching and not either of the 2 guys from our chapter!
Linda and I searched for red threads for Bring the Joy Santa that is a painted canvas the chapter is working on. Then, I started looking for threads for a counted project we’ll be starting in March but couldn’t decide on anything. Then, I got to stitch the Fyre Werks into Peace which was easy enough.
Shortly after I got to the blue tent stitches, I realized that the basted border wasn’t going to hold the entire design as charted. I had to move the motif down by restitching the basted border. Luckily, I had enough canvas to move the border up 6 canvas threads. By then, it was about time to head home anyway. Four hours flew by!
Here’s the rebasted border and my progress.
Counting the tent stitch blue border requires more concentration than a Stitch-In allows with our conversation and distractions of lovely painted canvases and walls of threads!
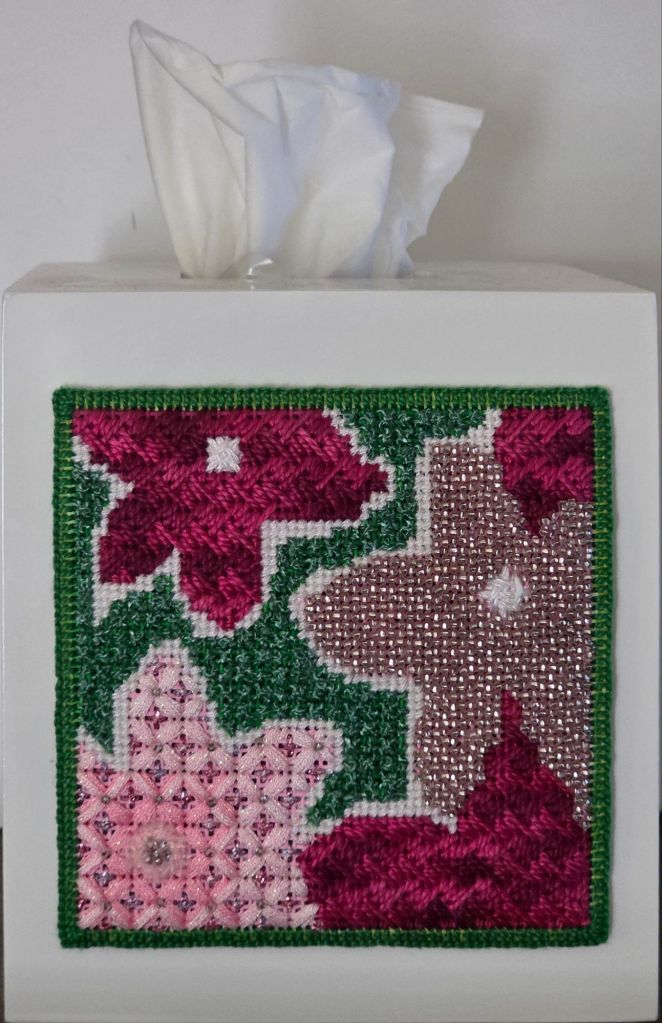
I finally decided what to do with Floral Fantasy, a small (4″ square) painted canvas by an unknown designer. After placing a buttonhole border around the design DMC Pearl 5 in green DMC 700, I whip stitched a piece of ultrasuede backing to it.
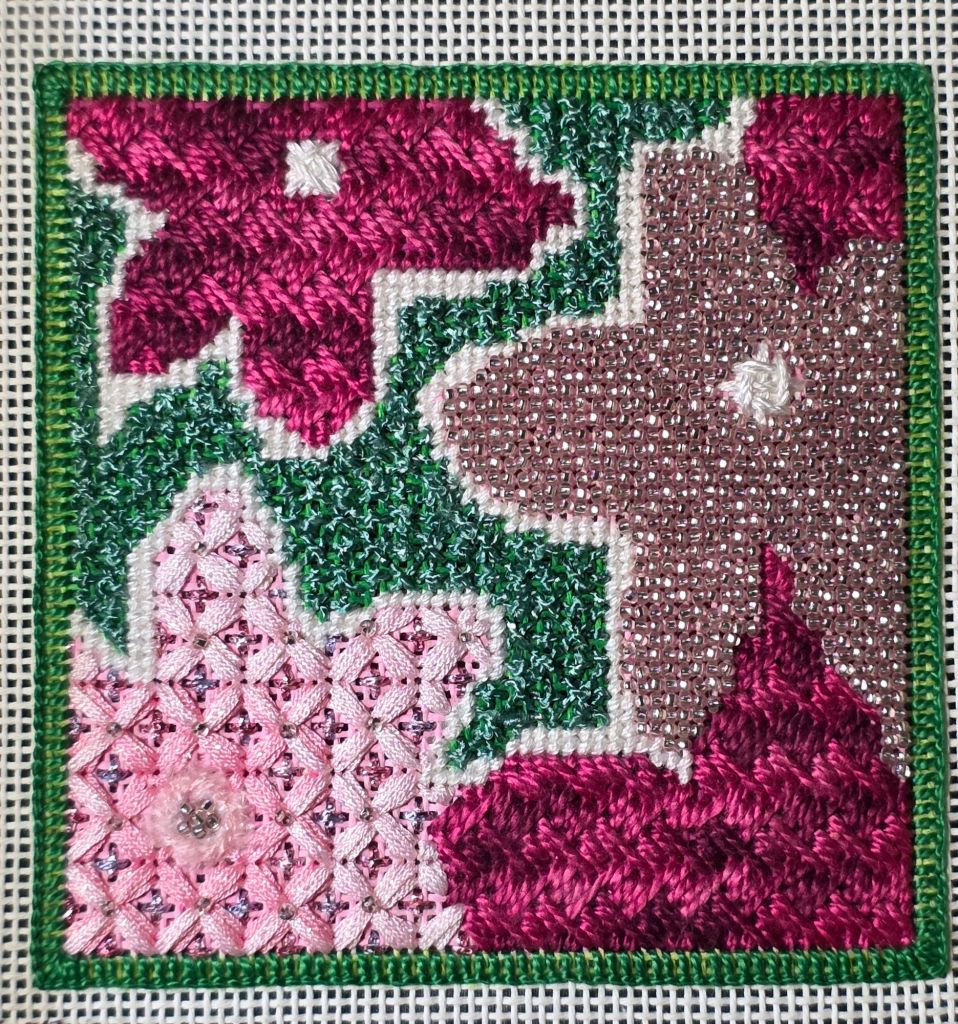
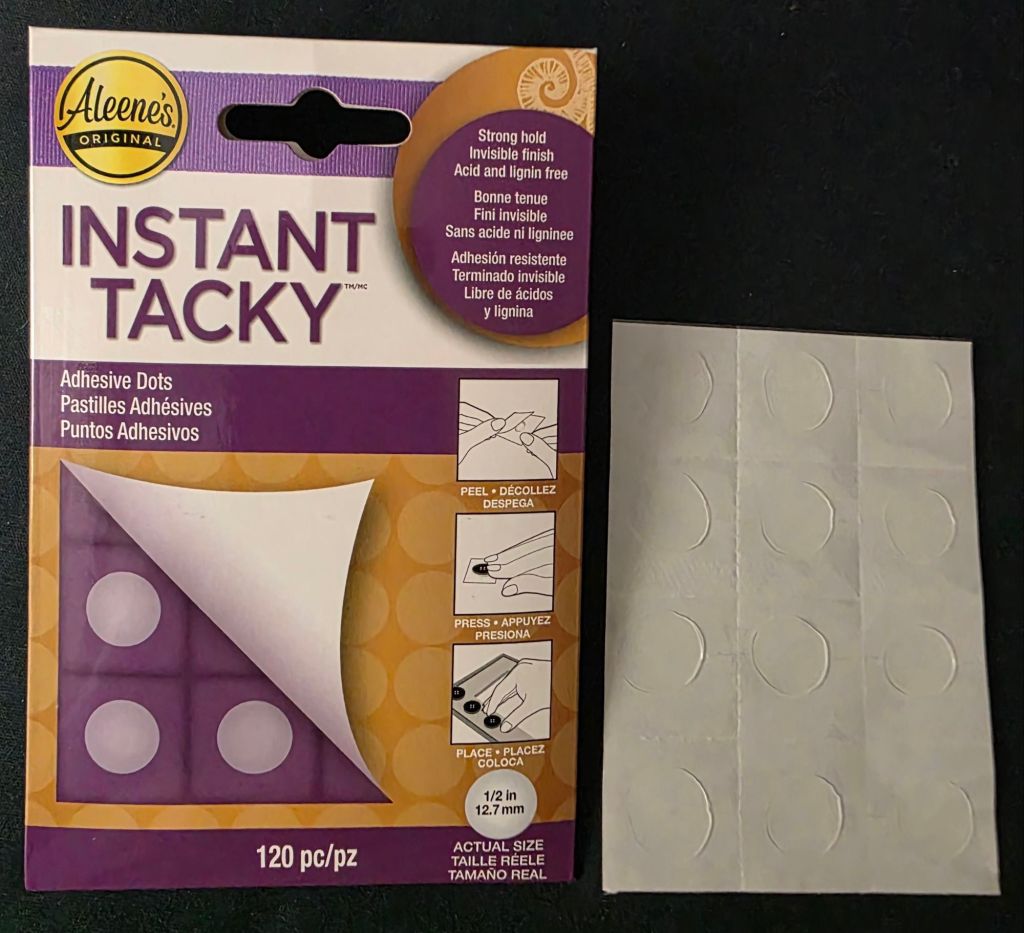
I held the ultrasuede in place with 4 Instant Tacky dots from Aleene’s as recommended by Ellen Johnson of Serendipity during her recent finishing class. Since they are acid and lignin free, I placed them on the back of the needlepoint (one near each corner).

The scary part is always cutting the canvas close to the stitching without cutting the threads. But, I did it. The trick is to squish the edge of the buttonhole towards the design before snipping slowly. Then, after all sides are cut, push it back towards the outside.


After placing 4 more pieces of Aleene’s tacky dots on the back of the ultrasuede in the corners, I attached it to the tissue box for our guest bedroom. I’m not worried about the tacky dots leaving a mark on the ultrasuede since I could easily remove the ultrasuede from the piece and reattach a new backing. Even with all those beads it’s not heavy.
I ran out Craf-tex and wasn’t finding it without a fusible interfacing. So, Linda suggested Peltex which she prefers over Craf-tex anyway. Michael’s wasn’t showing any brand in-stock near me. So, I went with Pellon sew-in stabilizer that I was able to find at Hobby Lobby in NJ (got their last yard and on sale) allowing me to continue on my finishing frenzy! It feels like the same weight as the other “heavyweight” one I’ve been using and is the same thickness.

This cabochon was stitched by the end of July but was waiting for me to get motivated to do the finishing. I try not to use glue (messy) and lacing across tab to tab as most finishers do doesn’t thrill me because it loosens easily. But, by lacing into the stabilizer, I can cinch it in place after every couple of tabs.
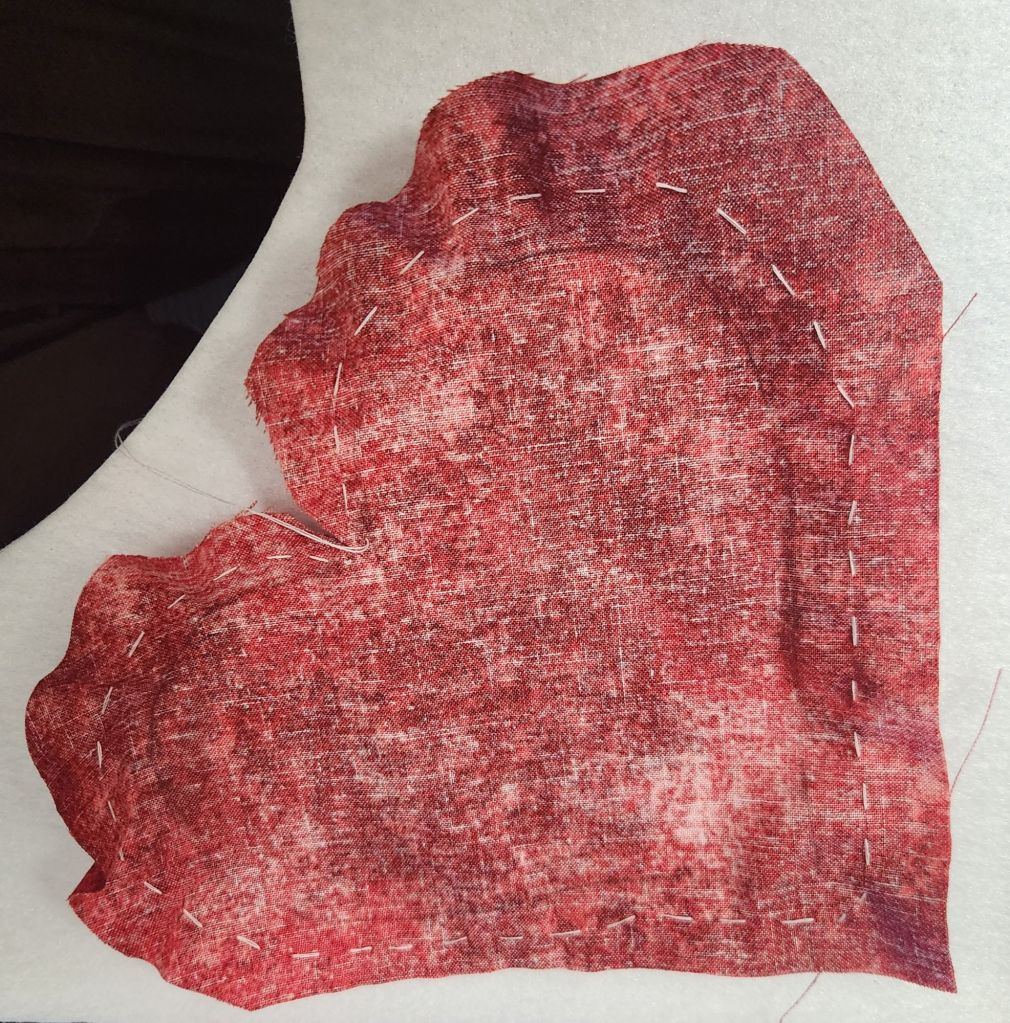
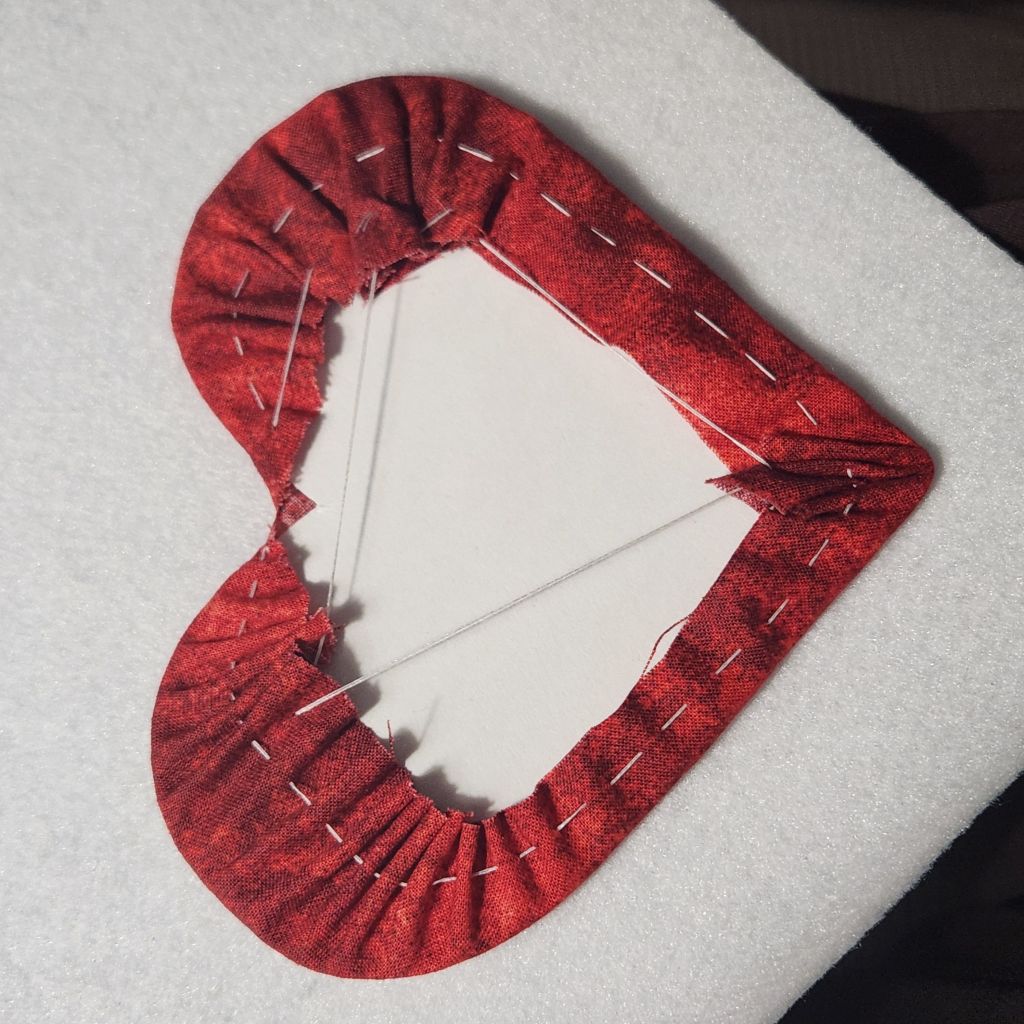
I had this piece of fabric from Linda along with 2 other fabrics that are actually earmarked for another design utilizing fabric applique that I have one my To Do List. It’s perfect for this ornament and I still have plenty. Aleene’s Instant Tacky Dots are fantastic! I placed one in the inside of the fabric to hold it in place on the magazine board, two dots on the felt that is slightly larger than the board and sewed around running stitch to gather the fabric together. That’s made my finishing so much easier! Making the piece of felt slightly larger made stitching the two sides together easier because the magazine board didn’t get in my way as I attached the cording.

Once my husband was available to be my stationary hook, I made cording with 4 lengths of DMC #5 Pearl 356 used in the design. The loop was done first and attached to the ornament side of the stabilizer. That’s another lifesaving tip! It makes starting and ending the exterior cording so much easier. And, the loop doesn’t twist when it hangs. I was lucky that my stash had the matching DMC Floss 356 to attach the cording.
I don’t think anyone would find where I started and ended the outer long cord. That’s usually been a problem but this one worked perfectly. Finishing still takes time but what doesn’t with needlepoint! At least I no longer dread the task. And, I am thrilled to say these Cabochons are some of my best finishes.
In my last post, most people queried said to place the Cabochons on the bottom half. Well, by the time I did the finishing, I had forgotten about that and finished it the way I’d been thinking it should be finished-with them on the top.
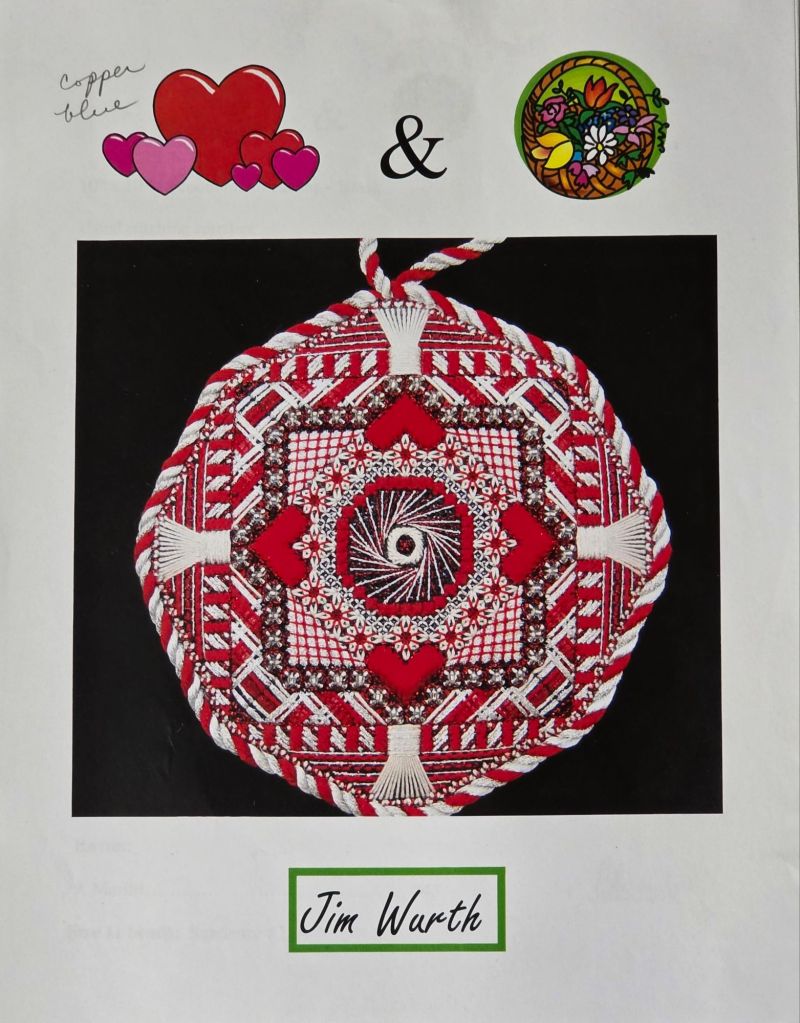
The Silent Auction at ANG Seminar had a lot of items! I got outbid on several counted pieces but did “win” Hearts and Flowers by Jim Wurth. It’s another octagonal-shaped ornament. Whoever donated it included their copper and blue thread choices. I’ll be pulling that colorway to see what that looks like (eventually). I’ve got a lot of stitching to do on my design from my other NAN class and my 3 ANG classes – my main goals now for the rest of 2025. Basically, 4 projects and 4 months!
Charity is the 2nd in the Cabochon Series by Susan Portra. All designs are based off a Rhapsody, a discontinued Rainbow Gallery thread. This one is R18. This card says, “Try running other yarns thru this.” I ran an overdyed thread thru white Flair for a nice effect in Beautiful Ohio, a technique that I learned from teacher, David McCaskill. It helped me win the ANG Princess Grace Award (https://melitastitches4fun.com/category/melitas-adaptations/ohio-star/).
This card of Rhapsody is too dark but a solid color through a lighter one would be nice to try. Learning/Sharing #1.
I did change to the Diagonal Greek stitch from French Knots that were supposed to go above the 5 diamonds. I found the pattern in Painted Canvas Embellishment by Carole Lake and Michael Boren. The French Knots were supposed to be on every Canvas thread with 5 strands of floss. It seemed to heavy. I used 2 strands for Diagonal Greek (3 strands were still too heavy). It really fits the design and reminds me it’s ok to change a stitch to what you prefer. I’ve heard more than one teacher say that once you purchase their piece, you can do what pleases you. Learning/Sharing #2.
I stitched on Charity last month and this month at our ANG MLS Stitch-in. Although I spent over an hour shopping for threads to fill in the kits for the other designs in the series, I did finally sit and stitch. That’s when I learned from Linda M (who learned it from teacher, Toni Gerdes) that using glue stick on the end of Tiara will control that from splitting apart. And, it really does the trick. Linda and Toni to the rescue! But, I will not seek opportunities to use this thread. I don’t see an advantage to it over other threads not requiring special handling. Learning/Sharing #3.

That leaves the bugle beads and Cabochons to do. Here I got the location of the prongs established and enlarged the holes with a large needle to ensure placement looks consistent. Learning/Sharing #4.

We talked bead trays and at least one person didn’t know that the square sticky bead tray with a cover can rest on the canvas while stitching with the cover bent backwards. Another reason this wasn’t a favorite bead holder was because you can’t turn the canvas over without it falling which I agree is a bother. So, I added a magnet inside the box. Problem solved. Lesson/Sharing #5.

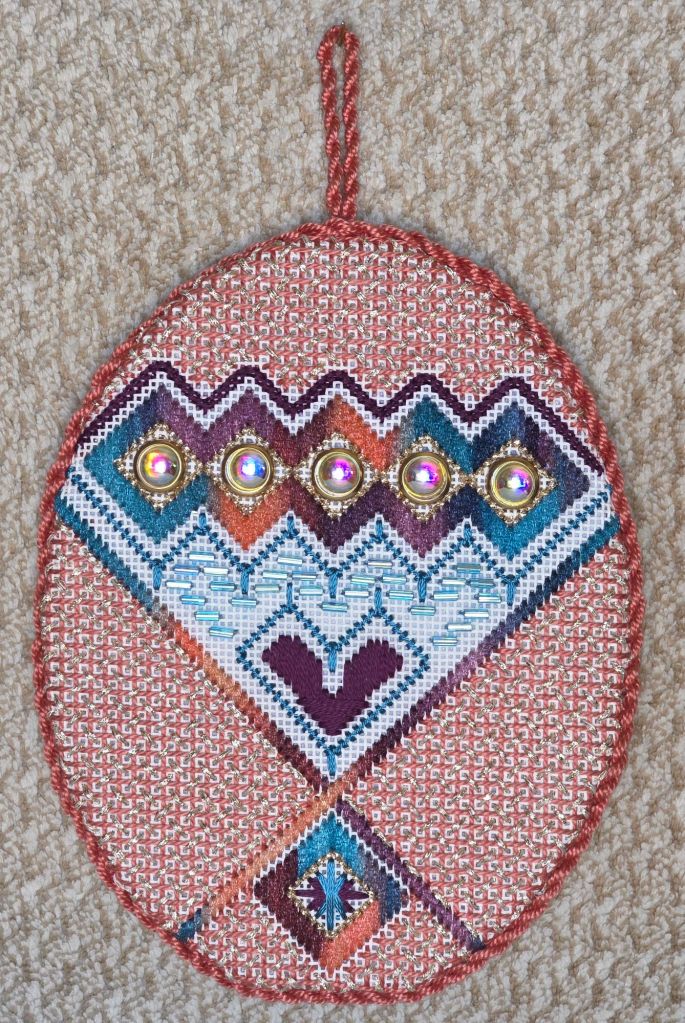
I can’t take time now to do the finishing but I had to finish the bugle beads and attach the cabochons.
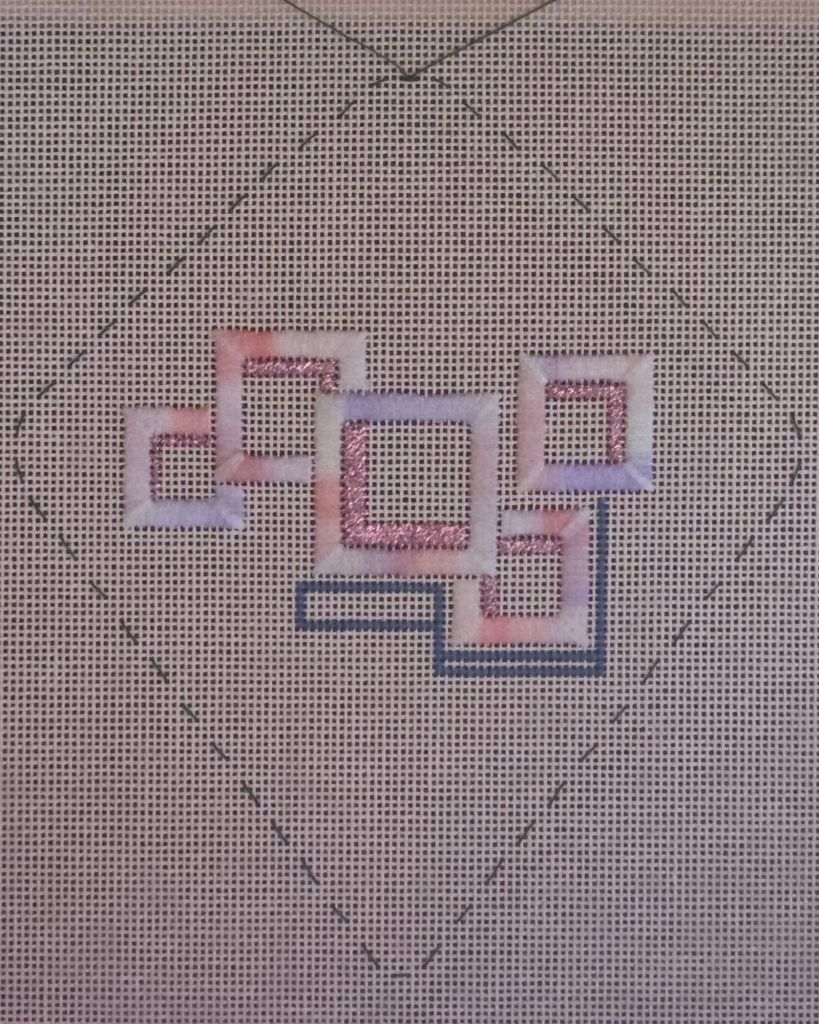
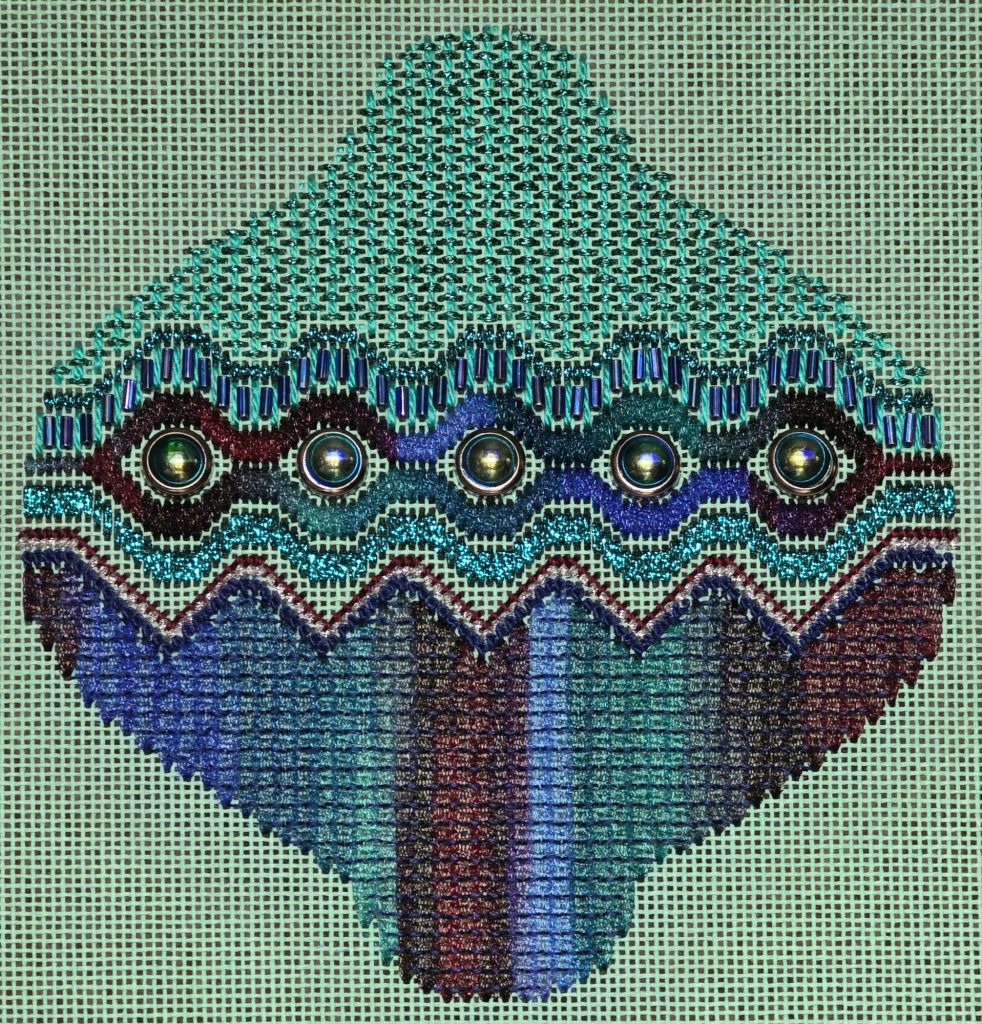
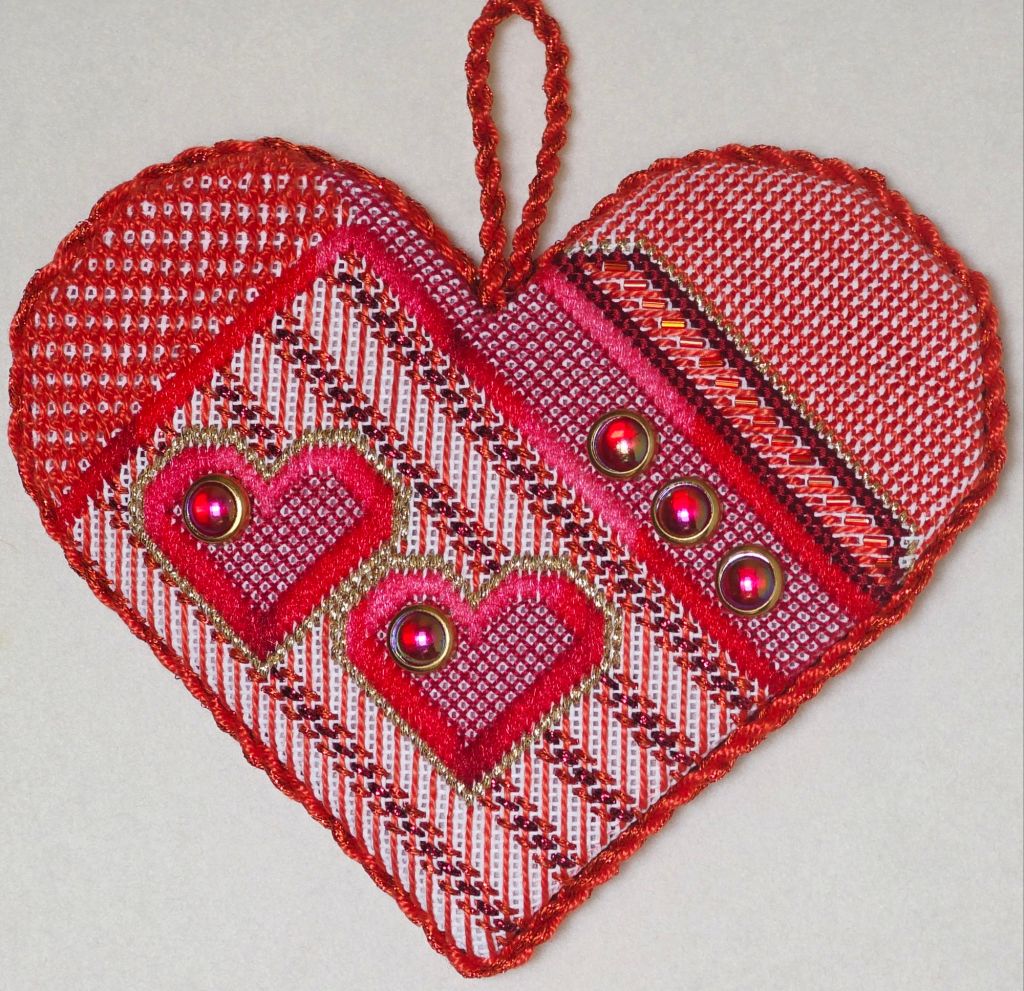
The directions show this finished sideways.

I stitched it thinking I’d finish it this way with the center motif looking like a heart.

Then, I solicited opinions from everyone yesterday and my husband today. I think it was unanimous to go this way.
What do you prefer?
In less than 2 weeks, I will be taking a finishing class with Sue Parsons of Westcoast Finishing at Fireside Stitchery. I just realized that I had finished all my round pieces. So, I went to my very limited (about 12) painted canvases stash. There was ONE round thanks to Linda who gave it to me for my birthday last year. It is a Lani canvas, 3″ diameter, and on 18 count canvas.
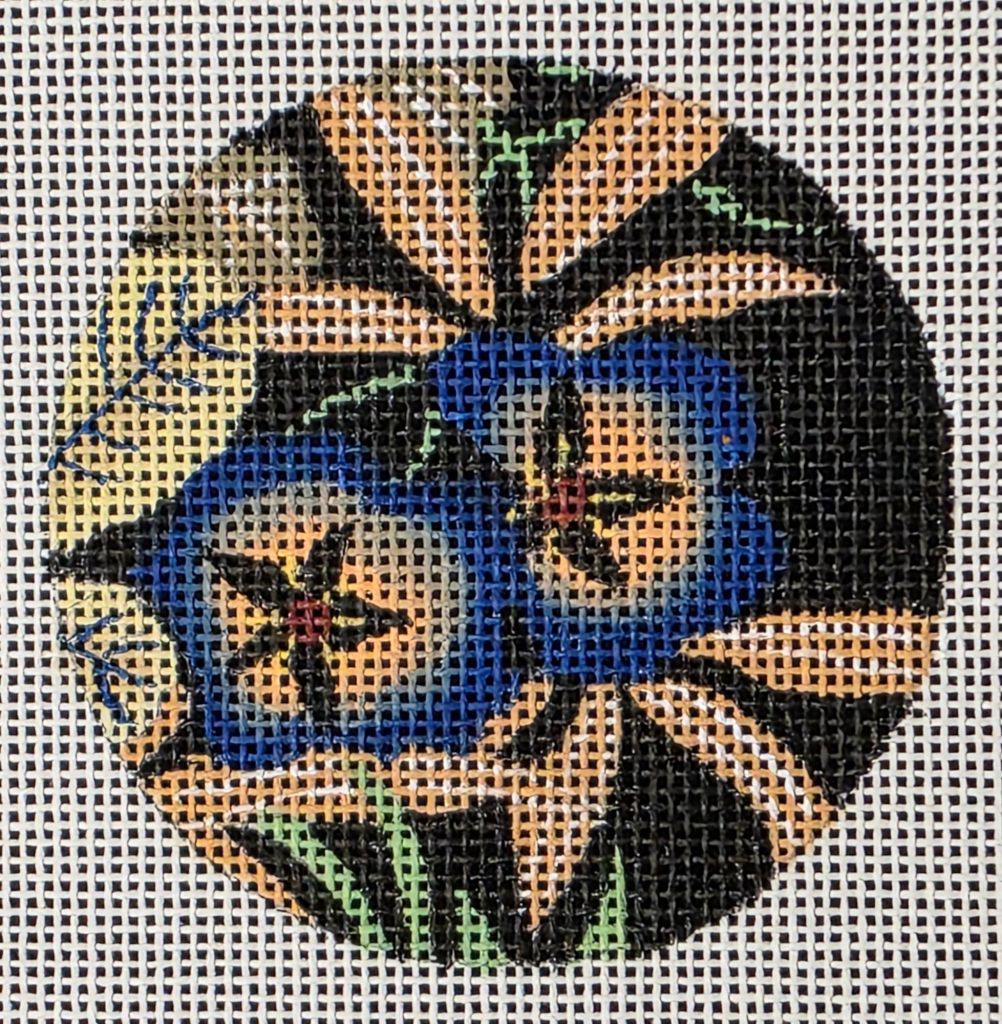
Ellen Johnson of Serendipity has a stitch guide formula that first has you identify all the parts of a painted canvas and that’s where I got stuck!! Besides recognizing these as flowers, I had no idea what type of flowers they represent. Also, the flesh colored things and the brown blobs with white veins confused me.
So, I reached out to the Serendipity community and enjoyed seeing the responses come in. I was reminded that if I don’t like the brown blobs, I could change them. Morning Glories with buds took the lead and one woman suggested I ask Lani and supplied her contact information. Within an hour of emailing Lani, stylized Morning Glories was confirmed.
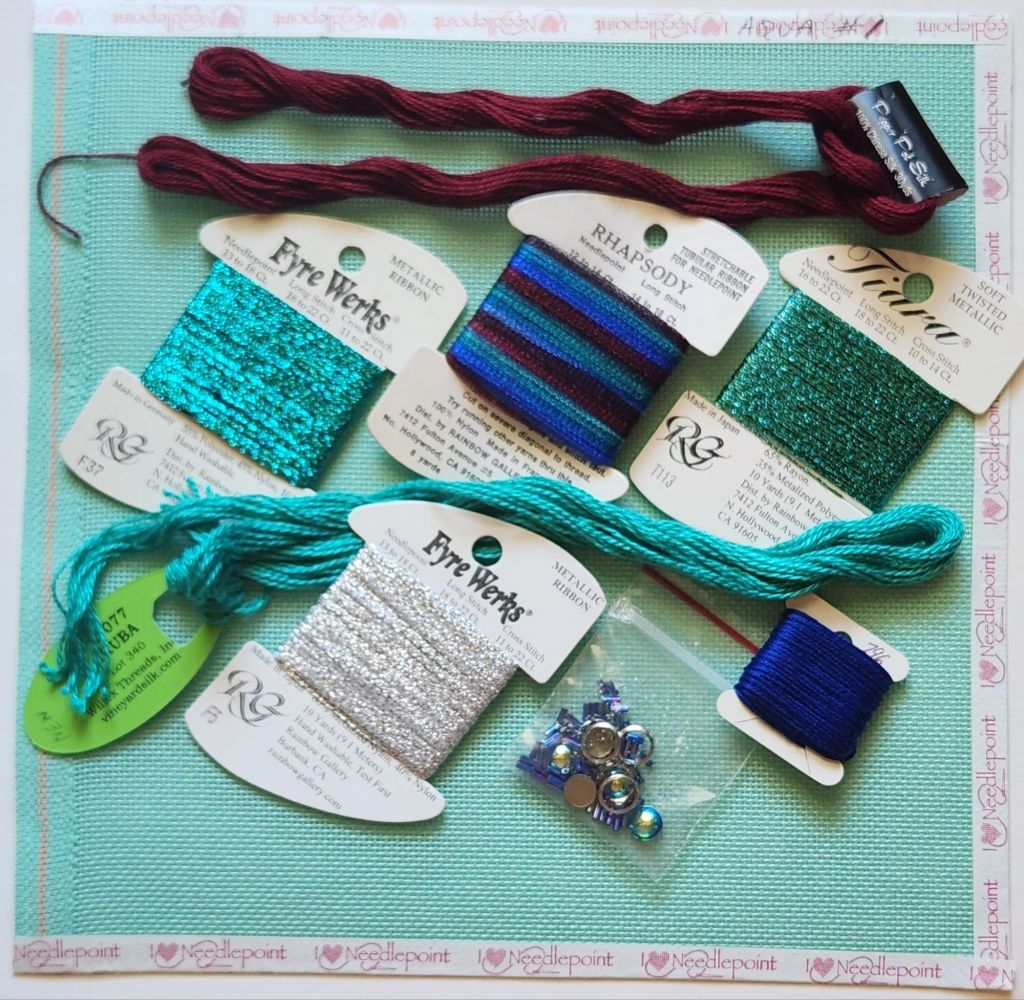
Next, I selected possible threads from my stash.

In case you’re wondering, I laced 2 sides because I didn’t have any 7″ bars.
Now, to select stitches!
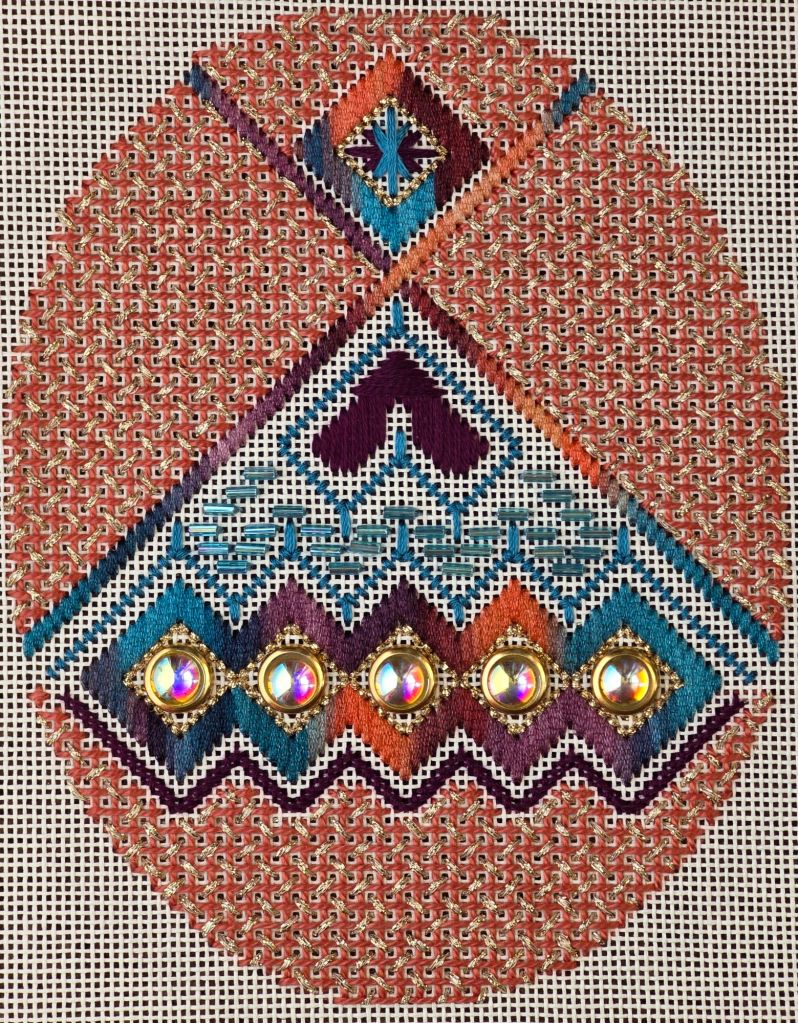
The first design from the Cabochons Series by Susan Portra is Joy (Love is the 5th that I stitched first).
Initially, I didn’t find Rhapsody R13, which is what it called for. The one I did acquire doesn’t have the tag on it but is really pretty. It has dark burgundy rather than purple running through it with the mint green and royal blue that was called for. I lucked out that the recommended Fyre Werks and Tiara go really well with this Rhapsody. Rhapsody is used in each design in the series and is a discontinued Rainbow Gallery thread.
I ended substituting 3 other threads from my stash:
- DMC Floss 796 for the royal blue Anchor Floss 123.
- Pepper Pot Silk Beet 20 for the dark purple Neon Rays N09. I thought Neon Rays was an odd choice for a single row of tent stitches anyway. And, this color is perfect with this Rhapsody.
- Vineyard Silk Classic Aruba C-077 for Anchor Perle 187. The thread gets couched into place by Fyre Werks, and these 2 threads look great together.
This is stitched on a lovely aqua canvas.
Before I started it, and thanks to Jacqui C from New Jersey Needle Artists Chapter, I got Rhapsody R13 and R18 and Fyre Werks F42. I like the one I have better than R13 in this heart, but I like R13 better than R04 in Hope (4th in the series). And, I like R18 better than R24 in Charity (2nd in the series). Now I have 2 extra cards if I find instructions for the missing 11th and 12th designs in the series. I’m still keeping my fingers crossed! If anybody knows what they are named or look like, please let me know.
Here Joy is stitched. It’s almost 5.5″ wide x 6″ tall.
I couldn’t use the Vineyard Silk C-077 for the cording because the skein had been cut. The length was just short of what I needed and it didn’t twist nicely. So, my stash came through! I had a partial skein of Twinkle 300 Malachite that works great. And, I had Splendor S880 to attach the cording to the canvas. Looks great.

I bought Loops and Threads, a 100% cotton fabric from Michael’s. It worked great on my ornament back. It comes in a wide variety of plain and patterns. FYI: Michael’s also had bolts of fabric. But, not being a fabric person, I didn’t really look them over. These small packs are $1.99 and big enough to get a few ornaments out of it.

I did the running stitch about 1/2″ inside the edge, gathered the fabric, laced it up to stay in place. I cut it large enough to create some padding but it wasn’t enough so I used wool felt for more padding. I sewed the cord on (no glue). I attached the short loop to to Craftex. This time, I tucked the long piece of cording up inside next to the loop and ran the cord across the back of the loop, attached the cording all around the ornament, and passed in front of the loop and tucked it in next to the other side of the loop. I said I never do the same thing twice!

I finished the ornament Love, 5th in the series from the Cabochons Series by Susan Portra.
This time, I did it differently. I used a running stitch and cinched it around the magazine board. With the rest of the thread used as lacing to keep it snug.

I added some Craftex as padding. Then, I glued it to the back of the front in a few spots with “Super NEW GLUE” by Euro Tool, Inc. that I picked up at Blue Santa Bead. It’s a small bottle and easy to control. It dries fast and firm.
I had enough of the DMC #5 Pearl 350 and Tiara T115 to use 4 strands of each to make the cording. I stitched the cording to the Craftex before gluing the cording into place while pinching the 2 sides together. I went back and stitched the cording in a few places to be safe.
Goal #21 stitched and finished! I decided to finish these when I take them off the stretcher bars so they don’t get jostled or the stitching skews once removed. Plus, finishing all ornaments together sounds like a worse option.
I picked up a bronze Metallic Soft Twist Trim Cord, size 20 from Access Commodities for Silken Sonata by Jim Wurth. It’s a perfect color for the ornament.
After lacing the ornament to the Craftex, I made a loop from the cord and secured it to the liner. I lined up the cord along the edge and left 1.5″ to tuck in after the back was attached.

I didn’t want cord to show on the edge because the edge is stitched Smyrnas. I just wanted the split between the back and front to be covered. I’m definitely not a fan of ribbons and bows on ornaments. Size 20 cord is thin, but it’s exactly what I wanted.
I had a lovely piece of green fabric leftover from my Quilt Magic Poinsettia that I placed on magazine board. It’s thin and light. Love it!

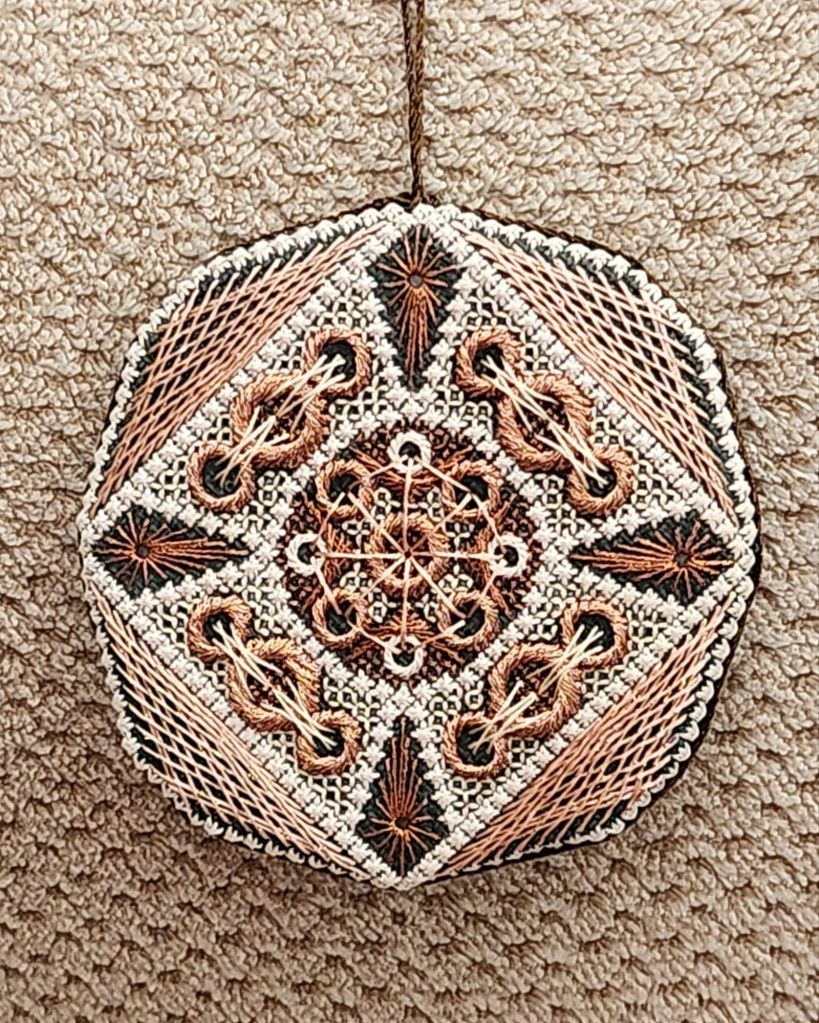
Goal #1 for 2025 was to finish Silken Sonata by Jim Wurth into an ornament. I’m thrilled that’s done and that it turned out so well! The finished size is 3.75″.
Other goals are progressing. But I still don’t have the ability to heed my final goal of not getting more goals! More on that another time.
