My ANG Main Line Stitchers Chapter is stitching the Folding Ort Box (OB) and the Ort Box with a Twist (OBT) both designed by Marilyn Owen. I stitched the Folding Ort Box years ago on 14 count interlock canvas and was never happy with it because it is too big and floppy. I was happy with the blackwork but that small area is about as much blackwork as I need in my life. The path needed to take is tricky – reminds me of organic chemistry in college – you have to see where you’re going too many steps in advance. I didn’t need organic chemistry in the pharmacy and I don’t need blackwork in my life!
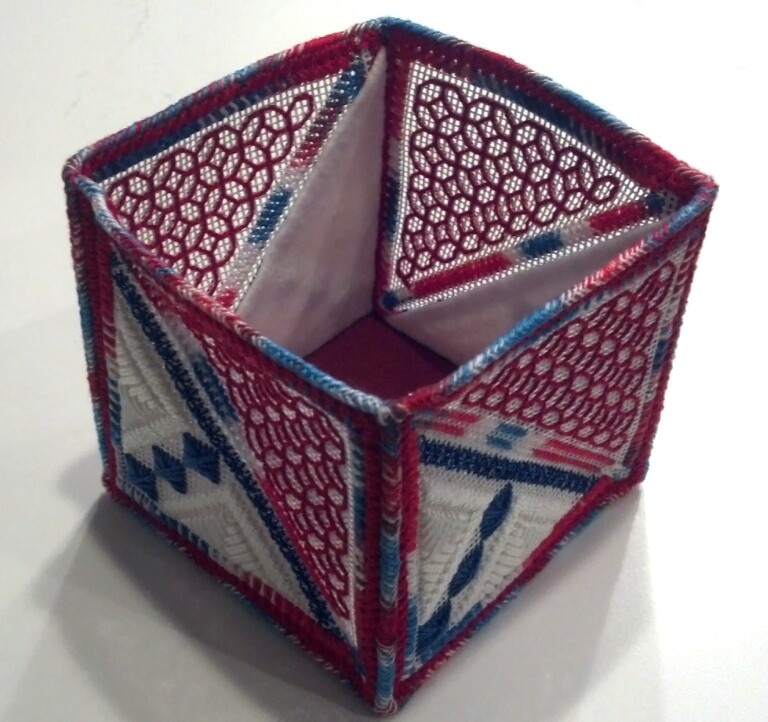
I am stitching both now on 18 count interlock. Because I save everything, I have my extra detailed blackwork map that I created years ago. Maybe it’ll be easier this time.
There are 7 members stitching the OB and 6 stitching the OBT. I am leading both pieces. Last month we covered colorways and basting. It took me 3 tries to get the basting on the OBT and Patrick found a mistake on my OB basting but that was easily fixed.
The error in this photo is pretty evident (stop laughing MO!). You’d have to count to find the one error (56 basted but should have been 66) and the other is marking the inner area.
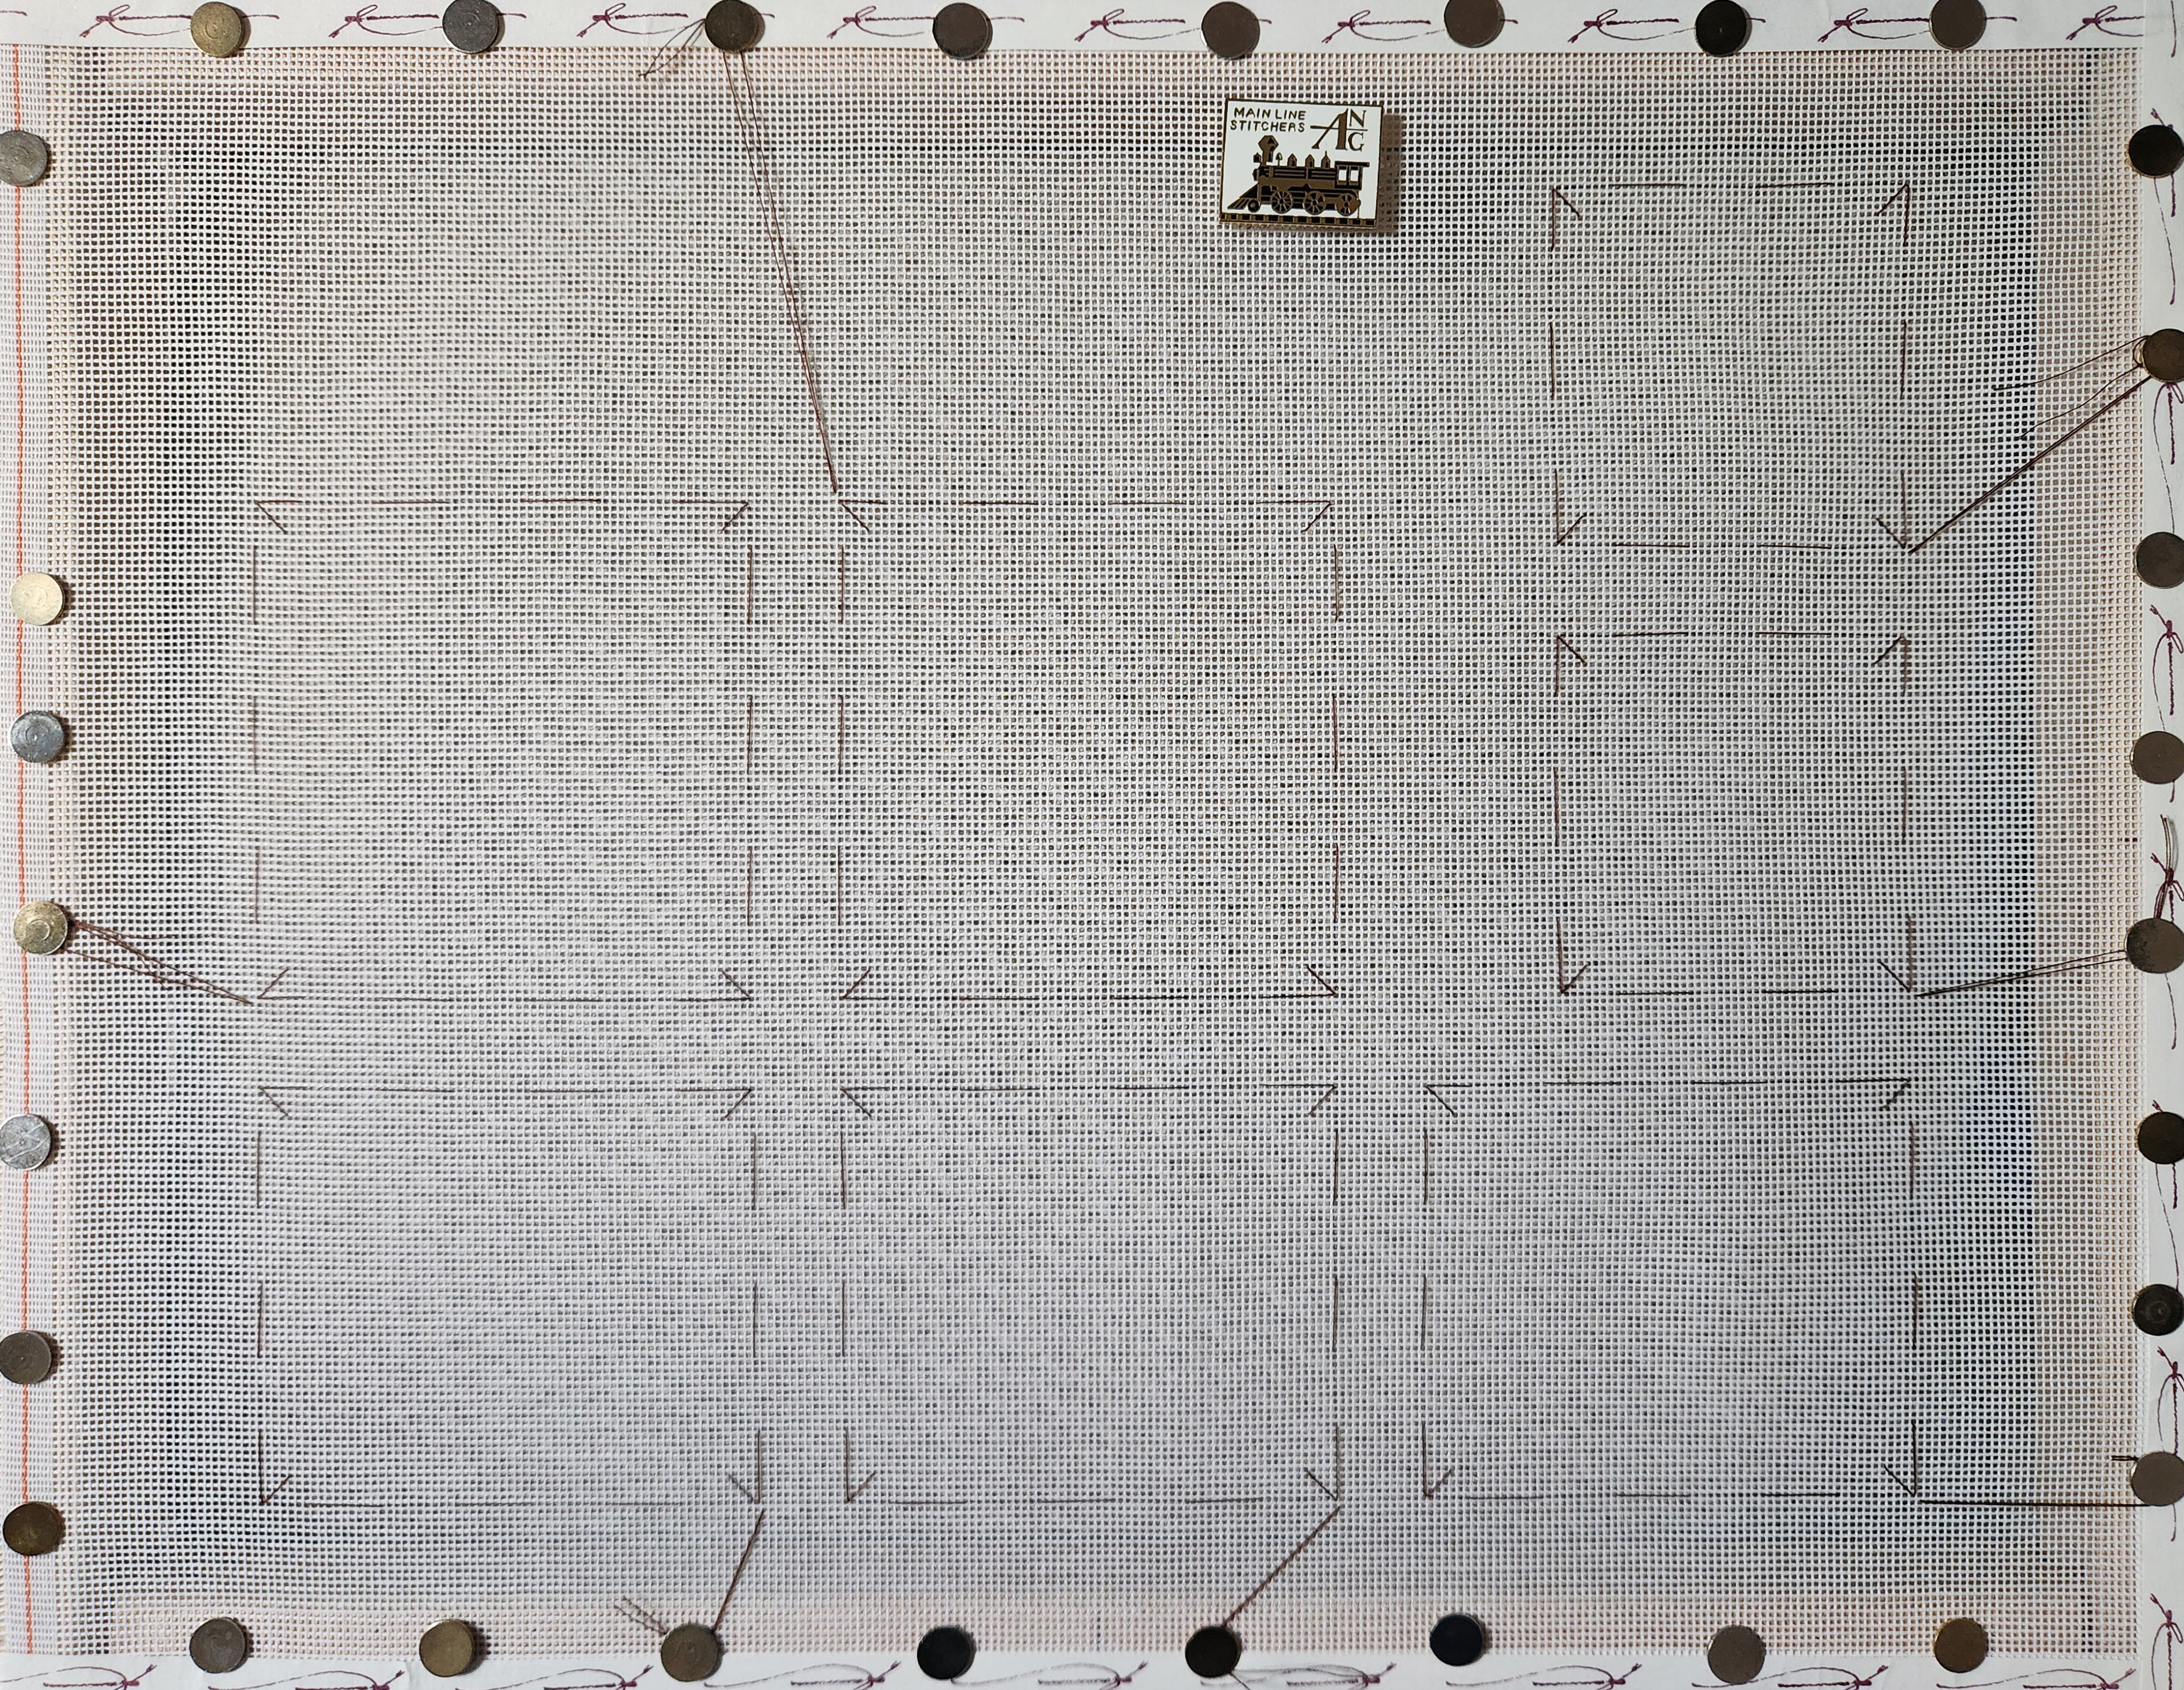
Finally, I got it correct. Had I drawn lines instead of basting, the canvas would have been a mess!
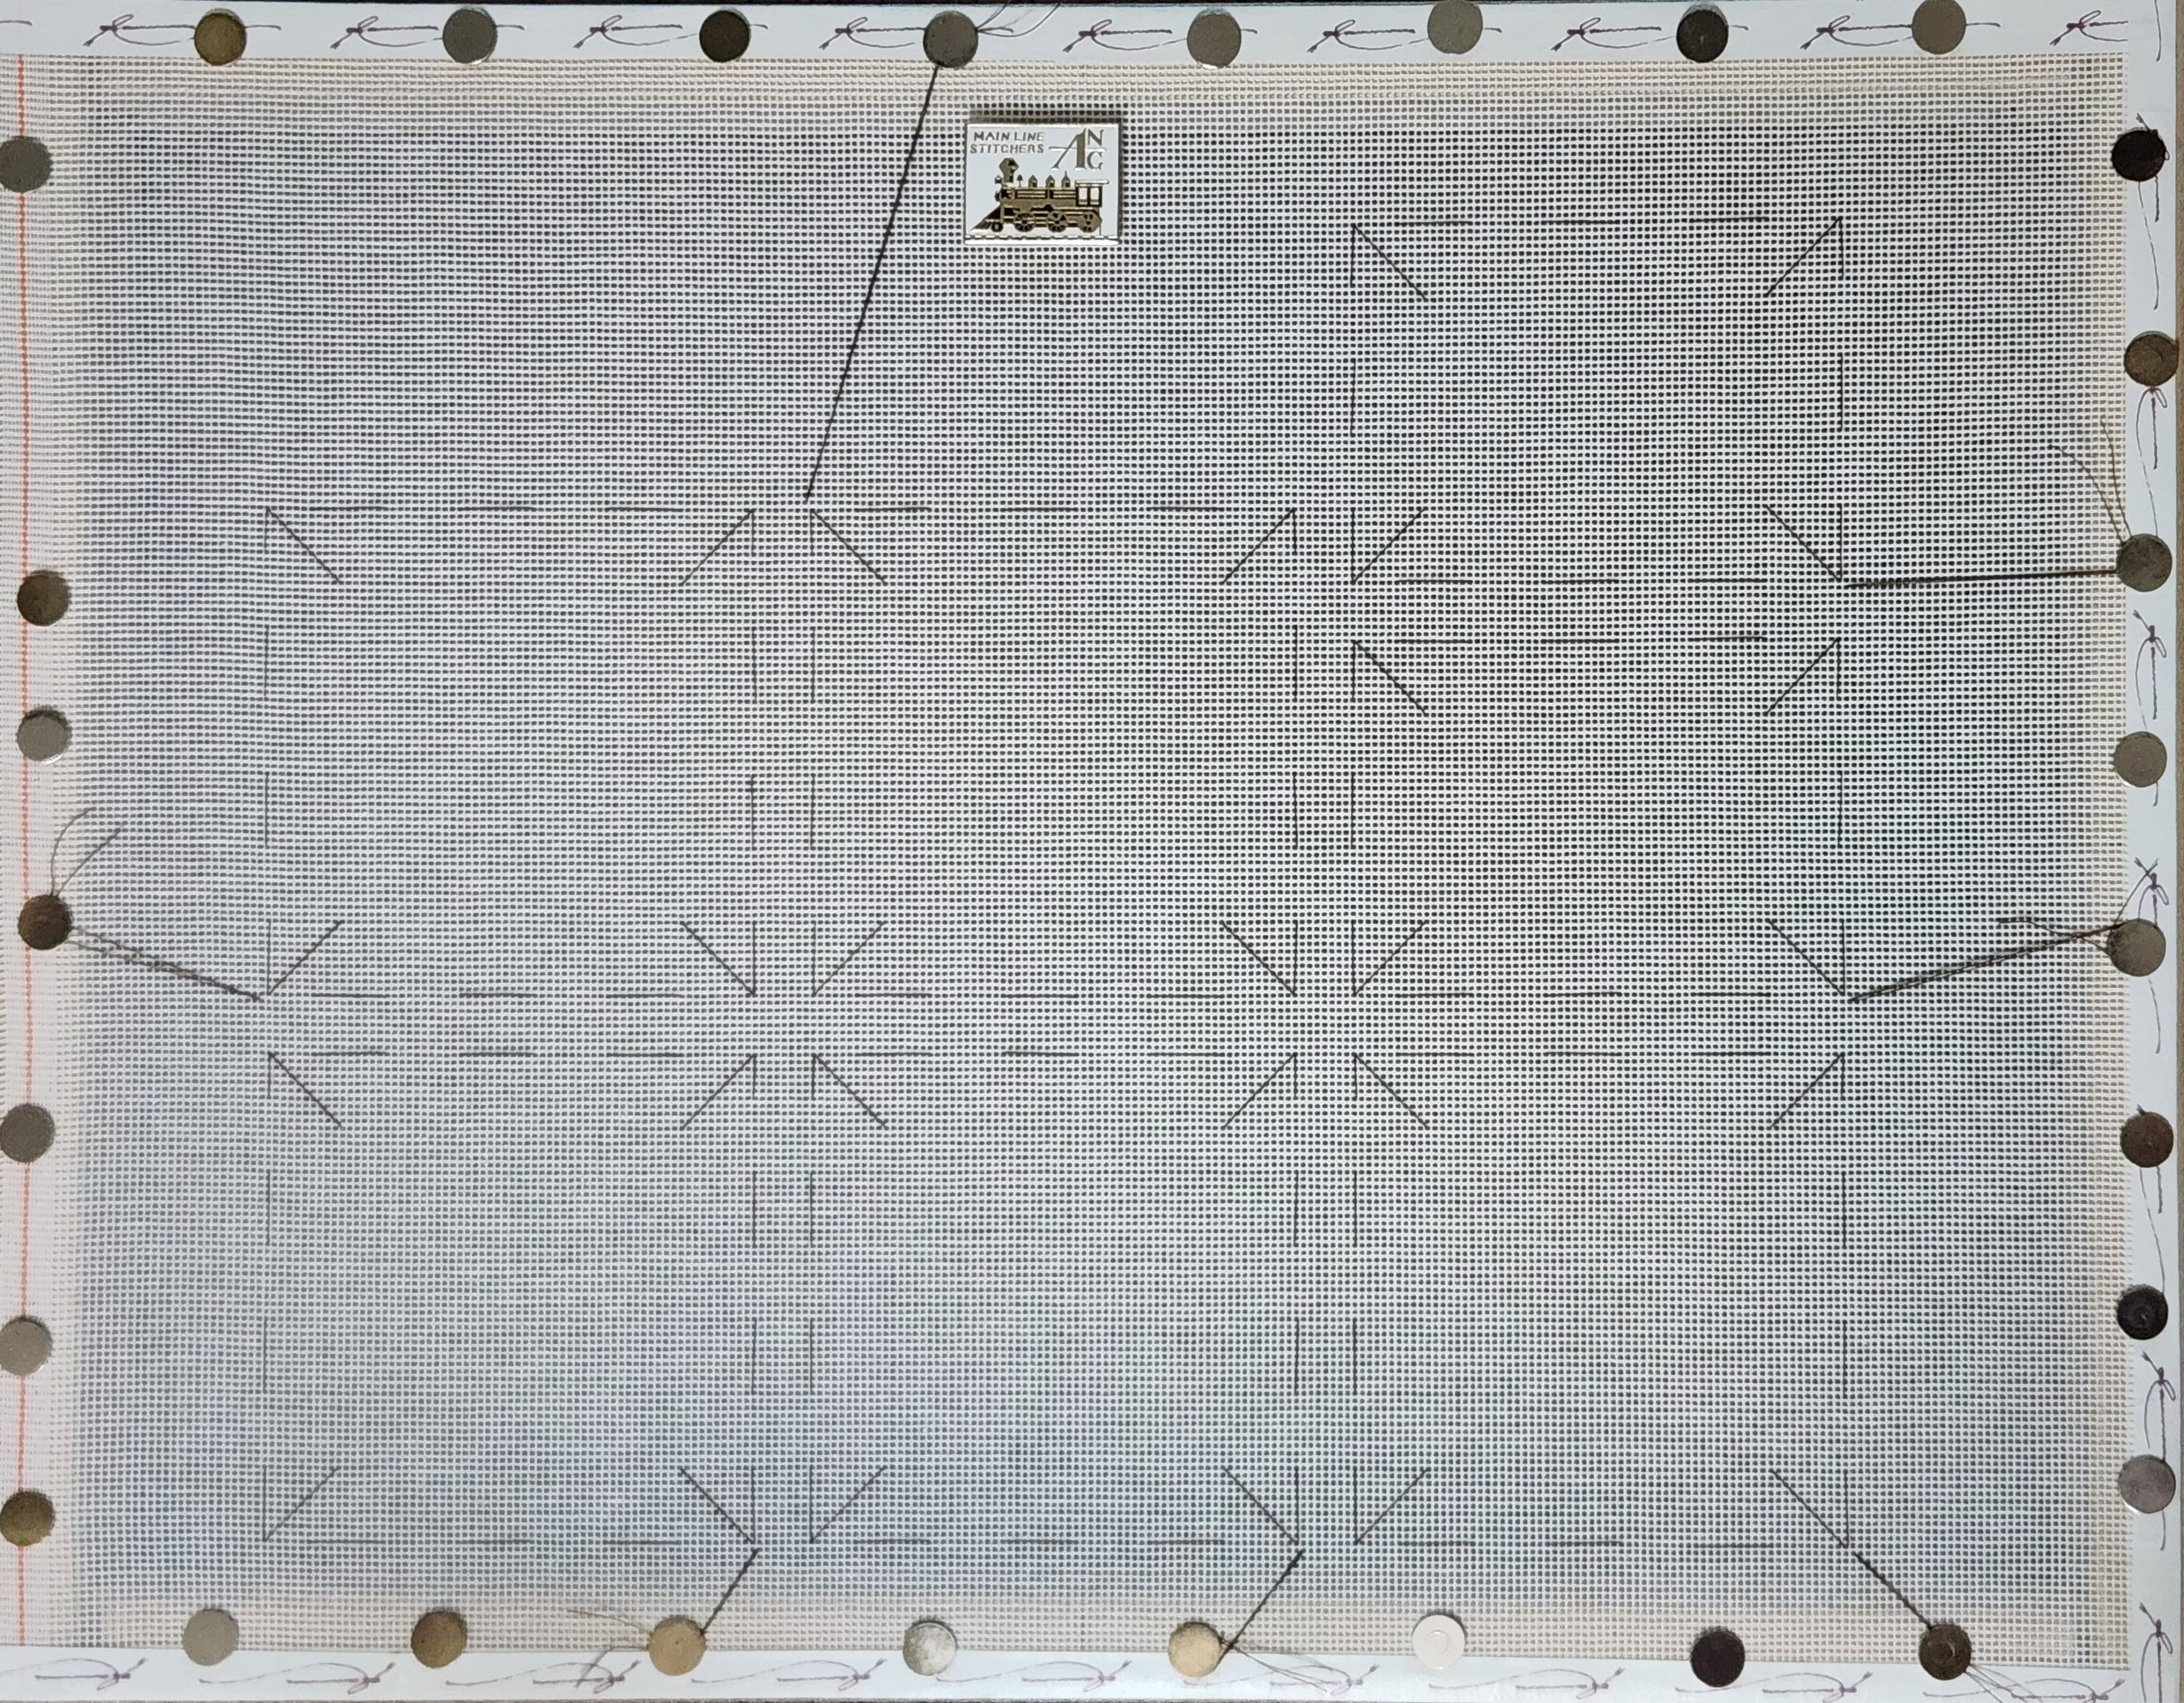
For both, I provided details as seen in this photo.
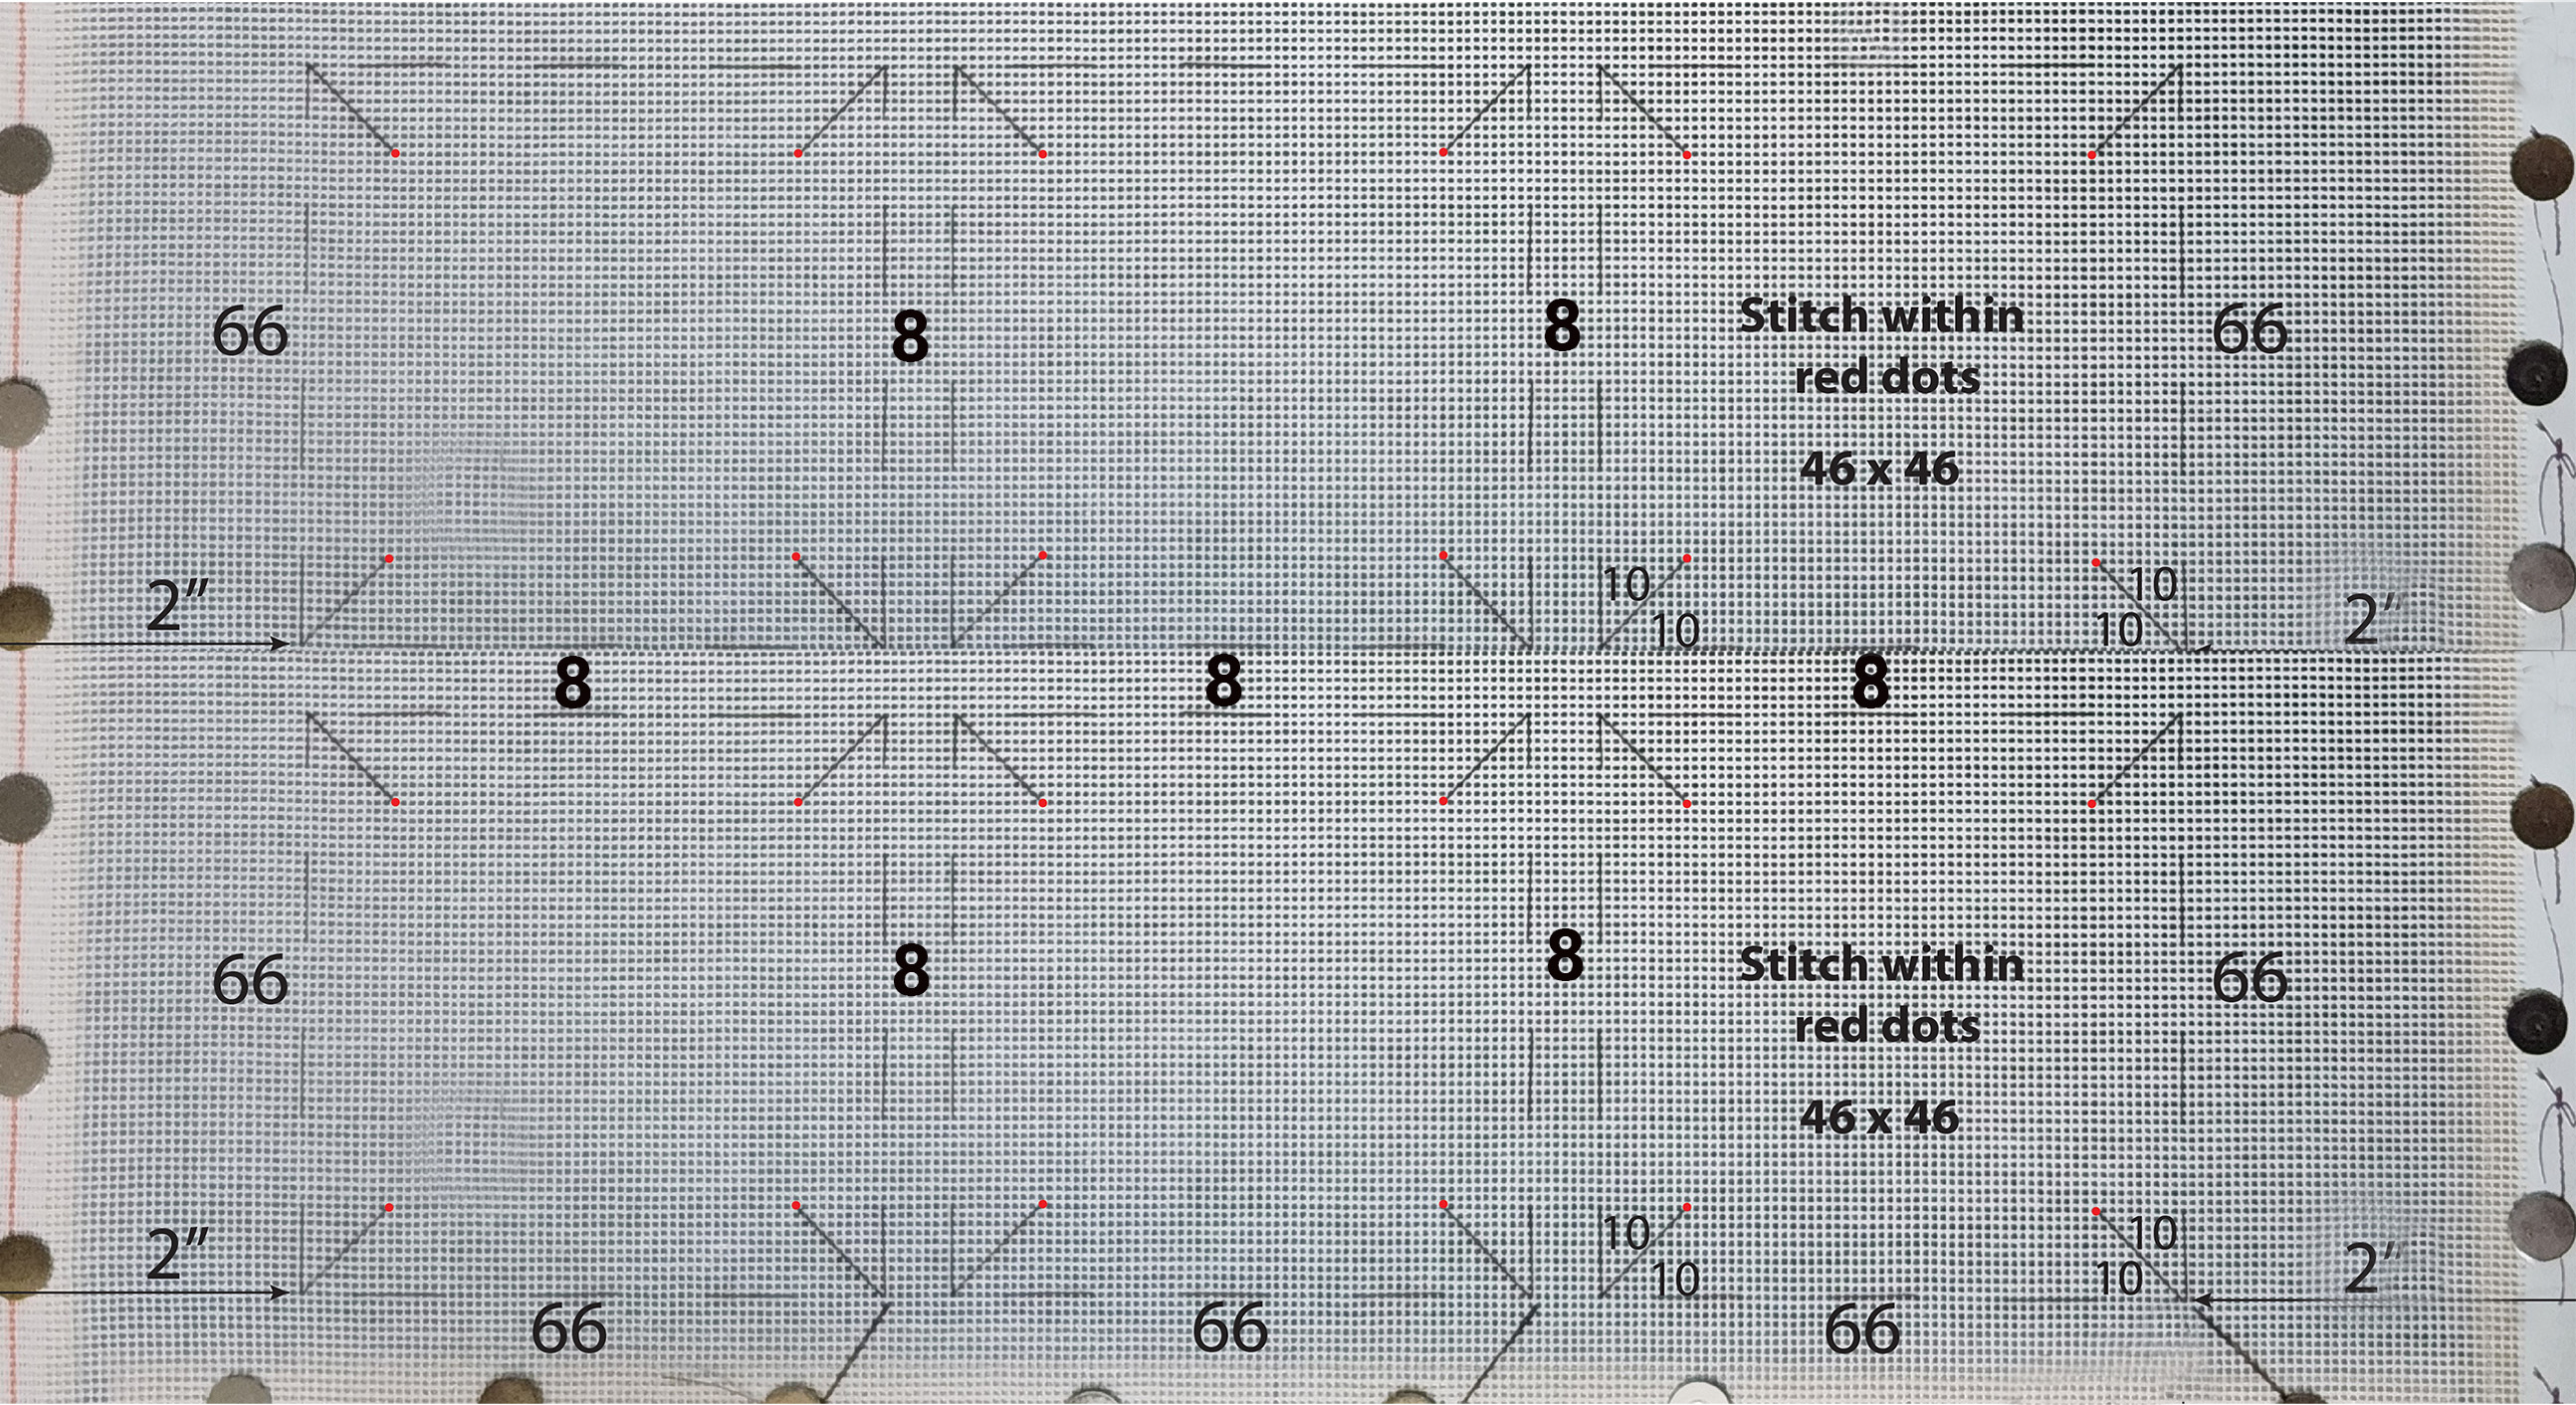
For this month, I am going to focus on the diagonal divider of the OB and the pockets of the OBT. The idea is to get less thread on the back in the dividing line. Marilyn figured out how to do that. I pretty much had to flip the canvas to catch the thread (left side of photo below) or else I wound up with a hot mess (right side of photo below).

The pockets will prevent the same type of folding on the OBT and what dividing lines there are, they are different (easier).

So, I need to finish these areas and get to next month’s areas.
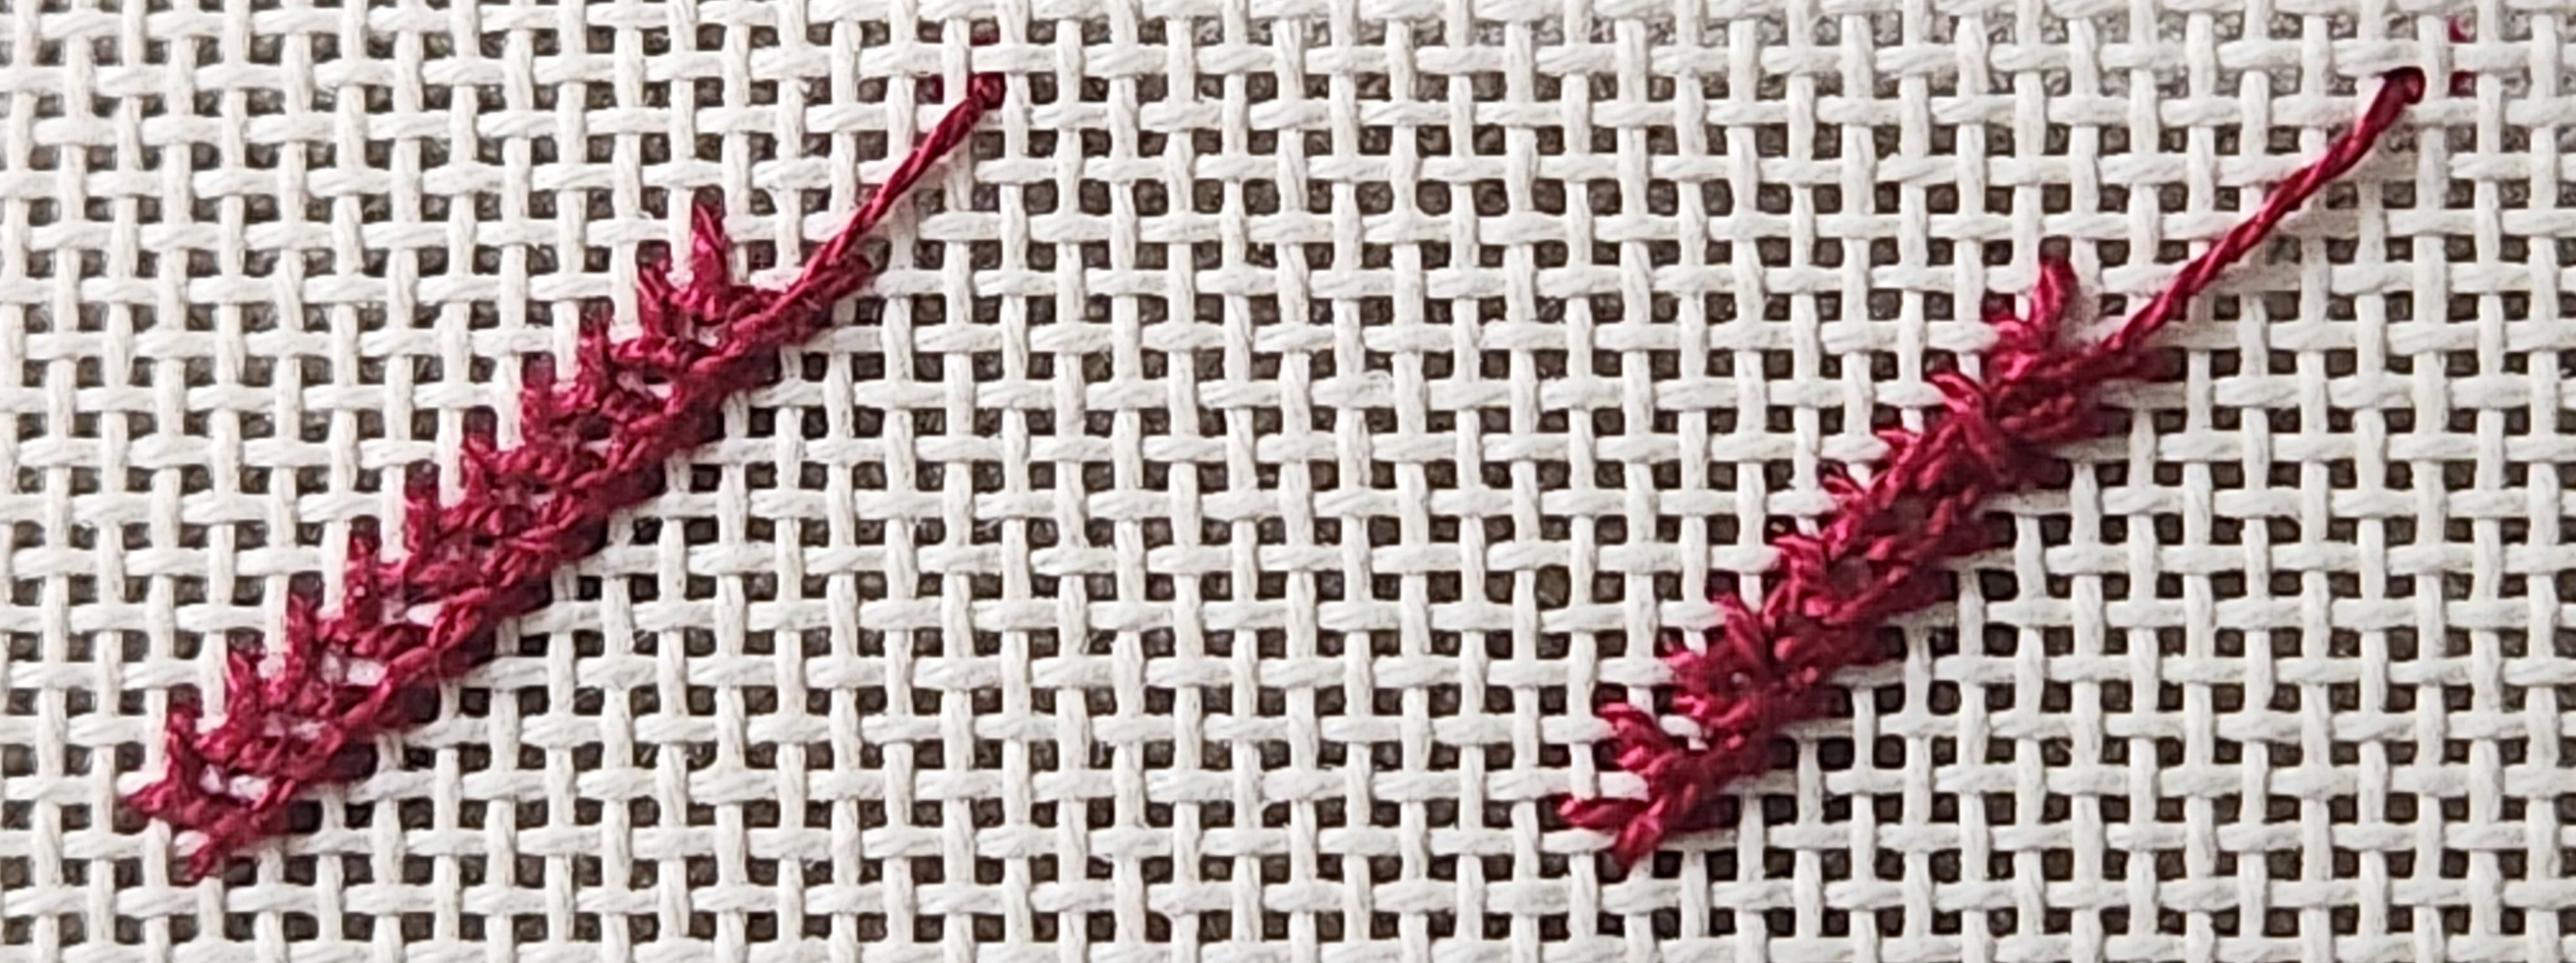
In 2021, my ANG Main Line Stitchers chapter stitched Rainbow Ribbons by Kam Wenzloff published in Nov/Dec 2019 issue of Needlepoint Now. We had a variety of colorways using beautiful threads from Color Complements. It was a fun project.

I am cleaning out folders in my computer and realized that I hadn’t posted my pillow. I had it finished at Needle Me in Havertown. It’s a purple overdyed Pearl with a gray Ultrasuede border.

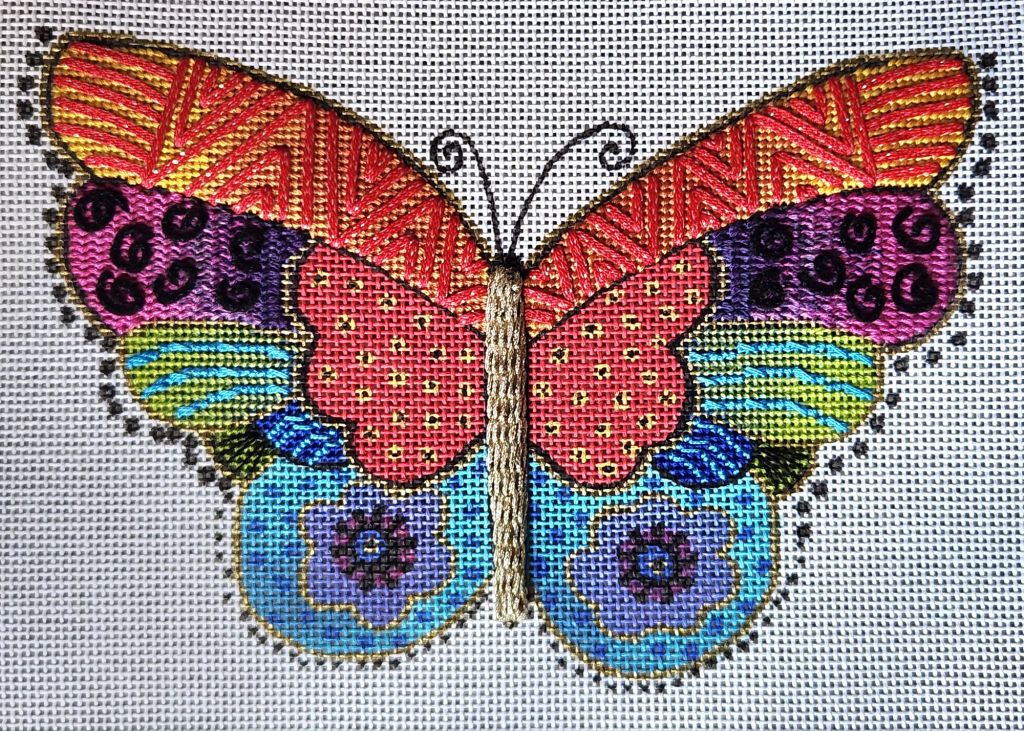
Filed under: ANG Main Line Stitchers Chapter, Laurel Burch Rainbow Butterfly by Danji
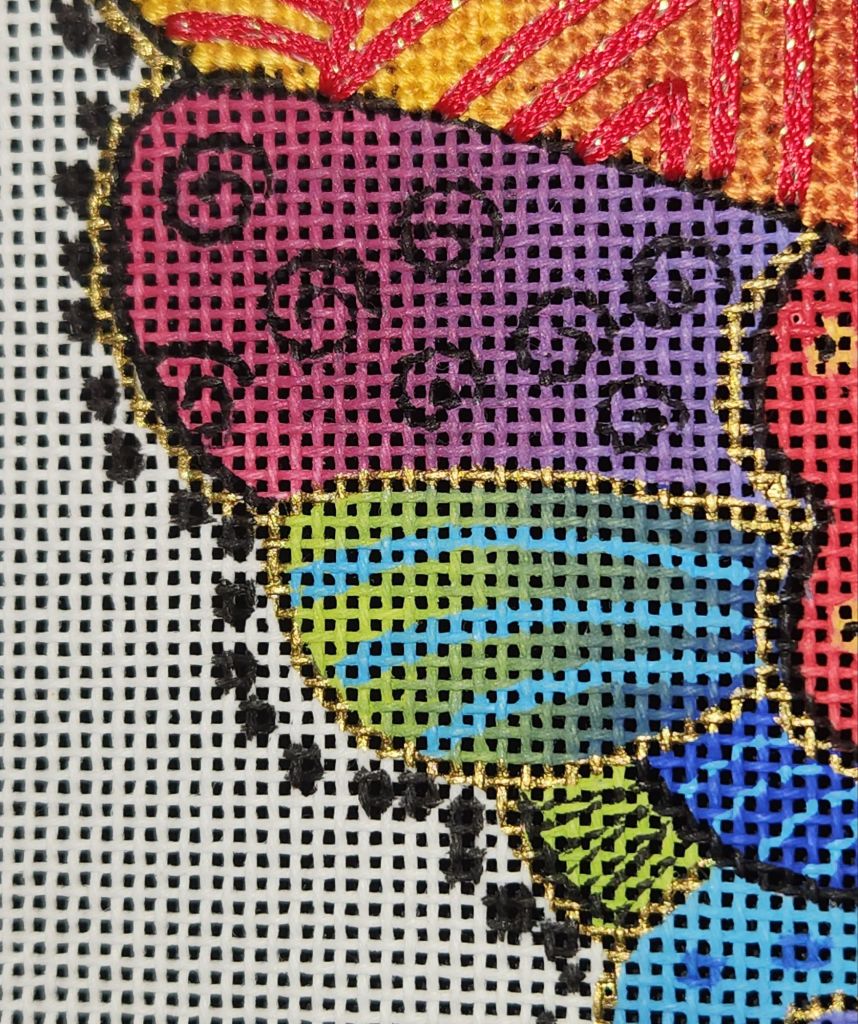
This post is out of order. I wanted to share how I stitched the lower areas. I started with a 3×3 Jessica and placed a couple of stitches in the center to help raise the center sequin and black bead.
There are black daisy stitches couching a short length of the Waterlilies African Sunset (all 12 strands).
I ignored the dark blue painted area and stitched the light blue Planet Earth Silk 8 ply Azure 1233 (3 strands) in a Hesitation Stitch (Painted Canvas Embellishment An Idea Book by Carole Lake and Michael Boren, pg 65) leaving room for a dark blue bead (Seed Beads, 14/0). The beads are from Beads by Blanche in Bergenfield, NJ, which closed after 27 years in May 2024. A few years ago, several of us from the ANG Keystone Garden chapter benefited from Trish Vine’s downsizing. I have a 30 gm tube of these tiny blue beads. I needed to diagram the Hesitation Stitch before stitching it to see if it would work.

A buttonhole stitch with 2 strands of Silk Lame Braid Petite (SP174) surrounds the center sequin and bead.

Filed under: ANG Main Line Stitchers Chapter, Laurel Burch Rainbow Butterfly by Danji
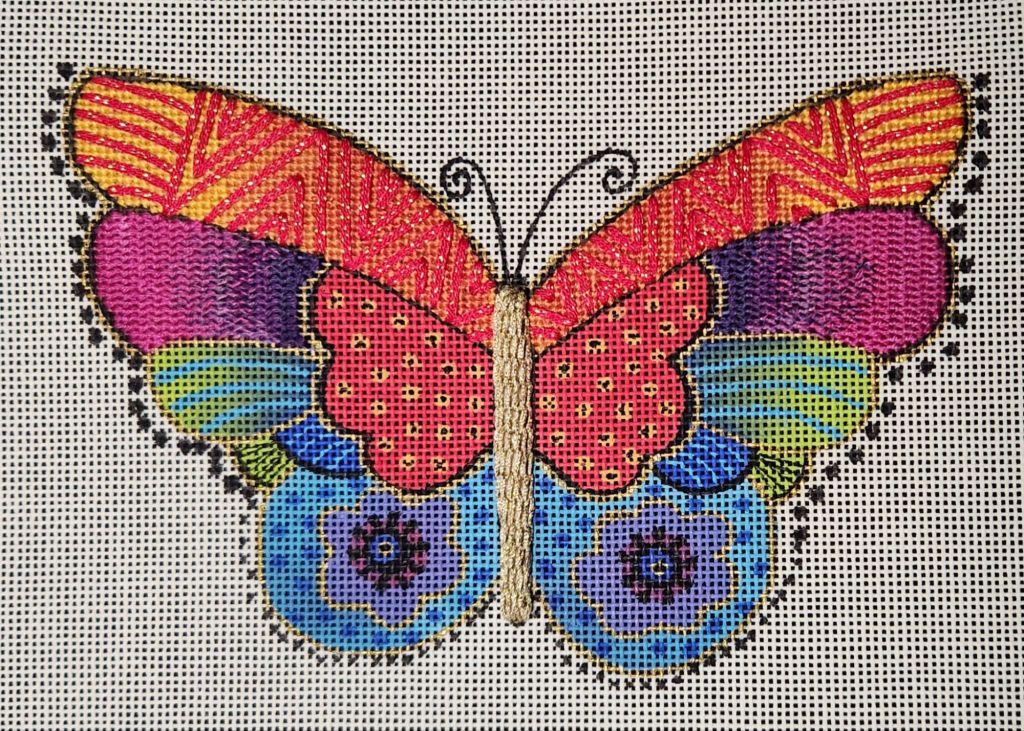
The final steps (antennae, outlines, and beads) of my Rainbow Butterfly by Danji.
I wanted the antennae to be more substantial than the black outlines, so I used Kreinik Facets and Petite Facets, respectively. These were all couched into place with Kreinik #4 Braid in matching 005 Black. I had to make the starting and ending holes pretty large to sink the Facets. Wrapping the thread with tape and making a pointed end allowed me something to grab and nudge through the enlarged hole, which I then tacked into place.
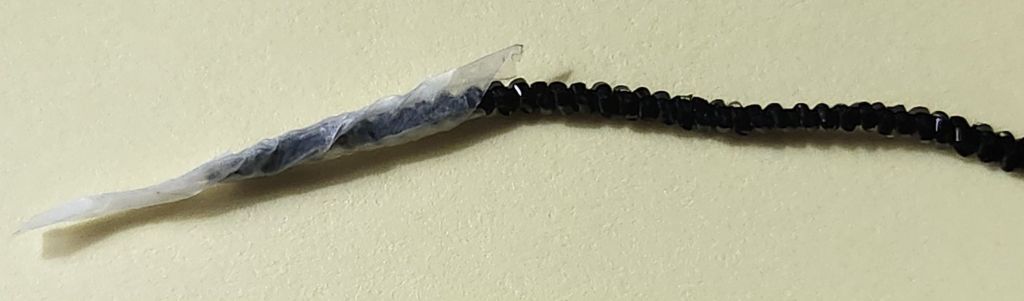
I planned my path with the Petite Facets to minimize the number of starting and ending holes. One long piece goes from the top left side of the yellow-orange wing down and around the body and across to the top right side. Two shorter pieces follow along the top of the fuchia-purple area. I made the “tape needle” again to start each side but used a large eye needle to finish.
The Kreinik Petite Facets 002 Gold looked more gold than the Kreinik #16 Braid 002 Gold that I had used for the body, and it was too thick, especially considering how much was getting outlined. I couldn’t have gone to #12 Braid because I needed the thicker #16 Braid to cover the width of the outline. I couched with #4 Braid 002 again. I also used #4 Braid to outline the edge of the small green and blue areas.

I often refer to Marilyn Owen’s article in the ANG Needle Pointers May/June 2021 issue for beading techniques. I used 2 different methods to attach the same size bead with 2 strands of black DMC floss. Both methods orient the beads vertically, but one is over 2 canvas threads and the other over 1 canvas thread. This allowed the same size beads to appear larger on the top half compared to the bottom, which is how the canvas was painted. I used Mill Hill Antique Glass Beads 11/0 (03040).

I’ll wait to share the background until it’s fully finished.
Filed under: ANG Main Line Stitchers Chapter, Laurel Burch Rainbow Butterfly by Danji
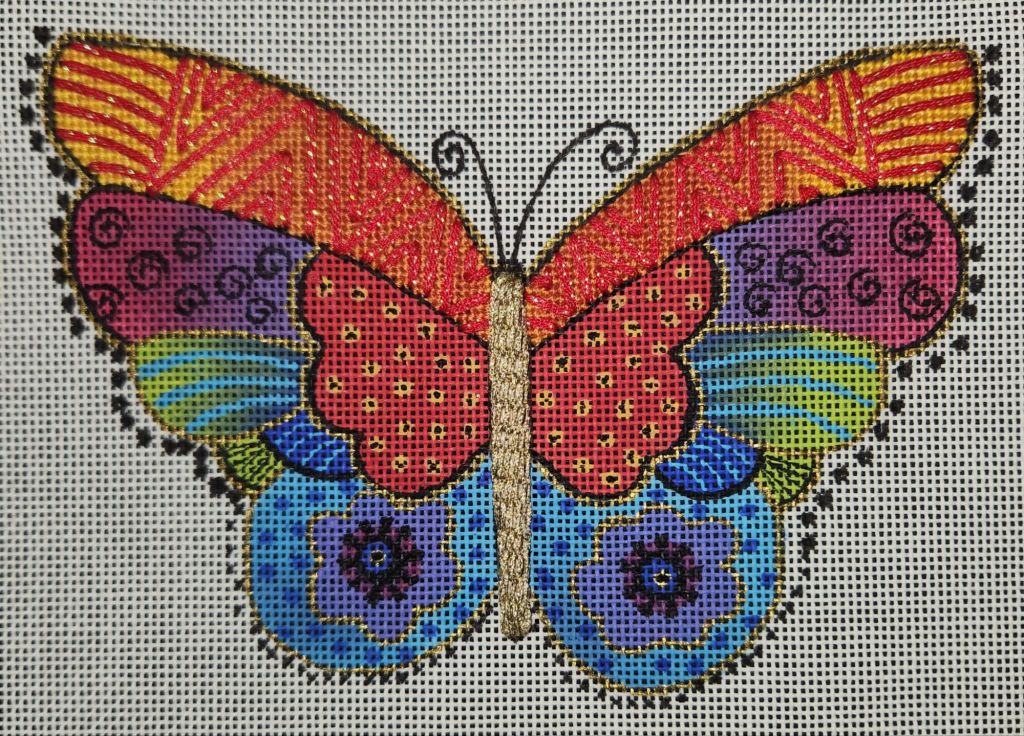
It probably would have made sense to work the center red areas before the outer center areas on my Rainbow Butterfly (by Danji, Laurel Burch Artwork). But, it worked out ok.
I stitched over the red painted area with 3 strands of Planet Earth Silk, Fury 1005 using a Climbing Stitch located in Painted Canvas Embellishment: An Idea Book by Carole Lake and Michael Boren (in the section appropriated labeled Wings 2).
I ignored the painted placement of the Sundance Sequins (SQ216) and placed a few extra in the area which are held in place by Miyuki Delica Beads 11/0 (DB-0310, Matte Black). Again, the sides are uneven (the left side is larger than the right side).

Filed under: ANG Main Line Stitchers Chapter, Laurel Burch Rainbow Butterfly by Danji
These 3 areas in the outer center area will be the only areas where I will let your eyes “rest” (a little) anywhere on my Rainbow Butterfly (by Danji, Laurel Burch Artwork). Did you know? Butterflies “roost” at night and avoid the rain. The raindrops can be devastating for a butterfly, and so they seek shelter.
The combination blue and green area used a couple of stitch ideas from Painted Canvas Embellishment: An Idea Book by Carole Lake and Michael Boren. The blue crosses are my variation to fit my space of theirs from page 68 on Wings 2 (Planet Earth Silk Ply, Azure 1233). The green is alternating rows of tent stitch going in different directions to change the reflection of light (Planet Earth Silk Ply, Fiddlehead 1056 – love that thread name). The canvas does have shading with it getting dark towards the center. So, I used one strand of the Planet Earth Silk in order to see some of the coloration of the canvas show through.
I did basketweave in the other areas with 2 strands Planet Earth Silk. I didn’t want it heavier than the blue and green area. One strand of the black worked fine for the lines.
Working this out on my computer before stitching it was very helpful. The sides are not perfectly identical. Did you know? Asymmetrically-winged butterflies are called chimera [ky-mee-ra] butterflies.

Filed under: ANG Main Line Stitchers Chapter, Laurel Burch Rainbow Butterfly by Danji
Next up was the fuchsia-purple area. This is another area with a lovely color shift from fuchsia to purple. I found Waterlilies 084 African Sunset in my stash and got Waterlilies 286 Aubergine (means eggplant).
Top left.
Top right.

I started with 4 strands of fuchia, then thread blended with purple in 3 steps (3+1, 2+2, 1+3), and finished with 4 strands of purple using a knitting stitch variation from Desert Island Stitches, Volume 1, pg 46.
Again, relying on my photos, I couched black Velour Yarn Fine Mesh by Fleur de Paris with one strand of DMC Floss 310 black. Instead of the 8 swirls, I only made 7 of them because of the odd number rule. Although, looking at the painted canvas, I see them grouped as 5 and 3, which looks fine too.

I couldn’t pass up the butterfly magnet by Accoutrements. They are pretty and strong.
Kristen used a fuchsia-purple overdyed and let the colors fall as they came. It was an excellent and less complicated option.
Filed under: ANG Main Line Stitchers Chapter, Laurel Burch Rainbow Butterfly by Danji
Back in August, I posted about the padded raised stem stitch that I used for the body (https://melitastitches4fun.com/2024/08/16/raised-stem-stitch-for-rainbiw-butterfly/).
I’ve been working on it while Kristen from my ANG Main Line Stitchers chapter has been working on hers. We each selected our own stitches and threads without sharing ideas. We both got done for this month’s chapter meeting. So, we revealed the progress photos and discussed choices as the program topic. I’ll post by area over the next few days.
For the top part of the wing on my Rainbow Butterfly by Danji, I found Waterlilies 280 Casabasa that has a color change from yellow to orange that very closely matches the colors on the canvas.
Left wing.
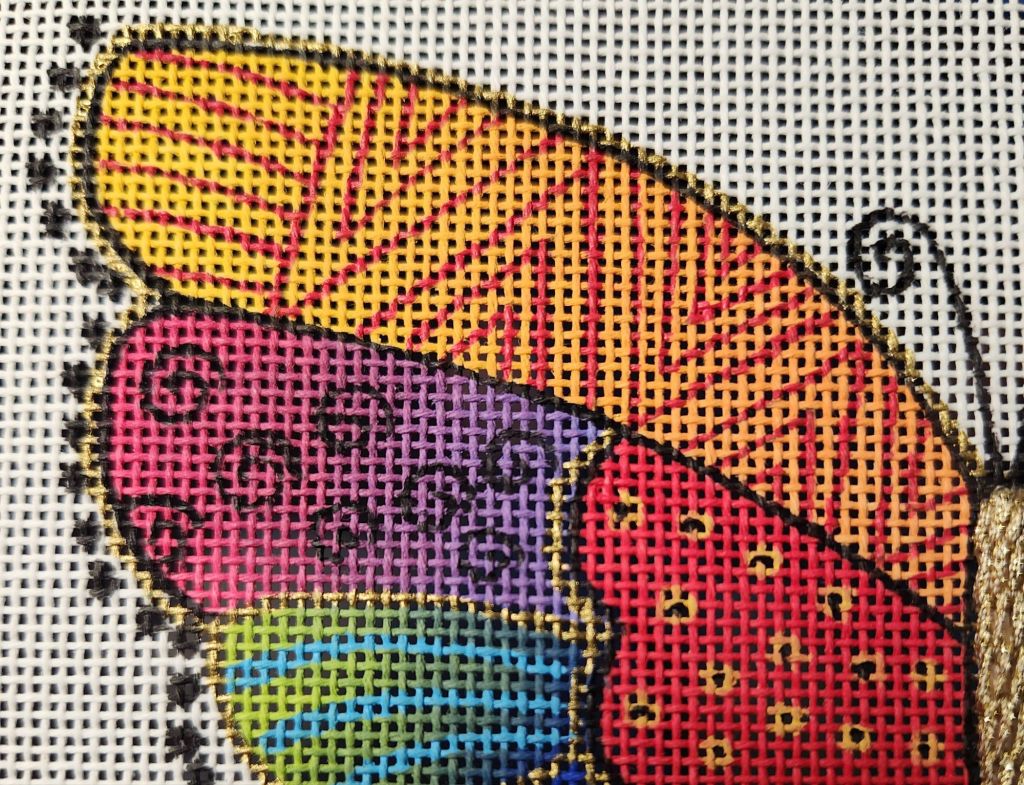
Right wing.

I decided to basketweave, which meant I would cover the red lines. I’ve never tried covering an area so completely to stitch on top of before, so I took close-up photos.
There was about 24″ left of the Waterlilies left because I had to cut lengths that moved from yellow to orange.
Kristen did basketweave, too, with an overdyed that created repeats of the yellow to orange color changes for a more banded effect. I’m sure hers was easier and looked great, especially since the red lines covered some of the area.

By carefully following the photos, I was able to place lines of Sparkle Rays (SR29) where they were meant to go. It’s probably not going to be something I do too often, but these were straight lines in a small enough area to give it a try. I just love that sparkle in Sparkle Rays. Kristen used a Kreinik Braid very effectively.
I decided to match the right side to that of the left partly because Sparkle Rays is a flat ribbon slightly wider than the painted lines. The inter wrapping triangle on the right wing had bothered me anyway. So, I followed the left side mostly. It’s not painted as widely as the left side, and so it does differ slightly.
Filed under: ANG Main Line Stitchers Chapter, Fibonacci Swirls by Olivia Hartshorn
Linda went through all 4 of the Area Ds on Fibonacci Swirls by Olivia Hartshorn (from Needle Pointers Mar/Apr 2022) at our October meeting for our ANG Main Line Stitchers chapter.
The stitch that caused the most issues was for Area D1 (upper right). The Alternating Scotch stitches are over 3, and compensation is required. Not all of the compensation will be hidden by the swirls. The bigger issue for me is that the stitch is all overdyed thread, while the other 3 areas combine it with a solid color. So, I grabbed the nearest stitch book (Painted Canvas Embellishment: An Idea Book by Carole Lake and Michael Boren) and opened it from the back end (which is how my husband reads magazines for some strange reason). On page 96, I found the Hesitation Stitch. It’s a solid and overdyed combination stitch in diagonal, offset Scotch stitches over 3. Perfect!
The Hesitation Stitch really works best by keeping 2 needles working. Two needles were needed for Area D2’s Milanese stitch (bottom right). I don’t know which I find more challenging – working with 2 needles or compensation of these stitches. Olivia didn’t compensate correctly but Linda pointed out the areas we needed to be careful. I am 99.9% sure I got it right. And, if I messed up, I hope it’s on an edge getting covered by the swirls which will be next month’s lesson.
Here’s the colorway on Congress Cloth. This uses the same overdyed thread but cut and stitched to create color movements.

And, on canvas. I worked on this a couple of days before our October Stitch-in Saturday, at our Stitch-in, and a few days afterward during the World Series Games 1-5. Only the upper left area worked up easily and quickly. Bottom left were small stitches that were easy but not quick. I let the color flow as it wanted only in the top right area.
I’m all ready for the final installment, the swirls, at our meeting tomorrow night.
Filed under: ANG Main Line Stitchers Chapter, Fibonacci Swirls by Olivia Hartshorn
Linda is leading our ANG Main Line Stitchers chapter on Fibonacci Swirls by Olivia Hartshorn (from Needle Pointers Mar/Apr 2022).
I have finished the C Areas on canvas (top) and Congress Cloth (bottom). I am controlling the flow of the overdyed threads trying to get a flow of color that will accompany the swirls that are stitched last. We’ll see what happens.

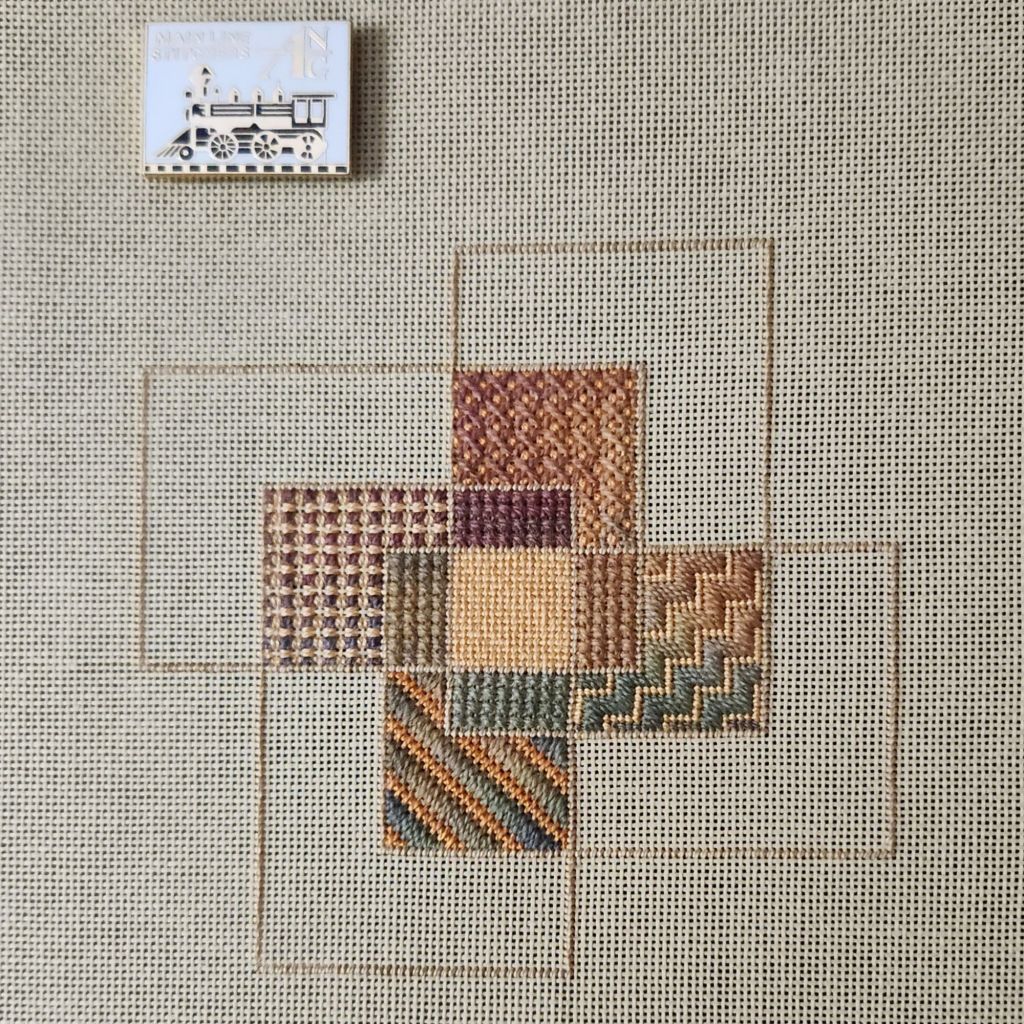
I am ready for our next meeting this coming Monday.
