I got Bill’s key chain finished just in time for us to take a tour of the ballpark yesterday! Turned out nice – I lined it & instead of gluing as suggested, I did a blanket stitch to connect the backing to make it more durable.
As we watched the introduction video shown to tour groups, we saw Bill hanging the sign that I made in 2004 that read, “From The Vet to The Vault”. Veteran’s Stadium was the Vet where they had played for many years & 2004 was the inaugural season for the new Citizen’s Bank Park. We had hoped that the new nickname would become “The Vault” & we could say we started it. One of our announcers, Larry Anderson, said on air that he liked the name but it never caught on. It was quite fun seeing Bill & our sign yesterday in the Phillies video!
With the key chain done, now I’m moving to the Ort Box, the spring project at our ANG chapter – until the hundred bears arrive so we can stuff them for seminar.


I’m ready to stitch the background. After working on bigger more complicated pieces, it is nice to work on quick smaller ones. I like the portability of the small ones too. I stitched at lunch hour & on the EL on my way home.

I thought I’d have time to finish a couple of things (read below the picture) before I worked on the key chain because I don’t have to leave Center City for my job until the end of the month. But, my husband brought a Ford Focus home on Friday for him to drive around the neighborhood. So, I decided I better get stitching & fast!
Except for the background tan, I had all the right colors in my stash!! So, I was able to get a lot done today – all except hillies, white outline, and background is done.

I finished getting the canvas ready for our chapter’s ort box project – nothing to show yet. And, the other things I’ve been stitching I can’t blog about yet either. They are the pilot class and some thank you gifts I’m making for folks who volunteer this year at the Hospitality Desk which I’ll be organizing as we get closer. I’m going to do a daily drawing for just folks who work the desk & they’ll get an opportunity to get a hand-stitched piece to commemorate the Seminar. For every hour you work, you’ll get 1 entry – so, the more you volunteer, the more chances you’ll get. I’ve made 4 gifts so far. I decided to take the time to thank you since you are taking time to work the desk. I’m really looking forward to Seminar!!
In the meantime, I’ve got a lot of handkerchiefs of my grandmother’s to photograph so I can show them to everyone. I ran out of time this weekend!
Looks like we’ll need a second car in 2012 & so, this will be for Bill’s key chain. Merry Christmas Bill!
A quick stop at Rittenhouse Needlepoint before Christmas uncovered this gem. It is by Voila, measures 8.25″ x 1.75″, and come with what you need to finish it!

Filed under: Christmas Ornaments
These did work up quickly! I changed the colors slightly (yellow to a more gold around the now 3 shades of red which get darker from top to bottom). A little felt on the back & DMC tied for hanging & done!!


Filed under: Christmas Ornaments
This was a great find on eBay before Christmas! Why better than the first 2 ornaments? These are actually part of the set I already have! Apparently, there were 12 in the set. I am confused about the date being 2000 – I thought I had mine since the 90s. But, maybe they added some each year.


You may recall from last year’s blog the angel & the bell: https://melitastitches4fun.wordpress.com/2010/12/20/on-the-5th-day-of-christmas-6-gold-christmas-ornaments/
From what a quick look on google, I think Creative Vision Design is still in business but gone in a different direction now (http://www.stitchaphoto.com/index.htm).
It’ll make a nice project to add to my gold metal ornament collection!!

Filed under: Christmas Ornaments
This was a good find on eBay before Christmas! I ordered them & then, by the time I opened them, it was a wonderful Christmas gift because I’d forgotten the designs that I’d found. It’ll make a nice addition to my gold metal ornament collection!!
From what a quick look on google, I do not think Needleform is still in business but you can find some stuff here & there still for sale.


Directions look easy:


You may recall that a previous blog was about the process of pilot stitching for ANG (https://melitastitches4fun.wordpress.com/2011/10/08/pilot-stitcher/). Well, I finished that blog by saying, “My hats off to the folks who match people & courses – it must be quite a challenge!!” Little did I know that person was Christine, or know that she’d ask me to take on her role of Correspondence Course Chairman (CCC) one year later while at seminar in Philly, or that the role involved matching select courses with pilot stitchers. And, I must say that being CCC is a bit more involved than I’d expected. But, I decided to take it on because I’d gotten so much out of the 3 correspondence courses that I’d taken shortly after joining ANG (https://melitastitches4fun.wordpress.com/2010/01/27/my-first-ang-correspondence-course-first-steps-with-nanette-costa/ and https://melitastitches4fun.wordpress.com/2010/01/30/understanding-design-by-mary-shipp/ and https://melitastitches4fun.wordpress.com/2010/02/02/understanding-color-by-mary-shipp/). This year’s Seminar was certainly a whirlwind of activity!
So, I am certainly glad that I have had the experience to pilot a course now that I will be more involved with the process. Christine has been great showing me the ropes and walking me through each facet of the position. It’s going well so far. And, come November 1, it’s going to get more busy as many of you enroll in one of the 10 new courses being brought to you by ANG. Basically, I act as liaison between the Rees Group, the teachers, and the students for the Correspondence Courses.
That leads me to the main subject of this blog, Patchwork Quilt by Pat Donaldson. Now that Patchwork Quilt has “gone public” and I have permission from Pat, I can blog about Patchwork Quilt. Had I thought she would be at seminar, I would have shown it to her in person. Oh well. I did meet Pat at Teacher Expo night and told her that I’d enjoyed doing the piece. She also has my permission to share my picture with anyone if they want to see a different color combination.
What a wonderful opportunity to use my stash! At first, I was worried about picking threads too thick or thin and would have to rip it out. Or, that I’d end up with an unbalanced piece. But, Pat said there were few rules except to have fun! So, one Saturday with Bill golfing, I sat down and spread out ALL my blue and green threads because I had the most of those 2 colors and they look good together. I began by dividing them by value (light to dark). She suggested 10 or more threads in each of the 2 families although less was ok – it would be more fun with more. I never expected that I’d end up using a total of 84 different threads including 36 fiber types across the 2 color families & the neutral. As you can see, I got over my reluctance and just had fun!!
Hopefully, some of you take Pat’s course and use it as an opportunity to experiment. If I do Patchwork Quilt again, I would do it in smaller units for gifts and donation pieces. I still have plenty blues, greens, and whites. My next largest stash is of different blacks, grays, reds, and purples. But, I have very little of yellow or orange. Bottom line, I could stitch a lot more squares in a variety of color schemes. Many thanks to Pat for designing Patchwork Quilt and Christine for selecting me to pilot this piece. It’s really a small world.
First color family is blue:


Second color family is green:


Neutral color is white:


All the threads are listed below (the 2x and 3 x in the parenthesis indicates how many time I repeated the thread somewhere in the piece):
Burmilana 3873
Designers Dream D02 (2x)
DMC #3 319, 336, 367, 368, 823, 890, 895, 939 (2x)
DMC #5 blanc, 334, 367, 890, 3346 (2x), 3348
DMC Floss 336, 3755
Flair F502
Fleur deParis 24
Frosty Rays Y042, Y090 (3x)
Grandeur #5 G802
Gumnut Yarns 369, 629 (3x)
Impressions 5133
Kreinik #8 braid 051HL
Kreinik #16 braid 393, 622 (2x), 4639 (2x)
Kreinik #16 ribbon 032
Merino Wool 98R
Needlepoint Silk 823
Neon Rays N68 (3x), NP02
Pebbly Perle P061, P66, P76 (3x)
Petite Very Velvet V634
Rainbow Linen R430 (2x), R445 (2x)
Rainbow Tweed RT14 , RT38
Sheep’s Silk SPS036(2x)
Shepherd’s Silk SS045
Silk & Ivory 02 (2x), 17 (2x), 55, 56, 70, 86 (2x), 102, 1063, 1316
Silk Lame Braid SL02
Splendor S860 (2x), S1026
Thread WorX 200
Vineyard Silk Shimmer S537
Watercolours 041 (2x), 065, 121, 127, 129, 140 (3x), 159(2x), 169, 228, 242, 254, 256 (3x)
Wildflowers 041, 127, 228, 254, 0076 (3x)
Not only is this a thread sampler but it is a stitch sampler incorporating over 16 different patterns. I learned a lot stitching the diverse blocks. And, with permission from Pat, I am very happy to share a photo of the finished piece:

Another aspect I understand better now is the ANG Distance Learning Programs. ANG has 2 different people who coordinate the Workshops by Mail Program (http://www.needlepoint.org/byMail/ChristmasHeartland/index.php), and a third (separate from CyberPointers) for CyberWorkshops (http://www.needlepoint.org/CyberWorkshop/Geo/geo.php). Apparently, I have not been reading Needle Pointers as closely as I could have been. The third person handles the Correspondence Courses (http://www.needlepoint.org/corr_reg.php) with more coming soon! Whatever you find to stitch, have fun!!
Filed under: ANG Main Line Stitchers Chapter, Christmas Ornaments, Kumihimo, Melita's Other Completed Pieces
Our theme for this year’s ANG Main Line Chapter meetings is “small”. In the fall, we’ll learn how to finish a small ornament using simple finishing techniques & a Japanese braiding technique called Kumihimo. Then, in the winter/spring, we’ll make an “Ort Box”, a small, collapsible container. Also, in spring, we’ll explore the world of “Marnie’s Miniatures” (one of our member’s is an award winner in miniatures). Lastly in the spring, we’ll have a small “tasting” of other Japanese craft techniques at the start of meetings when we work on the small ANG bear frame weights for the 2012 seminar.
On Sept 12, I’ll lead an introductory class in creating a simple 8-cord Kumihimo braid, a Japanese technique. I made braids using floss, DMC # 5 threads, Watercolour overdye threads, 1 mm hemp cording, 2 mm satin cording, & a combination of threads. And, I have 2 finished bracelets. The chapter will provide the Kumihimo disk, some hemp cording, and materials to finish one bracelet. The application of braiding to needlepoint can lie in creating a decorative matching braid to hang your piece of needlepoint, finishing the edging of an stitched piece, & couching onto a design. From left to right: (1) DMC # 3 (4 strands of white & 2 each of blue & white); (2) 1 mm Hemp cording (4 strands of red & 2 each of blue & white). Mine & my husband’s! I learned in about 20 minutes how to finish the bracelets at a cost of about $2 each with the wonderful folks at The Bead Garden in Havertown.

I wanted to explore textures & thicknesses. So, these are my results & comments about each. From left to right: (1) Blue braid: 2 colors of Silk & Ivory with 2 colors of Watercolours (2 strands each color) – you can just barely see the effect of the overdye but they wasn’t a lot of variation in the overdye thread to begin with; (2) Large red, white & blue braid: 3 colors of 2 mm satin cording (4 strands of red, 2 strands of blue & white) – too thick for a bracelet – better for a necklace; (3) Medium red, white & blue braid: 1 color Flair (4 strands), 1 color Frosty Rays (2 strands), 1 color Fyre Werks (2 strands) – it is surprisingly rough for how the soft threads feel separately so it not good for a bracelet & it stretches after being braided; (4) Very small red, white & blue braid: 3 colors of DMC floss (4 strands of white, 2 strands of red & blue) – it took a long time to stitch that small example so it is impractical to use on a large-scale but perhaps would have some application for miniature work.

On Oct 10, Carol from The Bead Garden will teach an advanced 12-cord Z-braid. She’ll share tips and show us a different way to start the braid. Carol has examples of various braid techniques. And, she has learned even from books written in Japanese! We’ll have enough hemp cording to distribute or they can use their own thread & have it ready for November’s finishing class. These are 2 of her braids using 12 cords & comments about each. From left to right: (1) Pink & black braid: 2 colors of wool/yarn (8 strands of pink, 4 strands of black) – the 3-dimensional effect is more obvious than in the smaller braid; (2) Pink & white braid: 2 colors of DMC #3 (4 strands each of mauve, pink, & white) – a little fancier braid than the simple one

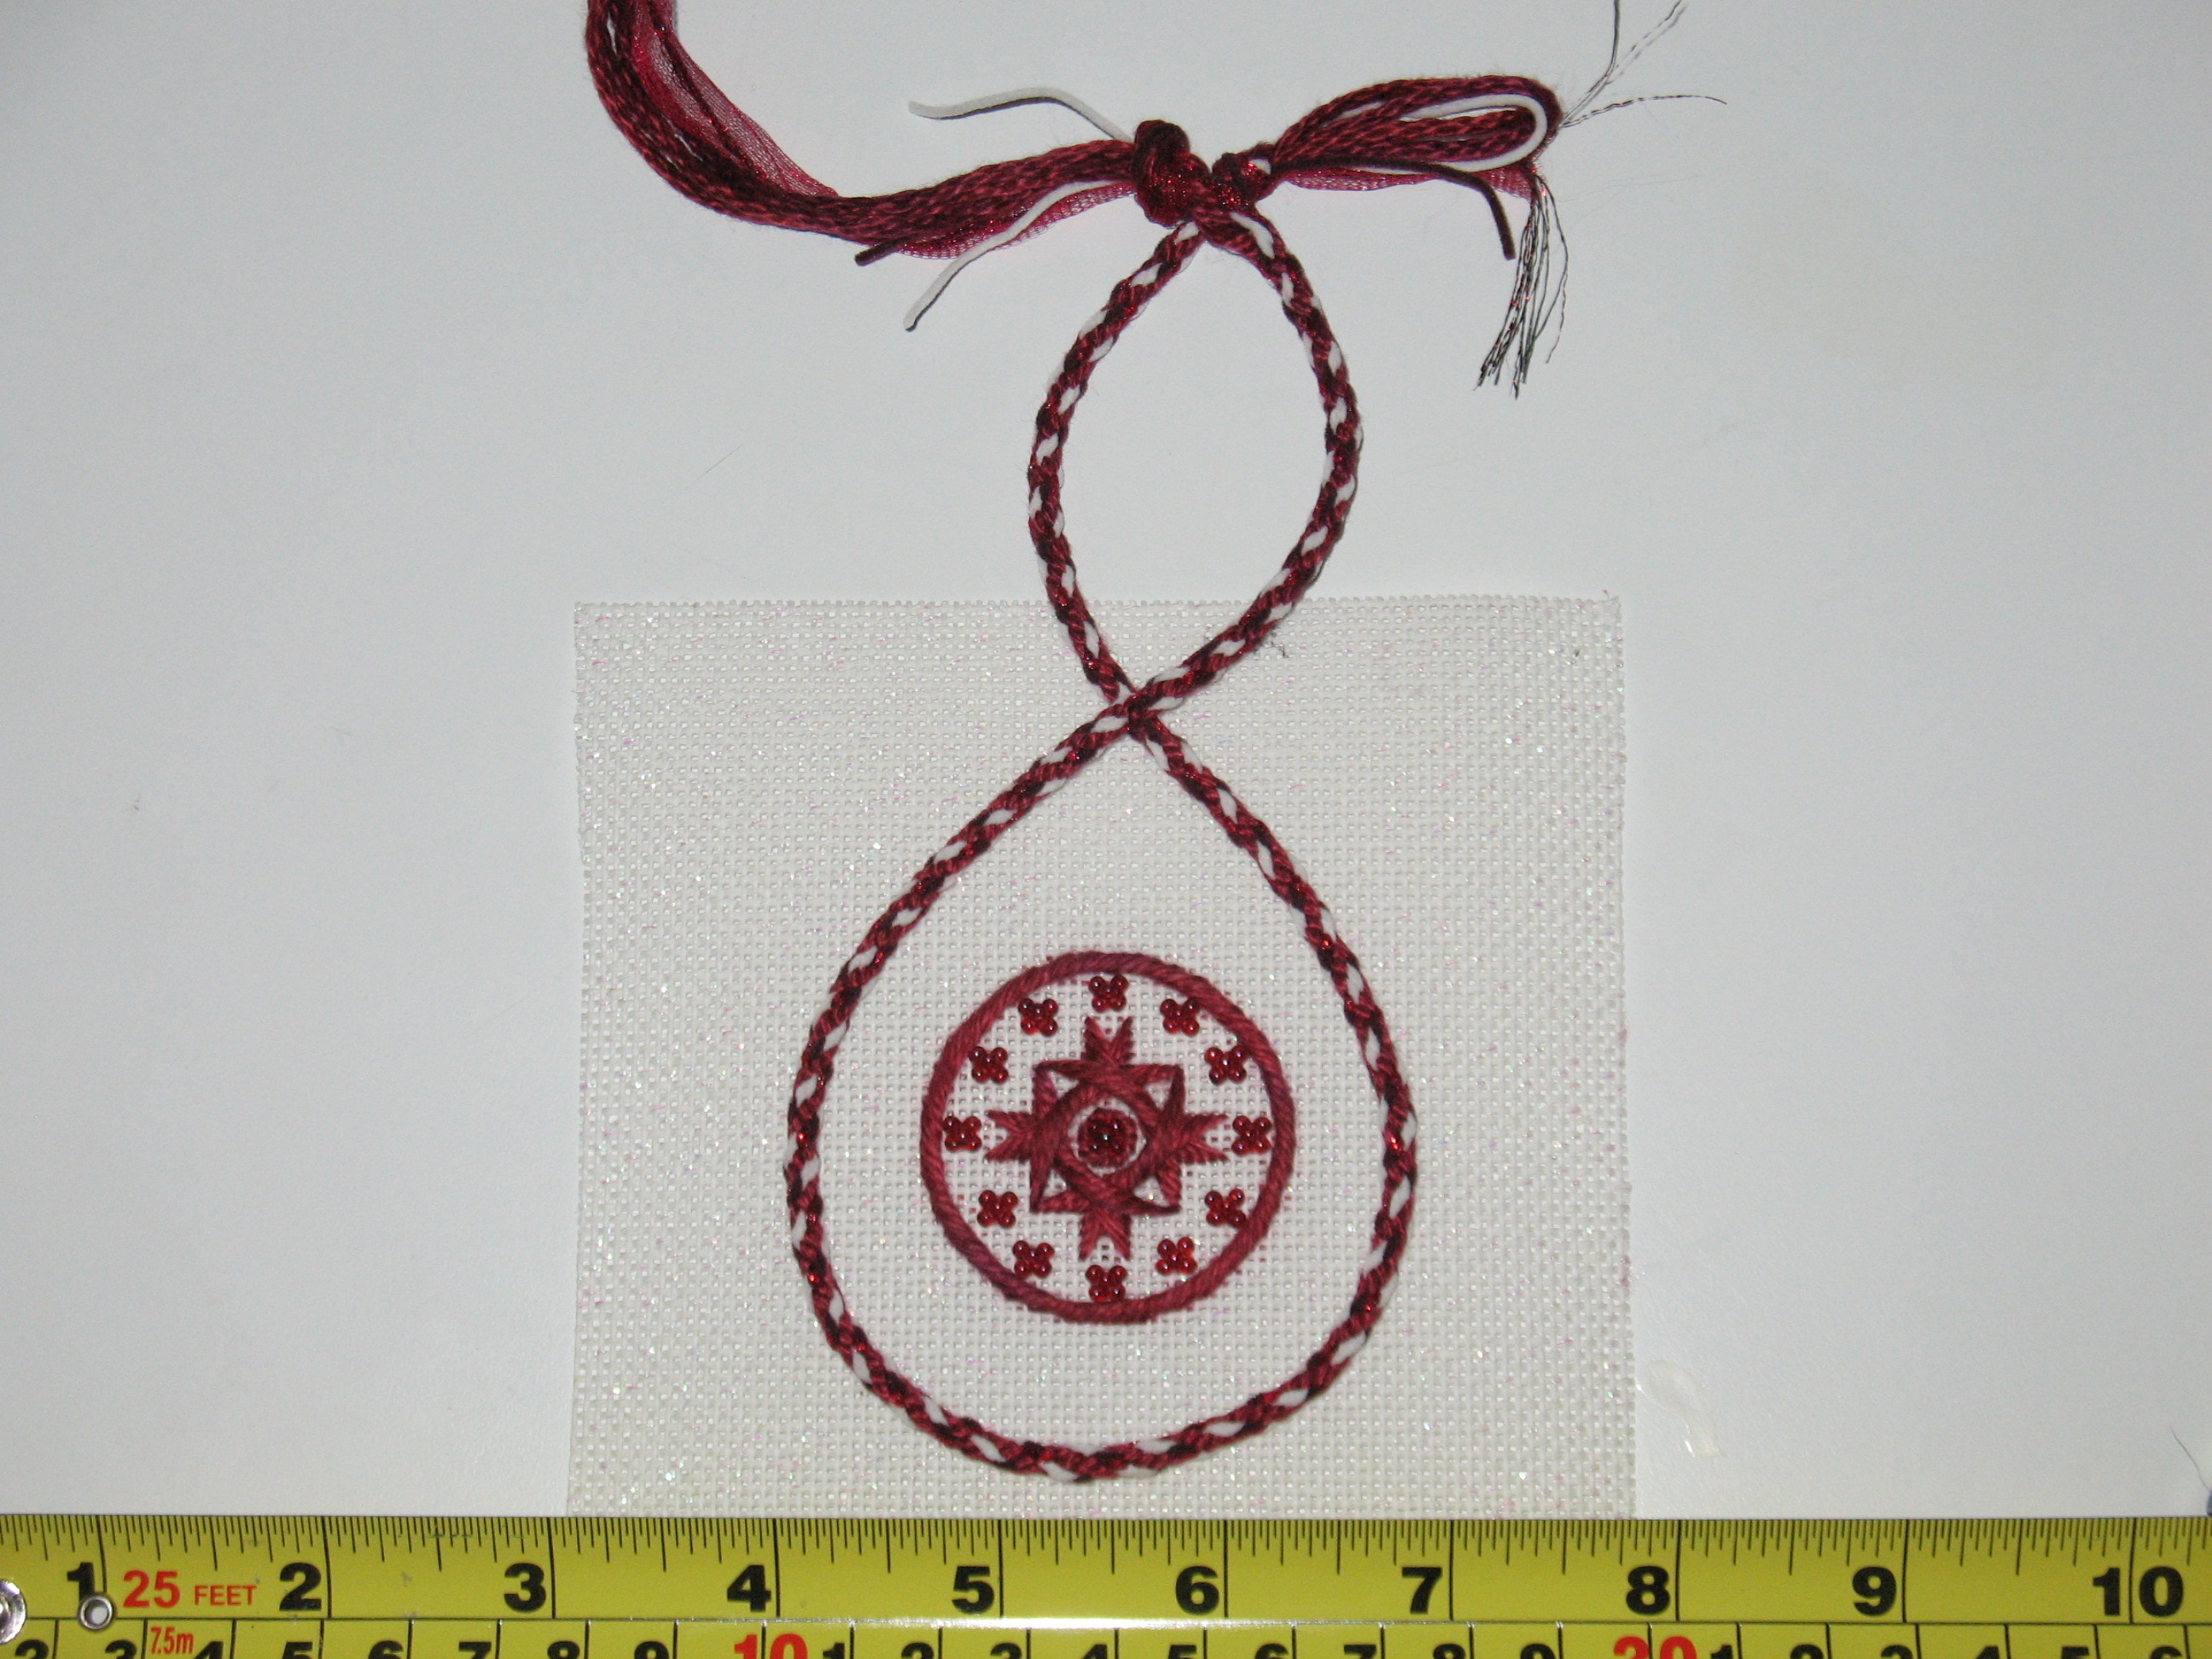
Then, on Nov 14, Karen from Nimble Needle will teach us a simple finishing technique for the 2 & ½” ornament. If we bring a stitched design and about a 12” braid (which allows for a 2” loop), we’ll be able to leave with a completed ornament! I’m ready as you’ll see below. For this, I used: 2 colors of Petite Very Velvet (2 strands each of red & white), 1 color Frosty Rays (1 strand of red), 1 color Watercolours (3 strands of Cinnabar an overdye without a lot of variation in it & the same as I used for the deign of the ornament) – I just wanted a little sparkle & needed the 3-ply per cord of the Watercolours so that it would be a thick enough braid.

Main Line Stitchers (PA): Join us as we explore Japanese braiding, Kumihimo. We’ll begin with 8 cords in Sept, then 12 in Oct, & use some braid to finish a 2&1/2 inch ornament in Nov! Come join us at 7:15 pm on the 2nd Monday of each month at St. Luke’s Church (203 North Valley Road, Devon, PA) just 30 minutes from Center City Philadelphia & 10 minutes from King of Prussia. Contact us at: MainLineStitchersChapter@needlepoint.org for more information.
Please note, I have no financial connection to artists or companies mentioned in my blogs.
The golf tee holder looks great! And, it arrived in time for his Labor Day tournament. Hope it brings him good luck!
Karen Milano at Nimble Needle did a great job finishing it & was kind enough to send me a picture of it! No affiliation with the shop (50D Tanner Street, Haddonfield NJ 08033, 856- 354-8100, www.nimbleneedle.net), just glad to have another wonderful store to visit. Now, we have a great excuse to go to Jersey for breakfast & pick it up Saturday before Hurricane Irene blows by us dumping more rain on us. Earthquake earlier this week & now a hurricane! Wild weather for Philly!

