Filed under: Brandywine Chapter, Cross Stitch and Beyond by JoAnne Westerhaus, Embroidery Guild of America
The EGA Mid-Atlantic Region hosted JoAnne Westerhaus at Camp Wannastitch in January 2024 for a Take Home Project (THaP) class. THaP classes are open to the member who will be taking the project back to the chapter as a program. It’s supposed to be inexpensive and easy to teach. And, it allows someone an opportunity to try their hand at teaching.
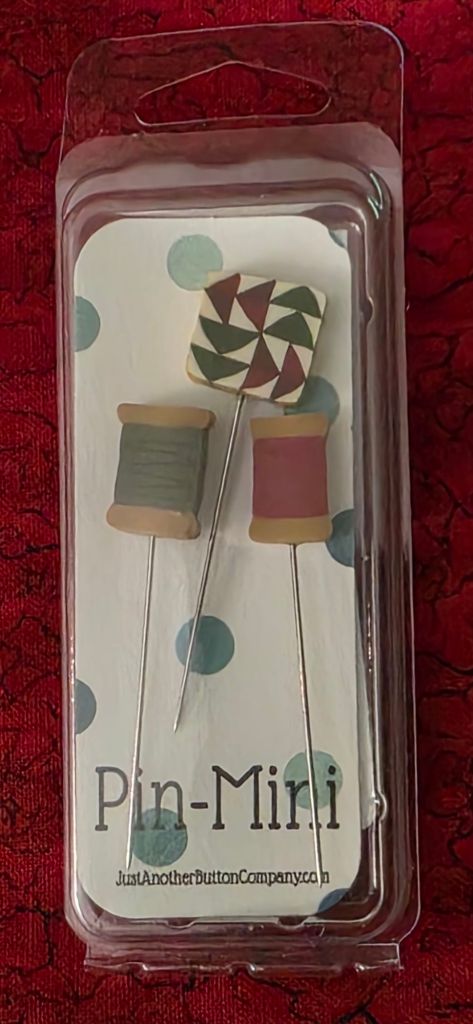
Sue from my EGA Brandywine Guild attended the Camp Wannastitch class and taught it in March 2025 to Brandywine members. I was away, but Patrick picked up the instructions for me. I decided to use the leftover variegated Heather skeins from other designs from Beautiful Stitches/Ann-Marie Anderson-Mayes. I’ll probably still have a full skein leftover and the solid colors.
JoAnne suggests it can be a needle book, coaster, sampler, or bookmark. I will make it a little differently at 4″ x 4″ when folded rather than 3.5″ x 5″. I’ll add 2 rows to make it longer. To make it wider, I made sure it was divisible by 4. I’m using eggshell Congress Cloth.
I basted along the left side because there needs to be 4 empty rows between each stitched row to reach 4″ x 4″.
The top row is a slanted cross that I can not recall seeing before. The diagonal stitch goes in first and then the upright stitches. About twice as much thread gets used on the upright stitches, so the color shift is quicker.
This was not one of my goals for the year. So, it’ll take a back seat and is good for travel. I stitched one band just to have it ready.

The second band was stitched during a Zoom talk given about making technology work for you as you age such as using Uber, setting reminders to get up and move, grocery/meal delivery services, and alert service if you fall in your home.
The next two bands were both the same and stitched Saturday with ANG Central Jersey Chapter at their May meeting after I demonstrated finishing for a round coaster. For Band 3, I went left to right and right to left with the same thread so the colors do not align as they do in Band 4. I started both trips across Band 4 on the left and started with the color matched other end of the thread. Remember that these skeins are symmetrically dyed. You know how much I love symmetry!! So, both bands are the same stitch but both bands looks different.

I got through some of Band 5 during the business portion of my last EGA Brandywine Guild Quarterly Meeting and finished it later that night.

It’s now August and I joined ANG CJC yesterday for the day to stitch on Band 6. I needed to pick up the kit for Winter Lights by Jennifer Riefenberg who is having 2 Zoom sessions in September. CJC is making it difficult to not add more projects to my list! They have a dozen projects with interest sign up sheets. I’ve already stitched one and do like a couple of the others but I resisted (for now).

Filed under: Brandywine Chapter, Embroidery Guild of America, General comments, Needles, Tools, Zokins
Lots to share about my EGA Brandywine Guild meeting earlier this week!
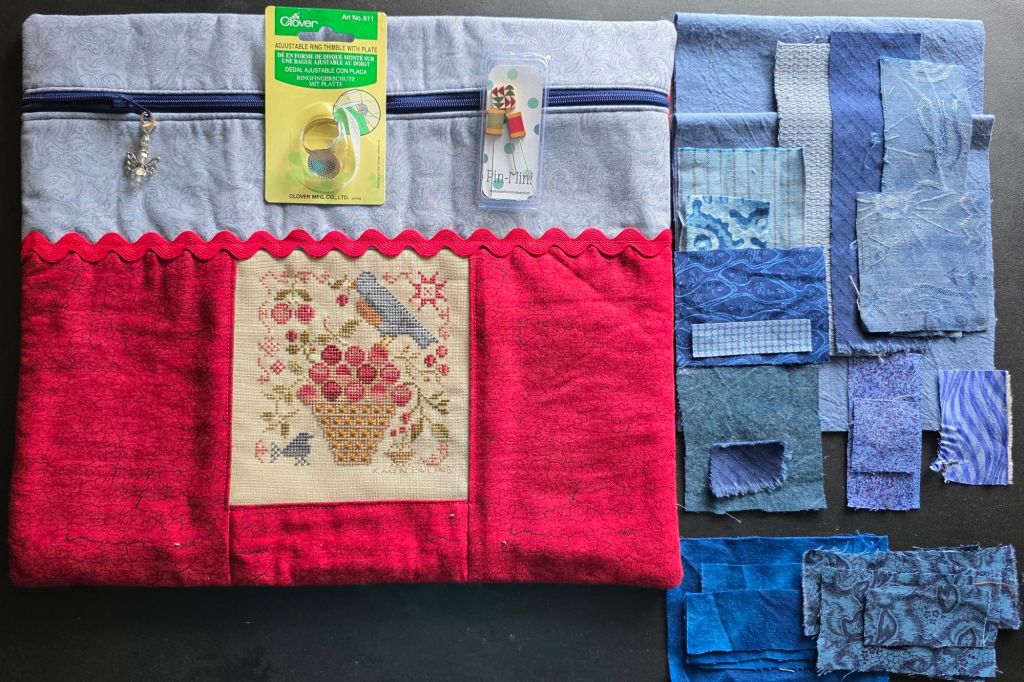
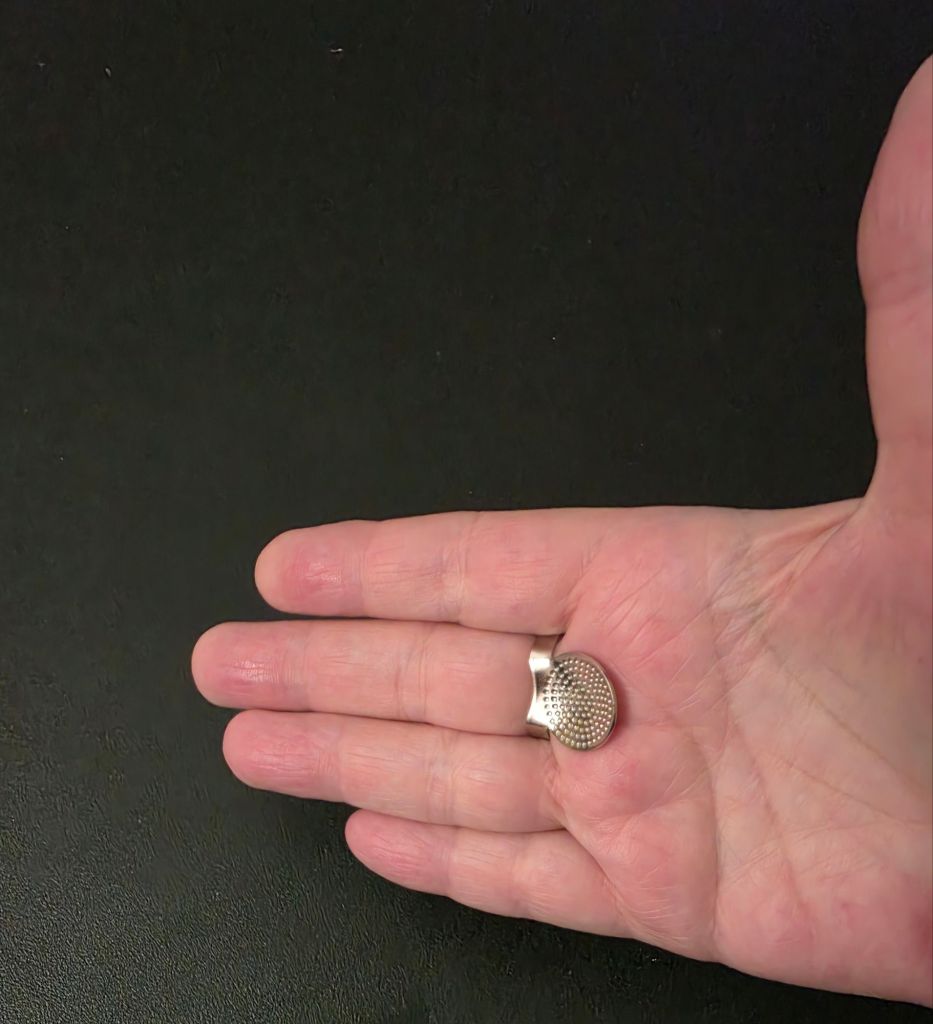
Kathy A and Karen S had prepared pieces of blue cloth and scraps of various fabrics for us to select. The right side of photo are the pieces I took. There were 12 of us. There could have 12 more and still had fabric left over! They also purchased a Clover adjustable ring thimble with plate for everyone. A new tool. It feels comfortable. Looking forward to trying it.
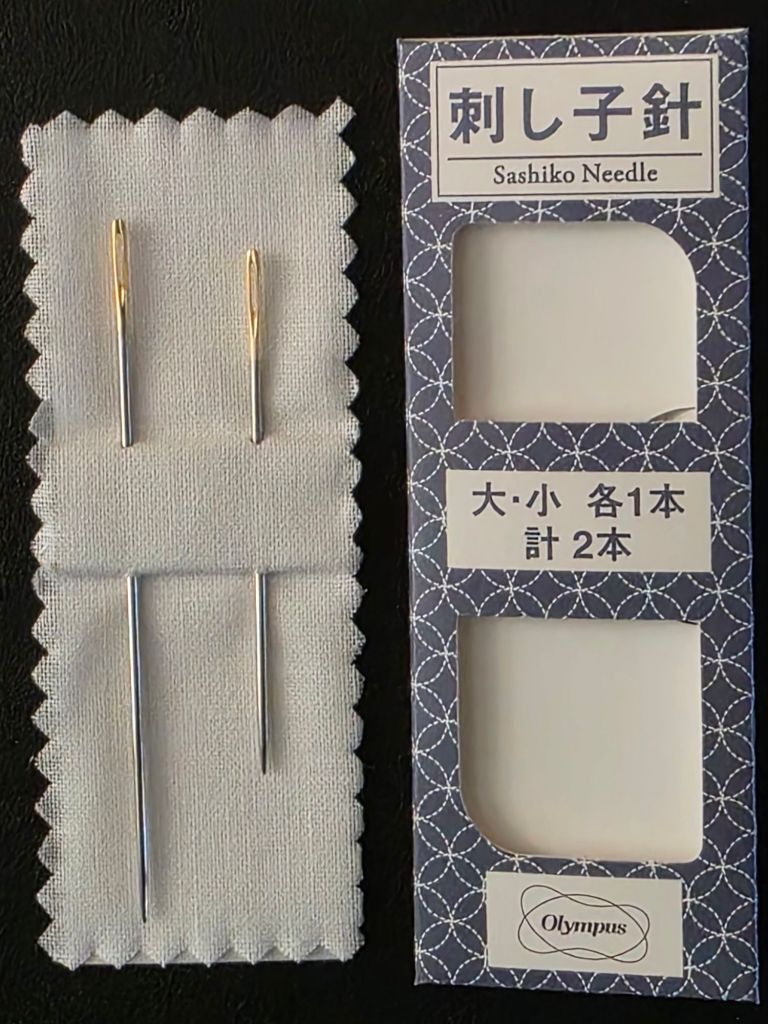
You stitch boro like you stitch Sashiko. So, I can use my Sashiko needles! I have a 2 pack. They have large eye for easy threading. The shorter (almost 1″) needles are for smaller, decorative designs while the longer needles (a little over 1.5″) are for straight stitches and basting. So, I will use the long one.
And, we got to share in the two opportunity baskets that Sue S, our Chapter’s MAR Rep won at the EGA-MAR Regional Seminar in Gettysburg! One of the baskets was from the EGA Molly Pitcher Stitchers Chapter in Carlisle, PA who are celebrating their 40th anniversary as a chapter. Congratulations and thank you for your generous contribution – it was a huge basket! Between the two baskets everyone got multiple gems. Not pictured are three red kitchen towels that I took.
I wanted and needed the project bag for the blue fabrics since I had intended to work with my fabrics and still will. Karen R from Molly Pitcher Stitchers stitched a lovely design and finished in coordinating colors. The Mollies have stitched two of my designs, Overdyed Spools and A Spring Sampler. I visited them after Overdyed Spools was posted as a Petite Project. So, I really appreciate having something of theirs. The counting pins are cute and came from them too! These will be perfect to carry in my travel tool bag.
Here’s the arrangement of my fabrics ready to stitch into place. I used all the straight pins I own!
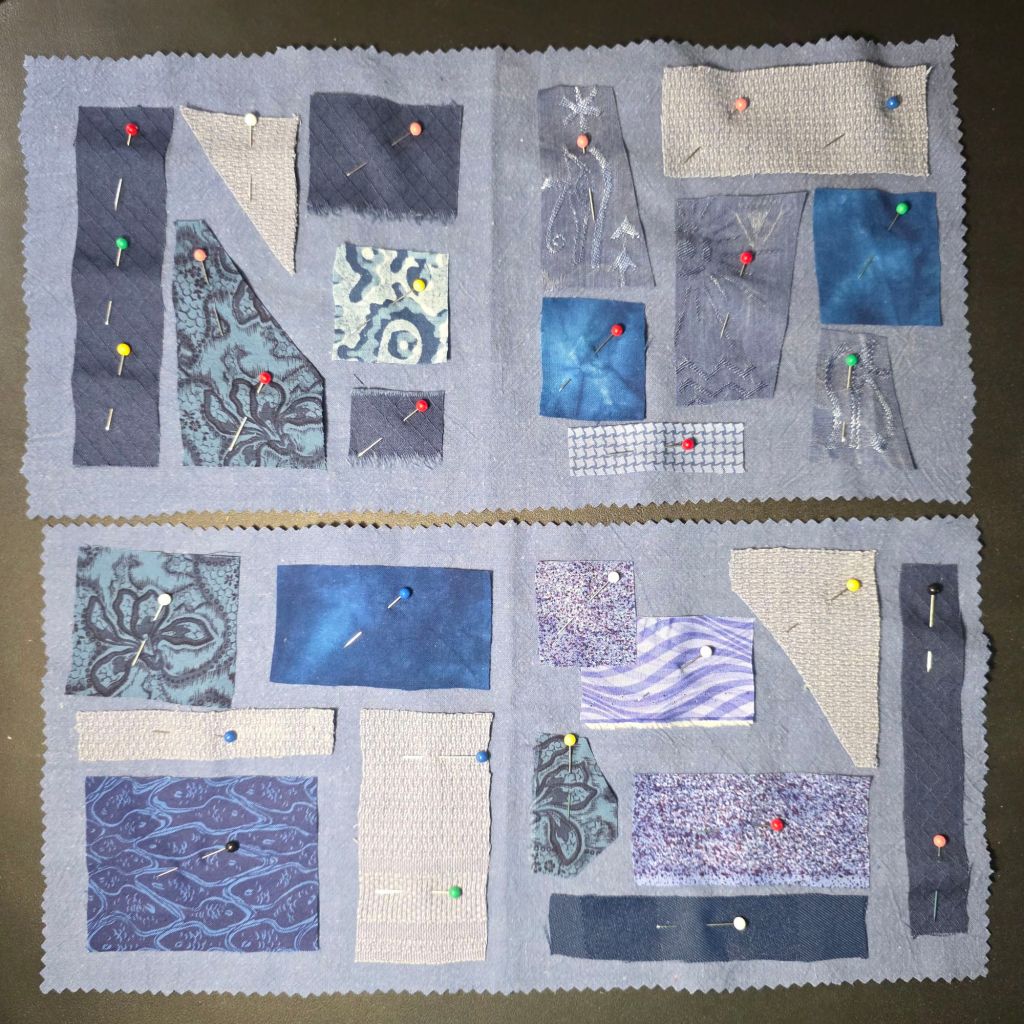
We have until September to stitch the small pieces onto the larger ones when we finish them into a cloth booklet (back to back with pages).
Kathy A and Karen S are leading the next 3 events (July 16, August 12-looking at the EGA Study Box on Surface Embroidery, and September 17-finishing what we start in July) for my EGA Brandywine Guild.
I really do not have remnants of fabric from clothes or rags which would be traditional materials for boro, a Japanese mending method of patching. I do have some lovely swatches of fabrics and a piece of blue fabric for the base. I won’t need all these but I like options! I’m upgrading from cotton thread to Planet Earth 6-ply Silk for stitching the swatches to the fabric, thus creating a zokin. I believe that is an accurate description of what I am getting into!

I believe running stitches will be used to attach small pieces of fabric to the base cloth. The cloth will cover a small lined notebook (5.5″ wide x 8″ high) I had sitting around.
It’s going to be a fantastic opportunity to use my self-threading needles. They are sharp.

Looking forward to what is now later today!!!
Filed under: Brandywine Chapter, Casalguidi Flower by Becky Quine, Embroidery Guild of America, Finishing, General comments
A lovely white lacquered tissue box from The Container Store is perfect for Casalguidi Flower by Becky Quine.
I posted about this design previously at https://melitastitches4fun.com/2024/07/25/roman-ruins-by-joan-rinehart-and-casalguidi-flower-by-becky-quine-for-ega-brandywine-chapter/
Since I have enough coasters, I thought about a tissue box for small designs/stitch samples. I initially bought a clear acrylic one but the tissue box didn’t fit. Crazy! Then, I decided clear wasn’t a good idea anyway. This one is white and 5″ wide x 6″ high, it fits a box of tissues, perfect size for small stitched pieces/samples, and is functional.
I finished it as a flat ornament wrapping the excess fabric on the back over a piece of magazine board and piece of wool felt. It is attached to the box with sticky back velcro.
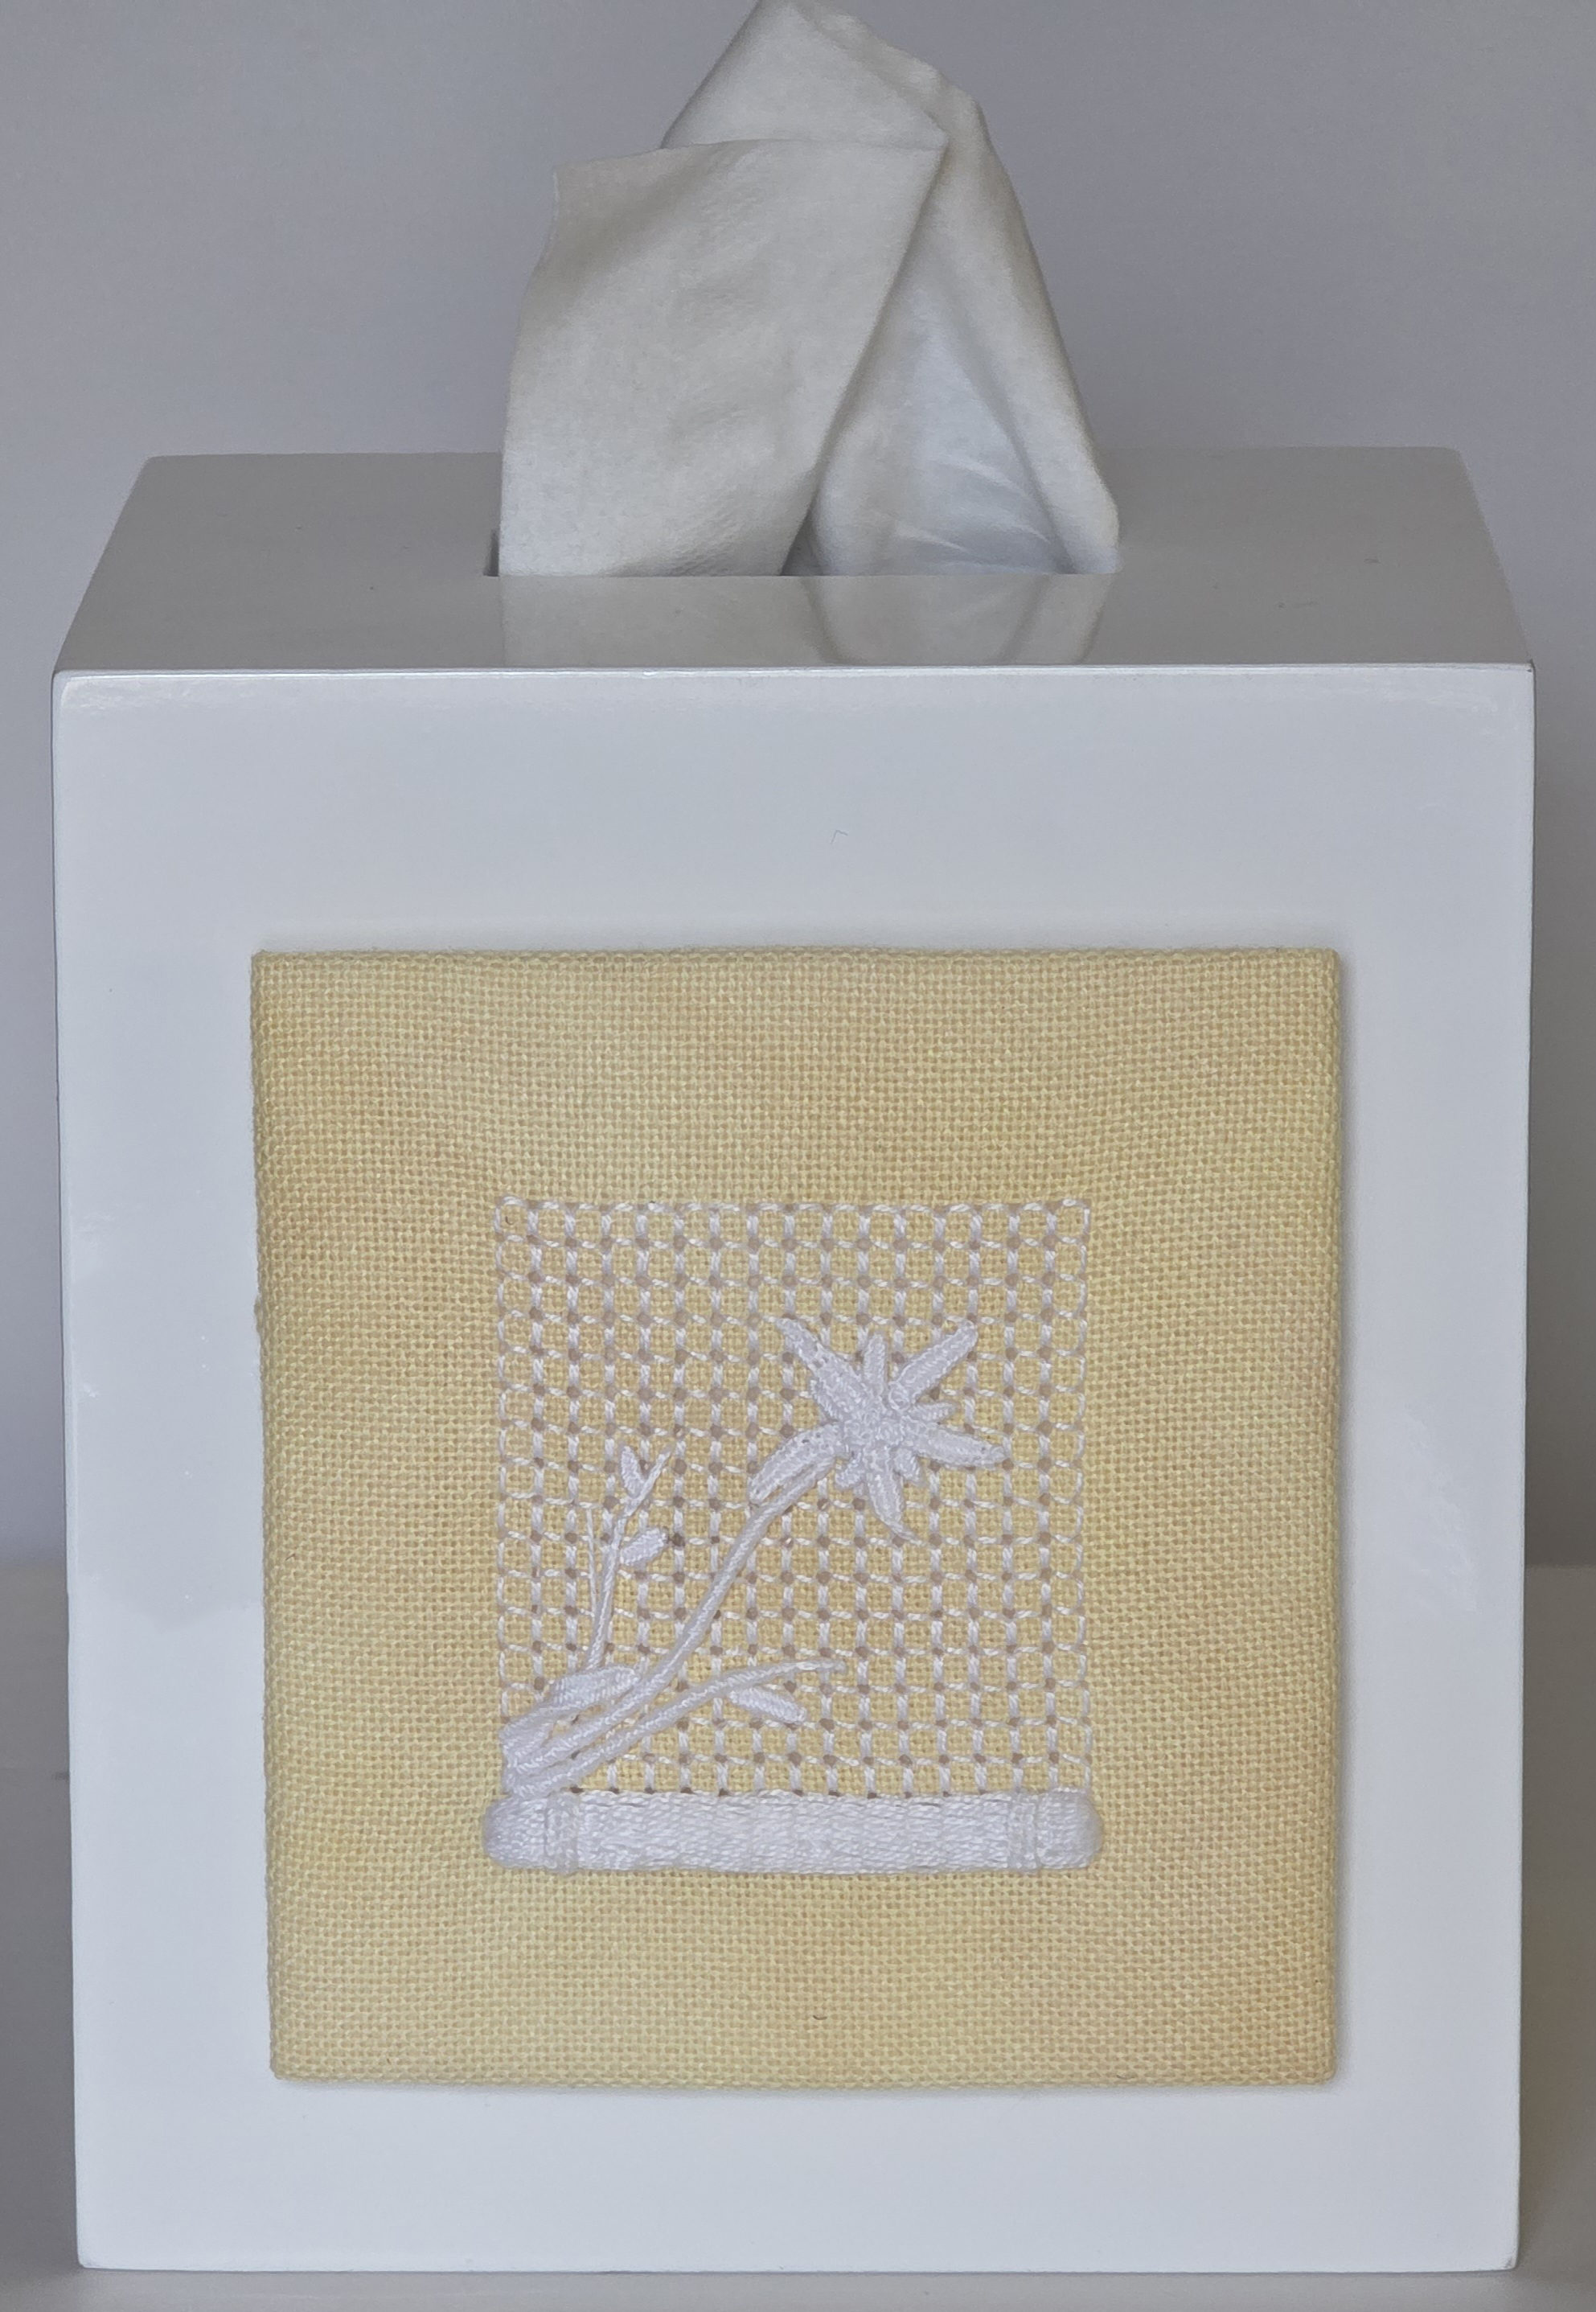
It’s near other yellow decorations in our bedroom. Love it!!
There are 3 more sides that can be decorated. And, I bought 3 more tissue boxes. Eventually, one will be in our bathroom (blues), extra bedroom (purples), and the other in the living room (whatever goes with brown/beige).
Filed under: Brandywine Chapter, Embroidery Guild of America, General comments, Tools
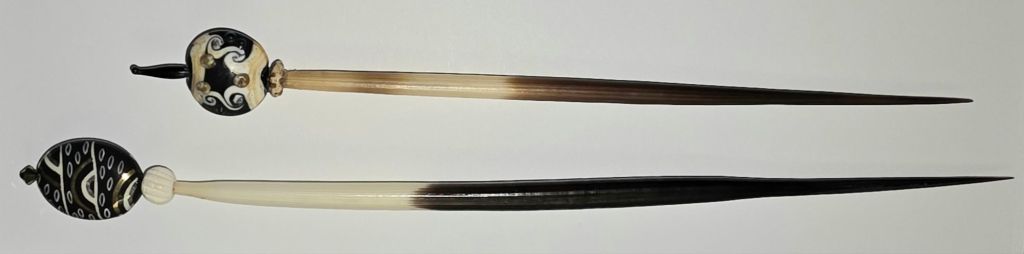
A few years ago, Patrick made and gave me a lovely porcupine quill laying tool. On Wednesday, he gave everyone at our Blue Santa Bead EGA Brandywine Guild outing a porcupine quill for us to make our own. Several of us found toppers to adorn them as he had done. I looked through almost all the drawers in the store and found several beads for my second quill. I didn’t have time to make it then.
I used the smallest black bead wire (No. 2) to attach the small bicone on top of the large black bead. I tied the bead wire off just below the large black bead.
The decorative black bead and the white one below it fit snugly on the end but I used the Super NEW GLUE to really secure them.
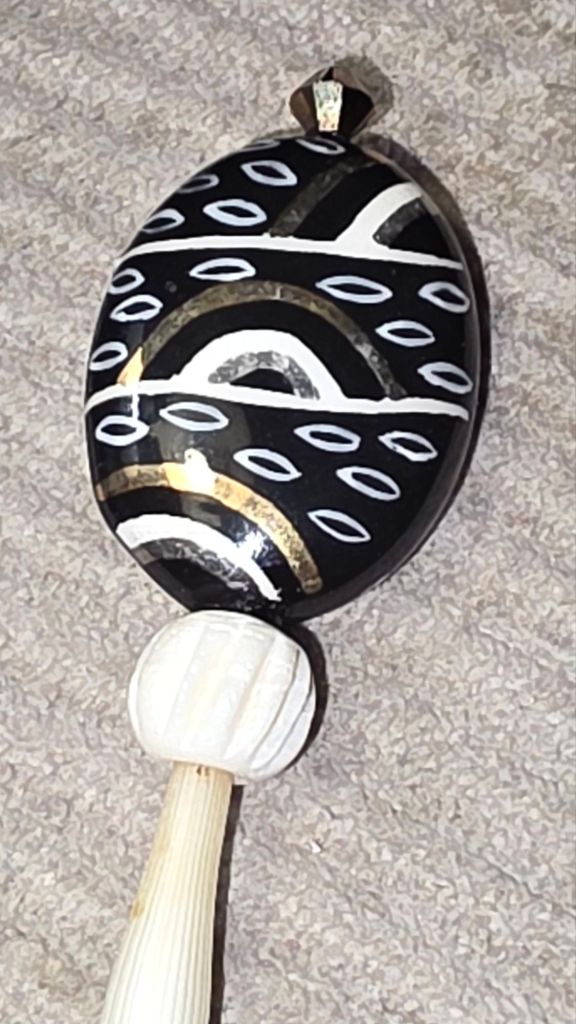
Patrick’s gift to me is on top and my new one is on the bottom.
Filed under: Beads, Brandywine Chapter, Embroidery Guild of America, General comments
Beaded Garden Wands were for sale at a store in Naples, NY earlier this month and knew I had 2 beads from a trip Bill and I had taken to Aruba! It seemed like a great idea to make my own and finally use those beads.
I found this 8″ screw at Home Depot. It was the only 8″ screw that was black – all others were silver. And, there no other black ones in the aisle! The silver ones were screws the complete length while this one is smooth on top.

So, while at the Blue Santa Beads making a Chatelaine with my EGA Brandywine Guild, I looked for beads. Most of the beads didn’t have a wide enough hole to work on the screw (including the 11 beads and the bicone in the next photo). But, I was undaunted and had an alternative in mind.

Today, after talking with the ANG Shenandoah Chapter about Festive Fireworks because they are stitching it as a chapter project, I had fun picking out the rest of the beads from my stash.

I used either beading cord or beading thread doubled. I wrapped around the screw using up almost the entire tube of Czech multi-colored beads! I also used the rest of the 6 mm round fluted purple beads that I used on Edward Scissorfish. There are drops of glue here and there. I bought 6 little bottles of Super NEW GLUE by Euro Tool. Have I mentioned how much I love that dropper bottle and the glue? It dries quickly and doesn’t clog.

However, it’s not like the ones in Naples. It’s not as bright. Bill’s right, we won’t be able to see it in the backyard. So, I placed it my little Lenox vase with 4 metal roses and we can see it in the living room. Perfect.

Today was and the next 3 days will be great for stitching thanks to the US Open.
Filed under: Brandywine Chapter, Chatelaines, Embroidery Guild of America, General comments, Scissors, Tools
Patrick led us through making chatelaines today at Blue Santa Beads in Media. I needed a special tutorial from my neighbor, Susan, after she figured it out while Patrick helped others. There were 10 of us there. He did an excellent job of getting us through this project. Getting rings on is not easy. I had 2 different sets of instruction and they still don’t make sense!
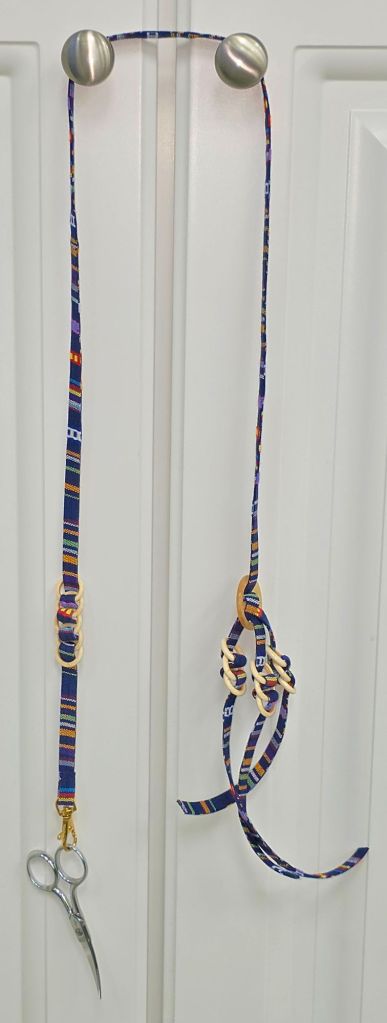
When I got home, I found scissors that have a protective leather sheath so that I won’t get stabbed when I wear it. It’s from ANG 2012 Seminar in Philadelphia celebrating the Guild’s 40th Ruby Anniversary. And, I placed the EGA Brandywine Guild strawberry on the other end. I can add 3 more tools. I haven’t decided what else to add.
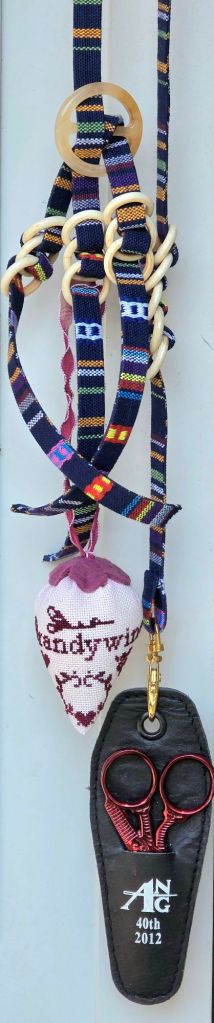
I had cording and rings left over. It’s not long enough to hang around my neck. And, I don’t know what I’ll do with it yet. But, something will come along.

There was plenty of time to shop for beads for 2 other pieces that I’ll be posting about over the next few days.
Filed under: Brandywine Chapter, Embroidery Guild of America, Strawberry Pincushion
Today, in the rain, Patrick and I were pleased that 10 members of our EGA Brandywine Chapter joined us for today’s project.
Patrick created the design which was distributed last month. Several had finished stitching it while others were still working on it.
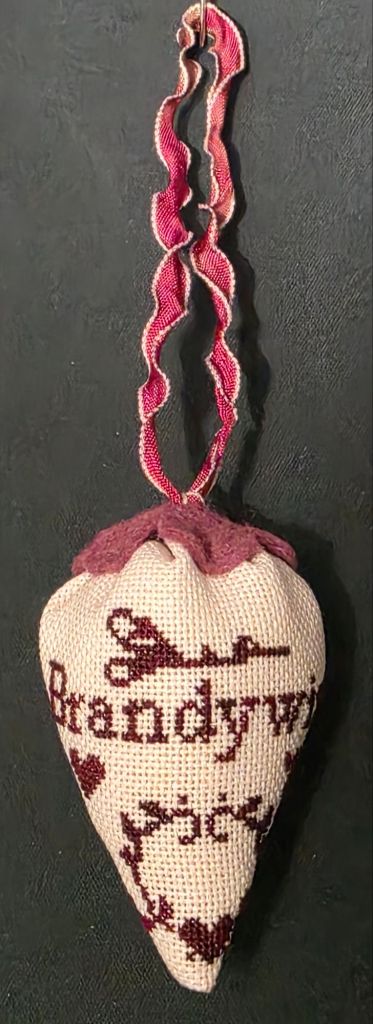
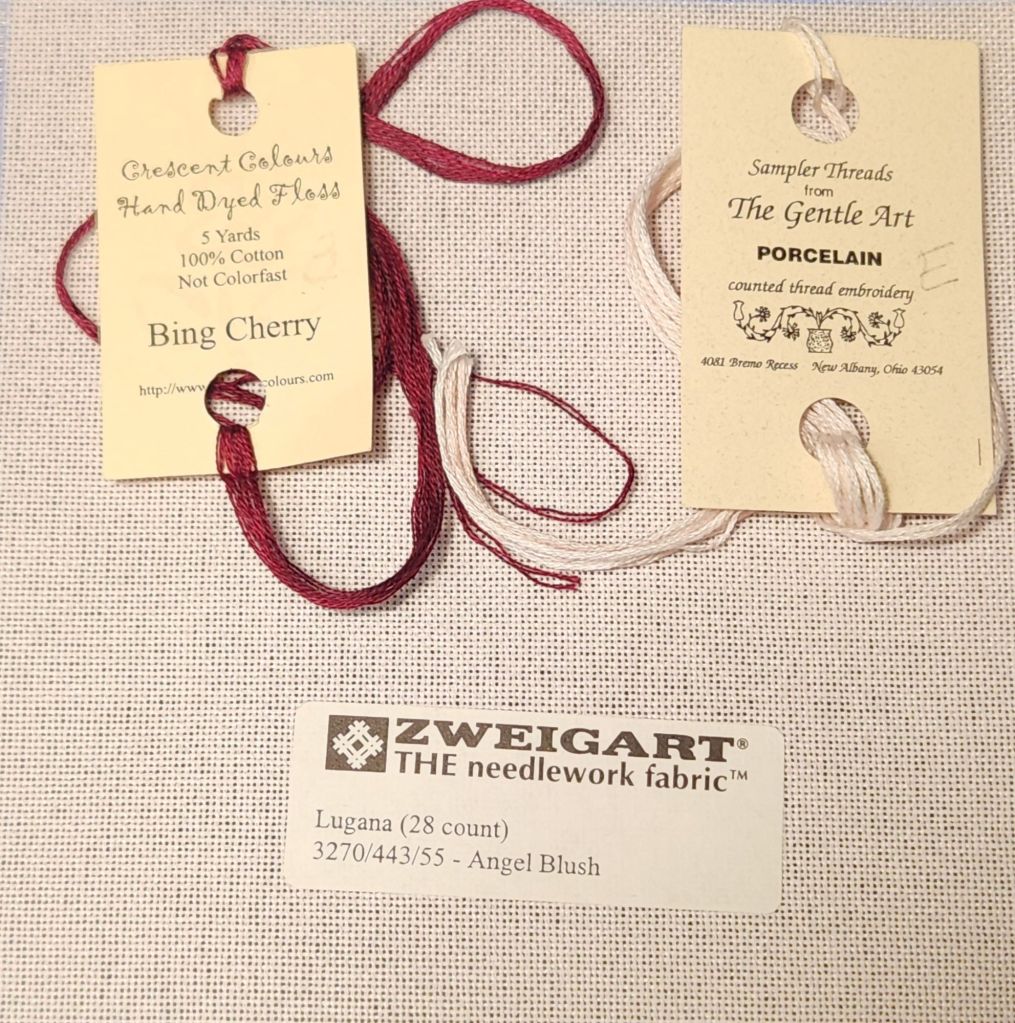
Mine was the smallest (about 2 and 3/8″ x 2 and 3/4″). I used Lugana (28 count in an Angel Blush that is slightly pink) and stitched over one canvas thread.
Patrick led us through making it into a strawberry. He and JoAnne had stuffing. We also could have used walnut shells she brought! Patrick had a variety of colored felt and ribbons. He also had buttons we could have used. Here’s mine. It turned out great!
Filed under: Brandywine Chapter, Embroidery Guild of America, Strawberry Pincushion
Patrick and I volunteered to be co-Presidents for one quarter of our EGA Brandywine Chapter’s year of meetings.
For April, we had a Zoom speaker, Toni Gerdes, speak on Additions to Stitching. I heard it recently through the ANG San Bernadino Chapter and enjoyed it again. There are several threads that I haven’t seen anywhere and a couple of ideas that I will try.
We handed out the motif Patrick designed, and I diagrammed. Then, in May, we will lead people through its assembly into a strawberry pincushion. For June, we go to Blue Santa Beads to make a Chataline.
I had a piece of Lugana (28 count in an Angel Blush that is slightly pink) and stitched over one canvas thread for a small one (about 2 and 3/8″ x 2 and 3/4″). Patrick stitched over two canvas threads for a larger one (about 4″). My stash had Crescent Colours, Bing Cherry fot the motif, and I’ll use Sampler Threads from The Gentle Art, Porcelain for finishing.
It turned out great and was ready to show at my EGA Brandywine Guild Chapter Quarterly meeting yesterday.

Patrick, Karen, and I had plenty of ground fabrics in different counts (24 – 36) and colors for people to choose. People had fun selecting theirs. Tough choices!
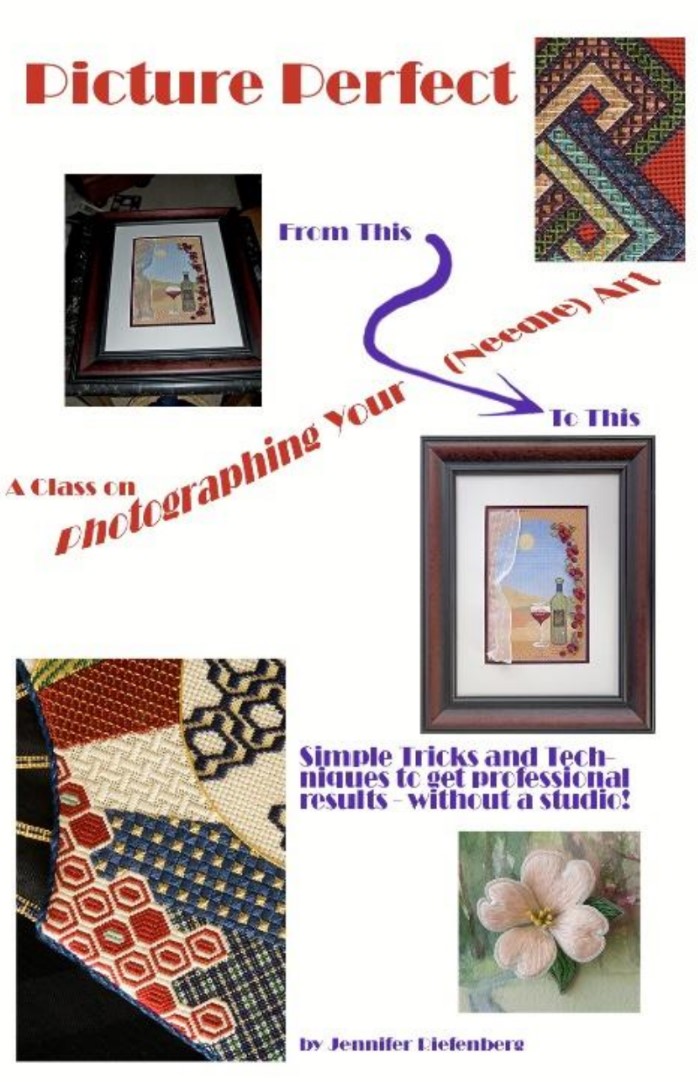
Textile Artist has a Stitch Club you can subscribe to but their newsletter is free of charge. A recent edition had an interesting article on basic photography for fiber artwork. You can access it at: https://www.textileartist.org/how-to-photograph-textile-art
In 2022, I took a photography class from Jennifer Riefenberg at the ANG Seminar and heard it again recently in a Zoom class How to Improve Photos of your Needle Art through the EGA Fiber Forum. It was my suggestion they invite her because you have to be juried into the Fiber Forum to be a full member by submitting photos of your original work. I am a Friend of Fiber Forum because have I not wanted to go through the process (maybe at some point). I picked up new tips I had not heard the first time. So, contact Jennifer if you are interested in a Zoom talk/workshop for your group. And, watch https://needleart.org/assembly/ for the photographs she took of this year’s National Academy of Needlearts Exemplary winners. There were some stunning pieces.