Yesterday, Linda and I made a trip to Rittenhouse Needlepoint for some threads. I enjoyed helping Linda find silk threads to replace cotton floss for a project of hers. The subtle variations in color are endless. Luckily, Rittenhouse has a variety of silks to choose from and we are lucky to be so close to the store.
I picked up 2 skeins of new threads they stock now but that’ll be the subject of another post.
What I want share here are the demo samples of what we’ll learn during Sandy Arthur’s classes on beads and ribbons the first weekend in April. We’re (Linda and I) not taking the third class on hairdos. Nor are we following her to Stitch-Stash in Rehoboth, DE for a lovely red, white, and blue basket although the condensed pilot class regarding “Conventional Techniques Using Unconventional Resources” sounds intriguing. There is probably room in all classes if you are interested-just call the store (s). And, here’s a link to Sandy’s blog: sandyarthur.blogspot.com or http://sandyarthur.blogspot.com/2019/01/face-2-face-appearances-time-for-us-to.html?m=1
This will be my first classes with Sandy and I’m sure I’m going to enjoy them as Sandy is just a fantastic lady and she knows beads and ribbons!!
Filed under: Celtic Knot, Dare to Design With Orna Willis, General comments, Threads
Have you ever had threads get twisted when you stitch? Who hasn’t? Well, I heard people try and explain z twist and s twist. While I understand it, I can’t see it. Until I can see the different twists, I will use the simple tip I heard from Cleo at my EGA Brandywine Chapter meeting which is to use the thread as it comes off the skein. This means that the beginning of the thread goes in the eye of the needle. Then, cut the other end and finish with that end. I was seeing issues with Trebizond and now I’m not.
This is the beginning of the second design that has come out of my design class with Orna Willis. My paintings reminded Patrick from my ANG Chapter of a Celtic Knot. I don’t know if the stitched piece in my colors will still remind him of a Celtic Knot but that’s what I’ve called this design.
Here are the paintings.
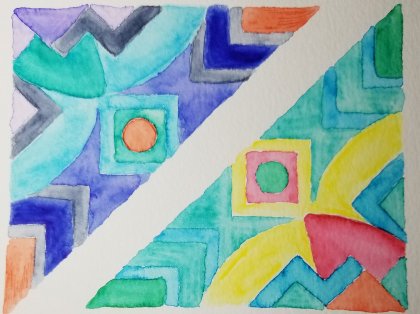
I tried to paint in my stitched colorway but didn’t do great.

Here’s the inner area stitched (sequins and beads will be added last). I’m using Trebizond TRA 381 Orange Sherbet, 3586 Birds of Paradise, 343 Peach Sorbet, Bijout MMT 429 Jasper, Kreinik 1/16″ ribbon 2122, and Watercolours 144 Pomegranate in this inner area.

A different color of Trebizond, Bittersweet TRA 376, replaced the Orange Sherbet TRA 381 into the next surrounding area.
I love how it’s looking but it certainly isnt easy to stitch due to the nonsymmetrical features and the weaving. I could stop here and add beads and it’d be a pretty little thing but I am going to keep on going!! All these threads are from the kit that came with Orna’s class. Even after I finish this piece, I’ll have threads enough to stitch at least a third piece!

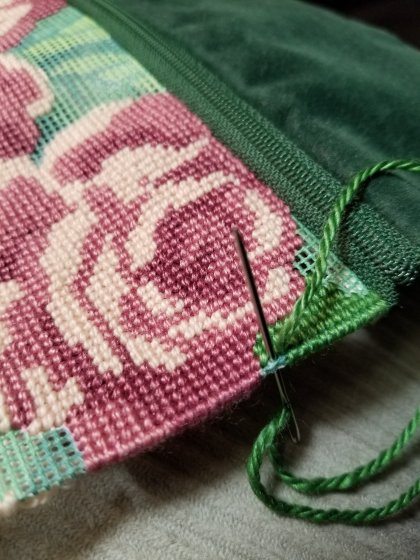
This is a Stitch & Zip eyeglass case called Roses (SZ309 from 1999) by Alice Peterson Co. It’s a painted 14 count canvas. It comes with cotton embroidery thread but I replaced that with threads from my stash including Silk & Ivory (50% silk and 50% Merino wool; colors: 55-kiwi, 56-lime, 161-lida rose, and 162-rosie o’grady) and Vineyard Merino (100% wool; color: M1136 conch). Using wool and stitching with basketweave should improve durability.
I couldn’t get the top edge to look like the rest – the angle was straight instead of angled. I saw my stitching buddy, Linda had stitched a Stitch & Zip with the proper edging. She explained and showed me how to do it. I don’t quite understand why it works but by turning the canvas upside down and stitching left to right with the needle moving straight up, the thread ends up angled correctly (like basketweave).
We got a wonderful new neighbor in the Spring and couldn’t be happier that she bought the house. Her name is Rose and she has a son who lives with her and occasionally watches his 5-year old son. He’s a cutie – loves science – smart kid. We are not Facebook friends yet so I can post that this will be a gift for her. A rose design for Rose.
But, first, I want to line it and again Linda has agreed to help me. She’s very good with sewing and is always generous by sharing her knowledge and experience. Thanks in advance!

Filed under: Come Design With Me by Orna Willis
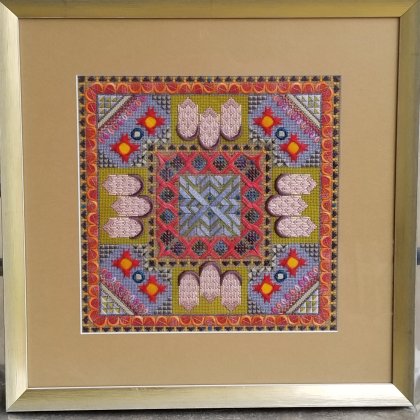
All framed and ready to hang. I need more walls!
This is from the online class with Orna Willis, Come Design With Me where she explained how she designs a piece as she goes. Orna set up a private Facebook group where we could ask questions and share our progress. It was interesting to watch this design develop and have her explain her thought process. At the end, class members named the design, Come Dance With Me. The instructions are on sale at her website Adorn By Orna. Use your stash to make your own colorway.
Thanks again Orna for taking us on that journey. It was an excellent learning experience.
Filed under: Dare to Design With Orna Willis
Most of the stitches worked up well except for the Nobuko Stitch (green thread under the purple beads). They seemed to blend together too much. So, I made fewer of them.
It’s been an interesting learning experience.
I’m already excited to turn another watercolor picture into a stitched design. I’ve got plenty of threads still. This class isn’t over until July.

Filed under: 2018, Dare to Design With Orna Willis, General comments, New Jersey Needle Festival
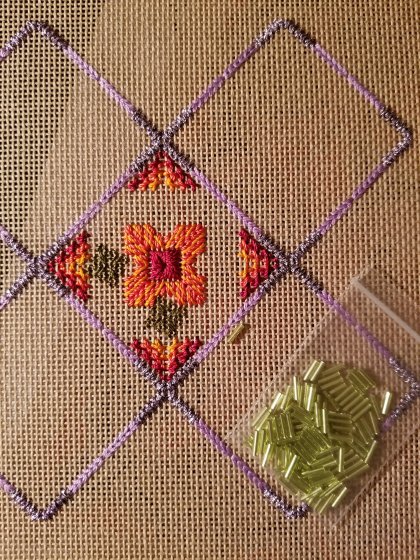
After I found Desert Island Stitches, Volume 2 regarding borders and this interesting kit (with threads that I have not used ever before) from Karen at Nimble Needle’s table, I settled down to stitch on my Dare to Design piece. By the end of the day, I had the center completed. However, the green stitch was bothering me. More on that later.

Throughout the day, I wandered around the vendors and looked at other people’s projects. It’s so fun to see what everyone is stitching. The ladies with New Jersey Needle Artists are doing another fascinating piece, Lorene Salt’s Autumn Kaleidoscope, in various colorways. Love them all!
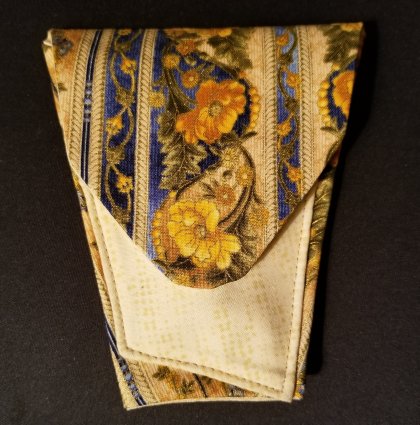
Everyone was buying something from Trish all day long. I finally picked up this scissors case because it can hold more than scissors. And, her fabrics are gorgeous. This one reminds me of spring!

I forgot to get a group photo this year but we had a full table. Besides myself, I enjoyed the company of Buff, Kristen (first timer), Patrick, Linda from West Chester NY (first timer), Lisa, Lori, and Linda.
More on the green area. I’ve discarded Pepper Pot Silk Olive 095 because it was too heavy (not pictured) and Soie Perlee olive green 274 because it was getting lost in the canvas (see double motif upper left side next to red/oranges). In fact, all the double motifs appear to become one blob. Maybe adding beads in the center of each would help define each unit but the beads I selected are way too big. I contemplated using Planet Earth 6 ply silk Shrub V 1058 (the two right on the upper row and the second from the left on the bottom row) because it matches bugle beads I plan on adding. But, it too disappears into the canvas. In previewing the bugle bead, I also realize how a single bead isn’t as bright when it sits alone. The Au Ver A Soie light green 325 works best in the double motif (left on top row) but gets lost singly (left bottom row).
So, it took me all night but I’m doing a single motif in the Needlepoint Inc SilkLeaf Green Range 256 (bottom row right). The double motif seems blobby still (center bottom below the red/oranges. You can see the single clearly. However, I need new beads. I wish I had know this while I was at Edwardian Needle. Oh well! Beads will go on last. I’ll figure that out later. I could always do French Knots. It’s been an interesting learning experience to see how slightly different threads appear differently. No wonder Orna says she rips a lot out as she designs.

Filed under: Dare to Design With Orna Willis
I got started stitching last week so that I could take this to stitch on this upcoming Saturday at New Jersey Needle Fest, a day long stitching event with 120 stitchers and 8-10 vendors. Yes, back to back stitching weekends!
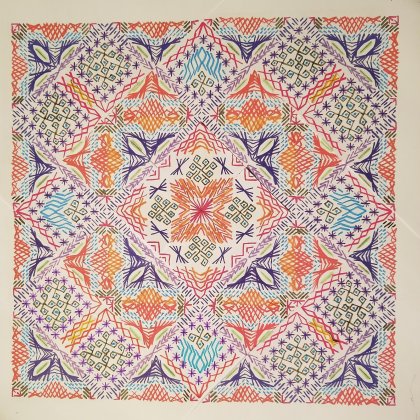
Overall, it’s a 5&1/2″ square. If I hadn’t designed it myself, I would have a hard time believing that everything I have planned to stitch is going to fit! However, that’s what happens when moving from 8 count paper to 18 count canvas.
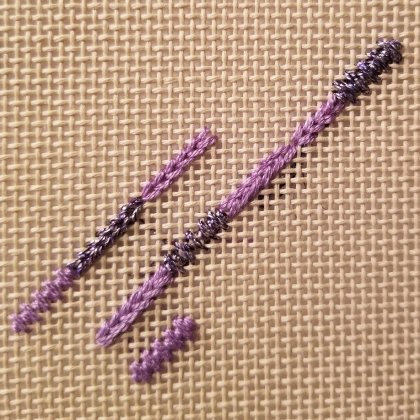
Instead of a lot of ripping, I tested the stitch and threads on a waste canvas. The #8 Kreinik worked ok for the knitting stitch bottom far left but was too thin coverage for the mosaic bottom right. I also decided that you could see the knitting stitch better with the Planet Earth. I tested Kreinik #16 upper right which happened to be in my stash but felt it was too heavy for an area that I doesn’t need attention. So, I bought #12 which looks great. I wanted to establish the border to decrease counting errors. Now, I can stitch the focal point.

Filed under: Dare to Design With Orna Willis
I won’t go through all my iterations of stitches that I selected or color combinations I tried for this painted design. But, the key pieces ended up being a frame outlining the triangles (Knitting stitch and Mosaic stitches in light and dark purple) and connecting them. The center diamonds have 2 or 3 shared components (Wavy, Smyrna, and Nobuko stitches). The colors help tie them together. The base that the diamonds fit into are same except the color of the crescents and half Waffles differ. Little changes made a big difference. Oddly enough, a small Smyrna in place of the 4 red straight stitches in the center diamond looked awful. The other thing that allowed me some freedom was remembering the lessons from Orna Willis‘ class Color Inspirations. I didn’t need to replicate the exact design but I did need the balance of colors. So, I am done and very happy! I just hope the threads work with the stitches. On to her next lesson which is playing with variations of Jessicas!


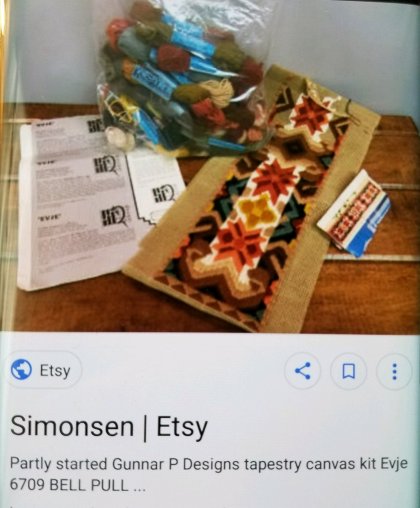
Filed under: Bellpull - Gunner P
I realize now I never shared the bellpull my mother stitched in Feb 1991. Maybe because I didn’t know anything about it other than I liked it!
Well, I found it when I was googling Gunner P Design kits because a woman on Facebook found an old kit. I found the image of the bellpull in an old listing and this info about Gunner Pedersen, a Norwegian embroidery business. Fascinating history at


Filed under: Beading and Ribbon-Sandy Arthur, General comments, Needlepoint Shops, Other People's Designs, Rittenhouse Needlepoint, Threads
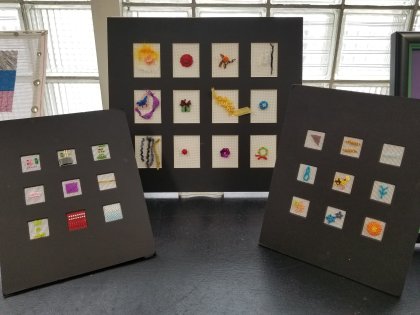
What a great 2 days I had with Sandy Arthur at Rittenhouse Needlepoint. We worked with beads the first day and ribbons the second day. These are the first classes that I have taken since Rittenhouse moved. The classroom is well lit, seats were cushioned, and overhead projector was useful. Very nice room. And, Russell’s homemade breads are delicious!
We covered quite a few of techniques which Sandy Arthur has perfected. So, when you look at my samples, don’t look too close and remember that I haven’t done a lot of bead or ribbon work before and time was limited (5 hours each of 2 days). Using beads was easier for me.
We learned multiple ways to attach single beads and multiple beads. Basketweave beading was tricky – really had to focus. We covered a felted ball with beads and a wooden bead with thread.
There wasn’t enough time in class to try everything in Sandy’s handouts. So, I played with the leftover beads and made a butterfly. And, the flower on the lower left corner allowed me to practice Line stitching with the green beads and Lazy Daisy stitches.
We learned the Japanese Ribbon Stitch, Ribbon Roses, Wrapped Stitch, Lazy Daisy Stitch, Gathering with Running Stitch, Ruching, and other techniques with no particular name.
I learned a lot in both classes. Sandy knows her stuff and teaches it well. As with anything, it needs practice to show improvement. That’s why a doodle canvas or the 2″ border of a canvas is good for practicing.