Filed under: Canvas Master Craftsman Program, Embroidery Guild of America, Fireside Stitchery, Needlepoint Shops, Step 6
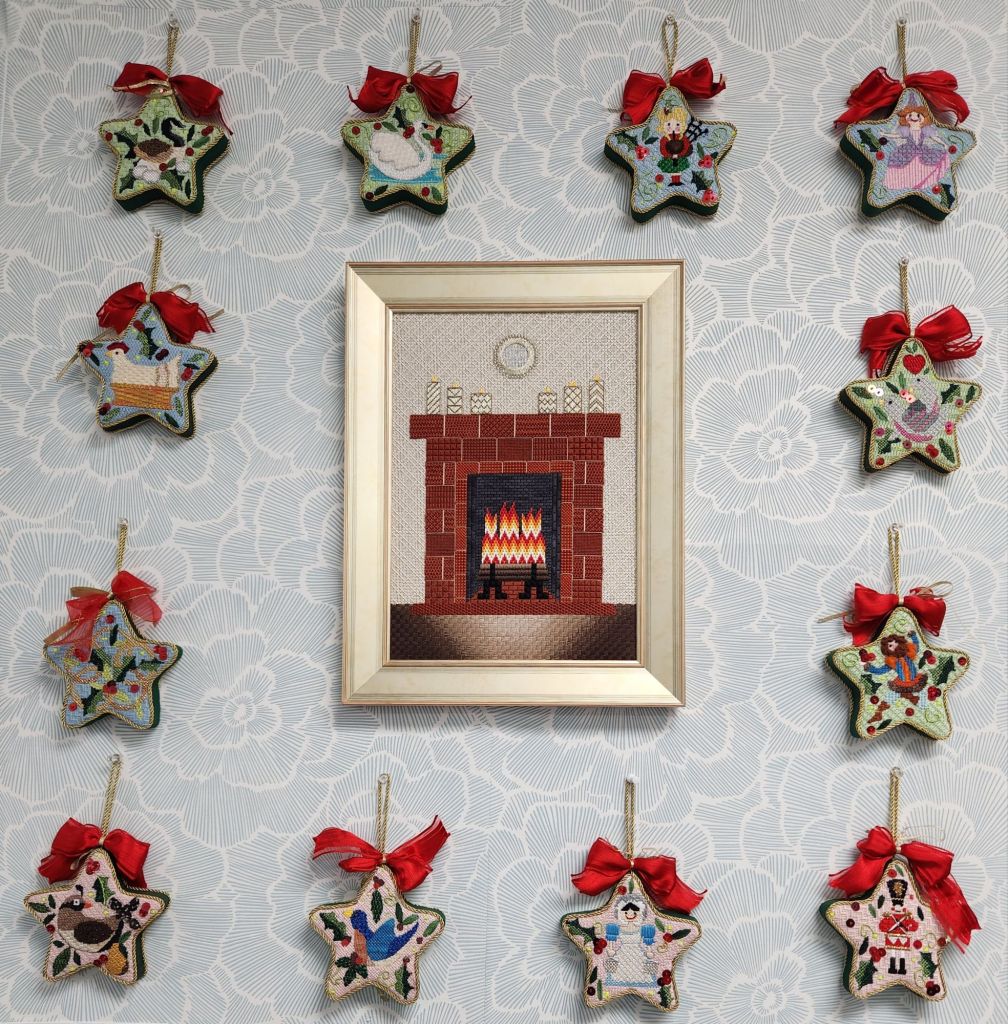
I love where they decided to place my Fireside Sampler inside Fireside Stitchery! It’s inside the front desk area displayed with a lovely set of ornaments. Lynn wants to get a fireplace, but in the meantime . . .
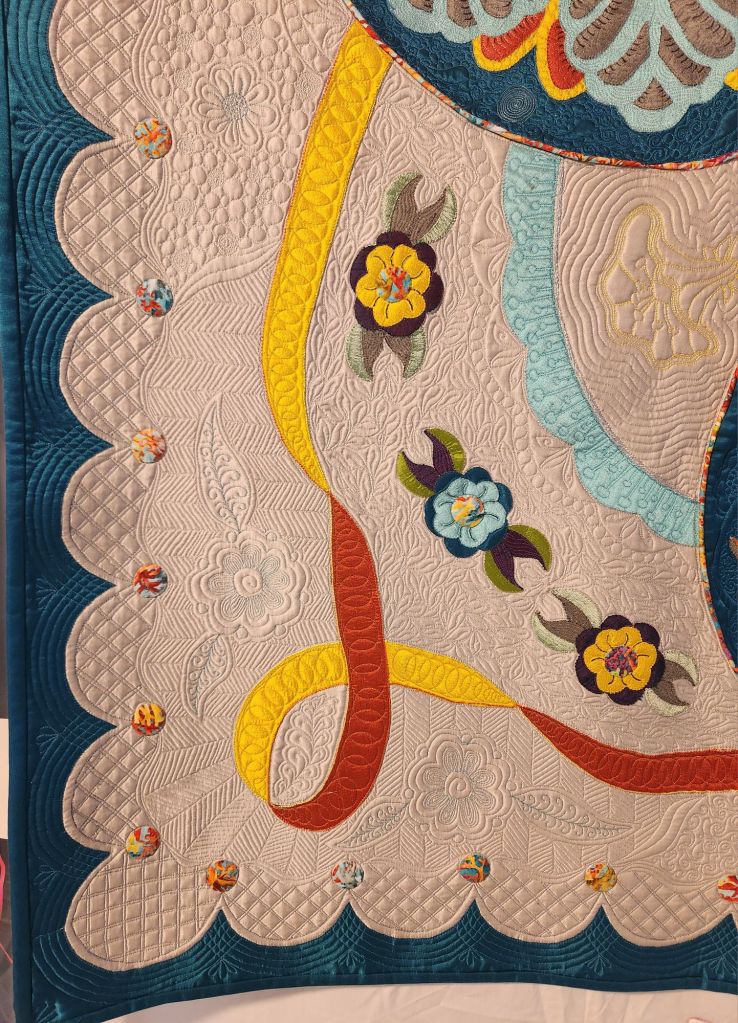
I got to see it hanging today after visiting the Valley Forge Quilt Show which was spectacular as always. I didn’t ask for permission to post any of the quilts, but I think i can post a part of Becky’s quilt to show off her talents, particularly noting the machine quilting she did herself. Stunning. Such a talented group of quilters. Very inspirational. And, they are excellent bakers as well. I got a few goodies!
Stephanie, of Spellbound Stitchery (.com), designed and taught a painting class at Fireside Stitchery today. She’s a lovely young woman, and I wish her all the best as she grows her line of canvases.

In just 2 hours, we painted our Philly Pretzel designed by Stephanie. It is small at 2.25″ square.
I didn’t count right to start off! I got the center marked without issue but then must have double counted the center when I marked off the 40 x 40 area.
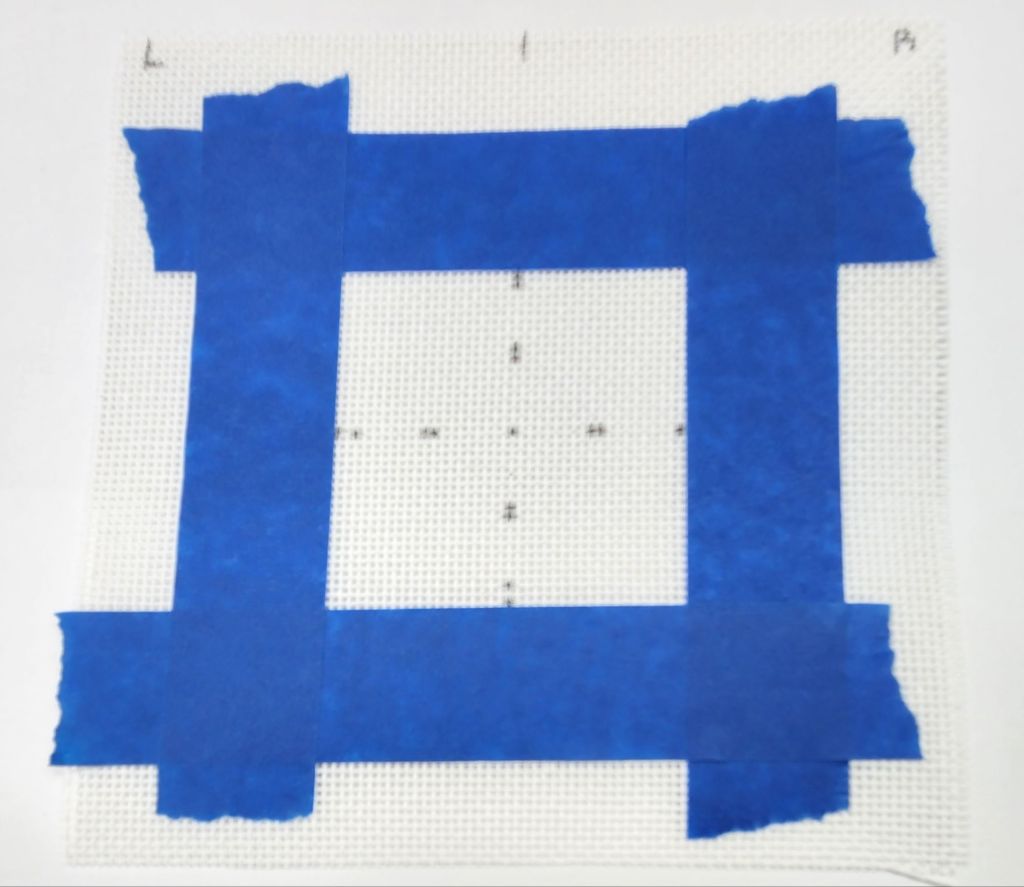
Stephanie said to go slow as we counted out the border, and I should have gone slower. Stephanie found my error & I covered the spots with white and repainted them in the proper brown. Cute little design.
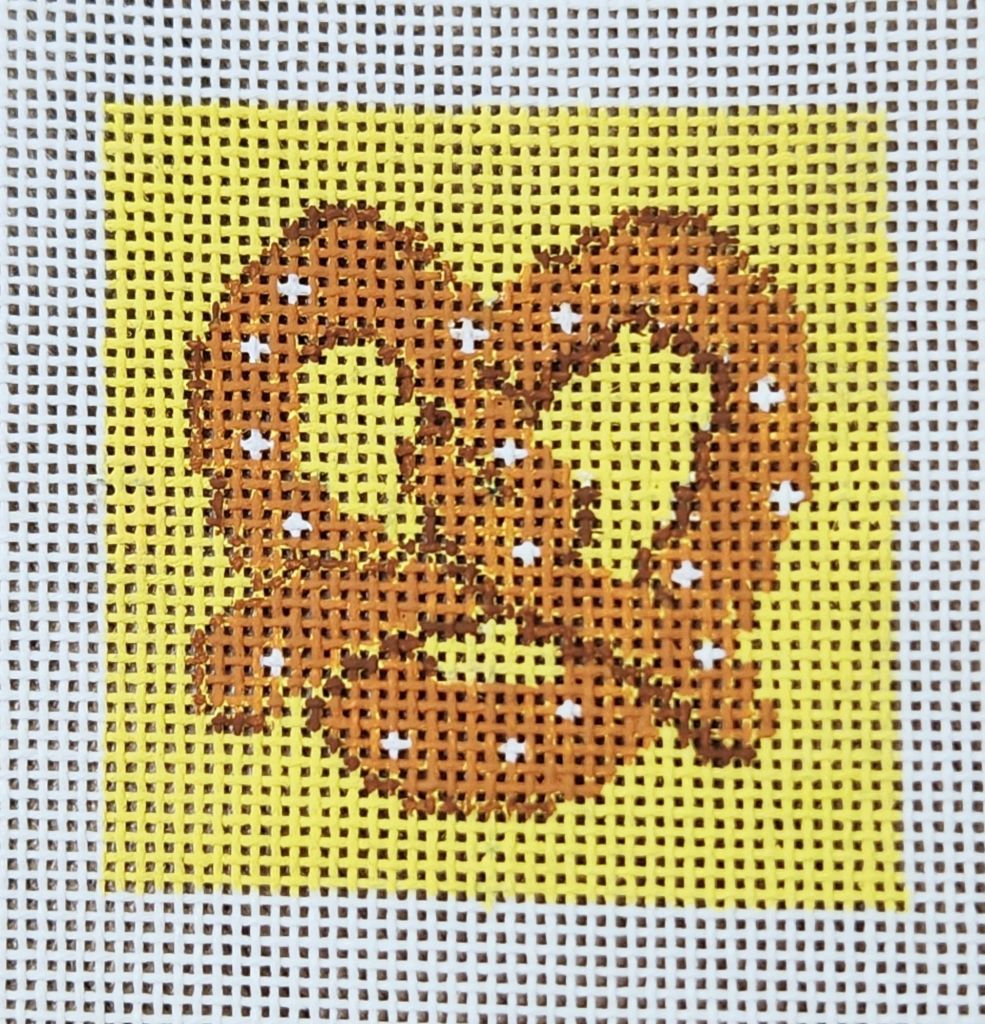
I’d like to paint a second one at home in a quiet setting. There were 2 tables of 8 at each table! I can see where my painting is less than professional, but it gets stitched over anyway. So, that makes me think I should just stitch it from the cross-stitch grid provided. But her tips on painting from a grid make sense, and class was fun. Two of my ANG Main Line Stitchers chapter members were in the afternoon class, at least one member in the morning class, and one past member came over to say hello.
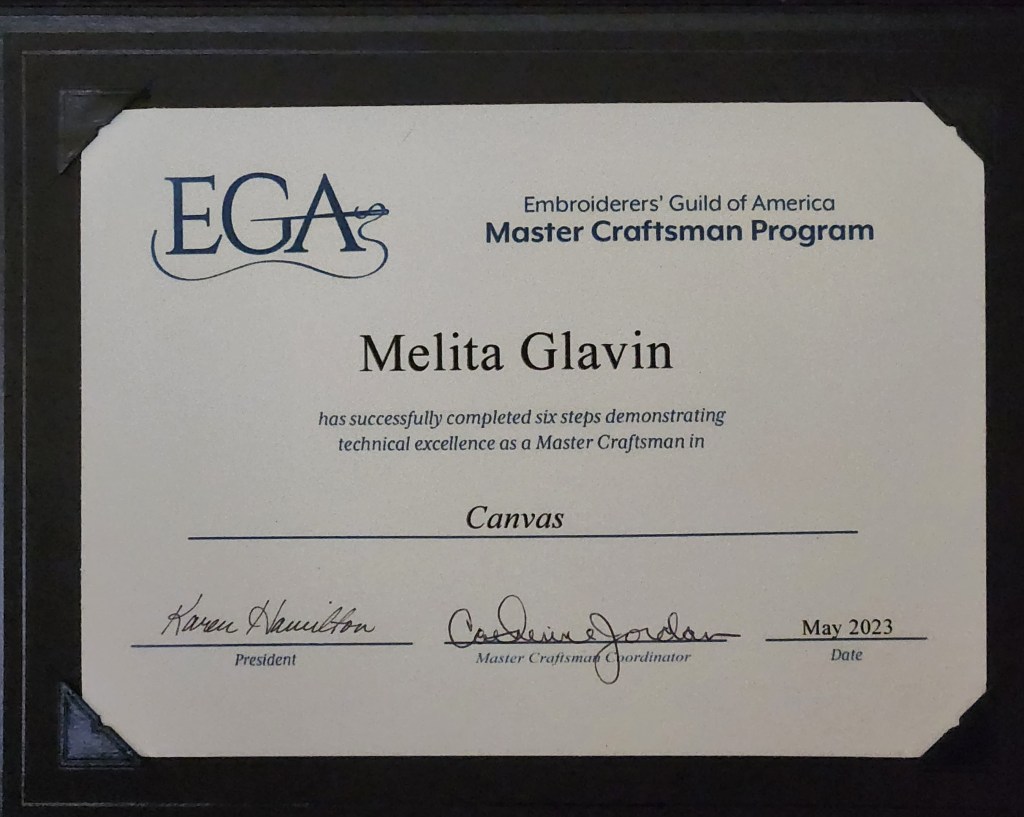
For the 2024 ANG Seminar exhibit in the Original Design category, I sent in my Fireside Sampler created for Step 6 of the EGA Master Craftsman in Canvas. But the ANG judges moved it to from the Original Design category to the Adaptation category because my artist statement included a photo and description of how I revised my 20-year old design. The second one is considered an adaptation of the first one. Had the original design not been mentioned, it would have remained in the Original Design category.
It is my second year being in the professional category. It did not get a ribbon from the ANG Seminar judges (it had gotten a 3rd place ribbon from Woodlawn judges). It scored well enough.
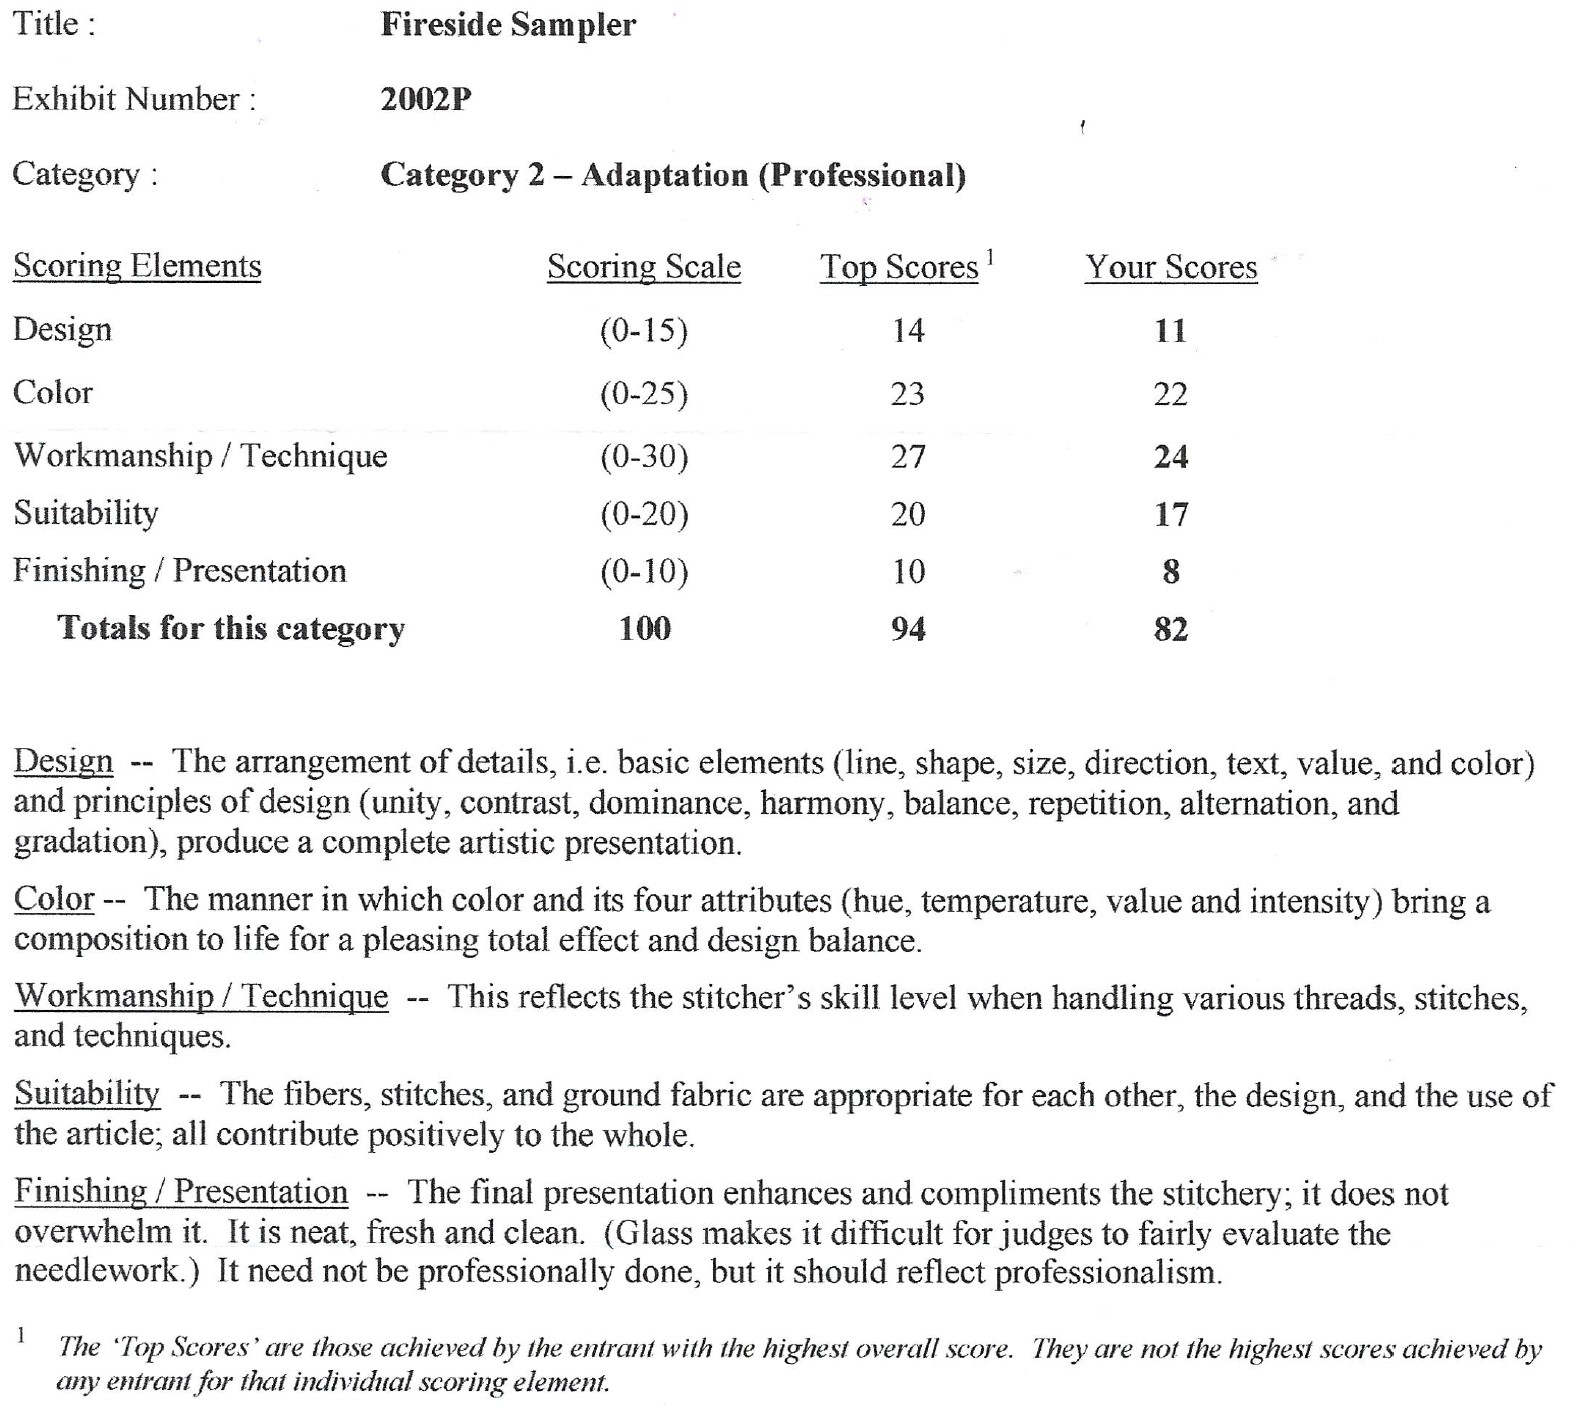
The score that is particularly confusing is for Workmanship/Technique because I lost 6 points while the critique has no negative comments regarding this area. It states: “The brick work in the fireplace surround shows immaculate thread control. This indicates a full understanding of the stitches chosen, thread pull while working each area, and control of stitch tension. The inner fireplace bricks and andirons are also finely worked, and the satin stitches creating the logs are even in both tension and thread twist maintenance. The long stitches used for mortar between individual bricks are well controlled. There are no loose or sagging stitches in this area.” So, why did I lose 6 points? It makes no sense.
There was no comment on why Finishing/Presentation lost 2 points. I’m just curious.
I can agree that the size ratio of the mirror is small compared to the size of the candles. I’ll also agree that the flames are very intense and a slight change in temperature of the flames would have added a more realistic appearance to the design. However, I can’t see that because the bottom flame row is very symmetrical, it detracts from the effort taken to add interest in the top row.
I was really pleased to see the judge felt it was a well-written artist’s statement and helped them understand just how much thought went into improving upon the original work and the efforts taken to create depth perspective on a flat surface.
And, I was happy to read, “I commend your thread blending efforts on the rug . . the result is worth the time and effort. Well done.” Again, a positive for Workmanship/Technique.
Once again, here is my Fireside Sampler.
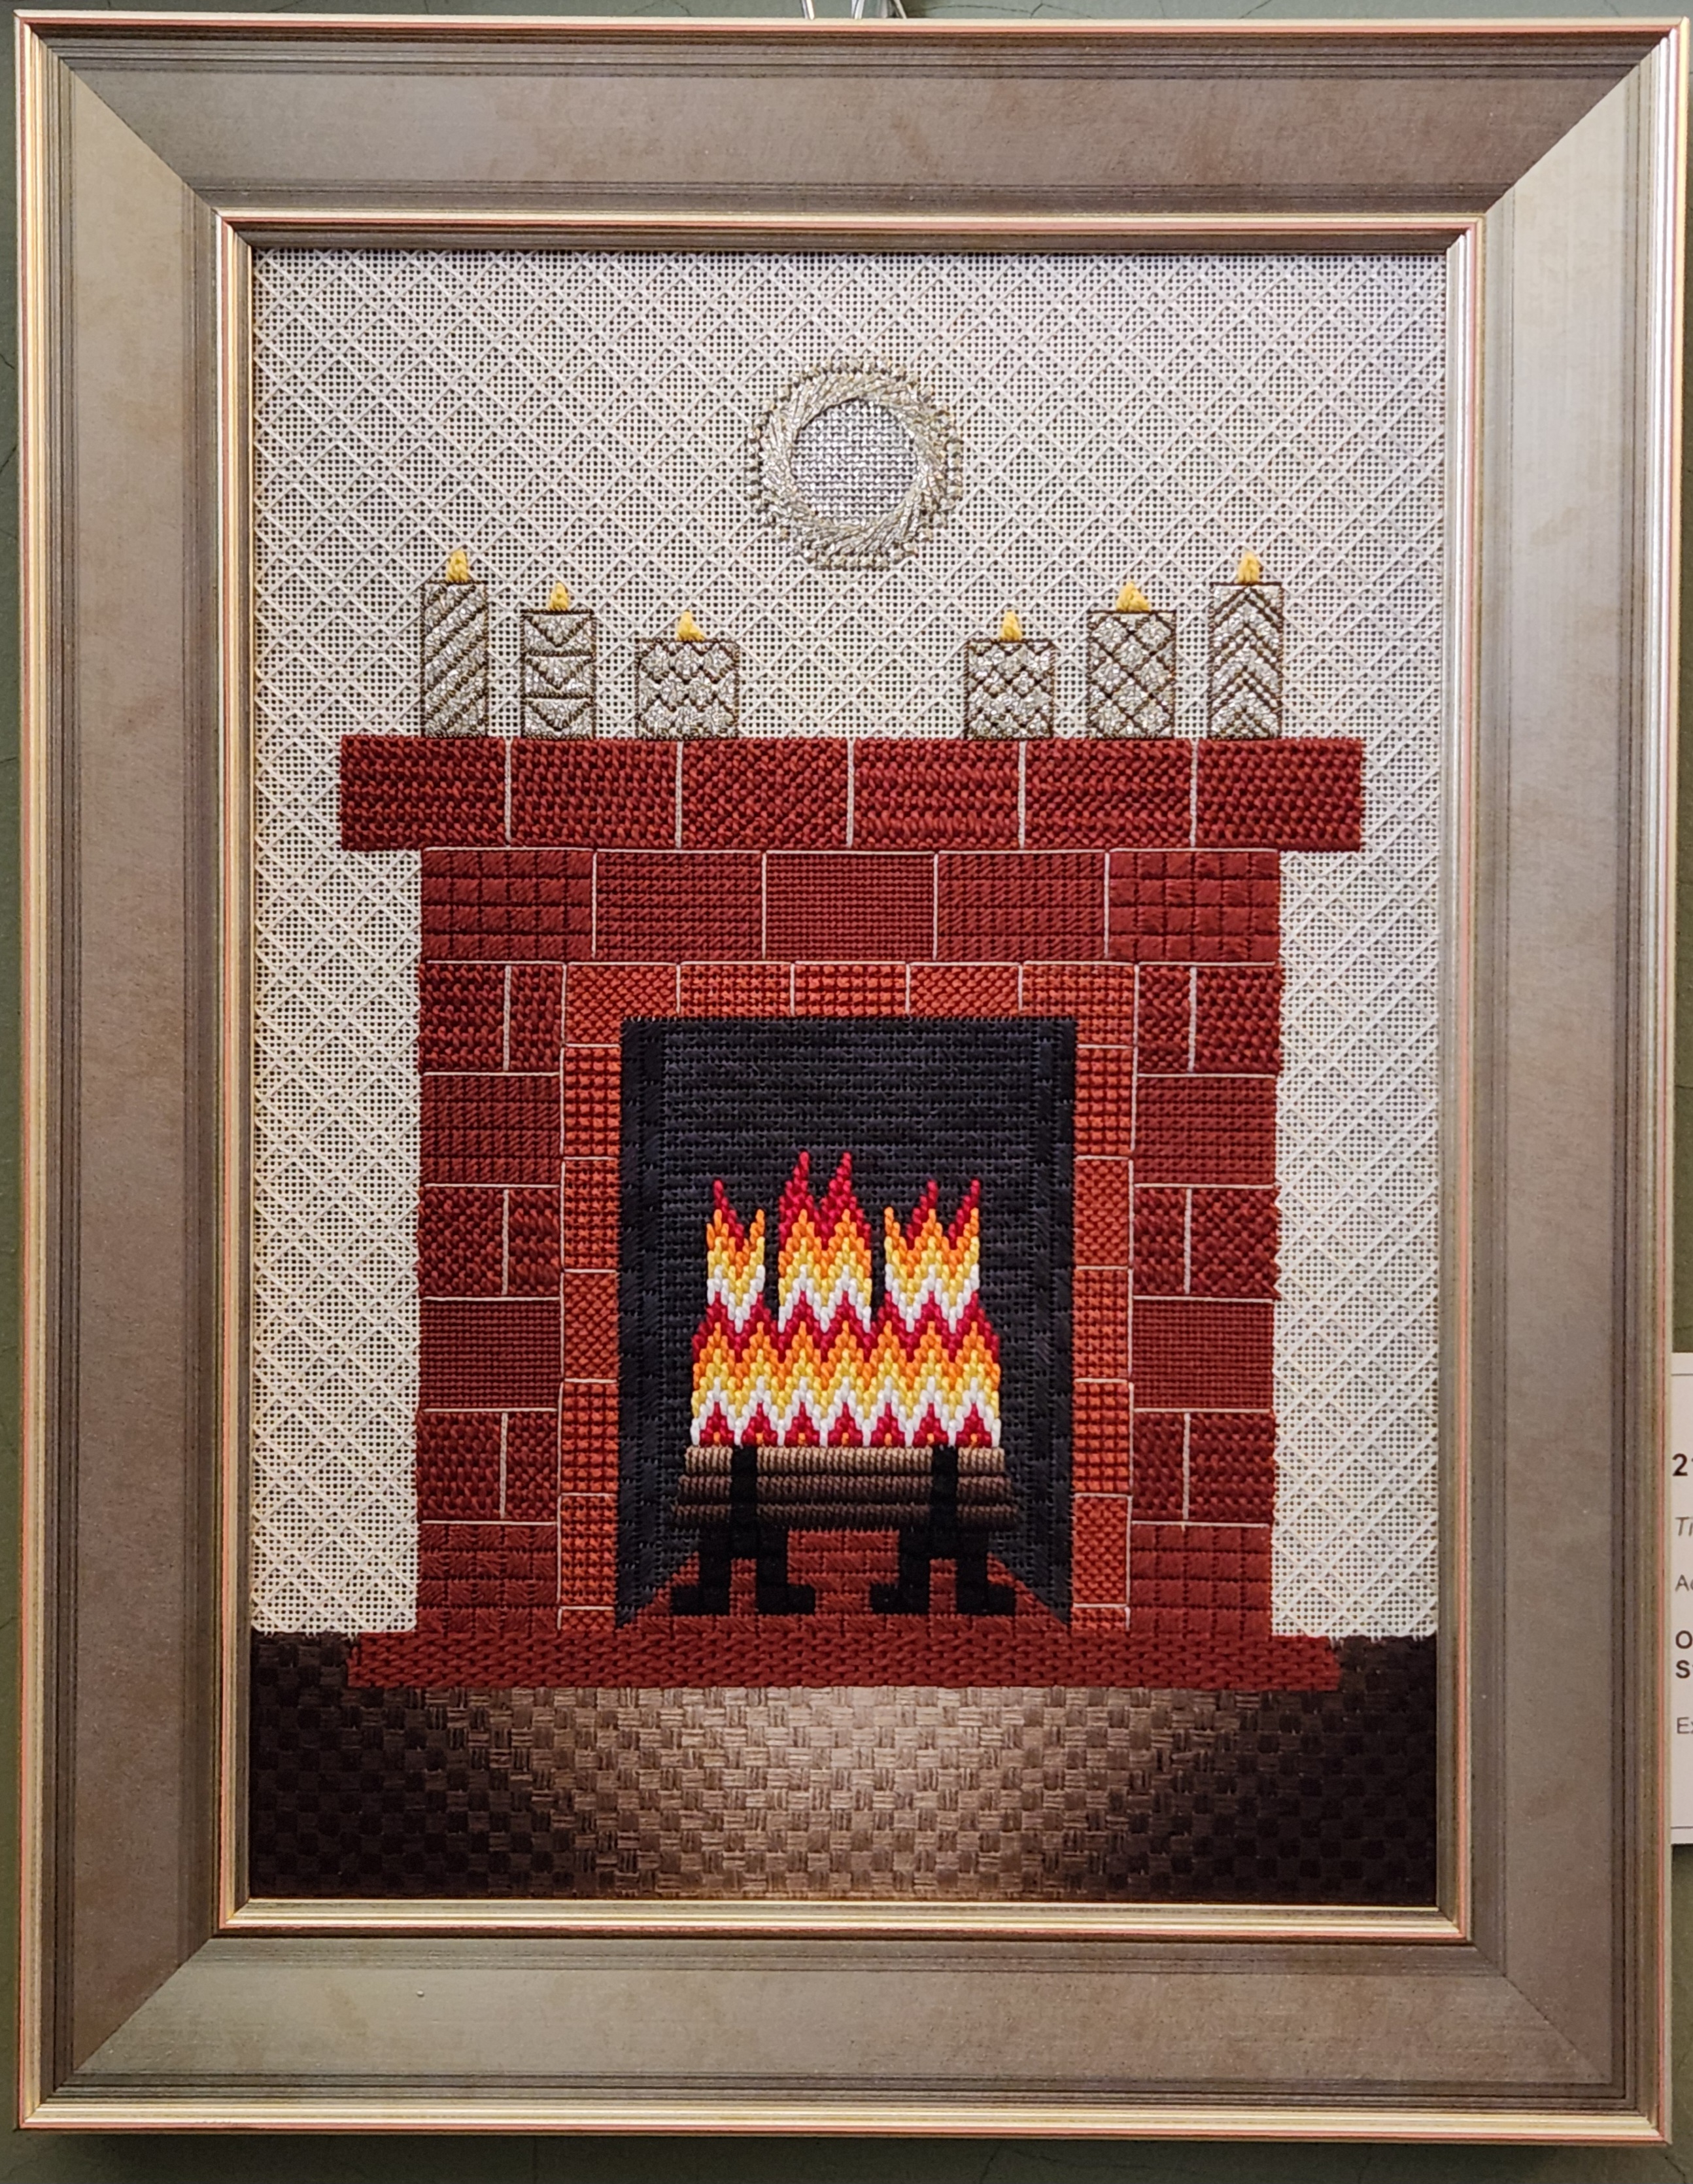
Lynn from Fireside Stitchery has asked to display this in her store. She wanted a fireplace in her store! I just hope nobody wants instructions. It would take a lot of effort. I left it at the store after I discussed this at our Main Line Stitchers chapter meeting.
Filed under: Canvas Master Craftsman Program, Embroidery Guild of America, Steps 1-6
One more post about the EGA Master Craftsman Program for Canvas! I decided that I wanted all 6 pieces in one post. I began the EGA program in the fall of 2019 and completed all 6 steps by the spring of 2023.
EGA has eight Master Craftsman Programs. Briefly, the programs “are designed to promote excellence in embroidery by providing the accomplished needleworker the opportunity to demonstrate skills and become certified as a “master” in her or his area of expertise. Each program area consists of six steps that test the ability and workmanship of the candidate.” To obtain further details about each program online, you must be a member of EGA. Judging is usually twice per year but you can take up to 2 years to complete each step.

Step 1 has you demonstrate that you can transfer a design and execute 10 stitches (no more and no less). The fabric type (18 count monocanvas), type of threads (stranded cotton), and color scheme are specified. I used 5 monochromatic values in what DMC calls Golden Yellow. I used lighter colors and smaller stitches to have certain elements recede. I turned the stitch on the right fish’s fin to add movement. I employed thread blending in some manner on all 3 fish. Documentation in an Artist’s Statement must include stitches used, source of stitches used, and threads (including 4” samples of any threads used).

For Step 2, you demonstrate that you can transfer a design, execute 21 stitches (including Turkey Work), and compensate using an analogous (Yellow, Yellow-Green, and Green) colorway. EGA supplied the geometric pattern again. It had to be done in an analogous colorway in cotton floss. I selected Yellow, Yellow-Green, and Green for my analogous colorway (which is 3 adjacent colors on the color wheel including a primary color; tints and shades allowed).
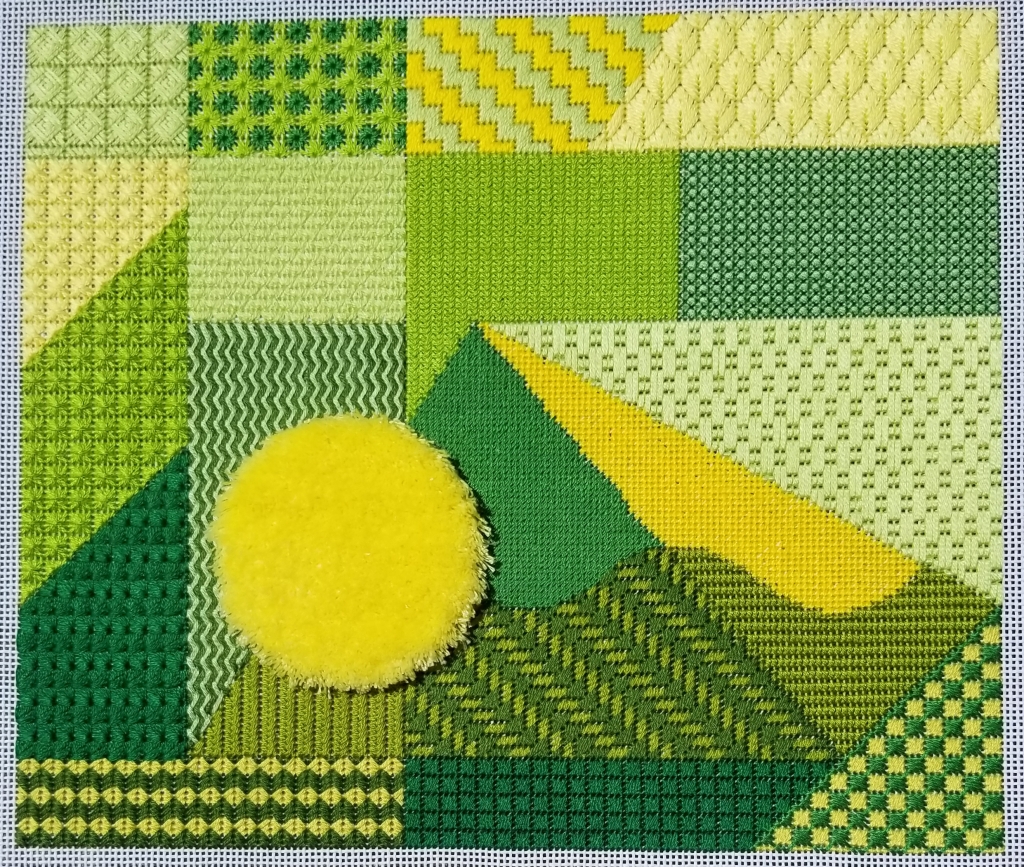
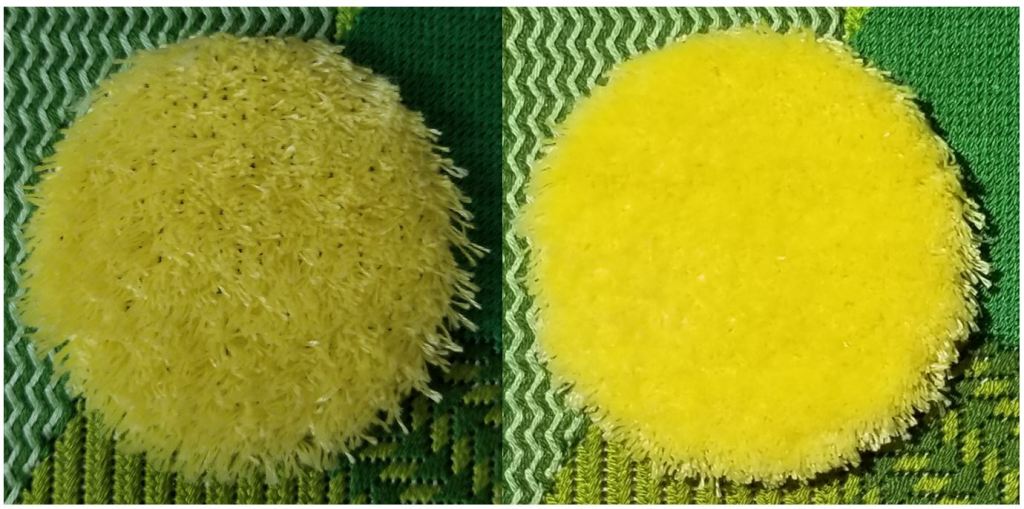
As I did the Turkey Work from bottom to top, the nap of the threads were pressed downward. So, I didn’t notice that the coverage wasn’t as full as I expected when it was fluffed up. I used 2 strands in the left side of the photo and 6 strands (as Mary Corbet suggests in her YouTube video) in the right photo. Much better! At least the stitching was easy to remove from the backside.

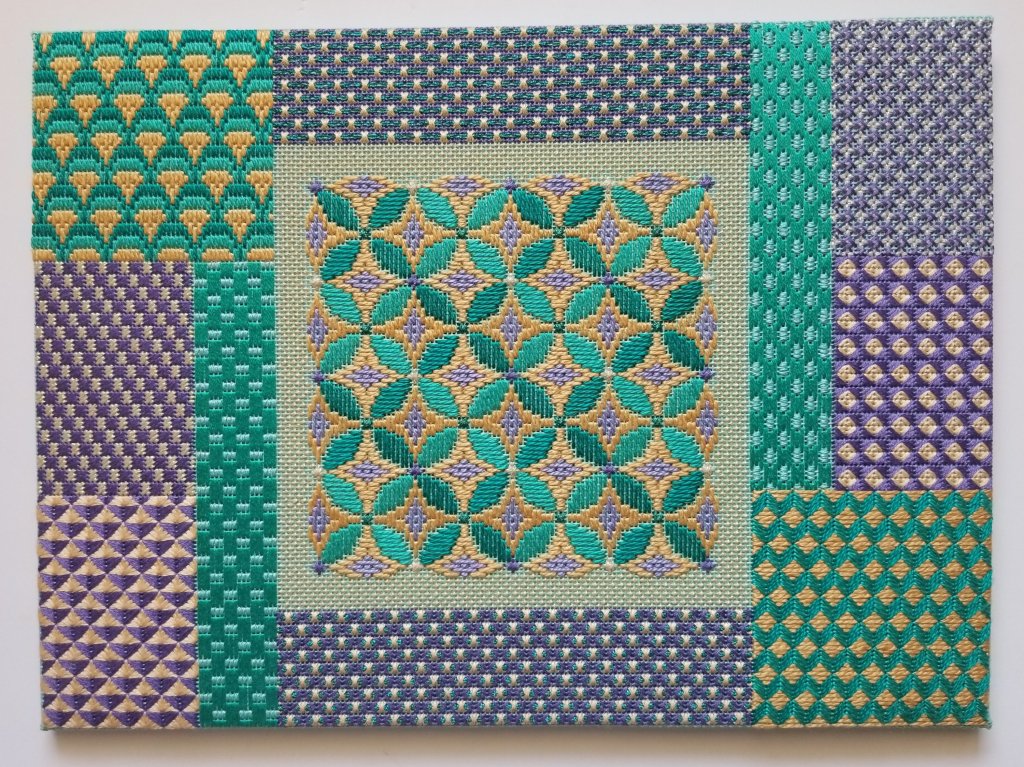
Step 3 has you use at least 4 diaper patterns in a split complementary color combination (mine is yellow-orange, blue-green, and blue-violet). Diaper patterns create strong visual diagonals in both directions. After studying the extremely thorough book, Diaper Patterns, by Ann Strite-Kurz, I decided to make this a diaper sampler by incorporating the eight basic pattern networks (square, diamond, brick, half-drop, triangle, hexagon, scale, and ogee) into a design. Networks moving clockwise from top left are: Scale, Brick, Half-drop, Diamond, Square, Hexagon, Brick, Half-drop, Triangle, and Square on the Diagonal with an Ogee in the center.

Step 4 has you incorporate 8 different bargello patterns but not into a “sampler”. However, each pattern must touch another Bargello pattern in the design. Any color combination was allowed. I selected a tetrad that are two sets of complements: yellow-orange (browns), yellow-green, blue-violet, and red-violet.

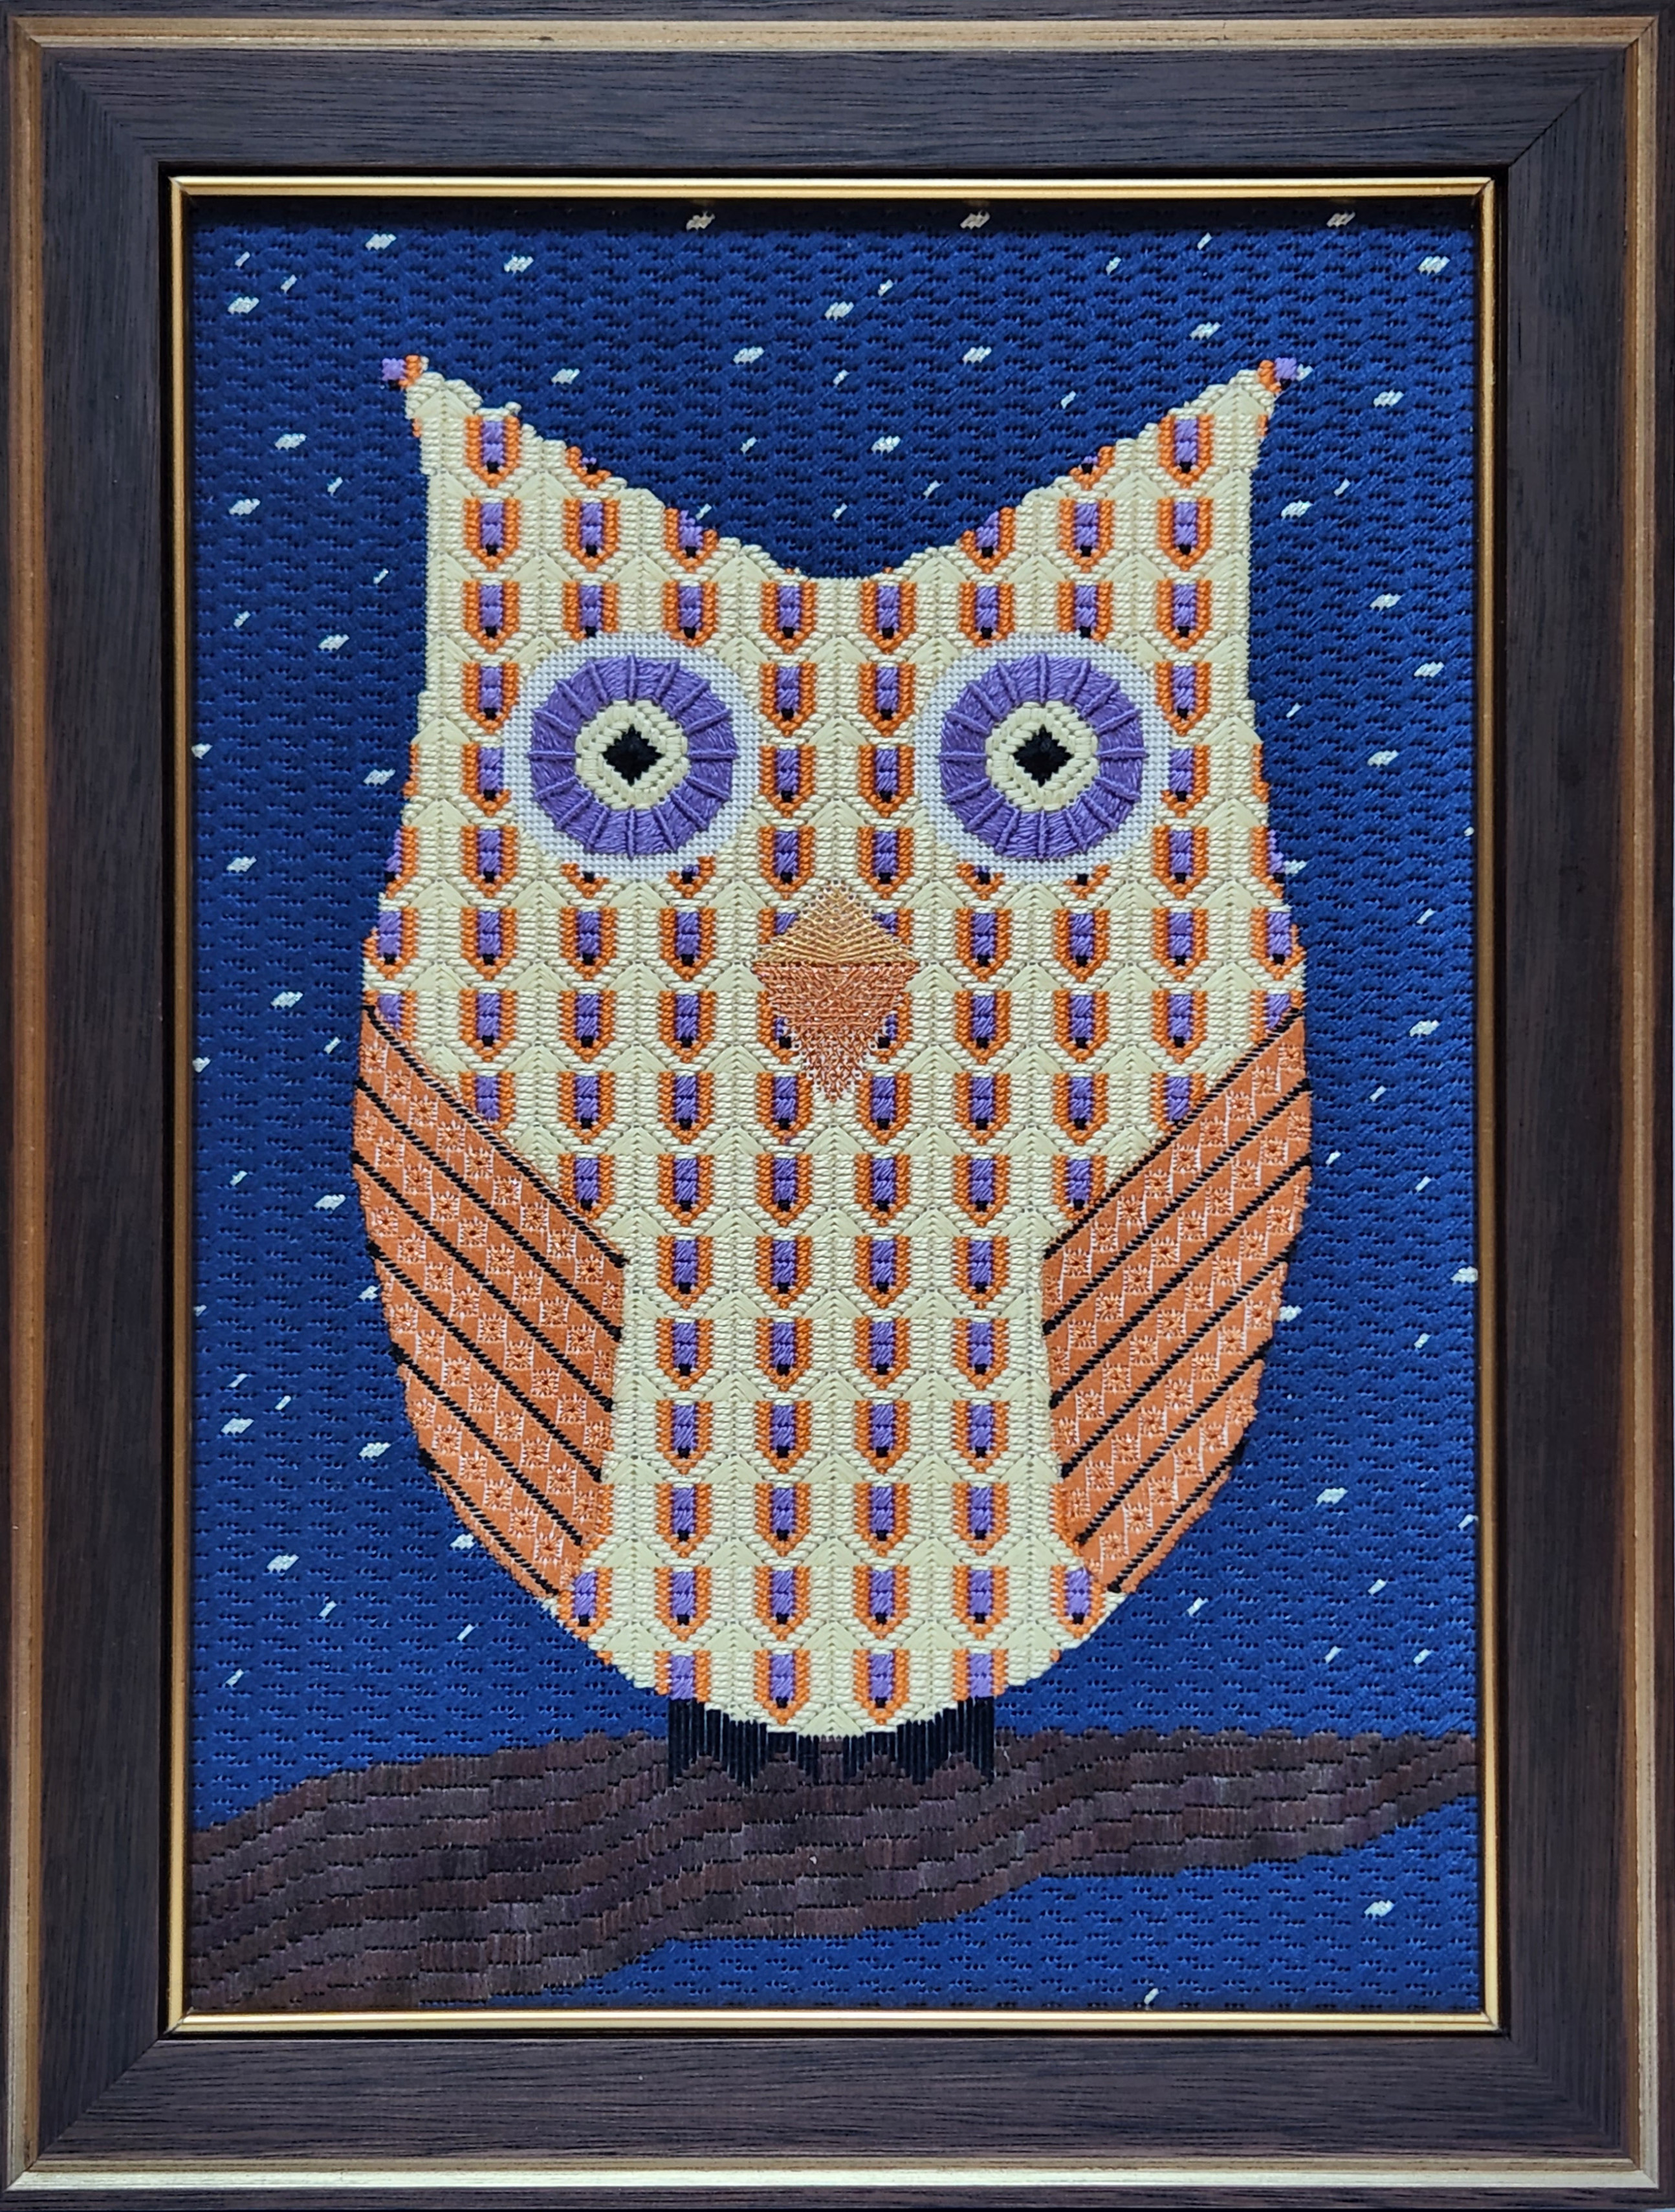
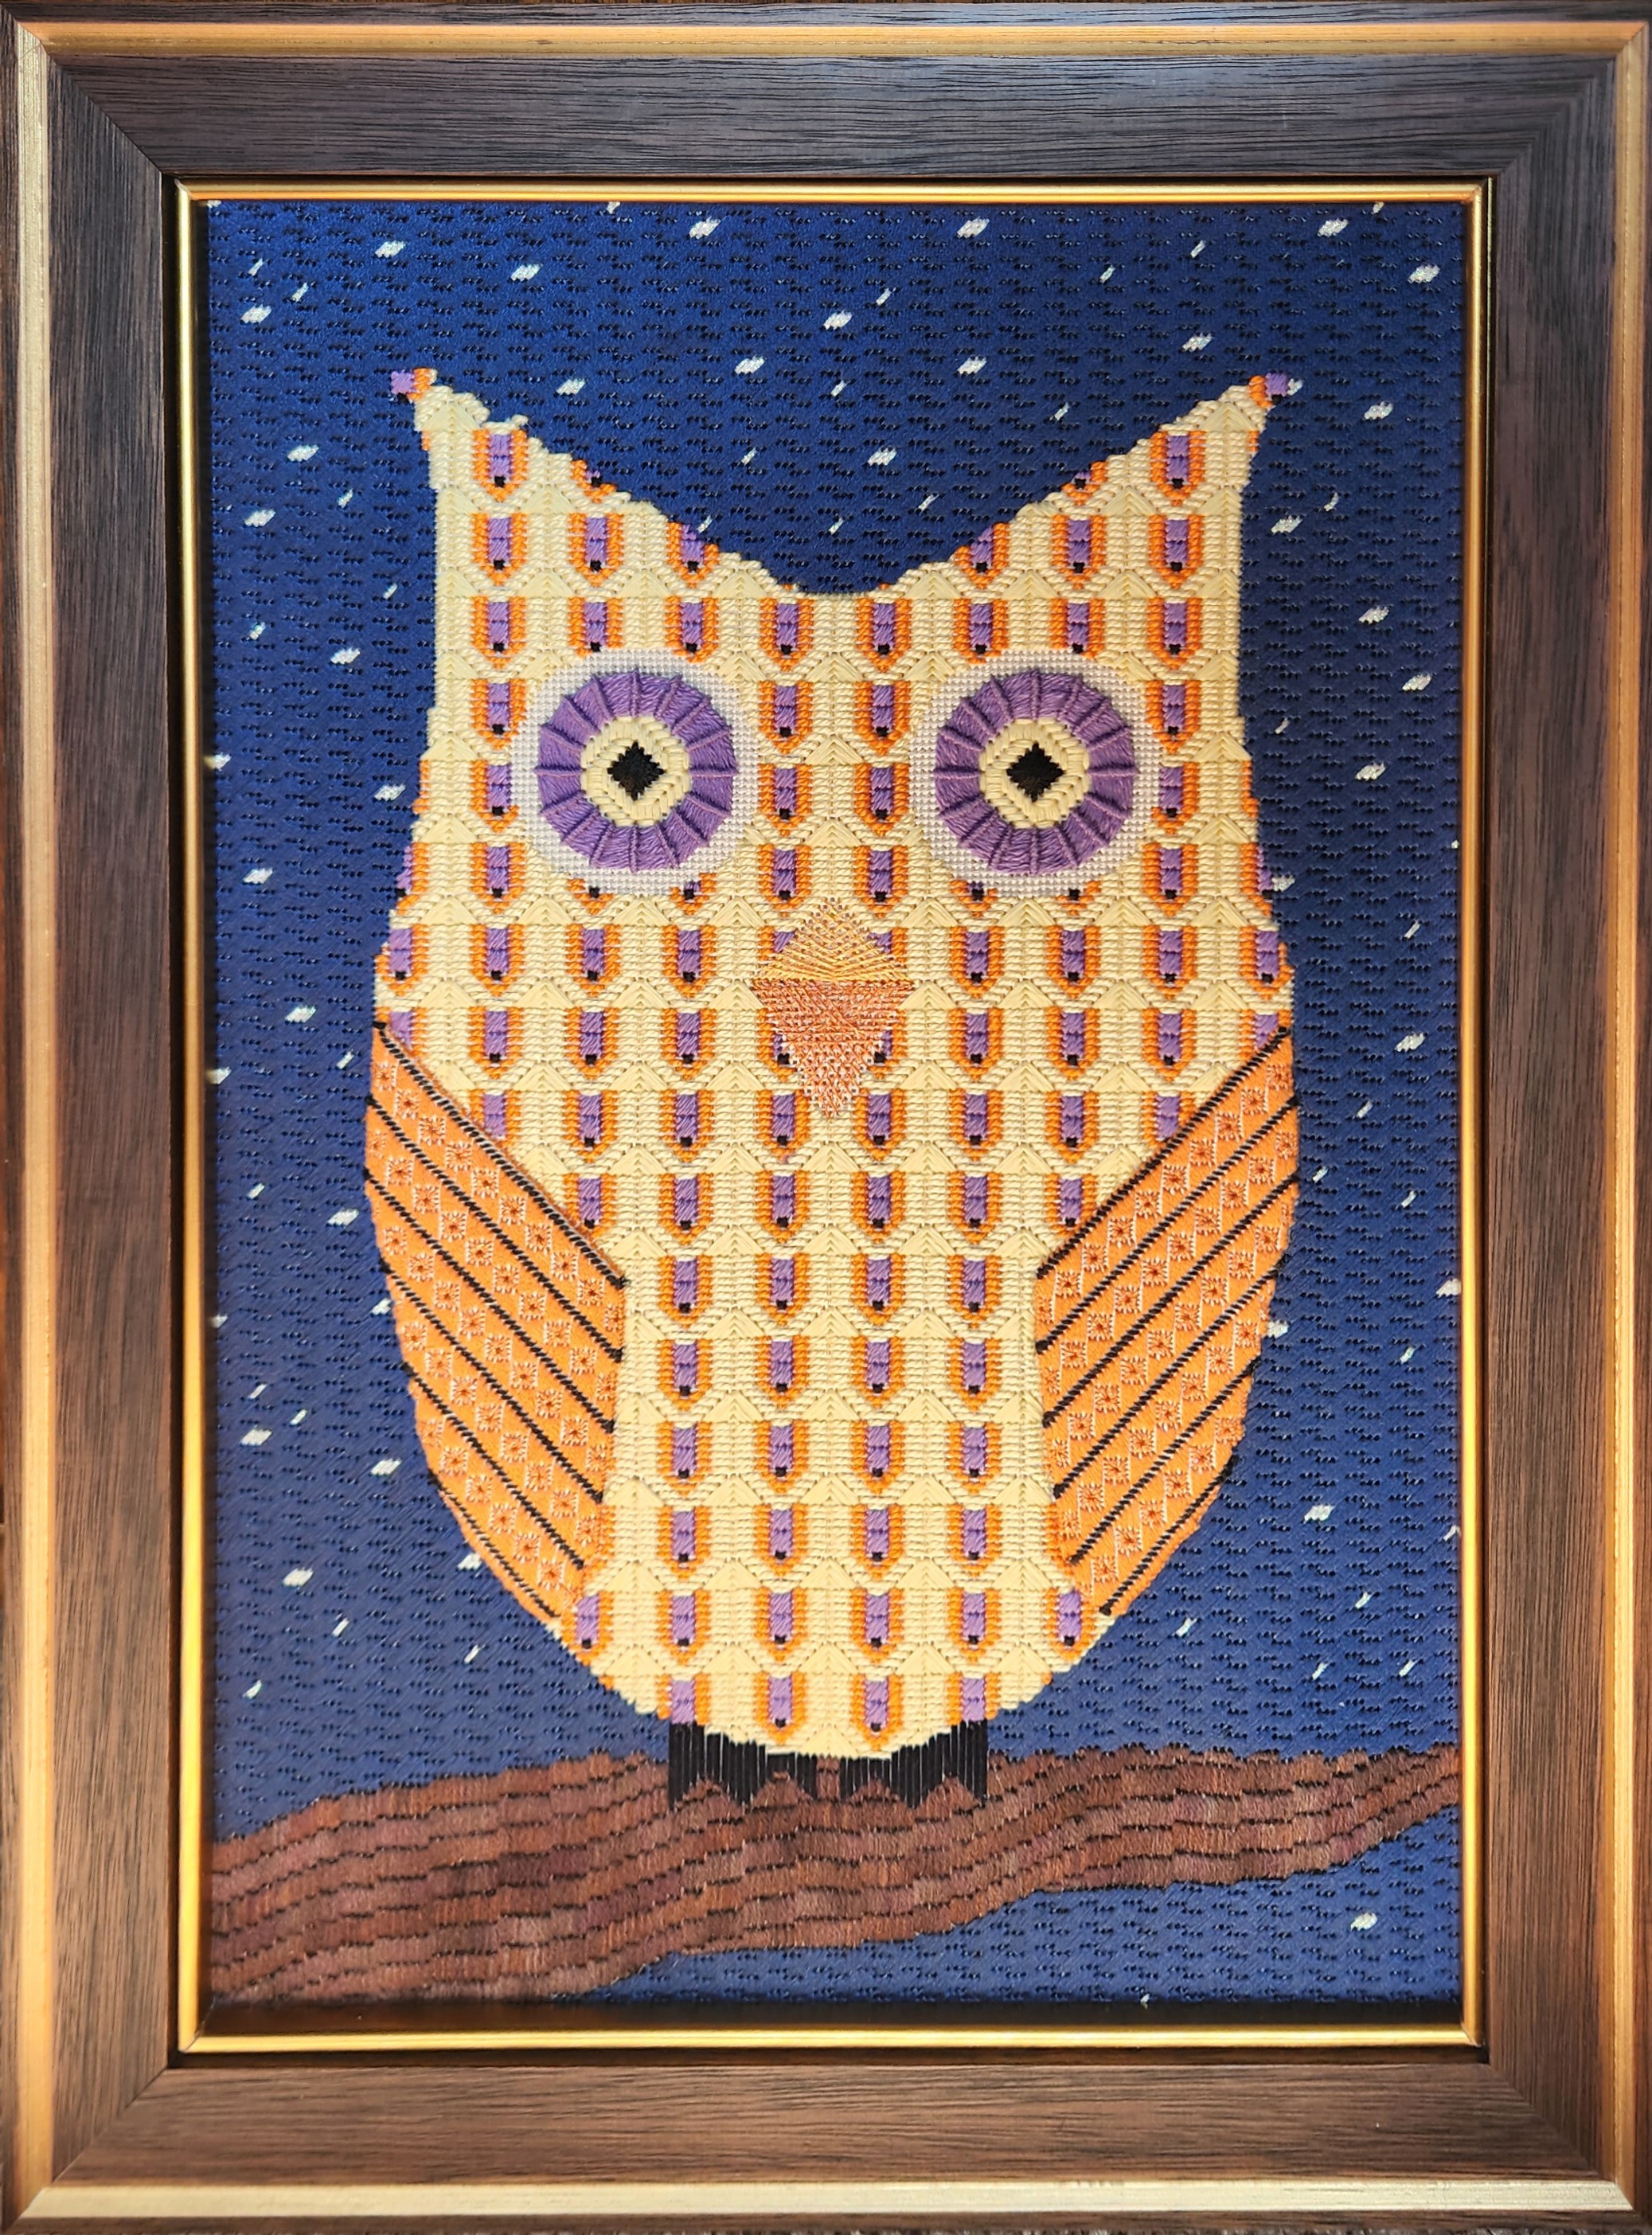
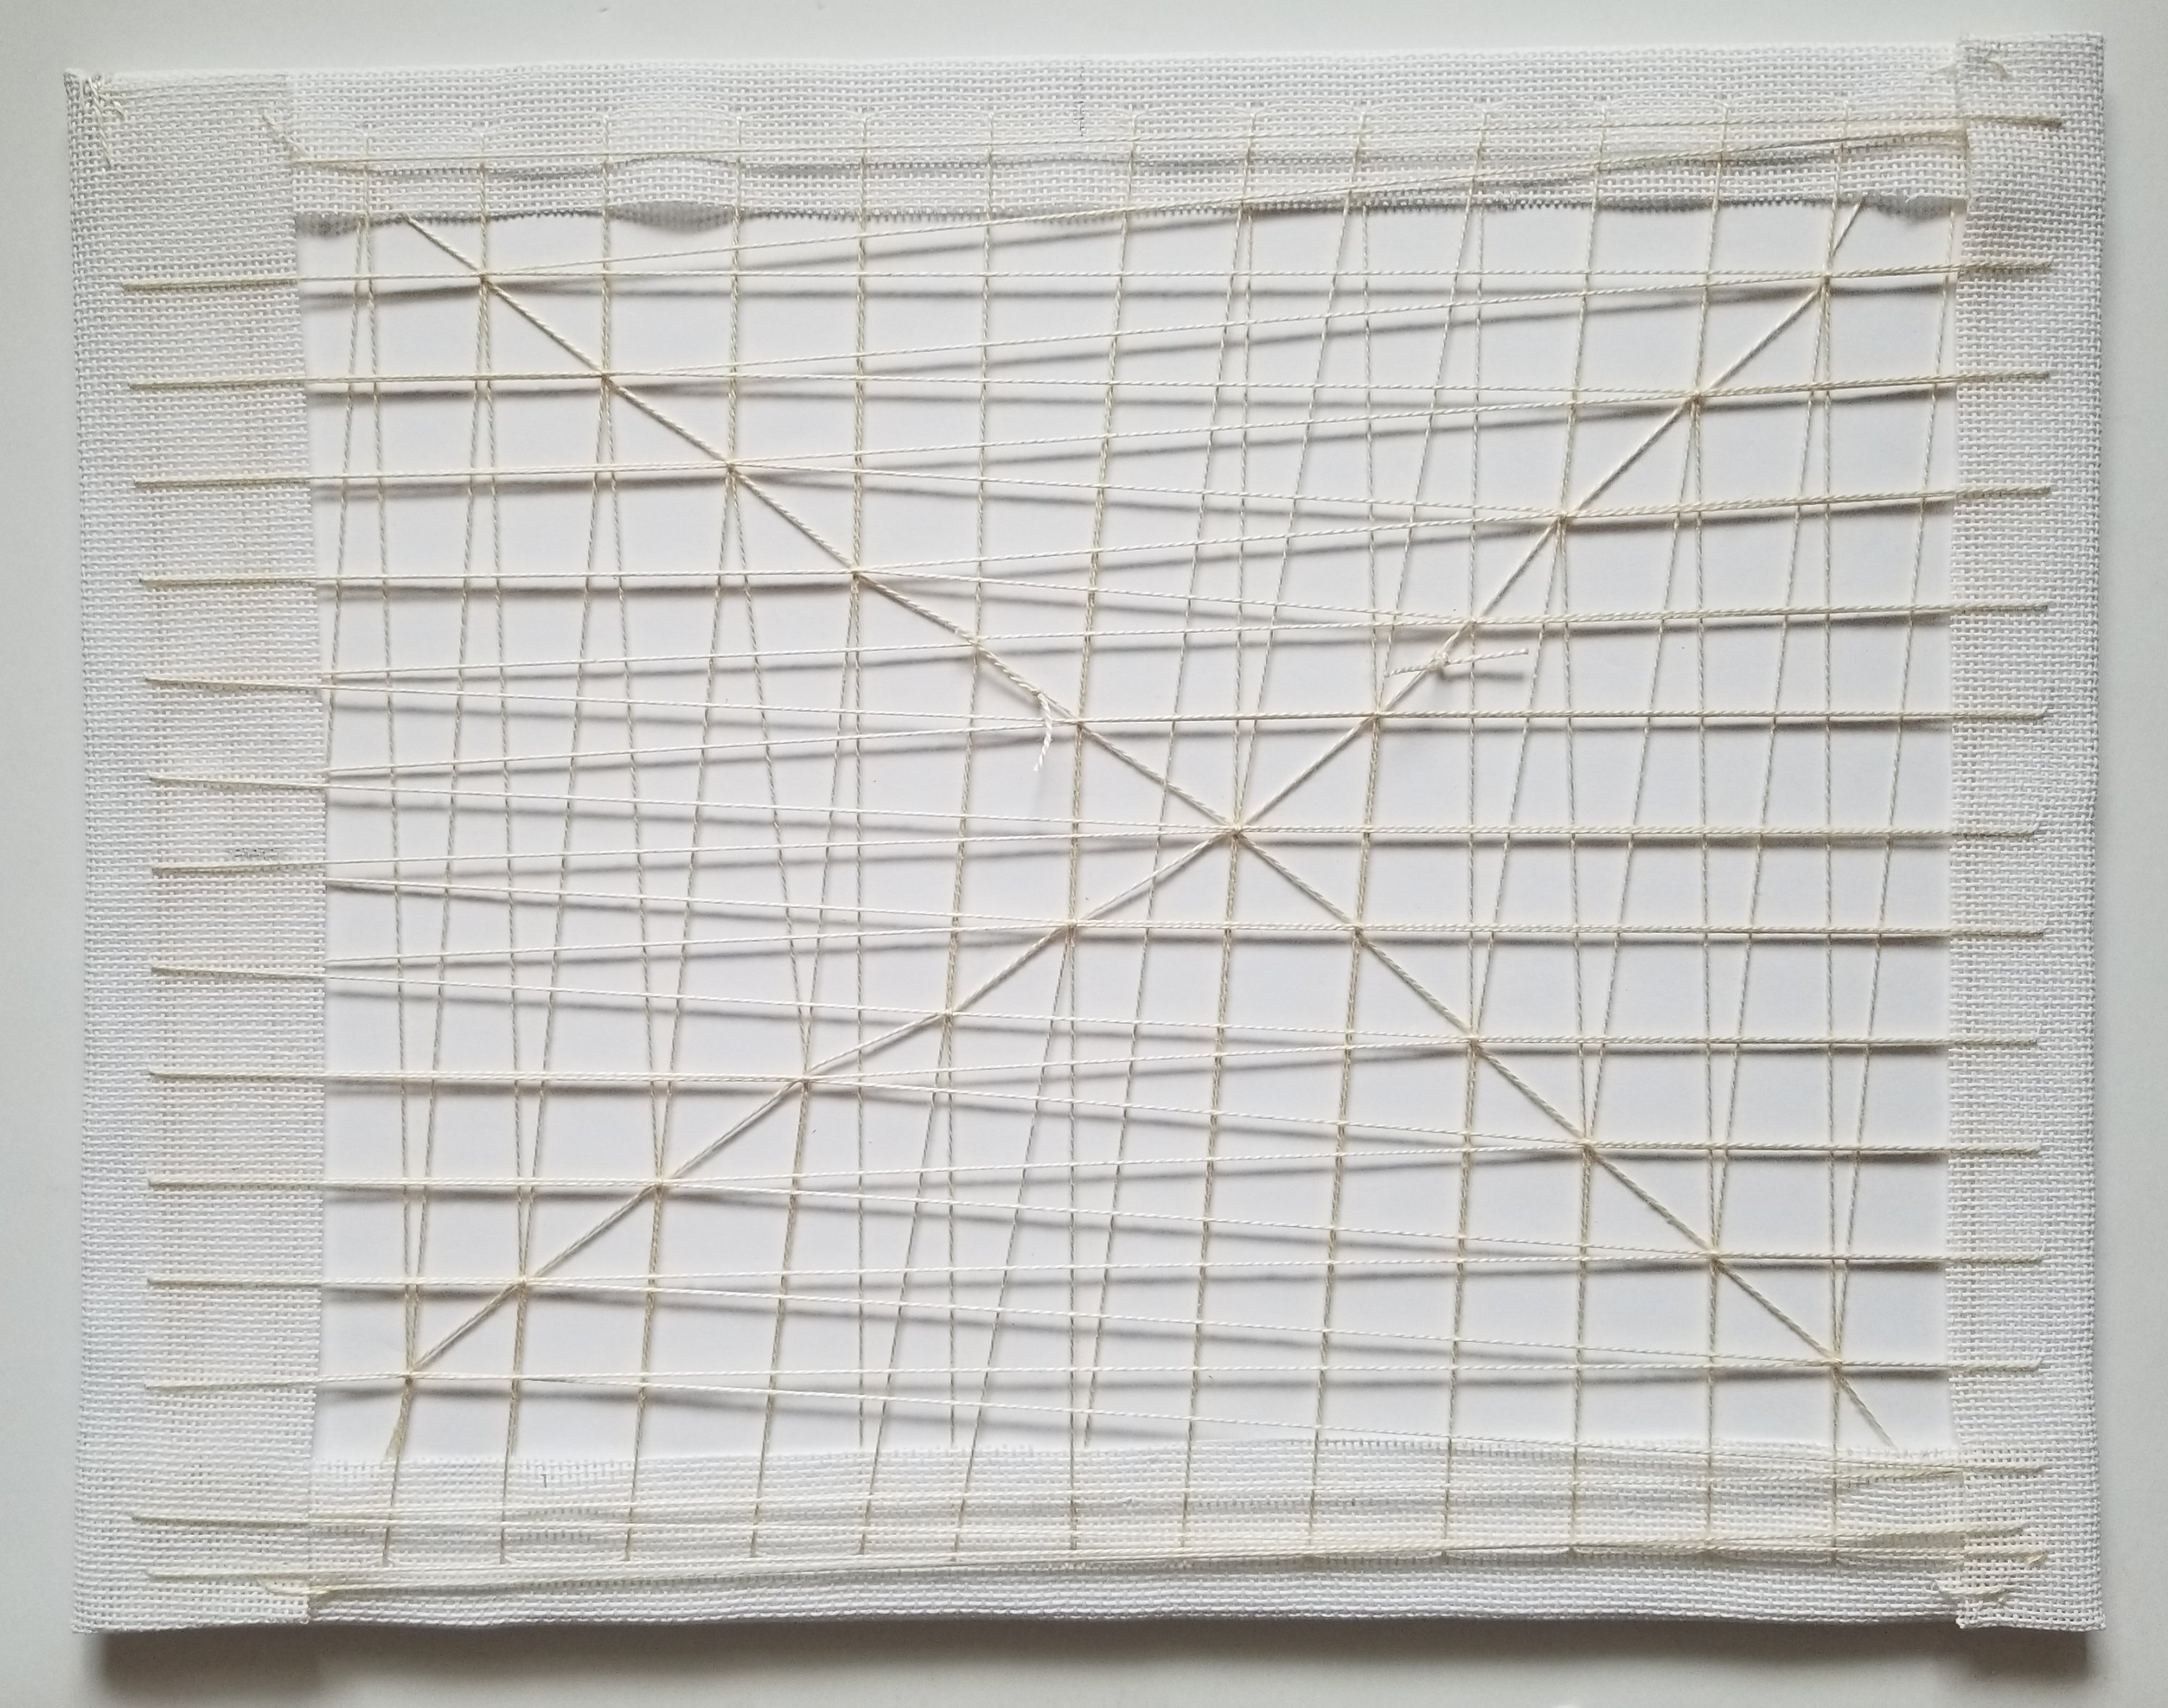
Step 5 has you place a canvas applique of a smaller size count canvas onto a larger size count canvas (my wings are 24 count placed onto 18 count). Pictured are my 2nd and 3rd practice wings. This is the only step that took me a year (thinking, planning, and practicing). I’d never done applique before. At least one applique has to be an irregular shape and greater than 1” square. I started this piece shortly after seeing the article Tale of Two Stitchers in the Needle Pointers (Mar 2021) regarding the 2 painted canvases of owls “Who Gives a Hoot” although mine doesn’t look like them. At first, I was going to make the round eyes the applique until I realized that a circle is not irregular! So, I switched to making the wings the appliques which actually made better sense since they should be in front of the body anyway. I would have padded it but the instructions didn’t say you could pad it. After my submission, they changed their instructions to clearly state that padding is allowed.

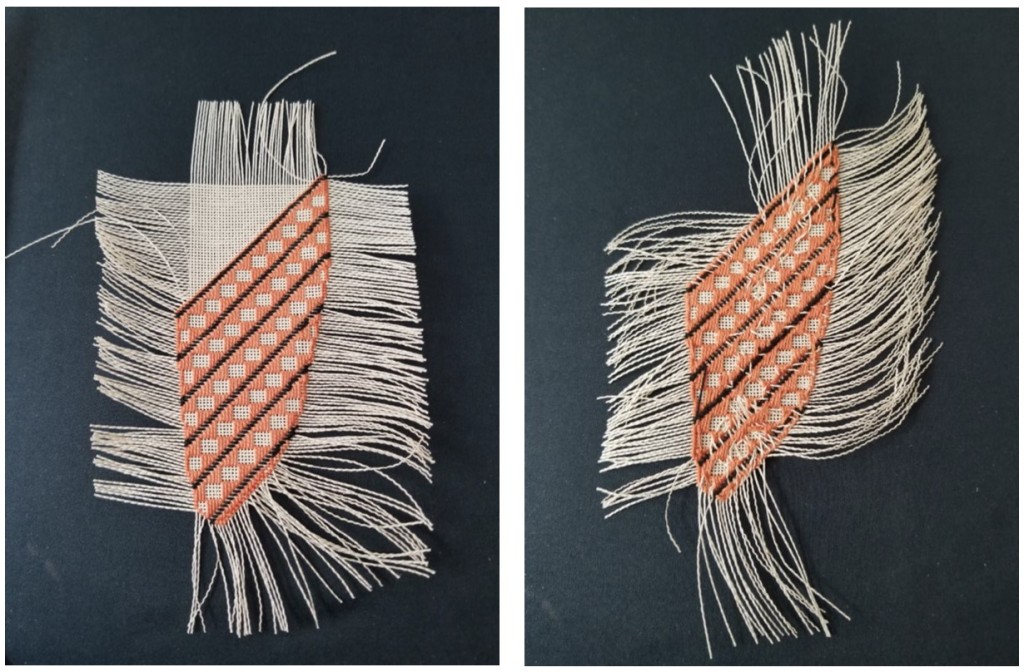
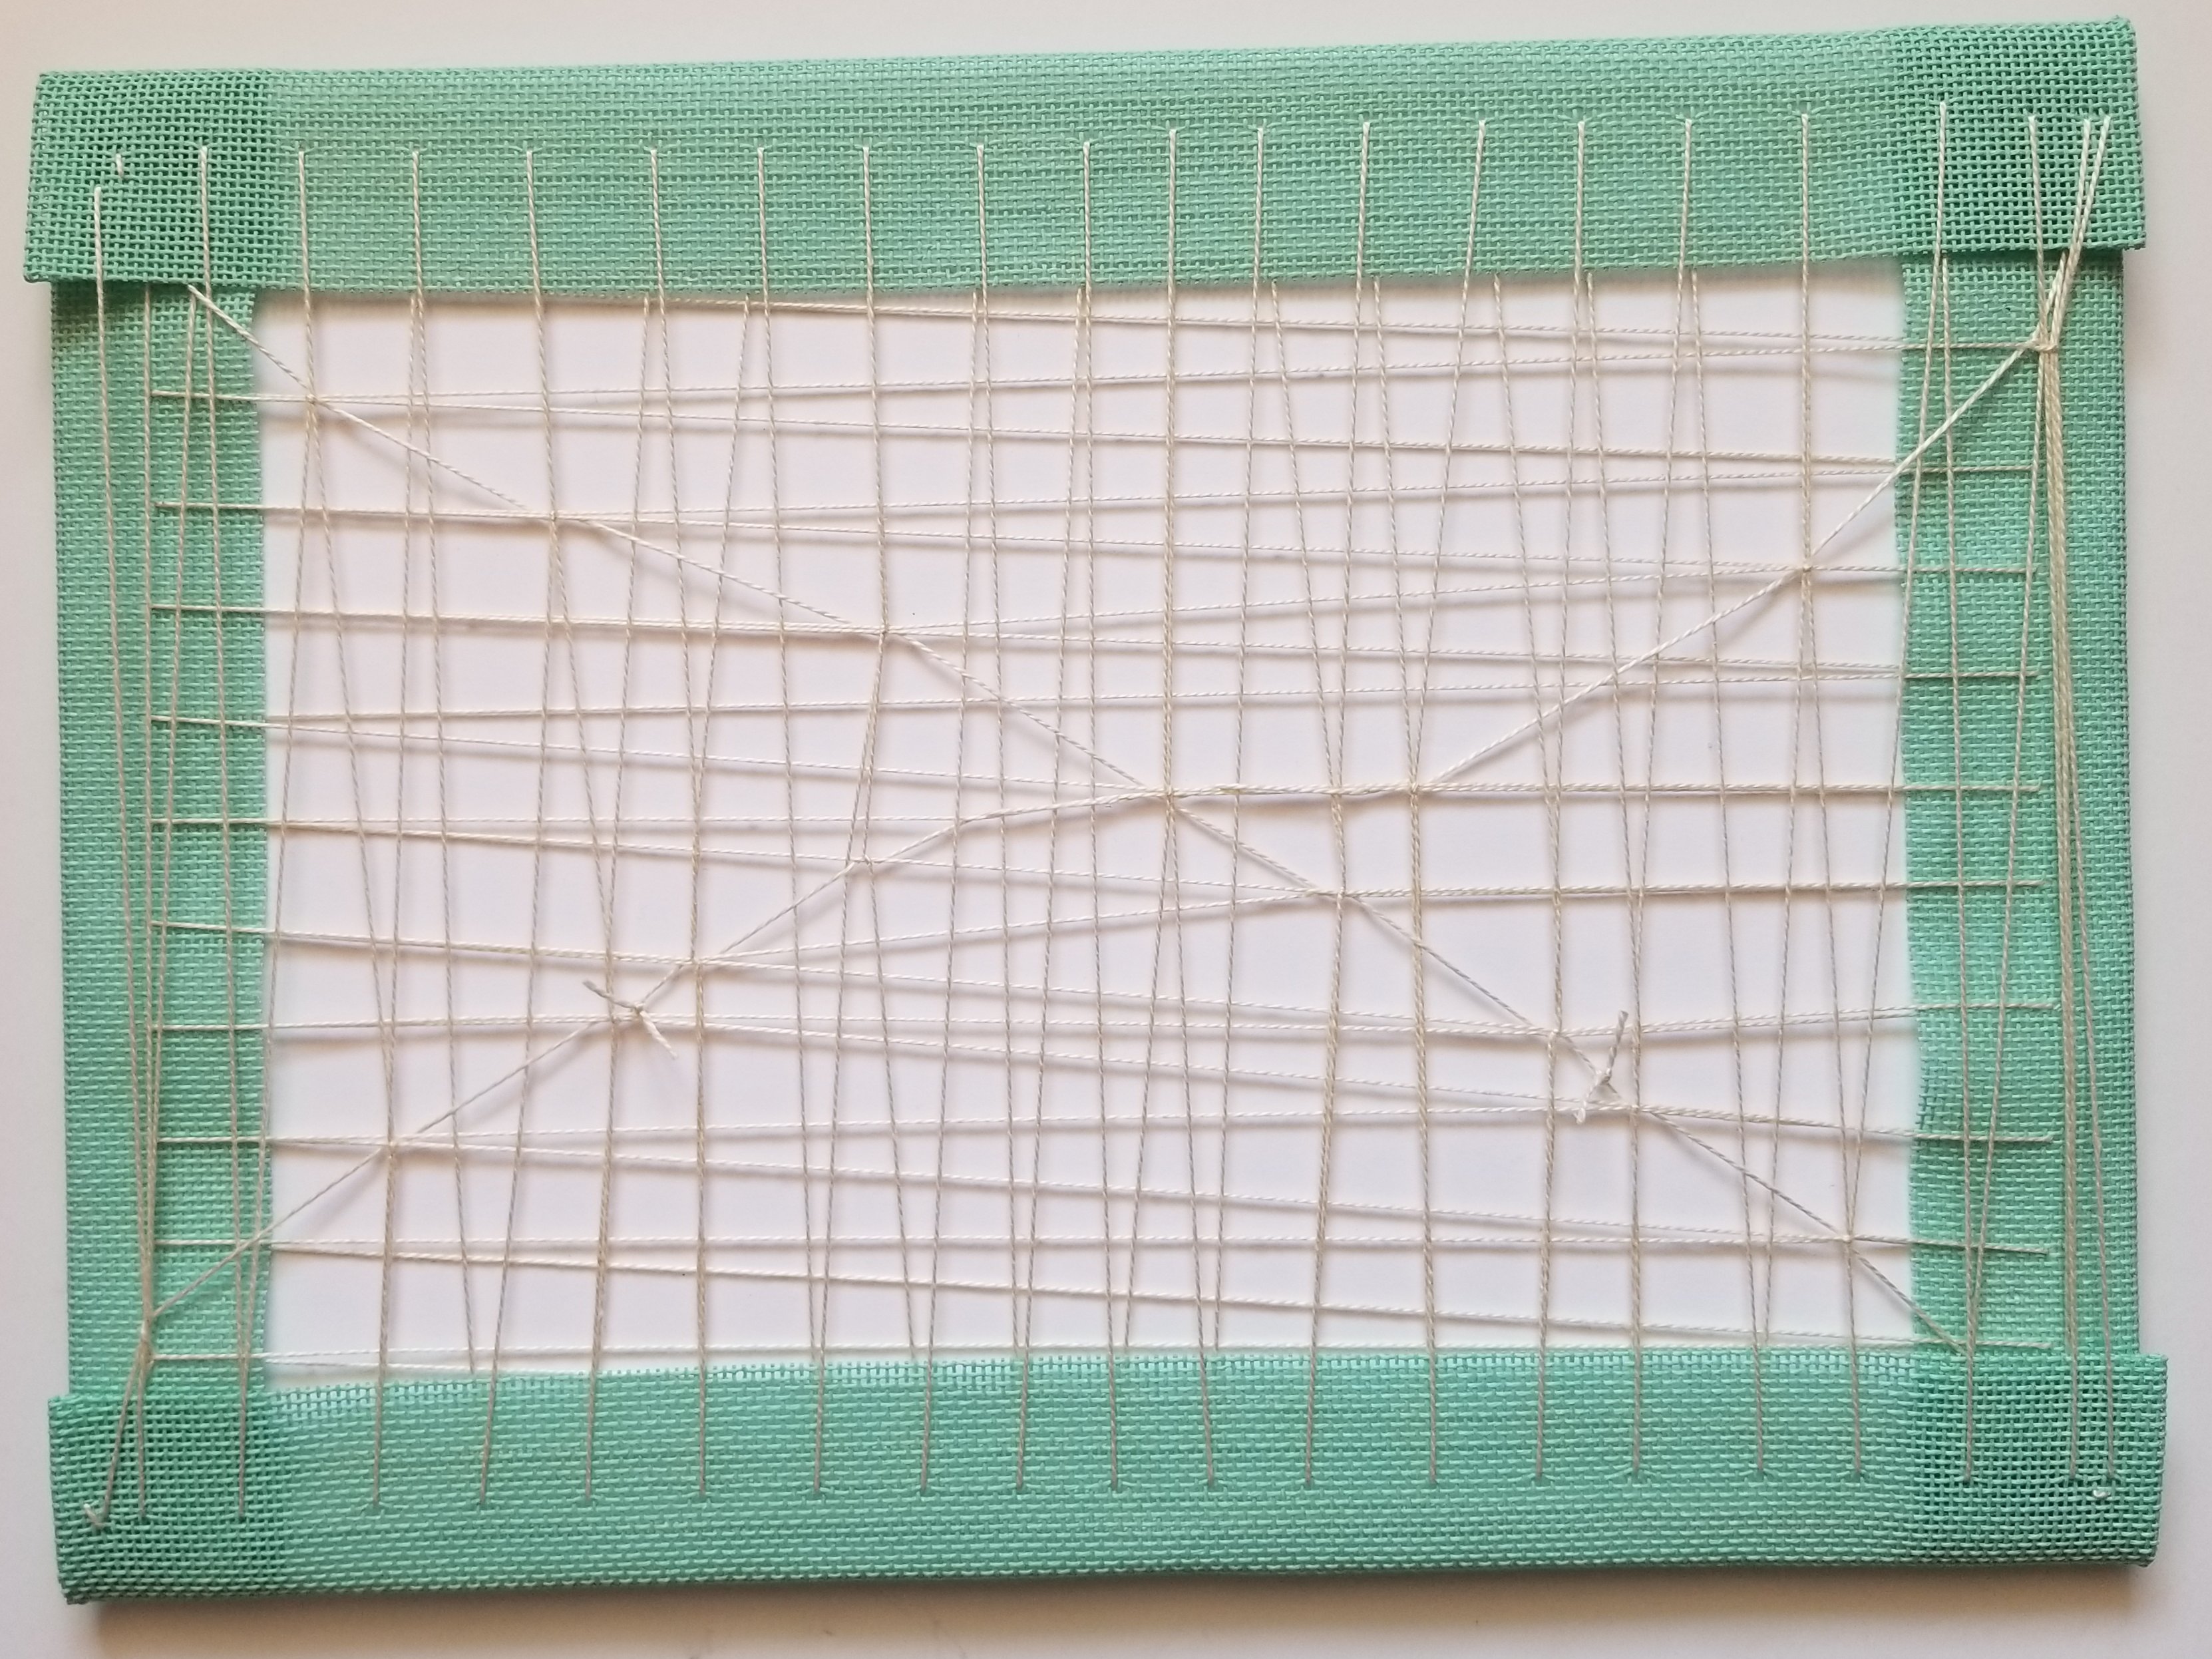
In a nutshell, Step 1 of making a canvas applique is to pull threads out to the stitched piece (in progress in left photo). Step 2 buries some threads on the back of the applique (right photo). The rest of the threads are pulled to the back and buried in the surrounding stitched area. It is time consuming.
Step 6 had to be an original design utilizing previous steps. This was an opportunity to redo a piece I designed years ago after taking First Steps by Nanette Costa. I learned 30+ stitches through my first ANG Correspondence Course and used those stitches in this fireplace. I especially wanted to make the design area taller instead of square and change the candles and background. This has well over 30 different stitches most requiring compensation. Bargello for the flames and a diaper pattern for the background. The rug employed a 21-step thread blending formula to move from light to dark using DMC Floss 842, 841, 840, 839, 838 (5 strands).

At least one of the judges felt the white in the flames was a little strong but that the ThreadworX overdyed was a perfect choice for the sooted walls inside the fireplace. The diaper pattern wallpaper recedes (as it should) and adds just enough texture to add interest. Different values of the bricks and logs add dimension as do the Smyrna cross stitches around the large Jessica. The glow on the rug is lovely and well-executed. I provided the 21-step thread blending formula to move from light to dark using 5 strands of 5 brown DMC Flosses in the Artist’s Statement.
I enjoyed the challenge, highly recommend the program, and thank the panel of three judges who thoughtfully reviewed each piece.
Filed under: Canvas Master Craftsman Program, Embroidery Guild of America, Step 6
Step 6 of the EGA Master Craftsman program for Canvas had to be an original design. This was an opportunity to redo a piece I designed years ago after taking First Steps by Nanette Costa. I learned 30+ stitches through my first ANG Correspondence Course and used those stitches in this fireplace.
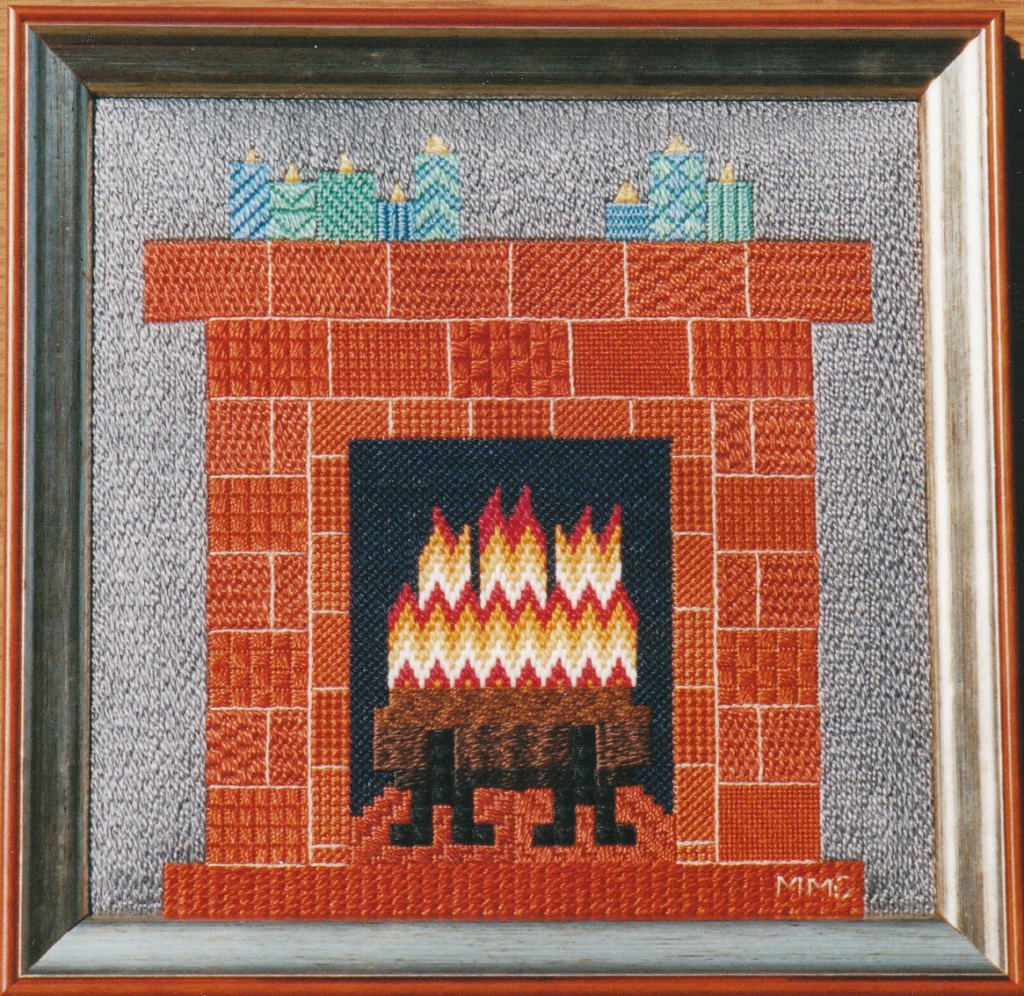
I especially wanted to make the design area taller instead of square and change the candles and background.
The updated piece (pictured below) passed with distinction and all 6 pieces will be going to Boston for the Seminar!
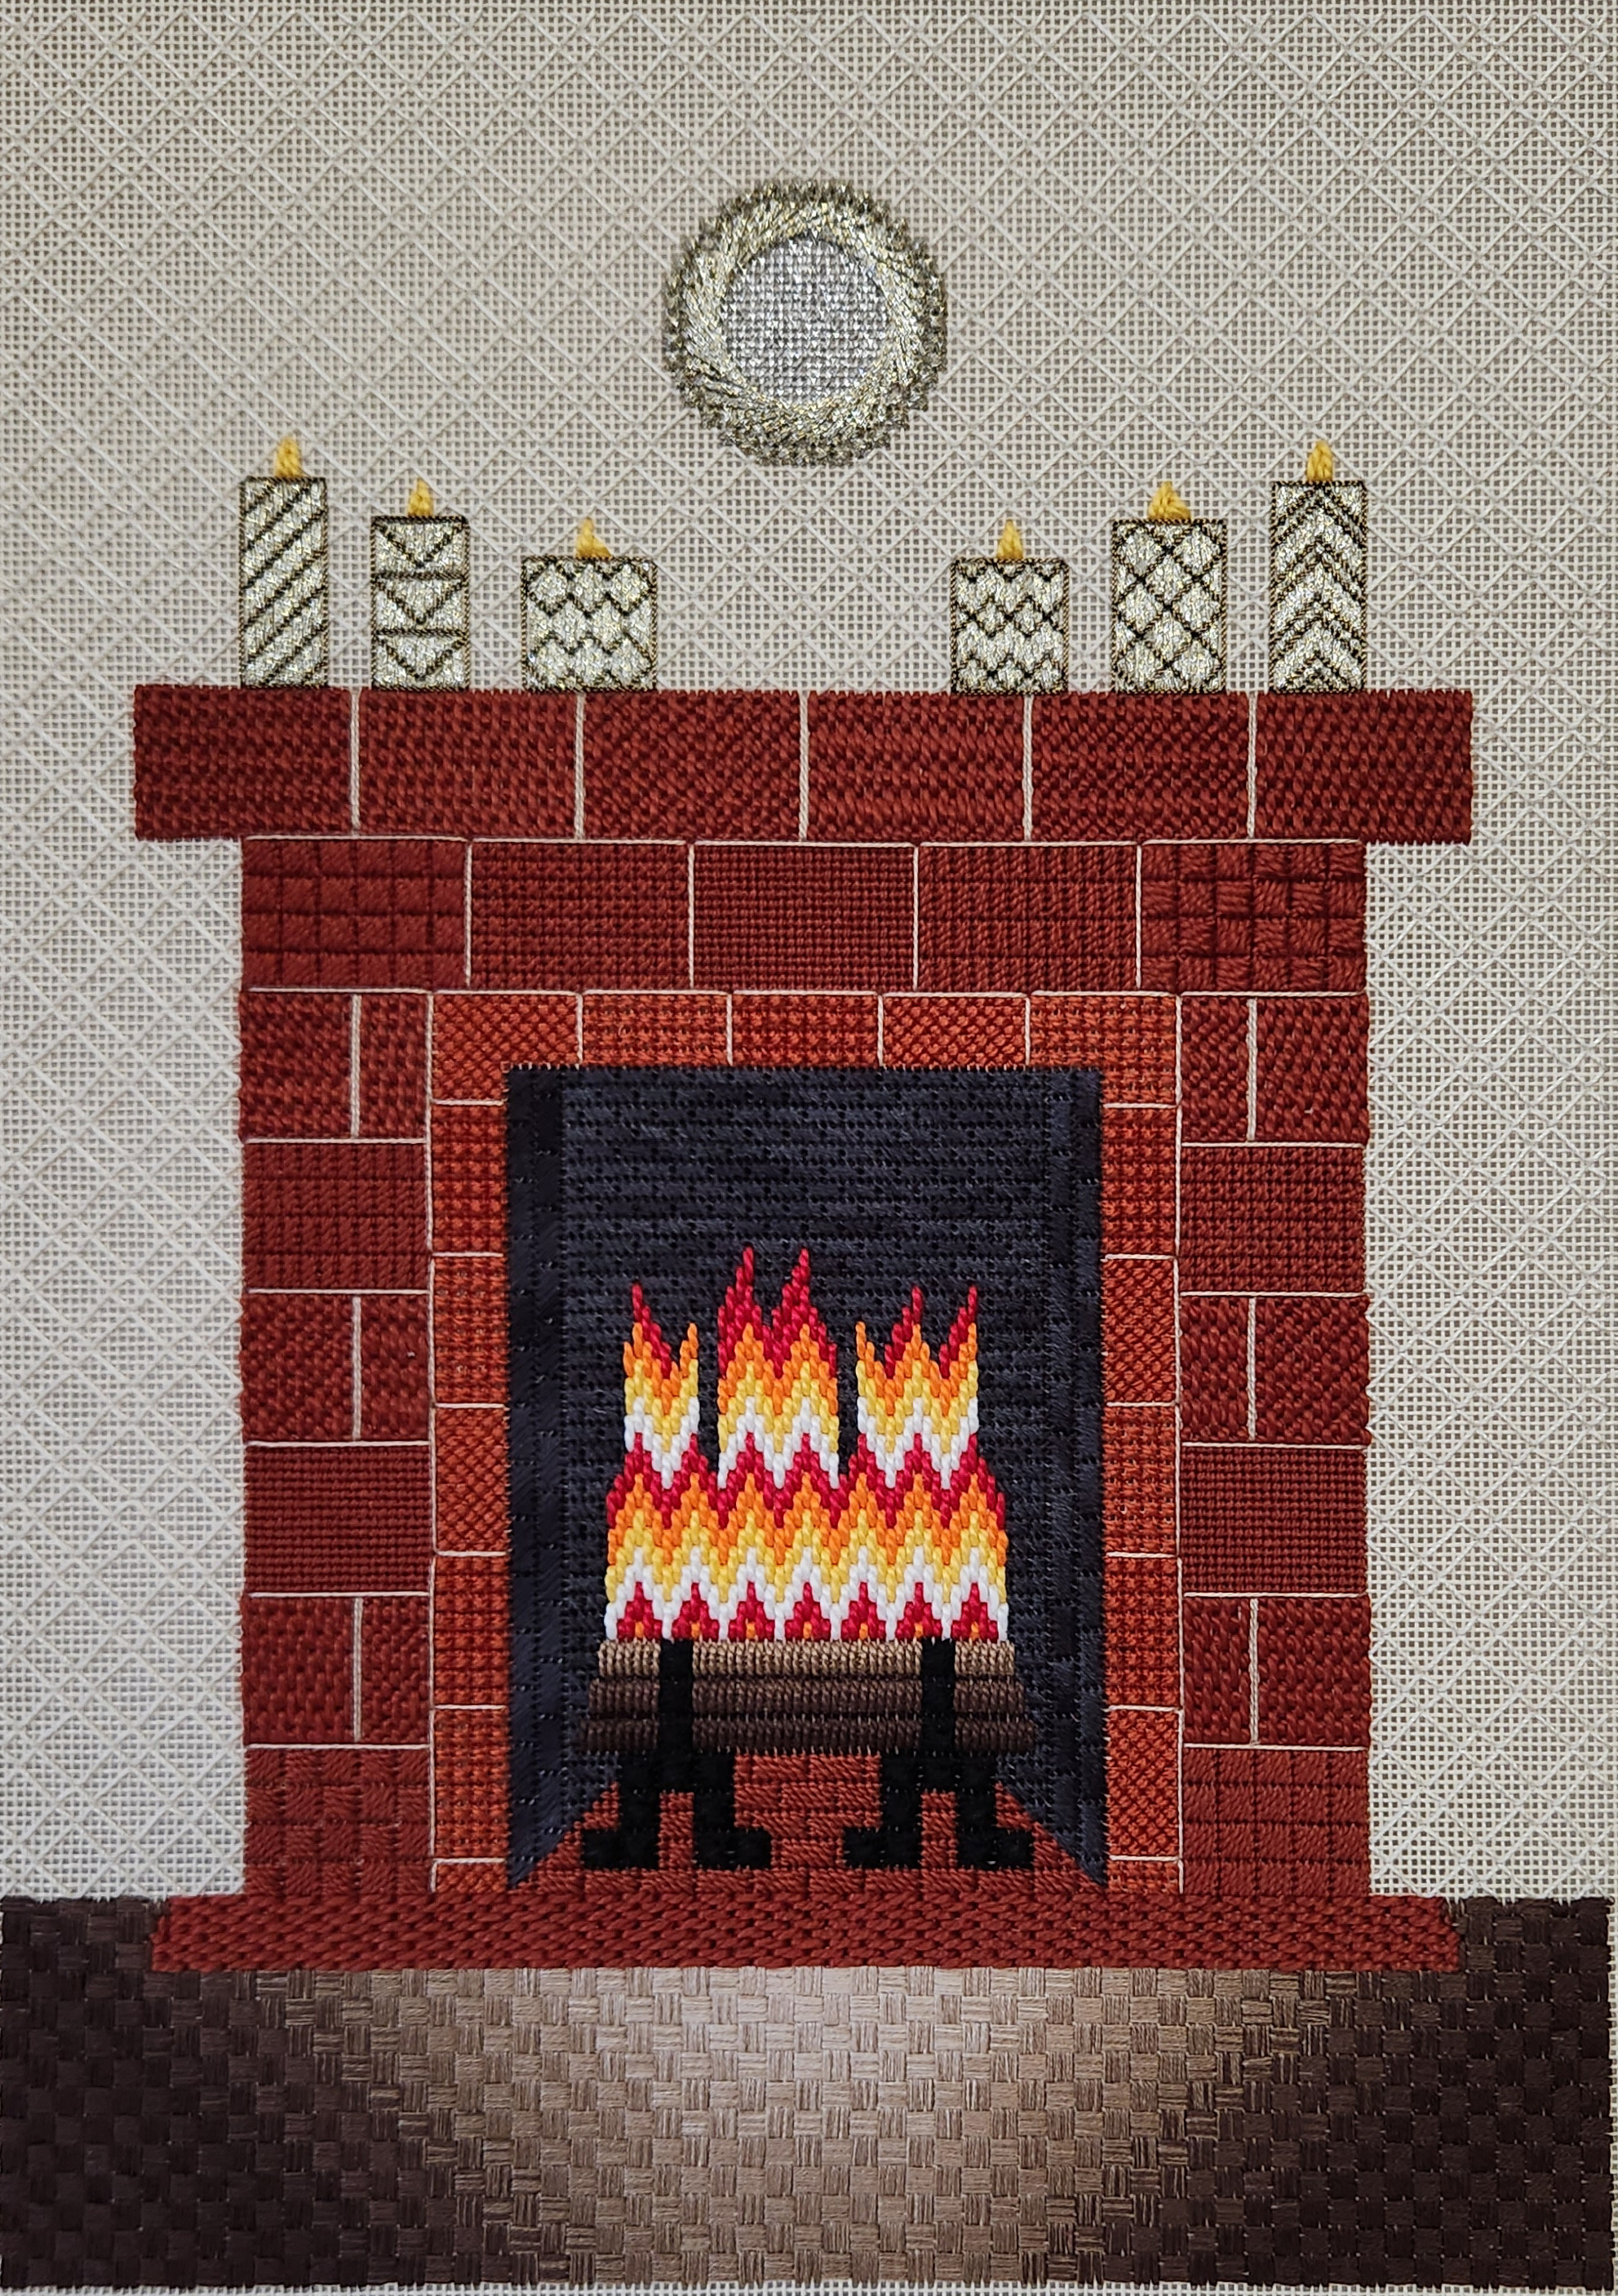
At least one of the judges felt the white in the flames was a little strong but that the ThreadworX overdyed was a perfect choice for the sooted walls inside the fireplace. The diaper pattern wallpaper recedes (as it should) and adds just enough texture to add interest. Different values of the bricks and logs add dimension as do the Smyrna cross stitches around the large Jessica. The glow on the rug is lovely and well-executed. The rug employed a 21-step thread blending formula to move from light to dark using DMC Floss 842, 841, 840, 839, 838 (5 strands).
Thanks so much to the three judges who take the time to review and critique the pieces. It was a challenging experience with some angst occasionally but I enjoyed the process.
Filed under: Canvas Master Craftsman Program, Embroidery Guild of America, General comments, Step 5, Woodlawn Needlework Exhibition
With my last post, WordPress informed me that I have posted 1,000 times! Wow, that’s a lot but I’ve been doing this since 2010. So, I was trying to decide what my 1,001 post would be. I’ve been stitching on projects that I don’t want share until they are done (Step 6 of the EGA Master Craftsman Canvas program and pieces for future Needle Pointers magazine articles).
However, I am preparing to head to south to see the 60th Annual Woodlawn Needlework Show. I found the list of all the entrants where they include the award winners (https://www.woodlawnpopeleighey.org/2023specialawardwinners) and where you can see photos of the special award winners including a couch (!) by Nancy Buckley, Birch Forest-French Alps by Norma Campbell’s (I love her pieces), Oklahoma Gothic by Darci Lenker (my husband looked at these online and thought this one was a photo!), and Cray Cray Bird by Barbara Levy (a member of ANG NJ Needle Artists/NJNA) to name a couple. The Woodlawn Needlepoint Show runs the whole month of March in Alexandria, VA (closed Tuesdays). There are a little over 400 judged entries this year (up 100 pieces compared to last year), special exhibits (https://www.woodlawnpopeleighey.org/2023-needlework-show-exhibitions) including 3 EGA/ANG chapters celebrating milestone anniversaries, and a variety of programs (https://www.woodlawnpopeleighey.org/2023-annual-needlework-show-programs) including a couple virtual.
Well, my Night Owls flew south hitching a ride with other members of NJNA and was awarded Second Place in the Original Design category. I did share this piece back in August. It is my original design from Step 5 of the EGA Master Craftsman Canvas program (https://melitastitches4fun.com/2022/08/31/canvas-master-craftsman-program-step-5/). The wings are appliqued in place.
I will report more after I see the show but wanted to remind everyone that the 60th Woodlawn Needlework Show has started and is well worth the trip. Even exploring the website offers some opportunities and eye catching pieces.
Filed under: Canvas Master Craftsman Program, Embroidery Guild of America, Seminar 2022-NYC, Step 5
Step 5 of the EGA Master Craftsman Canvas 3 had to include 2 appliques (canvas to canvas and at least one had to be irregularly shaped). It had to be 10″ x 14″.
The wings were stitched on 24 count Congress Cloth and applied to 18 count canvas. These are the practice wings. In a nutshell, Step 1 is to pull threads out to the stitched piece (in progress in left photo). Step 2 buries some threads on the back of the applique (right photo). The rest of the threads are pulled to the back and buried in the surrounding stitched area. It is time consuming.

I started this piece shortly after seeing the article Tale of Two Stitchers in the Needle Pointers magazine (Mar/Apr 2021) regarding 2 painted canvases of owls “Who Gives a Hoot”. At first I was going to make the round eyes the applique until I realized that a circle is not irregular! So, I switched to making the wings the appliques which actually made better sense since they should be in front of the body anyway. I would have padded it but the instructions didn’t say you could but it is allowed. They have changed their instructions to clearly state that padding is allowed.
I had to practice the technique and actually stitched 5 wings trying to get this right. That’s why this step took an extra 6 months. But, the piece passed with distinction. So, it was worth it. Bill likes owls, knew I had worked on it a lot, and thought Night Owl deserved to be framed. So, it was framed before going on display at EGA National Seminar from August 24-28, 2022 in New York City.
I’m glad I waited to post this until I got it back so I could take a new photo. Before my photography class:
After class:

Filed under: Canvas Master Craftsman Program, Embroidery Guild of America, Step 4
Step 4 of the Canvas Master Craftsman program had to incorporate 8 different bargello patterns but not into a “sampler”. So, I have 3 bowls, 3 abstract flowers, a background, and a border. It’s 252 x 180 canvas threads on 18-count canvas. I was surprised to see that it measured 14.5″ x 10.25″. Do stretcher bars actually stretch the canvas that much?
Step 4 passed with distinction and will be sent for display at EGA National Seminar in 2021 along with Steps 1, 2, and 3!
Any color combination was allowed. I selected a tetrad that are two sets of complements: yellow-orange (browns), yellow-green, blue-violet, and red-violet.
The left blossoms use 3 diamond patterns. For the bowl, I combined two of the same components used in the blossoms and overlapped them when joined side by side. The center bowl and blossoms are different but related diagonal patterns. And, the third group are both examples of mirrored bargello patterns.
I never thought I would finish the background which is a variation of Victorian Step from Decorative Backgrounds by June McKnight (page 53). Since this pattern has more smaller over 2 stitches than over 4 stitches, the stitches recede from the main design elements which consists of mainly larger over 4 stitches.
The border stitch was tricky to make it align evenly. I had to expand the pattern on the sides to make it fit. Four Way Bargello by Dorothy Kaestner is a great resource for bargello patterns. This is a variation of Mauve Ribbon Corners (page 110-111).
I really wish Liz Morrow was still with us. Her designs were instrumental in teaching me about different bargello patterns. Her last blog posting was 2 lovely Hearts for Hospice (http://lizartblog.blogspot.com/). Liz was a wonderful designer and teacher. She was another generous and supportive needlepoint mentor that I have been blessed to know. We are fortunate that her designs are still available at: https://www.lizartneedlepoint.com/#/. There are several bargello patterns I still want to stitch and under her needlepoint tab, I’ve always loved her Leaping Stag.

Filed under: Canvas Master Craftsman Program, Embroidery Guild of America, Step 1
Unlike my Step 2 piece which didn’t need blocking, Lisa did block the fish for me and I picked up earlier this week. I attached it with small nails to a foam board and laced it up. I’m using the same acid-free, 3/16” thick, white foam board (https://www.michaels.com/elmers-acid-free-foam-board-2-count/10390078.html) that I used for the previous step. Today, I laced up Step 3 too. No blocking was needed.
Since these pieces are not going to be judged, I didn’t want to mat and frame it. I ordered ultrasuede fabric to make the backs look nicer. They will be displayed in the Education area of EGA at the National Seminar in Chicago in September to advertise their Master Craftsman Canvas program. Bill and I are going to drive there for my first EGA Seminar. I have 3 classes which will be the subject of another post eventually.

Filed under: Canvas Master Craftsman Program, Embroidery Guild of America, Step 3
Step 3 of the Canvas Master Craftsman program was diaper patterns and my piece passed with distinction again and will be sent for display at EGA National Seminar in 2021 along with Steps 1 and 2. The instructions were to use at least 4 diaper patterns and a split complementary color combination (I selected orange, blue-green, and blue-violet).
After studying the extremely thorough book, Diaper Patterns, by Ann Strite-Kurz, I decided to make this a diaper sampler by incorporating the eight basic pattern networks (square, diamond, brick, half-drop, triangle, hexagon, scale, and ogee) into a design. I should call this piece Baby Steps because it barely touches the surface of what diaper patterns can create. Diaper patterns create strong visual diagonals in both directions.
There isn’t much open canvas but the judges commented that they did not see any visible threads through the canvas. It has good balance, excellent choices of diaper patterns and color, and the color of the canvas enhances the design where there is exposed canvas. And, I did a “fantastic job of laying threads”.
On the eve of Thanksgiving, I am thankful I passed, appreciate the judges comments, and am looking forward to Step 4 and creating a bargello design! I hope you spend this Thanksgiving being especially safe.
Read all about the program at https://egausa.org/certifications/master-craftsman-program/.

Filed under: Canvas Master Craftsman Program, Embroidery Guild of America, Step 2
For Step 2 of the Canvas Master Craftsman Certification Program through EGA, I was tasked with a provided geometric design of 21 areas to be done in an analogous colorway using 21 different stitches in cotton floss. Some stitch patterns could accommodate 2 or 3 colors.
I selected Yellow, Yellow-Green, and Green for my analogous colorway (3 adjacent colors on the color wheel including a primary color; tints and shades allowed). There are a lot of greens. So many that you’d think it would be easy to get colors to look good together. But, it was tough. Not all of the first 15 colors worked.
So, I decreased the number of colors to 11 (5 yellow, 3 yellow-green, and 3 green), replaced one color, and spread out the colors relying on the 5 yellow colors to unify the design.
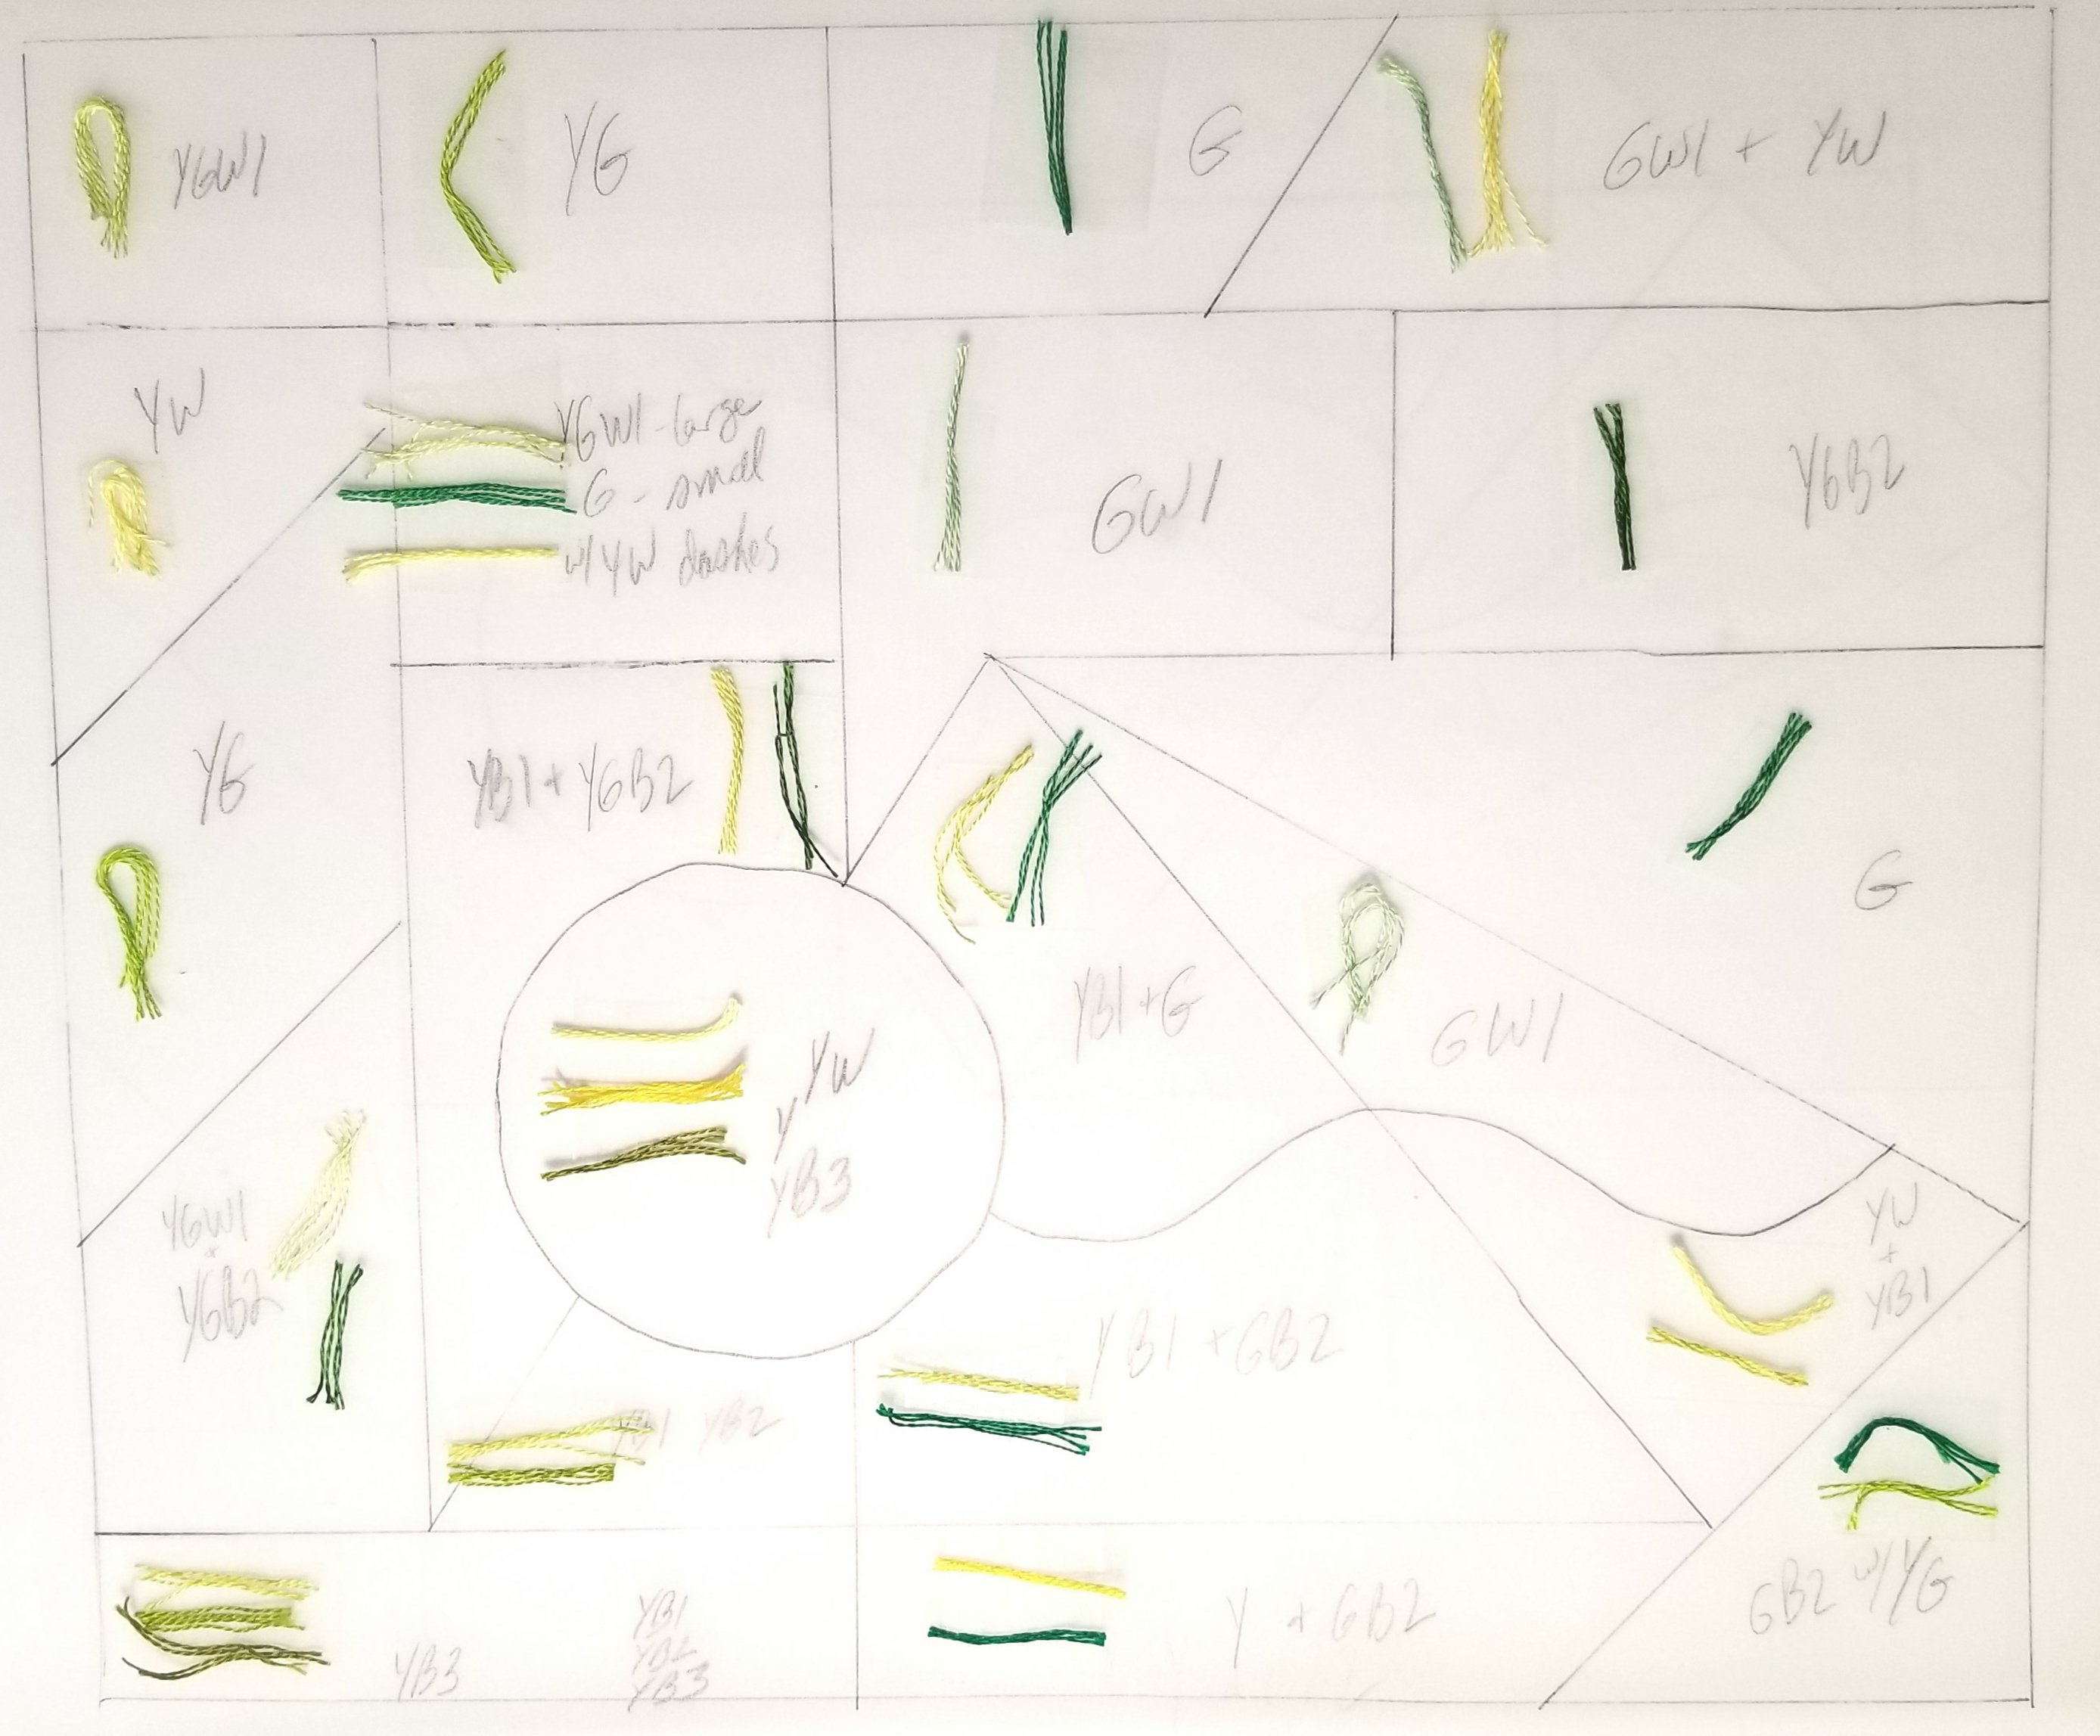
I mapped out the stitch patterns by area on my computer to minimize the amount of compensation because none of the stitches fit perfectly (probably by intention to test compensation ability). I thought I had everything where I wanted them but then realized I was off by 2 threads when I actually transferred the design to the canvas.
So, back to decide what went where. Only about 6 stitch patterns shifted. And, everything compensated better. A
After some practice stitching to settle on the number of threads needed for a stitch, I finally started stitching the real piece. The only section I had to restitch was the Turkey Work. As I worked from bottom to top, the nap of the threads were pressed downward. So, I didn’t notice that the coverage wasn’t as full as I expected when it was fluffed up. I used 2 strands in the left area and 6 strands (as Mary Corbet suggests in her YouTube video). Much better! At least the stitching was easy to remove from the backside.

I was once again thrilled to find out that I passed with distinction and have been asked to send this for display at EGA National Seminar in 2021 along with Step 1 which would have been going to EGA National Seminar this year except that it was canceled due to coronavirus.
A few threads at the outside right portion of the Turkey work would benefit from additional trimming but overall is “good” (although it could have been squished in transit). I was particularly pleased to have the judges note the “very good” compensation between multiple areas and threads were laid well.
On to Step 3 and diaper patterns!
Read all about the program at https://egausa.org/certifications/master-craftsman-program/.
