Filed under: Embroidery Guild of America, Pomegranate Heart by Melissa Sherbring, Seminar 2023 - Boston
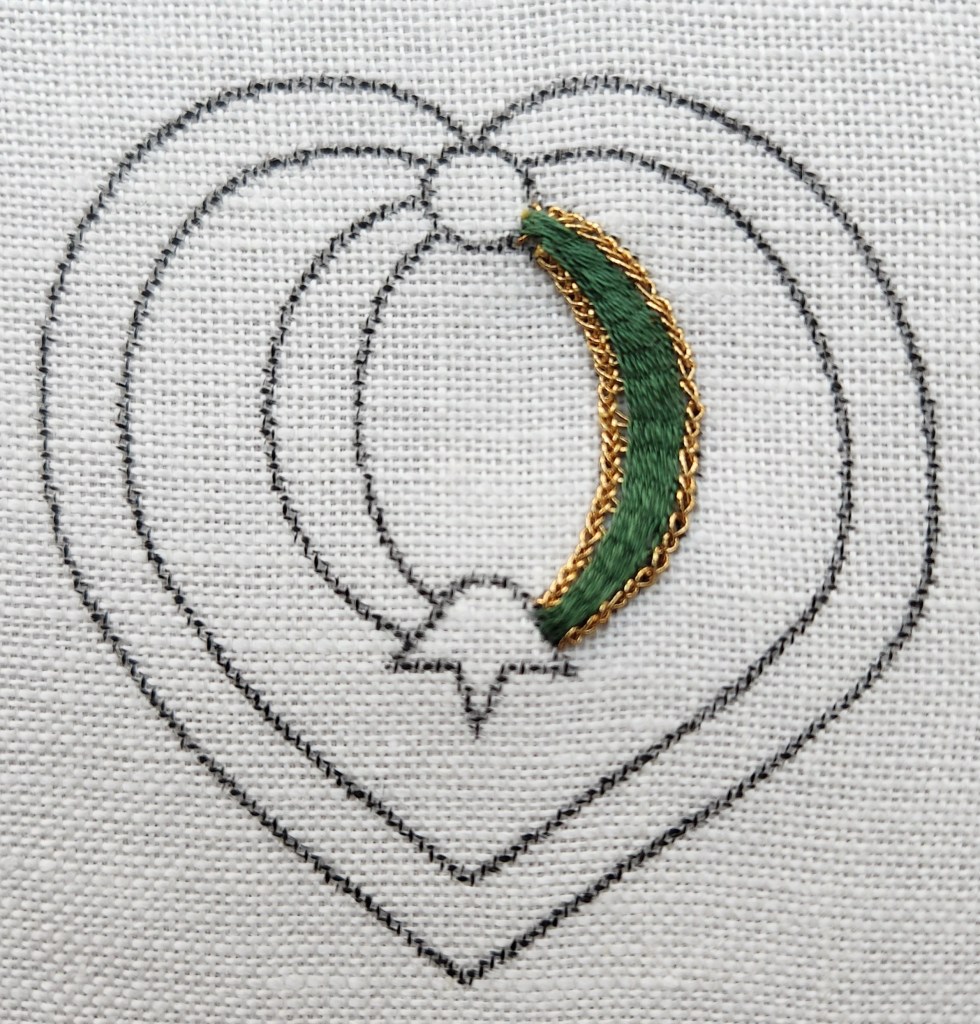
Pomegranate Heart by Melissa Sherbring is a 3″ x 3″ heart surrounds a pomegranate and is worked in three late 16th / early 17th century English embroidery stitches including a copper-colored, bumpy-textured Corded Larks Head filling stitch [a.k.a. Up and Down Buttonhole with Straight Stitch Return]. The remaining areas – rind, calyx, crown, attachment circlworked in three late 16th / early 17th century English embroidery stitches, and surrounding heart – are worked with gold passing thread in variations of Ceylon stitch. Outlines are worked in Stem stitch in cotton, both over the linen ground and over the rungs of Ceylon stitch. The background is a Woven Laidwork design in silver passing thread.
That is the description from the EGA website. The only part I understood before class in that description is Stem stitch which I didn’t get to anyway!
It’s a lovely piece and I thought learning 3 new stitches for a one-day class was reasonable. The time goes by so quickly. And, it did and it was paced well.
In the morning session, I did the four samples (bottom using red and yellow braiding cord) and the stitched part on linen is using gold passing thread for the Ceylon/Ladder stitch. Tricky getting tension even. I am glad I brought my magnifying clip-on light. Very helpful.

In the afternoon, I practiced the Lark’s Head Filling, Offset (top stitched sample in the next photo) using the yellow braiding cord. My sample shows a half-hitch on the right side but not the left side. The Woven Laidwork (bottom stitched sample) was a breeze. I didn’t worry about tension – so, it doesn’t look pretty.

Then, I read through the instructions and inquired more about how she transferred the design. To my surprise, her design is stamped! She uploaded an image to rubberstamps.com and used an ink pad. For $5, she had the stamp. That might be fun to try for my EGA Brandywine chapter.
With the last 45 minutes she had us stitch the raised Stem stitch with a single strand of green DMC floss. I know it’s not a race but the one woman next to me might be done tonight (I am exaggerating) and the woman on my other side didn’t get off the plastic canvas!
This year we, my husband and I, are in Boston for the EGA Seminar. We traveled by Amtrak from 30th Street Station to South Station in Boston. Nice way to travel.
We explored around the hotel yesterday and the trolley tour today gave Bill options to fill the next 3 days while I’m in class.
I’m taking Pomegranate Heart (3″x3″), a one-day class with Melissa Sherbring worked in three late 16th / early 17th century English embroidery stitches that I’ve not used before. More on that later.
My second class, a two-day class, is Understanding Color Relationships: Luster and Luminosity with Patricia Goaley. Lecture with some sort of stitching project.
EGA has very nice name tag holders. I’m still using the one from Chicago because it holds both my EGA and ANG name tags. The swag bag is a reusable project bag.

I had to get both the silk paints and Resist for painting on silk! This stencil of a rose has been in a drawer for years and finally used it! This used the Serti technique which requires clearly defined areas for the paint. Serti means “closed fence”.
The silk habotai I found online was too big. I needed a quarter of the piece. I figured having the extra pieces will be useful if my first attempt doesn’t go well.
After tracing the rose, I applied the Resist and let it dry. I forgot to wash it off but otherwise, I did fine with the second painting exercise. There is a lot of paint left over because a few drops of paint just absorbed to the lines of Resist.
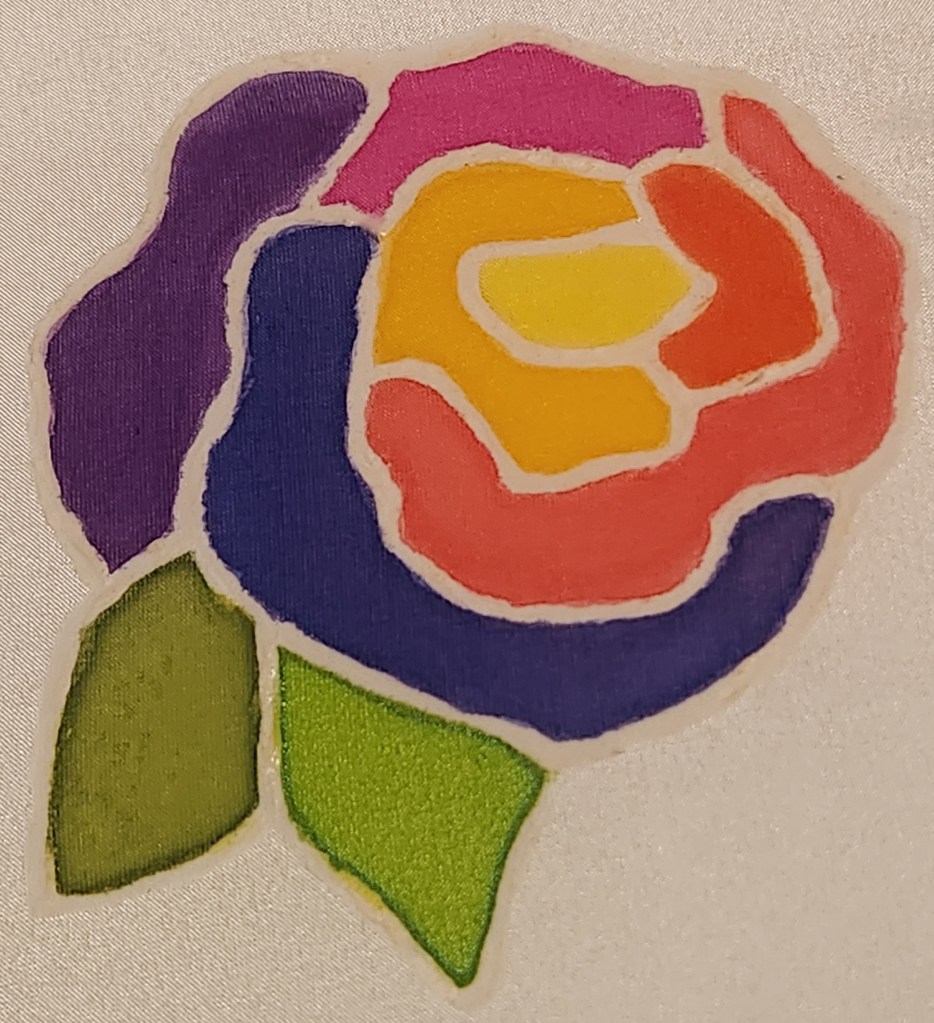
I have to use interfacing behind the silk because the silk is so thin. Laura gave me ideas for stitching this one too.
Laura Smith was kind enough to offer an extention on her EGA class, Draw and Paint.
I thought too much white (“snow”) came through on the canvas for my fish tank but I sent her a photo and she says it’s good after cleaning up around the edges of the fish. The rest is shading and will be covered by stitching.
This design is one I did years ago in the shape of a fishbowl on white plastic canvas. The plastic canvas made finishing easier because you could cut up to the edge without worrying about fraying. Yes, that’s a frog pin attached to the canvas which I’ve had since I was a child – his legs move!

It’s a design that I wanted to try again and to make it a little larger now that I am more experienced. This is also different from the first because I painted the canvas. Since I painted the water blue, I decided to change the blue fish to an orange one.
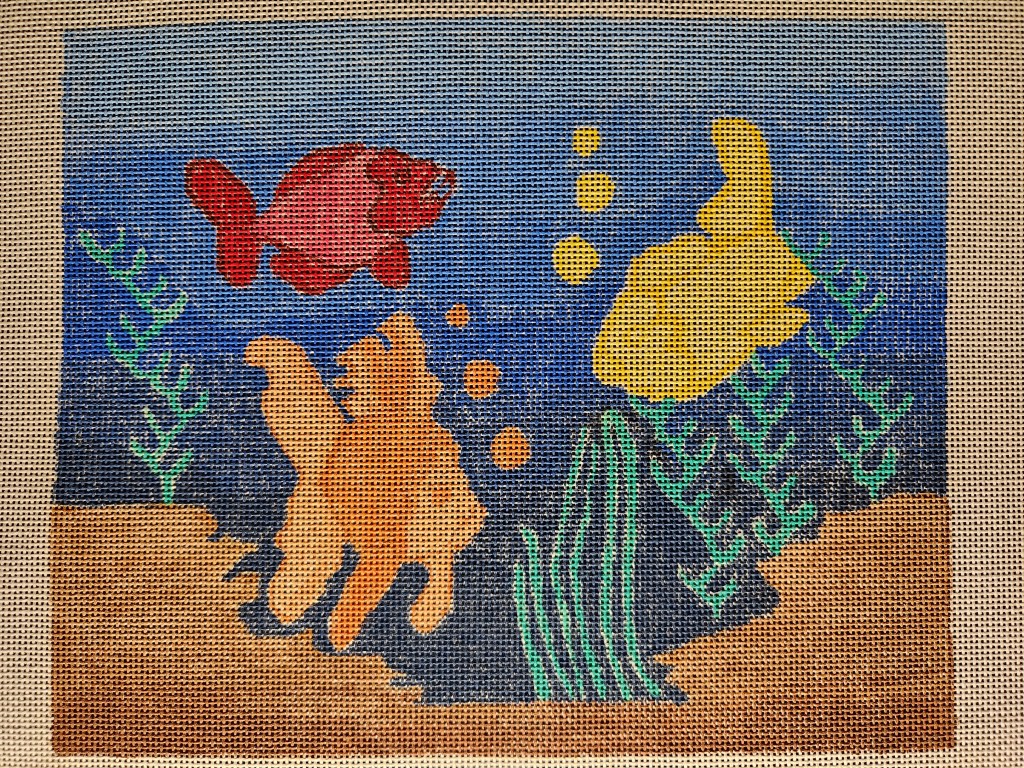
Laura said “Your painting is beautifully nuanced, yet not overcomplicated.” And, that the consistency of the paint mixture was good, no filled holes, and the color choices were excellent. Laura provided stitching ideas that are general. She suggested a few different things that I’ll have to think about.
I tried using the brushes I had but finally emailed her for suggestions on specific sizes and styles of brushes. I got a small set of Hogs Hair flat and round brushes and tested them out on this small scrap. I changed from light blue to dark blue as I moved downward. I love how my practice sky turned out.

I also reinforced that painted canvases are expensive for a reason – it’s not easy or a quick process.
Filed under: Crewel Stitches - Judy Jerow, Embroidery Guild of America, Mid-Atlantic Region
Back in May, I went to the EGA Mid-Atlantic Regional Spring meeting held in Wilkes-Barre, PA. I went up because the Take Home a Project (THaP) class was Stitching with Crewel Stitches with Judy Jerow, an expert in Crewel.
There really are 3 different greens, purples, and yellows Appleton wools but they are so close, the shading isn’t as evident as I expected. I had greens: 355, 354, 352; first 2 too close; purples: 103, 104, 105; first 2 too close (differences showed up the least of the 3 colors, probably because they are darker threads); yellows: 471, 472, 474; first 2 too close.
The stitching is done but this will not get “finished”. Nothing really wrong with it but can’t hang everything. I never came to like Appleton wool as I continued to stitch with it. Maintaining the twist is constantly required, it’s a hairy thread which looks messy to me, and the feel is rough. I was threading the correct end. More crewel work is not in my future. I’m also not comfortable working on a hoop – it feels awkward which would probably pass if I used it more often. Working on Twill Linen wasn’t easy because I pulled too hard (maybe?) which makes it pucker (I can flatten it in the hoop). Again, something that might not happen with practice.
I do want to use the Burden stitch and love her French Knots. The Raised Outline and Stem make great leaves. These stitches could all be done with different threads and on a different ground. It’s always fun to learn something new from a project and teacher. I throughly enjoyed Judy and her class.

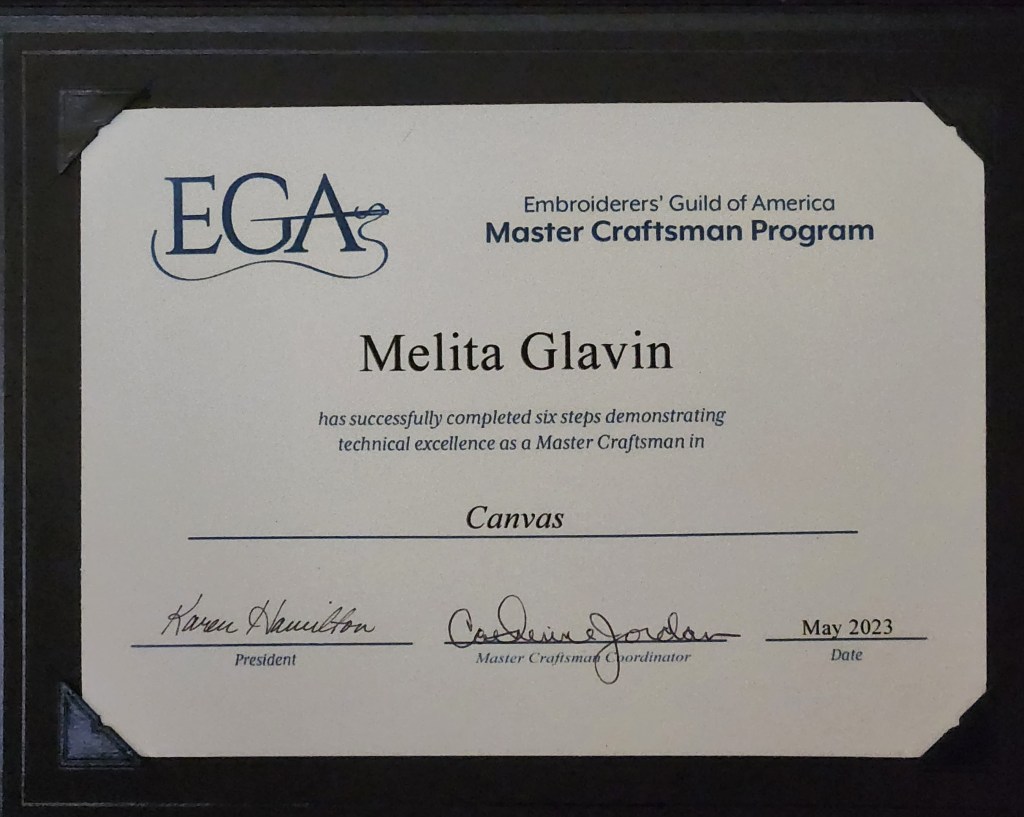
Filed under: Canvas Master Craftsman Program, Embroidery Guild of America, Steps 1-6
One more post about the EGA Master Craftsman Program for Canvas! I decided that I wanted all 6 pieces in one post. I began the EGA program in the fall of 2019 and completed all 6 steps by the spring of 2023.
EGA has eight Master Craftsman Programs. Briefly, the programs “are designed to promote excellence in embroidery by providing the accomplished needleworker the opportunity to demonstrate skills and become certified as a “master” in her or his area of expertise. Each program area consists of six steps that test the ability and workmanship of the candidate.” To obtain further details about each program online, you must be a member of EGA. Judging is usually twice per year but you can take up to 2 years to complete each step.

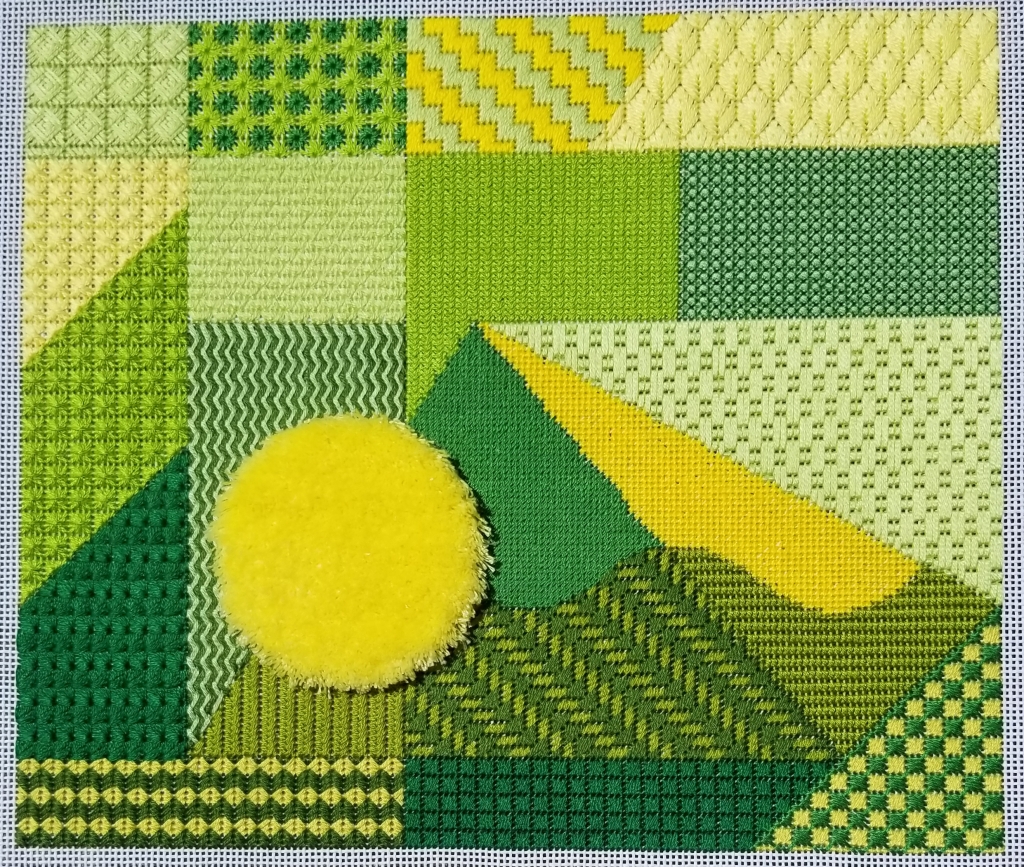
Step 1 has you demonstrate that you can transfer a design and execute 10 stitches (no more and no less). The fabric type (18 count monocanvas), type of threads (stranded cotton), and color scheme are specified. I used 5 monochromatic values in what DMC calls Golden Yellow. I used lighter colors and smaller stitches to have certain elements recede. I turned the stitch on the right fish’s fin to add movement. I employed thread blending in some manner on all 3 fish. Documentation in an Artist’s Statement must include stitches used, source of stitches used, and threads (including 4” samples of any threads used).

For Step 2, you demonstrate that you can transfer a design, execute 21 stitches (including Turkey Work), and compensate using an analogous (Yellow, Yellow-Green, and Green) colorway. EGA supplied the geometric pattern again. It had to be done in an analogous colorway in cotton floss. I selected Yellow, Yellow-Green, and Green for my analogous colorway (which is 3 adjacent colors on the color wheel including a primary color; tints and shades allowed).
As I did the Turkey Work from bottom to top, the nap of the threads were pressed downward. So, I didn’t notice that the coverage wasn’t as full as I expected when it was fluffed up. I used 2 strands in the left side of the photo and 6 strands (as Mary Corbet suggests in her YouTube video) in the right photo. Much better! At least the stitching was easy to remove from the backside.

Step 3 has you use at least 4 diaper patterns in a split complementary color combination (mine is yellow-orange, blue-green, and blue-violet). Diaper patterns create strong visual diagonals in both directions. After studying the extremely thorough book, Diaper Patterns, by Ann Strite-Kurz, I decided to make this a diaper sampler by incorporating the eight basic pattern networks (square, diamond, brick, half-drop, triangle, hexagon, scale, and ogee) into a design. Networks moving clockwise from top left are: Scale, Brick, Half-drop, Diamond, Square, Hexagon, Brick, Half-drop, Triangle, and Square on the Diagonal with an Ogee in the center.

Step 4 has you incorporate 8 different bargello patterns but not into a “sampler”. However, each pattern must touch another Bargello pattern in the design. Any color combination was allowed. I selected a tetrad that are two sets of complements: yellow-orange (browns), yellow-green, blue-violet, and red-violet.

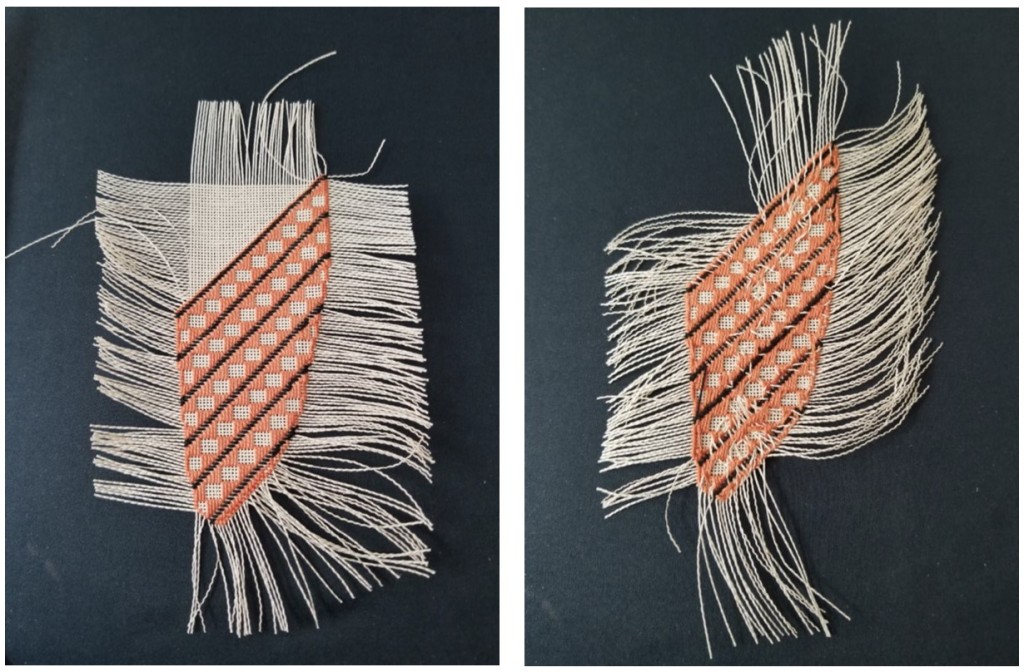
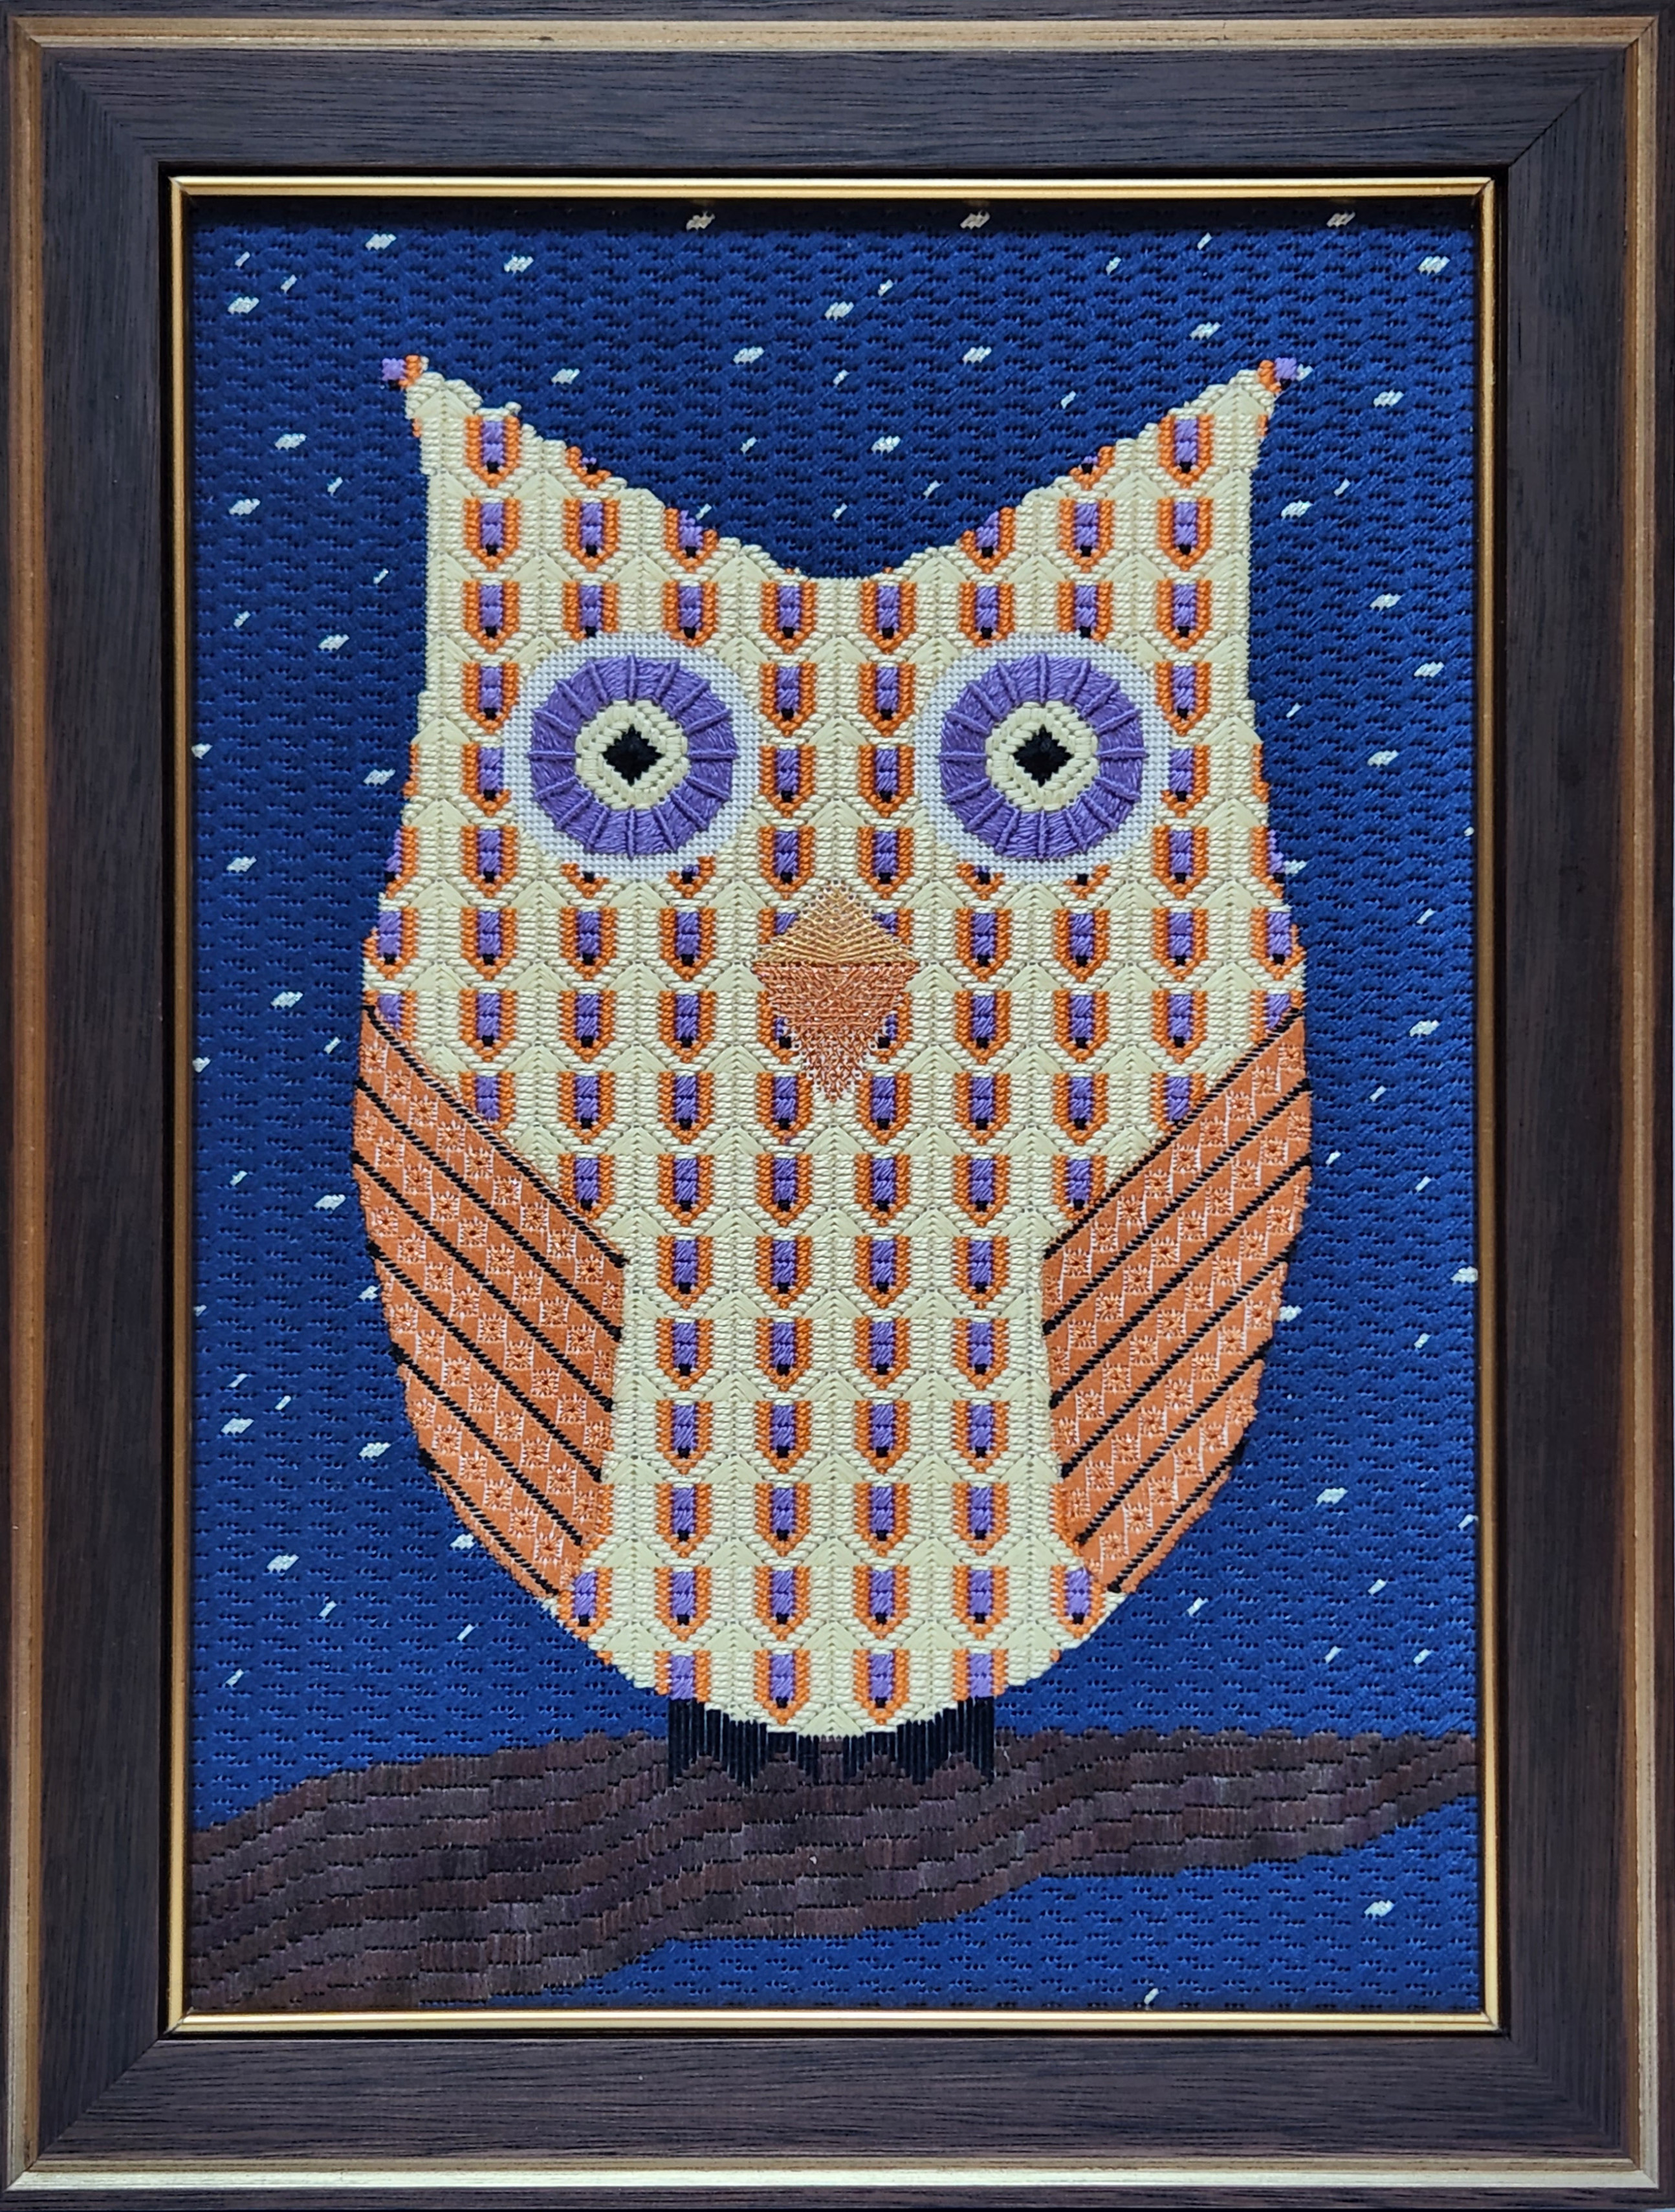
Step 5 has you place a canvas applique of a smaller size count canvas onto a larger size count canvas (my wings are 24 count placed onto 18 count). Pictured are my 2nd and 3rd practice wings. This is the only step that took me a year (thinking, planning, and practicing). I’d never done applique before. At least one applique has to be an irregular shape and greater than 1” square. I started this piece shortly after seeing the article Tale of Two Stitchers in the Needle Pointers (Mar 2021) regarding the 2 painted canvases of owls “Who Gives a Hoot” although mine doesn’t look like them. At first, I was going to make the round eyes the applique until I realized that a circle is not irregular! So, I switched to making the wings the appliques which actually made better sense since they should be in front of the body anyway. I would have padded it but the instructions didn’t say you could pad it. After my submission, they changed their instructions to clearly state that padding is allowed.

In a nutshell, Step 1 of making a canvas applique is to pull threads out to the stitched piece (in progress in left photo). Step 2 buries some threads on the back of the applique (right photo). The rest of the threads are pulled to the back and buried in the surrounding stitched area. It is time consuming.
Step 6 had to be an original design utilizing previous steps. This was an opportunity to redo a piece I designed years ago after taking First Steps by Nanette Costa. I learned 30+ stitches through my first ANG Correspondence Course and used those stitches in this fireplace. I especially wanted to make the design area taller instead of square and change the candles and background. This has well over 30 different stitches most requiring compensation. Bargello for the flames and a diaper pattern for the background. The rug employed a 21-step thread blending formula to move from light to dark using DMC Floss 842, 841, 840, 839, 838 (5 strands).

At least one of the judges felt the white in the flames was a little strong but that the ThreadworX overdyed was a perfect choice for the sooted walls inside the fireplace. The diaper pattern wallpaper recedes (as it should) and adds just enough texture to add interest. Different values of the bricks and logs add dimension as do the Smyrna cross stitches around the large Jessica. The glow on the rug is lovely and well-executed. I provided the 21-step thread blending formula to move from light to dark using 5 strands of 5 brown DMC Flosses in the Artist’s Statement.
I enjoyed the challenge, highly recommend the program, and thank the panel of three judges who thoughtfully reviewed each piece.
Filed under: Canvas Master Craftsman Program, Embroidery Guild of America, Step 6
Step 6 of the EGA Master Craftsman program for Canvas had to be an original design. This was an opportunity to redo a piece I designed years ago after taking First Steps by Nanette Costa. I learned 30+ stitches through my first ANG Correspondence Course and used those stitches in this fireplace.
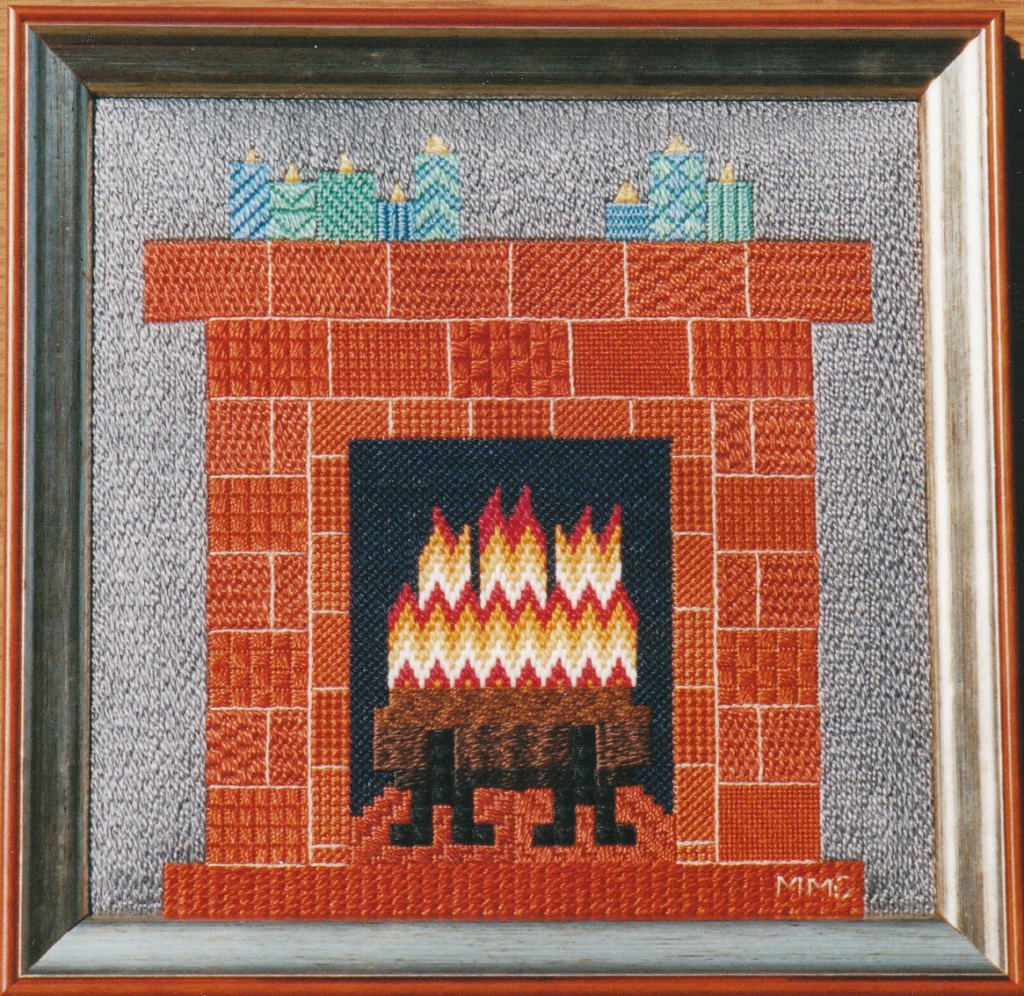
I especially wanted to make the design area taller instead of square and change the candles and background.
The updated piece (pictured below) passed with distinction and all 6 pieces will be going to Boston for the Seminar!
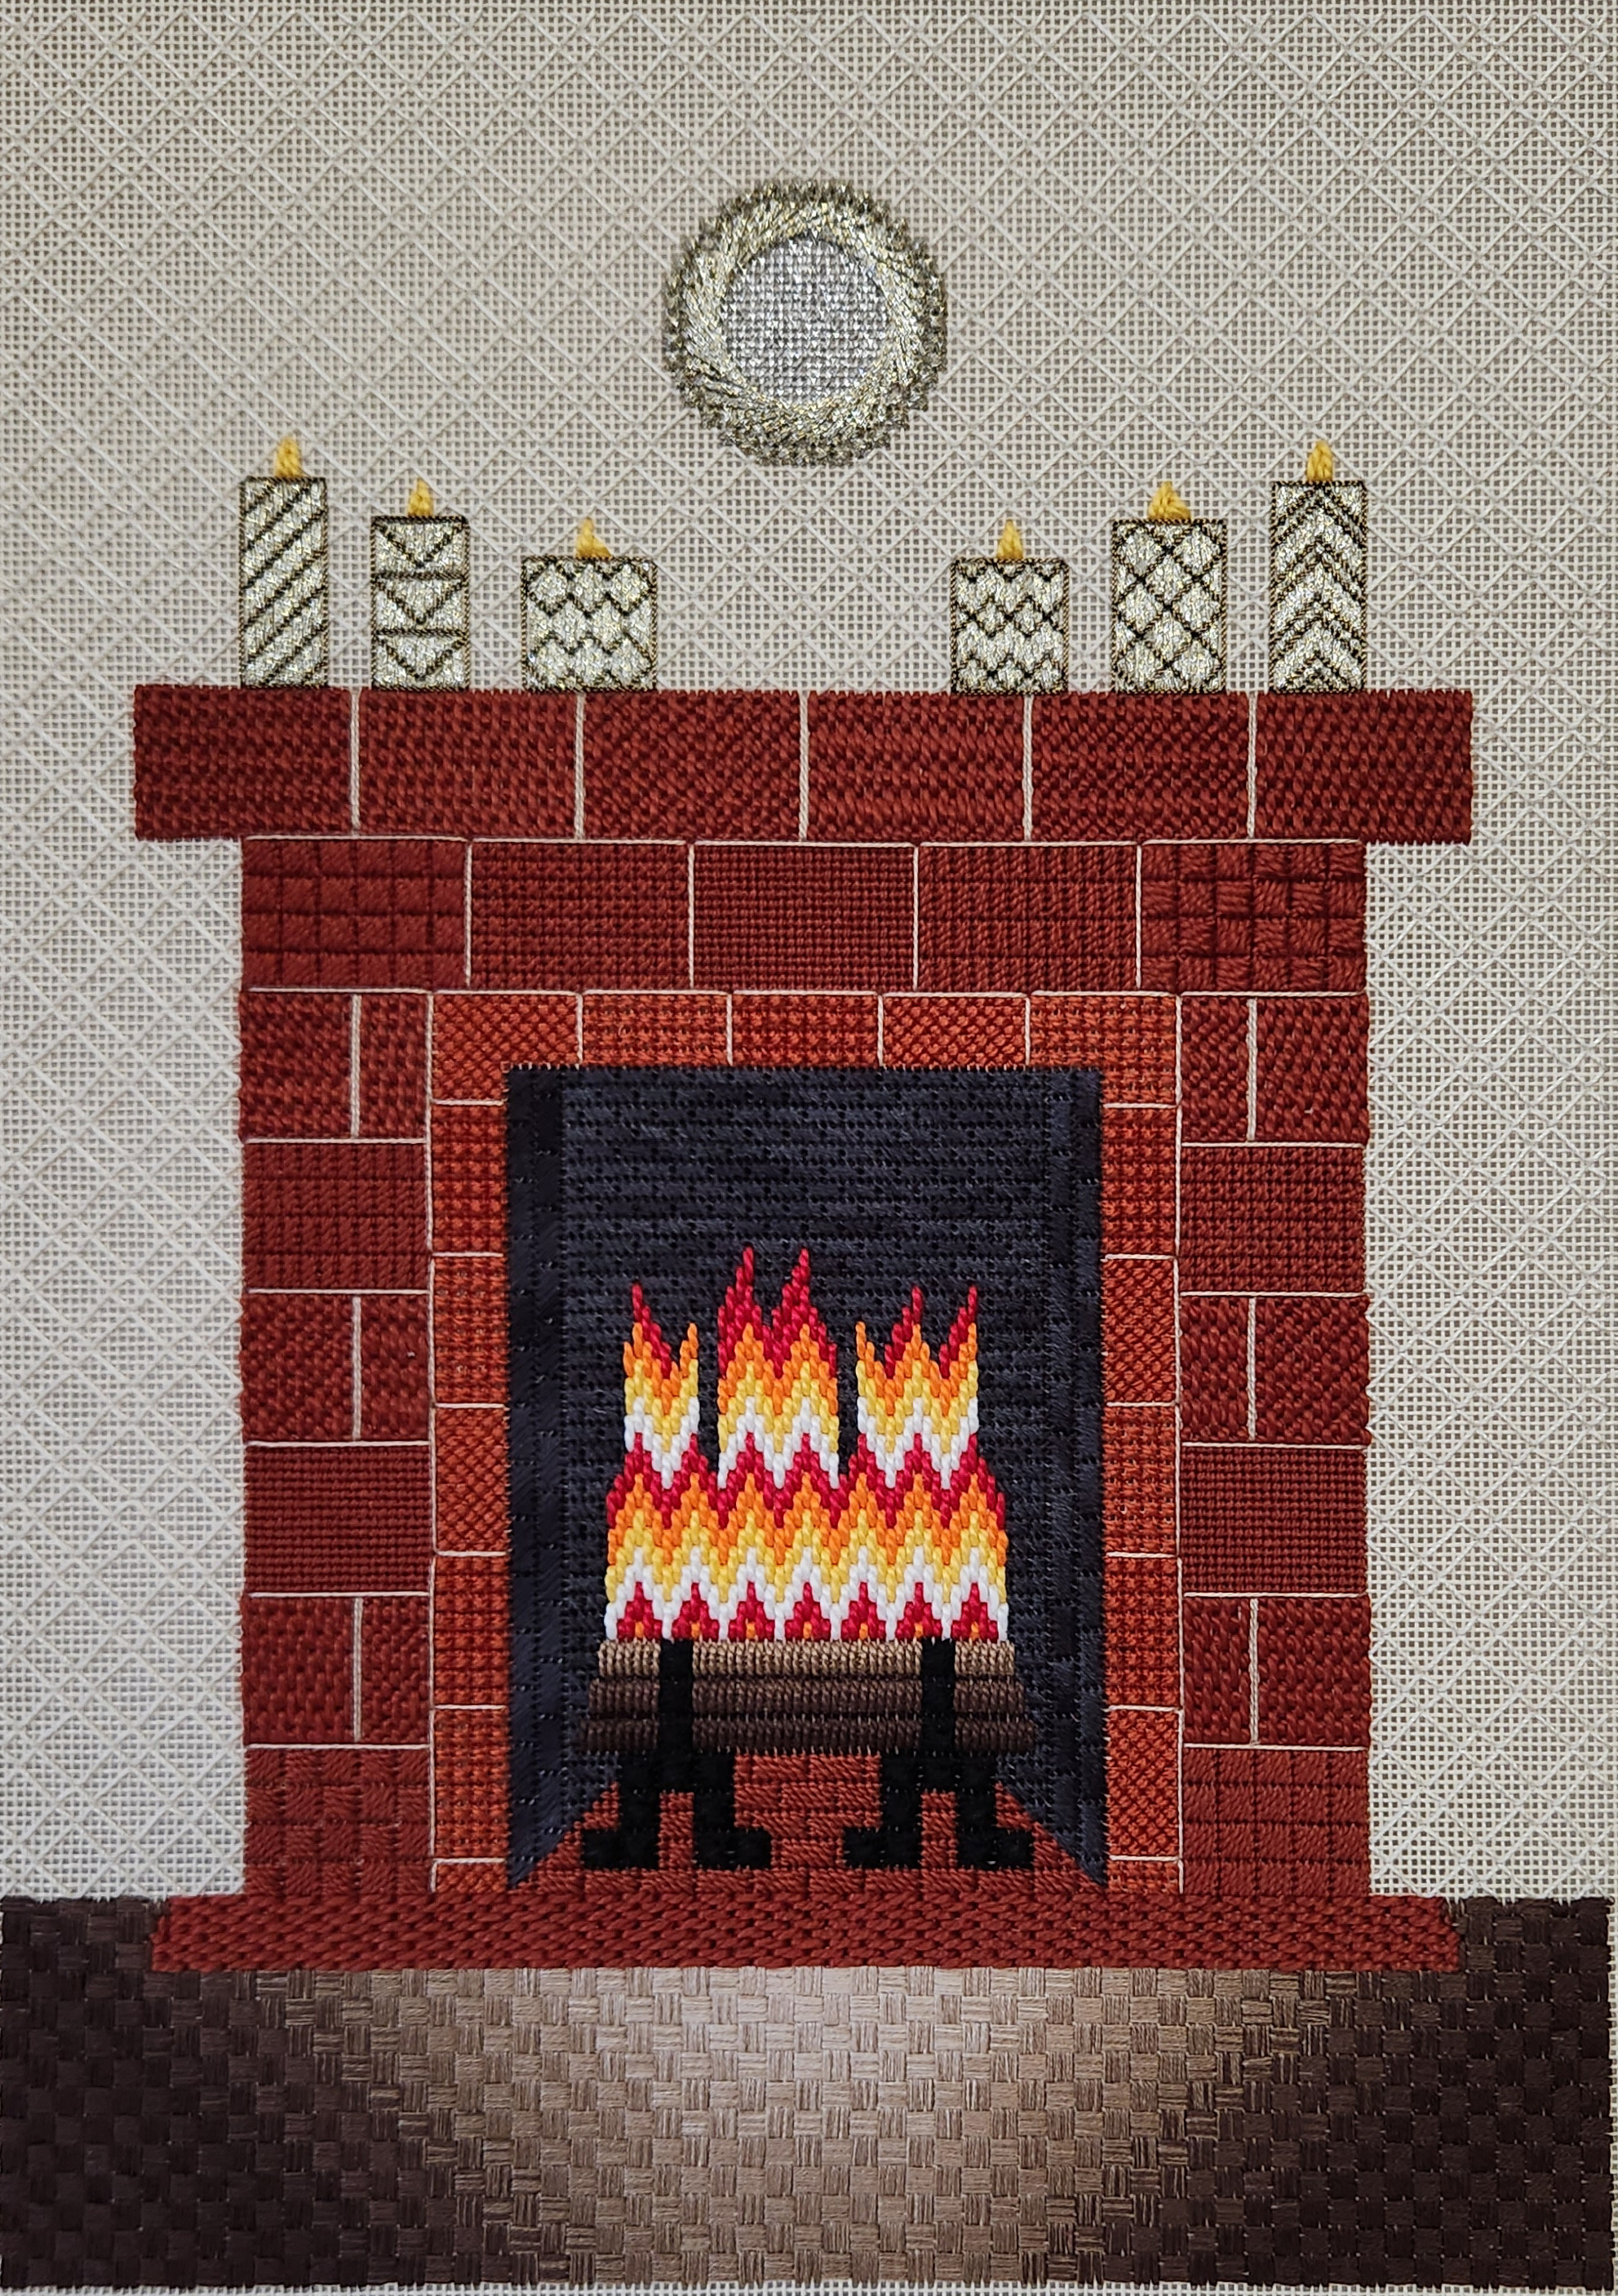
At least one of the judges felt the white in the flames was a little strong but that the ThreadworX overdyed was a perfect choice for the sooted walls inside the fireplace. The diaper pattern wallpaper recedes (as it should) and adds just enough texture to add interest. Different values of the bricks and logs add dimension as do the Smyrna cross stitches around the large Jessica. The glow on the rug is lovely and well-executed. The rug employed a 21-step thread blending formula to move from light to dark using DMC Floss 842, 841, 840, 839, 838 (5 strands).
Thanks so much to the three judges who take the time to review and critique the pieces. It was a challenging experience with some angst occasionally but I enjoyed the process.
Filed under: Crewel Stitches - Judy Jerow, Embroidery Guild of America, Mid-Atlantic Region
The EGA Mid-Atlantic Regional Spring meeting was held Saturday May 6 in Wilkes-Barre, PA. I went up on Friday because the Take Home a Project (THaP) class, Stitching with Crewel Stitches, with Judy Jerow started at 8:30 am. THaPs are geared towards chapter representatives returning to teach it to their chapter members. It’s my 2nd class as a student after teaching Overdyed Spools as a THaP in 2021.
Judy published Creative Crewel Embroidery: Traditions and Innovations. I don’t own the book but wanted to mention it because she is extremely knowledgeable and talented. One student had just gotten a copy of the book (used for a steal at a library sale-lucky lady-Donna!) and got it autographed.
With this design, we learned to use stitches other than long and short to shade a floral design. We learned how Judy makes chain, burden, French Knots, Coral Knots, stem, and outline stitches. She was frank and funny particularly when she said you can show me how you make these stitches but I’m here to show you how I make them. Then, you can do whatever you want!
I bought polyester Twill tape to wrap the inner hoop. There are 3 issues with the hoop (that I can live with for this project but a purist might find troublesome). 1. The hoop is plastic. Wood is preferred because they grip the ground fabric better and apparently don’t distort as easily. 2. The Twill tape is polyester. Natural cotton is preferred. The ground fabric can grab the cotton better keeping it stretched better. 3. The fabric is linen Twill and so wrapping the hoop wasn’t even necessary!

It was a 3-hour class that felt like half that long. The first stitches, chain (right sise in photo) and Coral Knot (left side of photo), weren’t worked on the hoop. And, I didn’t get to stitch the others. So, I didn’t use the hoop! I can’t stitch and listen. As I heard someone in class say, it’s not a race. With that said, this was my progress in class (except for the French Knots that I practiced on a napkin). There is no shading evident. But, there will be.

Cindy, one of my tablemates from Williamsburg, joined me at my table – nice to see her again. Several of the ladies let me know how much they and their chapter members have enjoyed Overdyed Spools.
Class was over in a flash. I learned how to start a thread and Judy even discussed her blocking method. I’m glad I got to get a lesson from her before she retires. She recently celebrated her 64th Wedding Anniversary!
Using 2 stranded wool is required to make it Crewel. This design and techniques are applicable to other threads but then is would be called Surface Embroidery. Good to know. Appleton wool is THE wool to use. And, I don’t care for it. It feels almost rough. We had 2 colorways to select from. One had pinks and the one I selected had yellows. We got 9 needles. Once I start shading, I’ll need them.

Filed under: Canvas Master Craftsman Program, Embroidery Guild of America, General comments, Step 5, Woodlawn Needlework Exhibition
With my last post, WordPress informed me that I have posted 1,000 times! Wow, that’s a lot but I’ve been doing this since 2010. So, I was trying to decide what my 1,001 post would be. I’ve been stitching on projects that I don’t want share until they are done (Step 6 of the EGA Master Craftsman Canvas program and pieces for future Needle Pointers magazine articles).
However, I am preparing to head to south to see the 60th Annual Woodlawn Needlework Show. I found the list of all the entrants where they include the award winners (https://www.woodlawnpopeleighey.org/2023specialawardwinners) and where you can see photos of the special award winners including a couch (!) by Nancy Buckley, Birch Forest-French Alps by Norma Campbell’s (I love her pieces), Oklahoma Gothic by Darci Lenker (my husband looked at these online and thought this one was a photo!), and Cray Cray Bird by Barbara Levy (a member of ANG NJ Needle Artists/NJNA) to name a couple. The Woodlawn Needlepoint Show runs the whole month of March in Alexandria, VA (closed Tuesdays). There are a little over 400 judged entries this year (up 100 pieces compared to last year), special exhibits (https://www.woodlawnpopeleighey.org/2023-needlework-show-exhibitions) including 3 EGA/ANG chapters celebrating milestone anniversaries, and a variety of programs (https://www.woodlawnpopeleighey.org/2023-annual-needlework-show-programs) including a couple virtual.
Well, my Night Owls flew south hitching a ride with other members of NJNA and was awarded Second Place in the Original Design category. I did share this piece back in August. It is my original design from Step 5 of the EGA Master Craftsman Canvas program (https://melitastitches4fun.com/2022/08/31/canvas-master-craftsman-program-step-5/). The wings are appliqued in place.
I will report more after I see the show but wanted to remind everyone that the 60th Woodlawn Needlework Show has started and is well worth the trip. Even exploring the website offers some opportunities and eye catching pieces.
Filed under: Christmas Ornaments, Embroidery Guild of America, Fiber Art Now, Fiber Forum, Other People's Designs
I couldn’t find a ball of DMC #8 Pearl cotton in a particular color locally. So, I ordered it from Herrschners in mid October. I was surfing the website and found a garland of Christmas lights on plastic canvas. So I ordered the kit as well. I couldn’t get just one ball of DMC #8 Pearl, right?!? I had Bill put the kit away and today I opened it having forgotten all about it! I have a string of wooden light bulbs. These will be cute too.

Since I am not ready to be a full member of EGA’s Fiber Forum, I signed up for EGA’s Friends of Fiber Forum ($10/year) https://egausa.org/fiber-forum/. It’ll be a great start to see what goes on with the group.

I also got a year (4 issues) of Fiber Art Now (https://www.fiberartnow.net/). The website has tons of things to explore once you subscribe including their digital archive.
Quite a diverse selection! From plastic 7 count canvas to fiber arts.
