Filed under: 2018, Dare to Design With Orna Willis, General comments, New Jersey Needle Festival
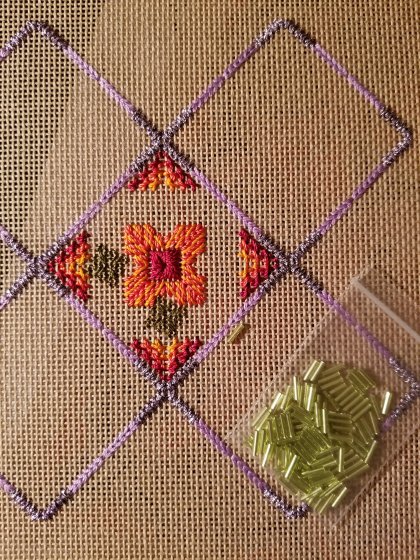
After I found Desert Island Stitches, Volume 2 regarding borders and this interesting kit (with threads that I have not used ever before) from Karen at Nimble Needle’s table, I settled down to stitch on my Dare to Design piece. By the end of the day, I had the center completed. However, the green stitch was bothering me. More on that later.

Throughout the day, I wandered around the vendors and looked at other people’s projects. It’s so fun to see what everyone is stitching. The ladies with New Jersey Needle Artists are doing another fascinating piece, Lorene Salt’s Autumn Kaleidoscope, in various colorways. Love them all!
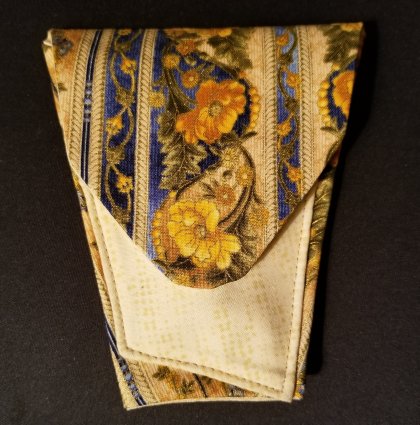
Everyone was buying something from Trish all day long. I finally picked up this scissors case because it can hold more than scissors. And, her fabrics are gorgeous. This one reminds me of spring!

I forgot to get a group photo this year but we had a full table. Besides myself, I enjoyed the company of Buff, Kristen (first timer), Patrick, Linda from West Chester NY (first timer), Lisa, Lori, and Linda.
More on the green area. I’ve discarded Pepper Pot Silk Olive 095 because it was too heavy (not pictured) and Soie Perlee olive green 274 because it was getting lost in the canvas (see double motif upper left side next to red/oranges). In fact, all the double motifs appear to become one blob. Maybe adding beads in the center of each would help define each unit but the beads I selected are way too big. I contemplated using Planet Earth 6 ply silk Shrub V 1058 (the two right on the upper row and the second from the left on the bottom row) because it matches bugle beads I plan on adding. But, it too disappears into the canvas. In previewing the bugle bead, I also realize how a single bead isn’t as bright when it sits alone. The Au Ver A Soie light green 325 works best in the double motif (left on top row) but gets lost singly (left bottom row).
So, it took me all night but I’m doing a single motif in the Needlepoint Inc SilkLeaf Green Range 256 (bottom row right). The double motif seems blobby still (center bottom below the red/oranges. You can see the single clearly. However, I need new beads. I wish I had know this while I was at Edwardian Needle. Oh well! Beads will go on last. I’ll figure that out later. I could always do French Knots. It’s been an interesting learning experience to see how slightly different threads appear differently. No wonder Orna says she rips a lot out as she designs.

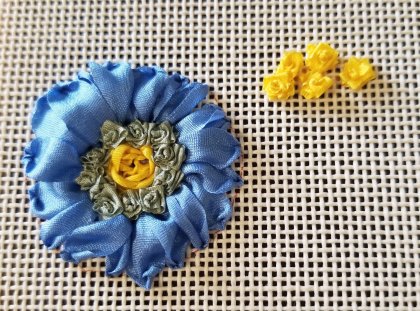
I got to show off my finished crazy quilt to Pam and others at Edwardian Needle today. Everyone loved it. I had added some ribbon French Knots, strung some beads, placed some lazy daisy stitches along the bottom, and spun a cob web which are typical to crazy quilts as they represent good luck. And, I had excellent luck finding more ribbons and beads to make a second piece. It’s actually not luck because Pam has such an excellent selection. I’ll show my Main Line Stitchers Chapter some of what I learned about beaded and ribbon flowers probably in June. It’ll help reinforce what I learned.
I helped a woman pick an easy, less expensive canvas and Linda helped her pick threads. She never stitched anything and I couldn’t resist helping her (or is enabling the correct word?). As we left, she was being shown how to stitch basketweave. Welcome to our world!
What a wonderful store, owner, employees, and such welcoming patrons. There are even 5 tables for sitting and stitching. Today, 4 of the 5 tables quite full. You can sign up for time with Pam and she’ll help you with your particular canvas. It’s always fun seeing what other people are doing.

Filed under: Dare to Design With Orna Willis
I got started stitching last week so that I could take this to stitch on this upcoming Saturday at New Jersey Needle Fest, a day long stitching event with 120 stitchers and 8-10 vendors. Yes, back to back stitching weekends!
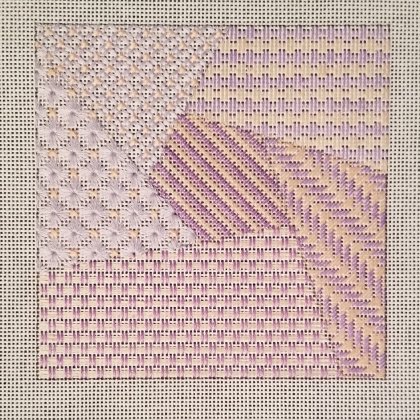
Overall, it’s a 5&1/2″ square. If I hadn’t designed it myself, I would have a hard time believing that everything I have planned to stitch is going to fit! However, that’s what happens when moving from 8 count paper to 18 count canvas.
Instead of a lot of ripping, I tested the stitch and threads on a waste canvas. The #8 Kreinik worked ok for the knitting stitch bottom far left but was too thin coverage for the mosaic bottom right. I also decided that you could see the knitting stitch better with the Planet Earth. I tested Kreinik #16 upper right which happened to be in my stash but felt it was too heavy for an area that I doesn’t need attention. So, I bought #12 which looks great. I wanted to establish the border to decrease counting errors. Now, I can stitch the focal point.

Another great day at Edwardian Needle with Betty Pillsbury teaching. The class size increased by 3 today. A nice group of women. All great stitchers. Everyone’s pieces looked wonderful. I switched to a practice canvas because I didn’t have space to practice all of what we’d be going through on my stitched canvas.

I may add a background around the right flower and have it made up into a stand up piece. The center blue arrangement could get an edging stitch and become a bookmark. The left top isn’t finished so not sure what I’ll do with it. And, the beaded sample isn’t enough to do anything with.
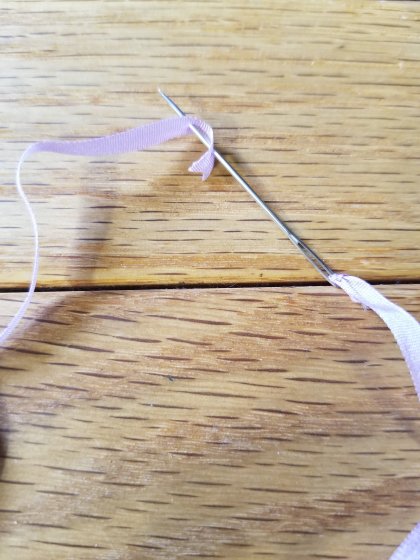
As a reminder for me: To make a knot with ribbon, you have to place the needle through the end of the ribbon and then again 1/4″ inside before pulling the needle through the ribbon. If you do it inside to out, you won’t get a knot for anchoring on the back. I learned that firsthand.
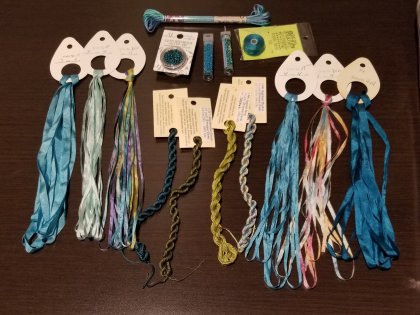
Betty Pillsbury is giving us a great class on using ribbons, sequins, and beads. Learning a lot and got a lot done. Pam, from Edwardian Needle, provided a generous kit and Betty brought some more stuff for us to try. I’m the only one that stitched a base and Betty is accommodating me without any problem.
Pam also provided a lovely lunch of salad, eggplant parmesan, sausage/red peppers, roll, and 3 desserts!
Some stitching I did on a practice canvas but most stitching was right on my stitched canvas. Many of the kit’s contents I can use but I am using some of the threads and beads that I brought with me.

Here’s an update to a program that we introduced to my ANG Main Line Stitchers group for a coffee cup canvas that we will all stitch and give to Starbucks as a thank you for letting us use their conference room for free. Come join us any second Monday of the month at 7 pm at 218 Lancaster Ave.
I’ve just stitched 3 more cups including the bottom right green cup. I wanted a full coverage because the canvas wasn’t painted correctly. So, I used alternating mosaic. I like adding a sparkle with Kreinik to that green. It’s odd that the handle is one of only 2 cups with a red handle. I stitched the other cup with the red handle in the upper right corner. For this cup and saucer and the white cup with red saucer near the bottom center, I tried 3 different wavy stitches that I found in Desert Island Stitches, Vol 1. These can be done vertically or horizontally. The wavy stitch in the grey cup was a little tricky but I like the look. Only 8 cups left to go and nearby backgrounds. This is a fun canvas to stitch!

Back at November’s Time for Needlepoint Retreat, Pam from Edwardian Needle gave us a line-drawn canvas, a stitch guide, and 2 skeins of Presencia in peach 1468 and light lavender 2687 (other colors were also offered) as a thank you gift for attending. She told us it could be used as a base for a crazy quilt/ribbon class she’d be offering in 2018 (smart marketing idea). I didn’t recognize the name of the teacher and googled her name, Betty Pillsbury. She’s written a book about crazy quilts and has taught beading and ribbon embroidery. She offers stitching how to videos on her website (greenspiralherbs.com). So, I am looking forward to this 2-day class this weekend.
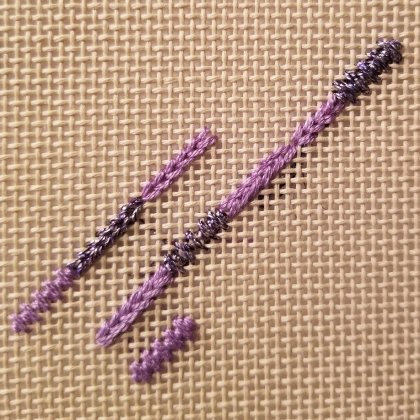
As I was stitching my canvas in the week before the class, I realized that I was running out of the lavender after stitching 2 areas (upper 2 left areas) and nobody sells Presencia around here as far as I know. So, I decided to switch to DMC 210, a slightly darker lavender for the right 2 areas. And, DMC 209, an even darker lavender for the bottom and center areas. I was very surprised by the difference in appearance of the 2 right-sided areas stitched with the same DMC 210 and Presencia 1468. Both use just 2 threads but the top area is so much lighter than the lower area. Switching from a straight stitch to a diagonal stitch really affects the outcome. I’m glad that I ran out of the lavender because it will be a more interesting base now with some variety.
Because of the direction of the stitches, the final result does make the large bottom area (stitched with the darker 209) look more like the upper right (stitched with 210) than the center (stitched with 209). Interesting exercise.

Filed under: General comments
One of the benefits of attending an event like New Jersey Needle Festival is that we see people’s projects and their tools. Lori had a great rechargeable, clamp on light. It opens just wide enough for Evertite Stretcher bars and fits the interlocking wide bars easily. The brightest level of 3 is very good. It lights up the 12″ x 12″ canvas and especially the center 6″ x 6″ area where I’m stitching. It would last 4.5 hours at this level. The beam angle is 90 degrees so that it is focused and not shining in anyone’s eyes. The goose neck is flexible. It’s small and light weight. And, the bulb didn’t get a bit warm after 2 hours. I was shocked to get all this for $10.99. It recharges via a USB cord. I already had the USB wall plug portion that came with my phone.
On Amazon, search “LE Dimmable Desk Lamp, Rechargeable Clip LED Desk Lamp, 14 LEDs Gooseneck LED Portable Reading Book light, 3 Dimming Level, Touch Sensitive Table Lamp”.
We can’t bring plug in lights to ANG Seminars starting with Washington later this year. Because it only lasts 4.5 hours, it wouldn’t last a full day class. So, I’ll use the charger we bought for phone emergencies on trips. We got myCharge and a USB cable (sold separately) for approximately $25. In Amazon, search “myCharge RazorPlus 3000mAh Portable Charger With USB Port“. The USB cord that came with the light is compatible with the charger.
Now, after class, I just have to remember to recharge everything!