Filed under: Canvas Master Craftsman Program, Embroidery Guild of America, Seminar 2022-NYC, Step 5
Step 5 of the EGA Master Craftsman Canvas 3 had to include 2 appliques (canvas to canvas and at least one had to be irregularly shaped). It had to be 10″ x 14″.
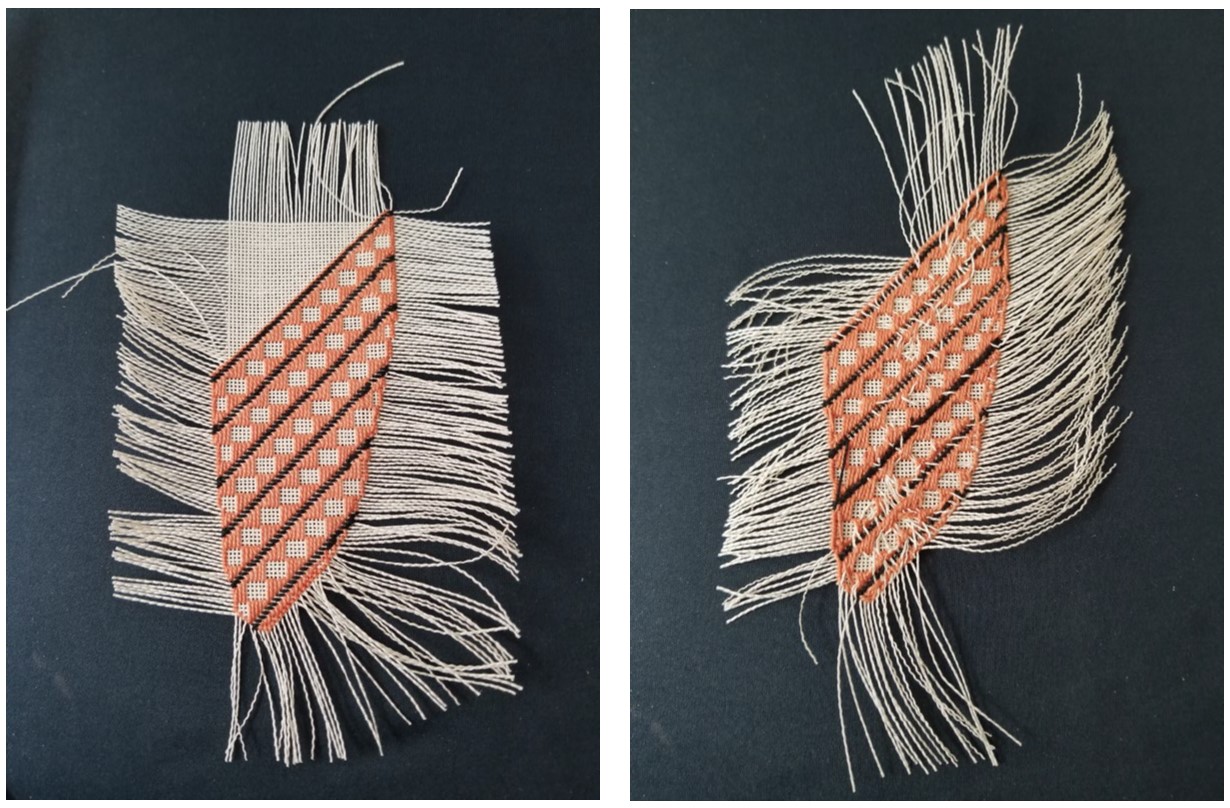
The wings were stitched on 24 count Congress Cloth and applied to 18 count canvas. These are the practice wings. In a nutshell, Step 1 is to pull threads out to the stitched piece (in progress in left photo). Step 2 buries some threads on the back of the applique (right photo). The rest of the threads are pulled to the back and buried in the surrounding stitched area. It is time consuming.
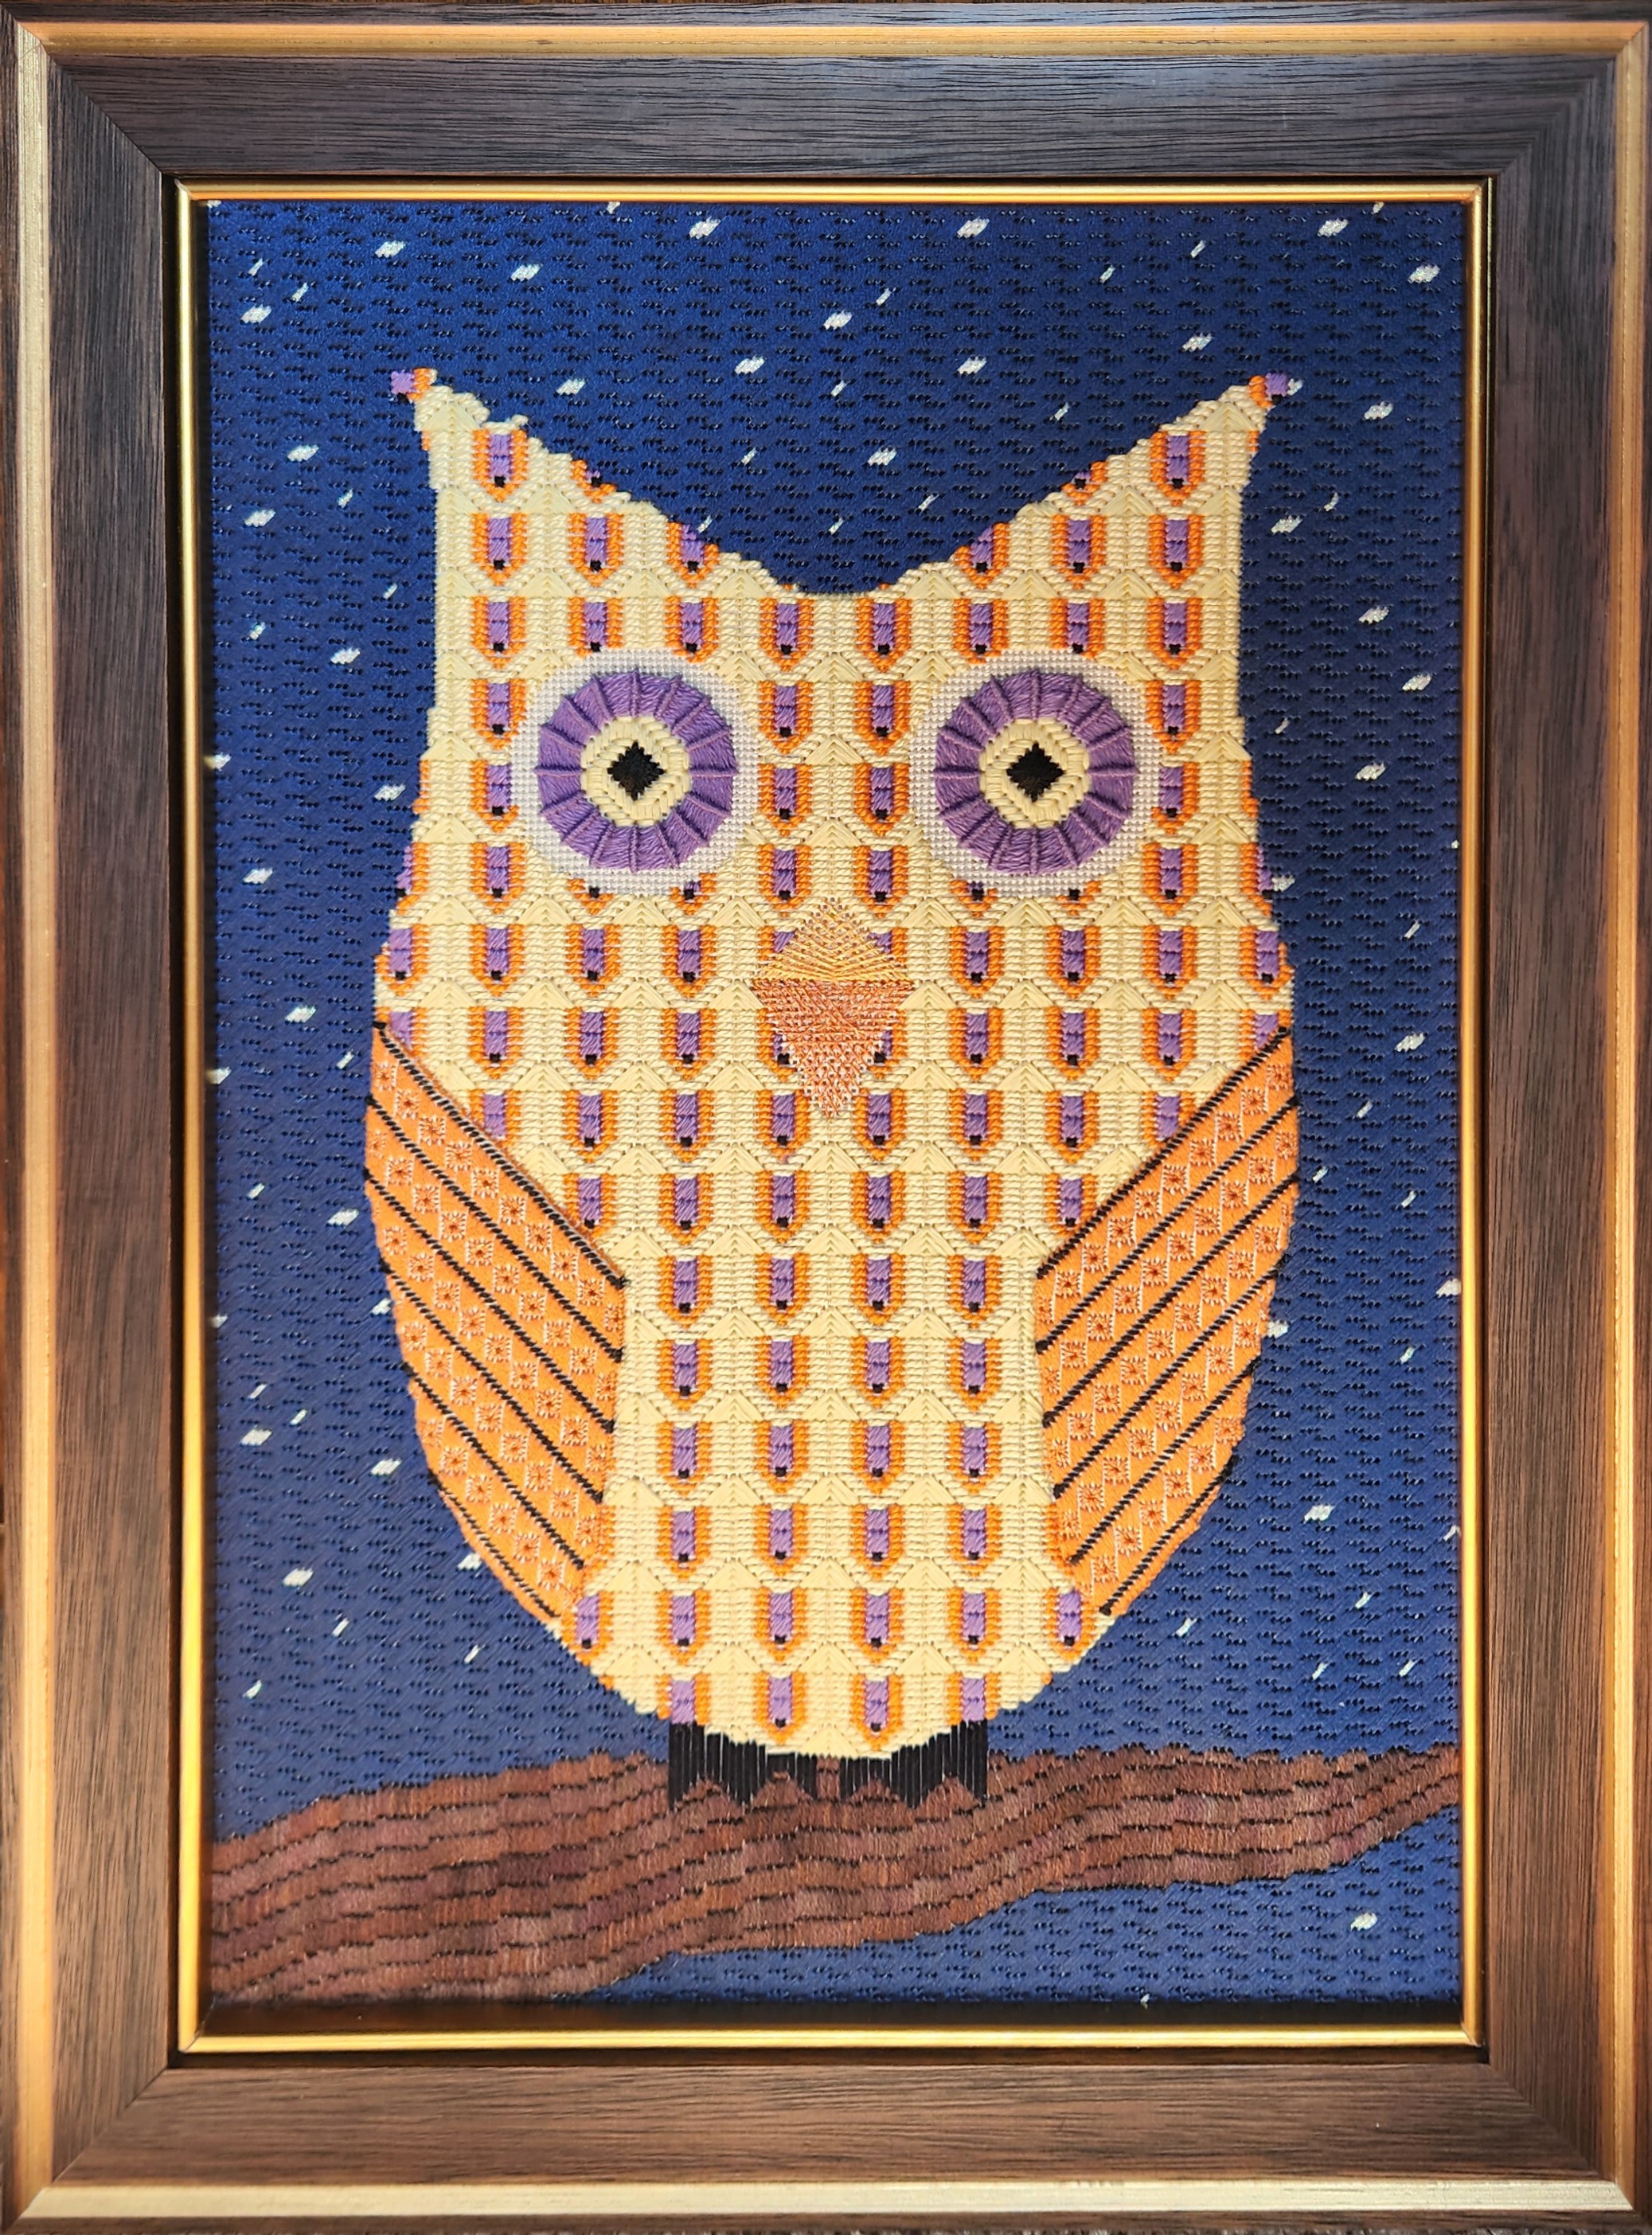
I started this piece shortly after seeing the article Tale of Two Stitchers in the Needle Pointers magazine (Mar/Apr 2021) regarding 2 painted canvases of owls “Who Gives a Hoot”. At first I was going to make the round eyes the applique until I realized that a circle is not irregular! So, I switched to making the wings the appliques which actually made better sense since they should be in front of the body anyway. I would have padded it but the instructions didn’t say you could but it is allowed. They have changed their instructions to clearly state that padding is allowed.
I had to practice the technique and actually stitched 5 wings trying to get this right. That’s why this step took an extra 6 months. But, the piece passed with distinction. So, it was worth it. Bill likes owls, knew I had worked on it a lot, and thought Night Owl deserved to be framed. So, it was framed before going on display at EGA National Seminar from August 24-28, 2022 in New York City.
I’m glad I waited to post this until I got it back so I could take a new photo. Before my photography class:
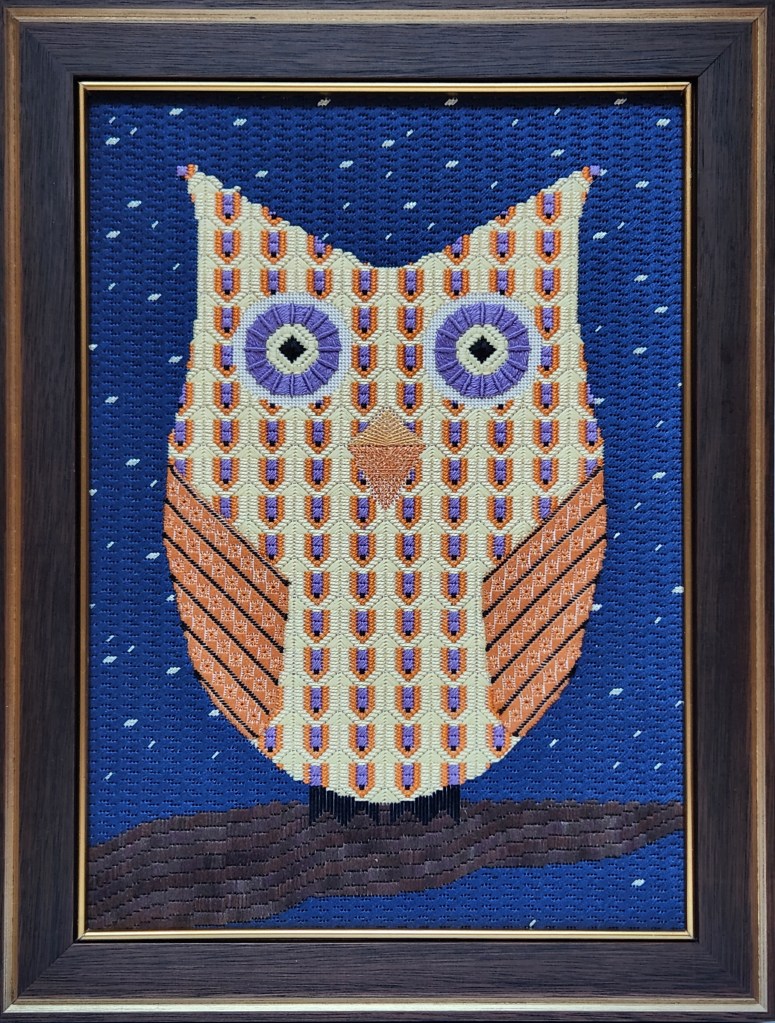
After class:
Filed under: ANG Main Line Stitchers Chapter, Busy Lizzy, General comments, Ginkgo Leaves, Needlepoint Shops, Other People's Designs, Threads
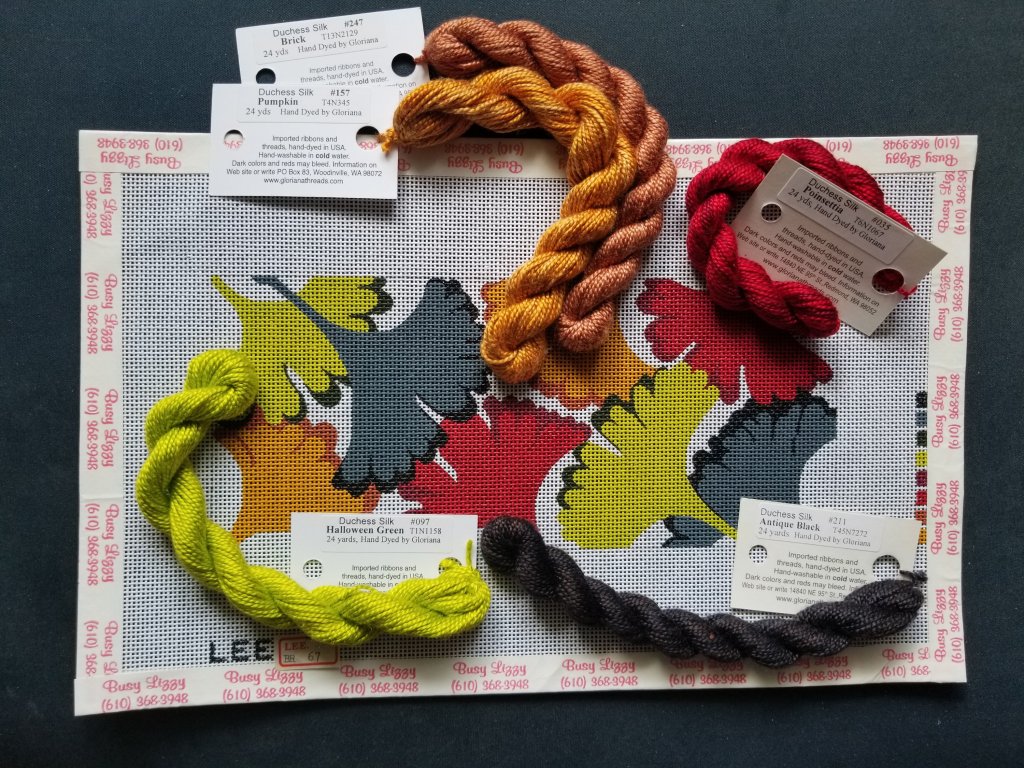
Ginkgo Leaves is a Lee canvas (design size 8.5″ x 3.75), BR67. In June, at Cleo’s First Tuesday Stitch-in at Busy Lizzie, I found a new thread Line that I haven’t seen anywhere else. It is from Gloriana Threads and is Duchess Silk, a hand-dyed thread. Some colors have more subtle changes in the skein than others. The Antique Black is darker than the canvas but that’s ok. And, I will not use Brick after all because I am using some sparkly threads including Kreinik, Silk Lame Braid, or Snow for the edges of the leaves.
I was thinking basketweave for something easy to stitch but discovered that Duchess Silk is too thick. So, I selected various stitches incorporating a little additional sparkle into four of the eight (different from the edges).
My main goal was to find stitch patterns with stitches over 2 or 3 canvas threads that would create a diagonal effect according to the direction of the leaf. They came from Desert Island Vol 1 and 2 by Carole Lake and Michael Boren, Lone Star’s Grab-n-Go Stitches, Needlepoint Dictionary of Stitches by Susan Sturgeon Roberts, and The Needlepoint Book by Jo Ippolito Christensen
Part of this was stitched at yesterday’s Stitch-in with the ANG Main Line Stitchers. We had 5 in person at Buff’s house because the church is working on the floors. Speaking of Buff, she was quite observant by noticing that I was uncharacteristically stitching “in the well”. It is something that I have done when the canvas has too little around the sides of the design because it makes ending threads easier. When do you work “in the well”?

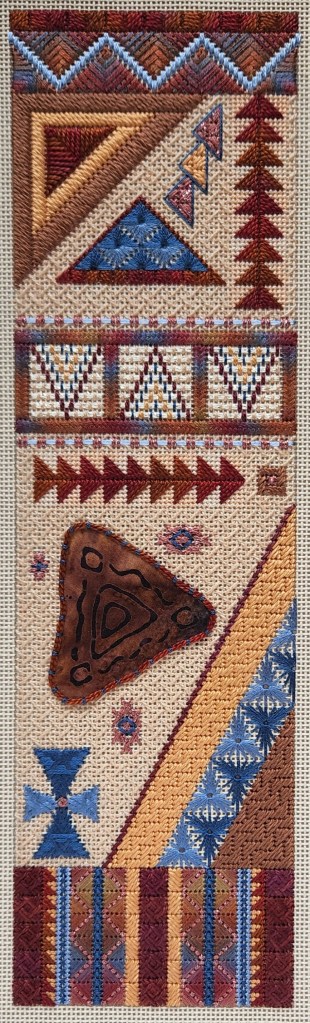
The main reason for taking Mesa Triangle with Kathy Rees was to learn about fabric appliques. I also liked the colors and of course, I enjoy classes with Kathy. The design is 3.5″ x 12″.
As I stitched, I realized that while this is not a symmetrical design, there are components within the design that I am making symmetrical by manipulating the overdyed threads. It is very subtle and you may not notice it but it makes me happy.
The triangles divided by the blue zig zag line on top are the first examples. The 3 across the top match, the two bottom center match, and the two smaller side triangles match.
In the next section below on the right, the nine triangles match as they progress downwards as does the very slightly overdyed tent stitches. I stitched each side down with matching colored threads instead of stitching side to side. I did the same thing for the other nine triangles that appear horizontally further down.
In between those triangles are a band with 3 “windows”. The “panes” are an overdyed thread, Gloriana Mesa Sunset, appropriately enough, which I love. I got the top and bottom panes matching pretty good without actually trying. And, I did get the far left and right vertical panes to match. Then, I shifted the blue down just a tad for the center two vertical panes.
For the bottom panel, the 4 Gloriana Mesa Sunset columns all match, gloriously!
I never expected to get both Seminar pieces done in the 2 weeks since returning. But, I have lots to start including two new ANG Main Line Stitchers chapter projects (these bars may just work for one of them) and my EGA Step 6 Master Craftsman Canvas Program (design, canvas, and threads are ready). I am also looking forward to a class with Catherine Jordan in September and Toni Gerdes in October.
Filed under: A Spring Sampler, ANG Cyberworshop, ANG Seminar 2022, Making Stitches Work For You with Carolyn Mitchell, Melita's Designs, President's Award
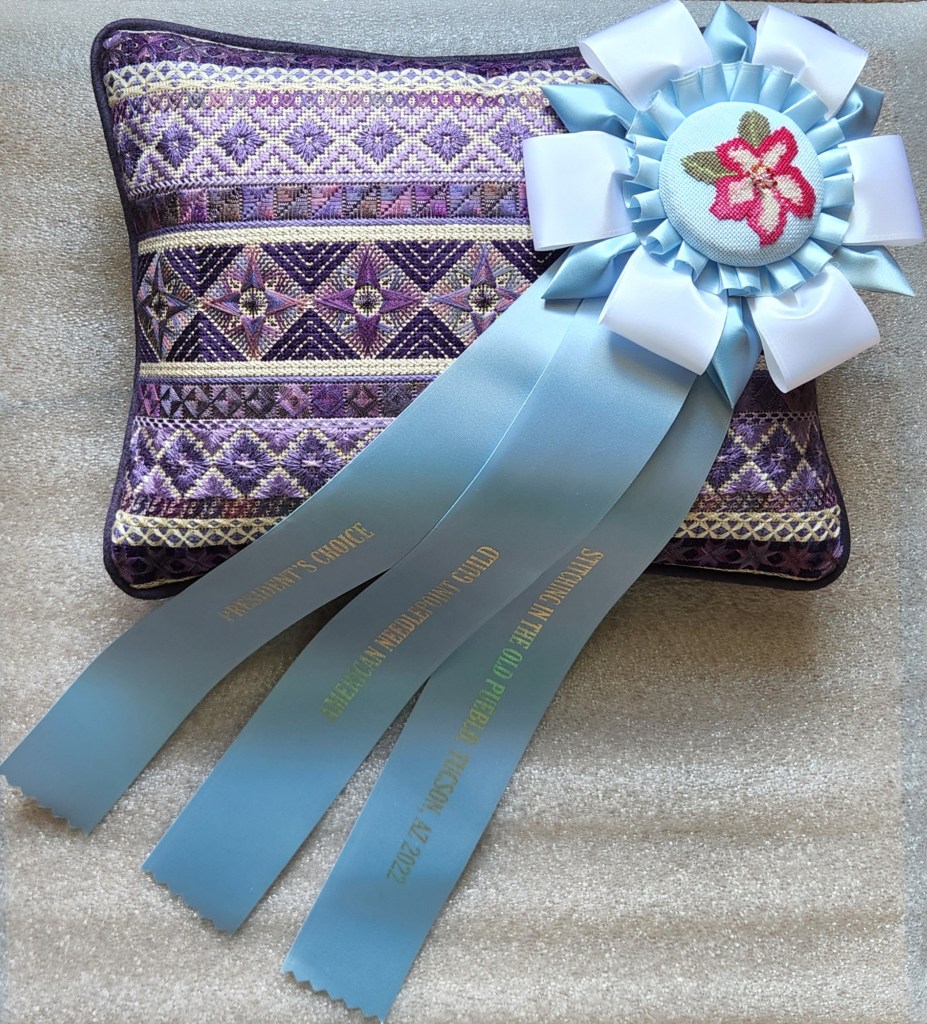
Shirley Burns designed all the special award hand-stitched ribbon centers for the ANG 50th Anniversary Seminar Awards and Betsy Smullen stitched the Desert Rose for the President’s Award. I did ask and all the ribbon centers should appear in an upcoming issue of Needle Pointers. All were lovely! Thanks again to all the volunteers who participated to make the whole Seminar a success.

I enjoyed the opportunity to have a class, Blue Hills, with Dawn Donnelly for this “mixed media” piece that incorporates Dawn’s hand-made paper. It’s about 6″ x 8″ on 14 count. Fun to stitch.
You can see it in the third area from the top. I cut the paper and stitched it into place.
Between the 8th and 9th area (under the straight satin stitches of Watercolours) I did not like the ripped paper because it didn’t rip how I wanted. So, instead of using that piece that was supposed to be tacked down with a “fake bullion” created from DMC Pearl Cotton #5 which required at least 72″ and crunching one strand to create a coil (which is a long length to get without shredding). I decided that it was not going to happen for me. Not worth the aggravation especially because I knew I had Woolly Whites (WW010) from The Thread Gatherer. It’s perfect!
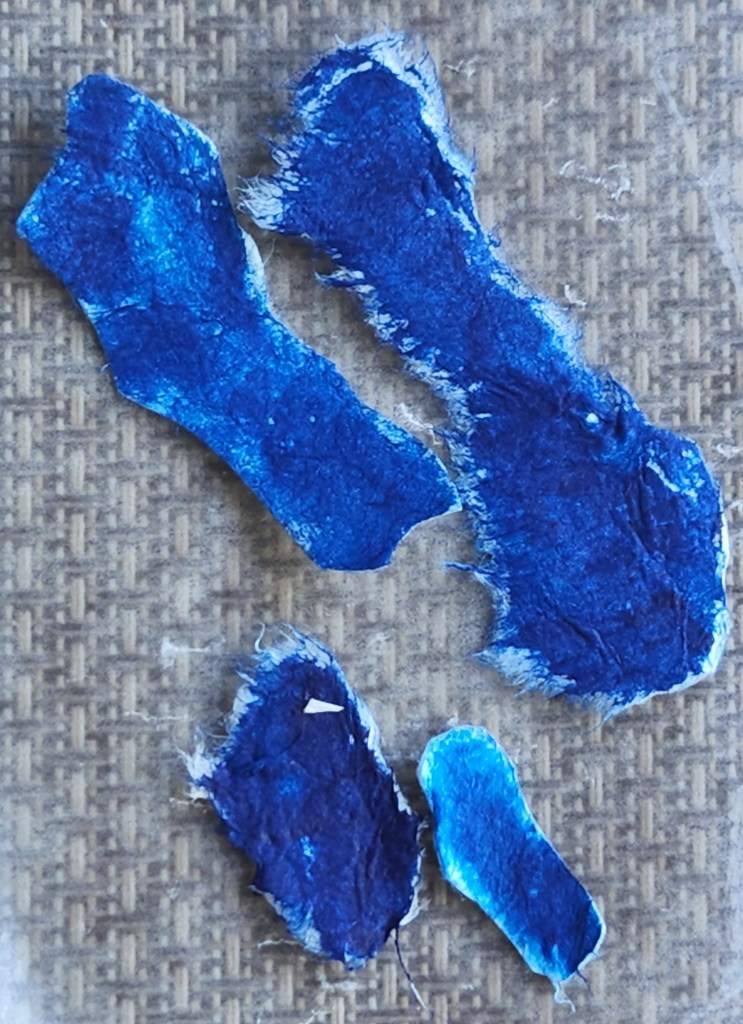
In the second to the bottom area, underneath the Satin stitches are 4 pieces of blue painted papers instead of 3 that Dawn suggested (they show up more in the photo than in person). I thought the one piece was too small but it fit in on the far left. That allowed the 2 medium sized pieces to fit in the center and the large on the right. I did not want the papers to shift during framing. Dawn had suggested glue. But, I used one strand of dark blue thread and a chenille needle to tack them in place. They aren’t going anywhere ever! In order to see the paper through the stitches, one strand Trio worked fine (2 strands didn’t allow any paper to show).
Placing the beads and French Knots (with 1, 2, and 3 wraps) randomly with all variety of threads was fun (just don’t look at the back).

What happens when Christmas meets From Dawn to Dusk by Karen E. Dudzinski from Textured Treasures? This cute ornament! It is Motif 1-1 which I agreed to stitch to show how the various motifs would look if stitched individually for ornaments. This is one of three projects that ANG Main Line Stitchers will be stitching over the 2022-2023 year.
I had Needle Necessities 153 Razzle Dazzle Red for the Satin Stitch Leaf and a roll of 1/16 silver metallic ribbon for the Plaited Upright Cross and center leaf vein in my stash. The red flosses from dark to light are 814, 816, and 321.
Instead of the 11/0 beads, I used 15/0 Miyuki beads and Sundance silver sequins BDS-SQ214 which I have plenty to share if anyone is interested. I think they will sparkle better.
Other threads were DMC Floss Blanc, DMC #8 Perle white, DMC #5 Perle 321 red, and Kreinik #8 Braid 001 silver.
It took me about 6 hours to stitch this (spread over several days). I kept track to get a sense for how long it would take members to stitch a motif if we do one a month.
I stitched Access Commodities Metallic Soft Twist Trim Cord (Size 16) on with Sulky Invisible thread (fine 0.004) which was quite a challenge to see! But, it worked better than a matching silver thread because I had to go into the Ultrasuede backing & kind of deeper into the front to cinch the two sides tight. The cording Size 32 might be better although this is fine. It was way easier and quicker than using the Palestrina stitch for the edging. For this ornament, I used one layer of Skirtex, a stiff interfacing, that I had left over from a name tag kit obtained from Marilyn when we volunteered for ANG Distance Learning together. We made coordinating name tags for the 2014 ANG Seminar in Chicago. I had forgotten where I’d gotten Skirtex from, searched on my blog, and found out where I’d gotten from. I keep following Marilyn around ANG! She is excellent to work with and very knowledgeable.
My finishing is not perfect but looks very good. The first photo revealed a piece of invisible thread that had gotten caught on an edge but I was able to bury it. So, it was all done & ready for our August ANG Main Line Stitchers meeting this past Monday.

Filed under: Ottawa Quillwork on Birchbark
While in Tucson, we wandered into a bookstore and I found a book on Ottawa Quillwork on Birchbark. It looks like needlepoint doesn’t it!

Examples of this craft in the book were found almost exclusively in Emmet County, Michigan. The Native population of Ottawa created these pieces. Birchbark contains an alcohol making it antiseptic and resistant to microorganisms. The containers were therefore used for storage of food or other perishables. But, most of the examples show pieces used for decoration.
Layer in the week I found an example of the craft. That’s an inner lining on the upper left corner – not sure what is the purpose of the liner.

Day 2 of my third class with Dawn Donnelly started with Dawn demonstrating the Butterfly Chain stitch. That’s the green stone stitches tied together. I took photos of the steps as I stitched it because I kept missing it from her diagrams.
The stem stitch went in underneath just fine. However, once I got past the third row of Oriental stitch, it got tough because the area got so thin. But, I figured it out on graph paper. I didn’t fill in any of the Gobelin stitches yet.
Dawn talked us through straight stitch areas to allow more time on other areas. The Mosaic Checkerboard is tricky only because it is a small area. The green is Huck’s Weaving which is easy enough.
I’m not looking forward to making a fake bullion with DMC Pearl #5 because you need at least 72″ length of thread to cover from side to side without breaking!
Various French Knots, eyelets, and blue Rhodes stitches (begun in the bottom area) should not be a problem. I hope my notes on paper and beads are clear when I get home.

I’ll have to finish this asap once I get home so that I remember what to do! Once I get in my comfy chair with my lap stand (which I forgot to bring), I should be able to finish this relatively quickly. It’s on 14 count canvas and really fun once you get the rhythm of an area. During a 2-day class, you have to move on just when you are enjoying the area. That’s just what happens in a class setting.
Seminar 2022 is over now. What a week! Lots of people telling me that they are looking forward to stitching Crescent Journey – very happy!
My third class, also 2 days, is Blue Hills with Dawn Donnelly. It is another type of applique of a different sort – applying paper to a canvas. This is also referred to as Mixed Media. Dawn makes her own paper. We didn’t have to do that but she explained the process and has a Zoom lecture on that topic which I was fortunate enough to be an invited guest earlier this year. She gave an abbreviated talk about the process today.
Her advertised description of class is: The hills in Michigan may not be big or blue, but they are beautiful. We are surrounded by water and a wide range of terrain. Blue Hills is my attempt at bringing that beauty to life. After a short lecture on handmade paper, the student will spend time exploring the paper by painting, wetting, tearing and cutting it into shapes. It will be attached to the canvas and surrounded with stitches including Corset, French Knots, Branscombe Edge, Criss Cross Hungarian, Butterfly Chain, Oriental, Rhodes and a fake Bullion.
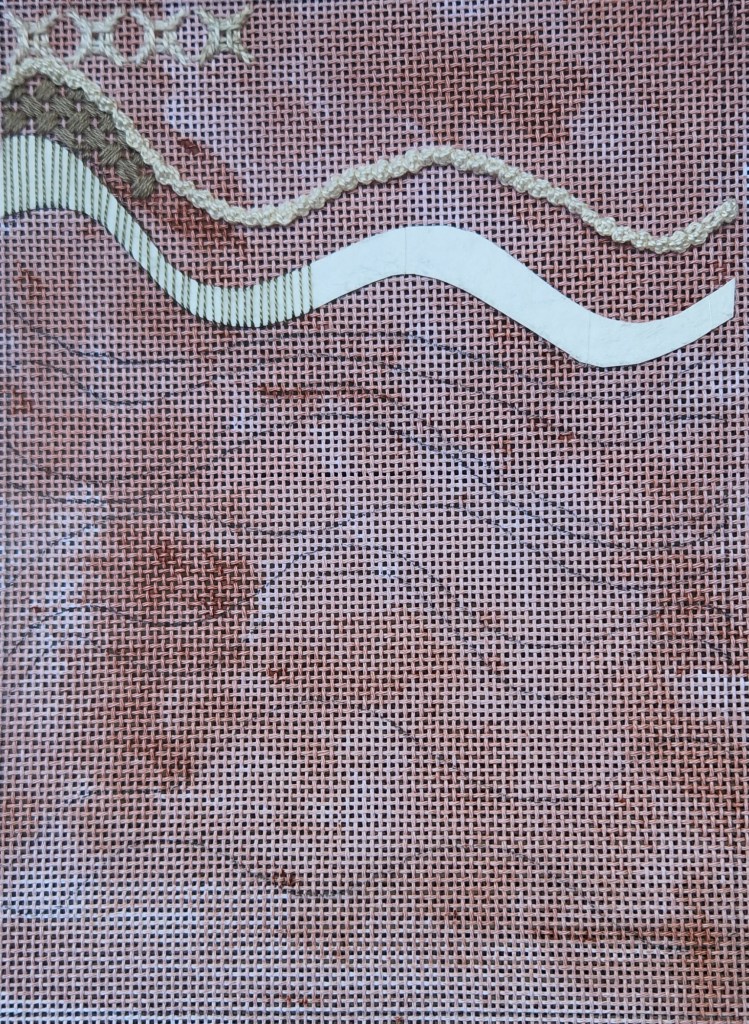
We cut and ripped paper in the am and then painted some of the pieces.
In the afternoon, we started attaching one of the pieces. We also did 2 of the toughest stitches, Corset (top stitch) and Branscombe Edge 2nd from the top stitch). Corset comes up under stitches and Branscombe Edge builds 3 buttonhole stitches next to each other. Dawn said that we could make the backstitches over 2 or 3 canvas threads. I did over 2 and they got crunched together.

This is over 3 canvas threads so you can see the difference. I kind of like mine better because it is not as uniform.

Day 1 progress. I will be finishing the 4th band tonight so that the paper is completely attached.
Filed under: ANG Seminar 2022, Photographing Needlepoint - Jennifer Riefenberg
We got some great tips on photographing needlepoint from Jennifer Reifenberg. I have been getting photos on cloudy but bright days but need to get a white board to help get rid of shadows. Also, I need to get a white and black matte background fabric depending on what I’m photographing.
Photo taken a few years ago.

Today’s photo during class.

So, I can already see an improvement in my photos.
