Filed under: Uncategorized
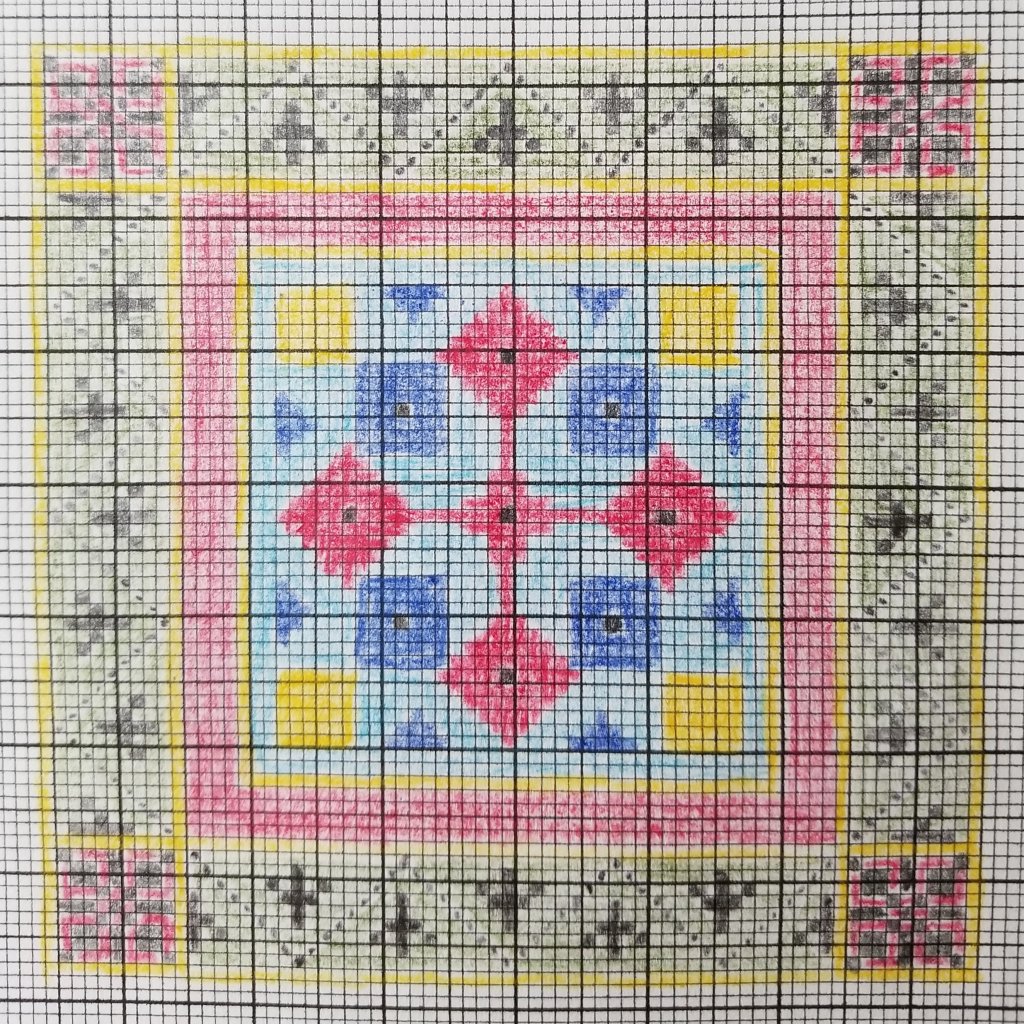
The Star of Stitches by Kathy Rees is an ANG Stitch of the Month for 2020 and my ANG Main Line Stitchers chapter is stitching this as one of our two counted projects for this year. Somehow, I forgot to post about this project until today!
Instead of outlining the areas with pencil, I used basting threads. They get in the way some on the bottom where I double backed. So, I pull them out once I get started enough within the area.
My Color Complements overdyed threads (048 Fall and 191 Golden Yellow) have way more color changes in it than what Kathy Rees probably intended. And, the areas of color seem to change quicker than in Watercolours. So, I can’t select portions to concentrate the color in certain areas. I was afraid that the subtle patterns would not be as obvious. But, the stitches differ enough that I think it’ll be fine.
The women at New Jersey Needle Artists (NJNA) gave some insights from their experience stitching it this past year (they have a wonderful variety of beautiful colorways which you can see on their blog). And, I decided to to go with a skein of #5 and a skein of #8 in each colorway because they thought that Watercolours was a bit too thick in several stitches. I picked up Silk Lame Braid Petite as well as Silk Lame Braid for 18 count in both colors. There are a couple of places where the thinner thread will probably look better (to me). Also, I couldn’t find a Petite Very Velvet I liked in my color & it is kind of thick for a couple of the stitches (in my opinion). So, I went with Silk Serica, a Kreinik & it worked fine in the first area.
I’m very pleased with the outcome of the first area. Love these colors.

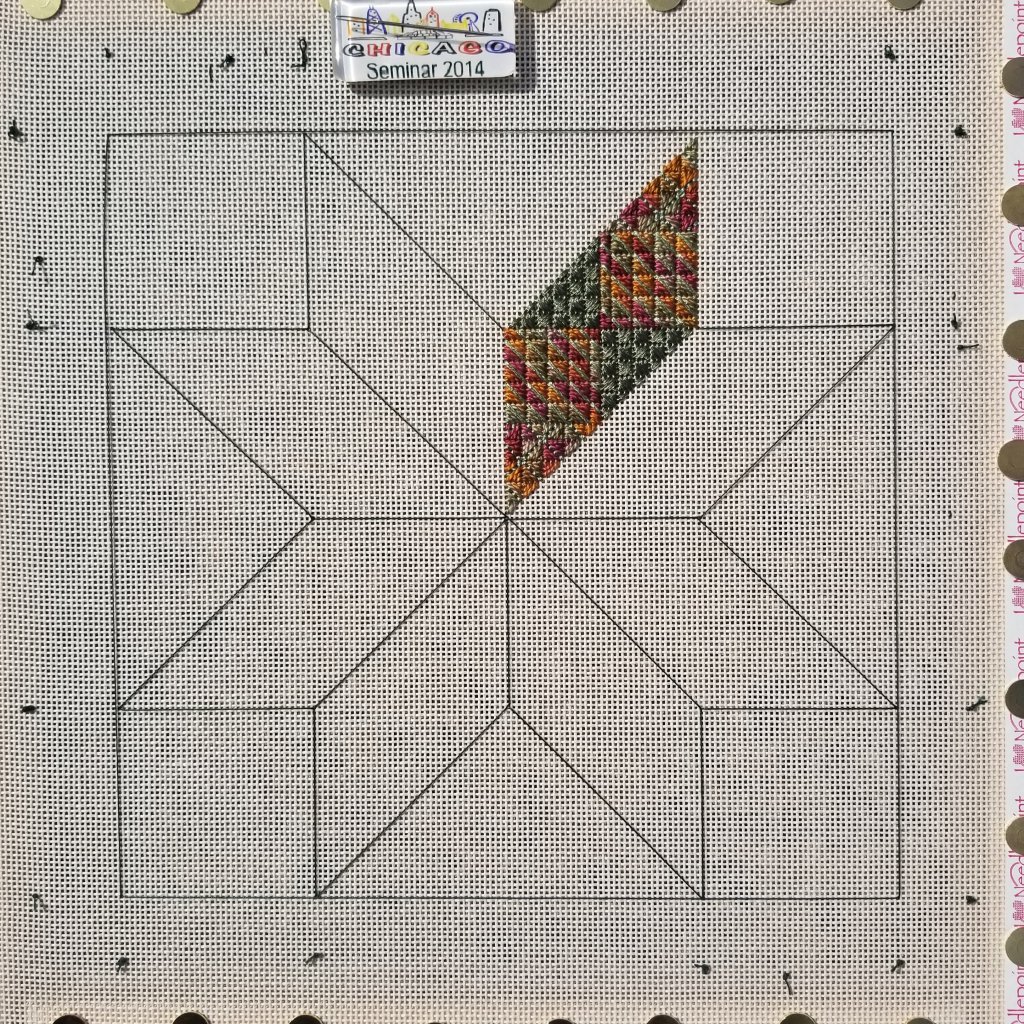
For Area 2, I used different weights for the overdyed thread (#5 in the squares and #8 in the triangles) and the Silk Lame (for 18 count in the outer triangles and Petite in the inner triangles) to create some differences in texture within the overall area.

Had to use my ANG magnet for this piece!
Area 3 used a variety of Smyrnas (regular, oblong, and long-armed). Here I made sure that the colors were placed symmetrically. The diagonal line between the last 2 areas will get filled in later.

Filed under: Canvas Master Craftsman Program, Embroidery Guild of America, Step 3
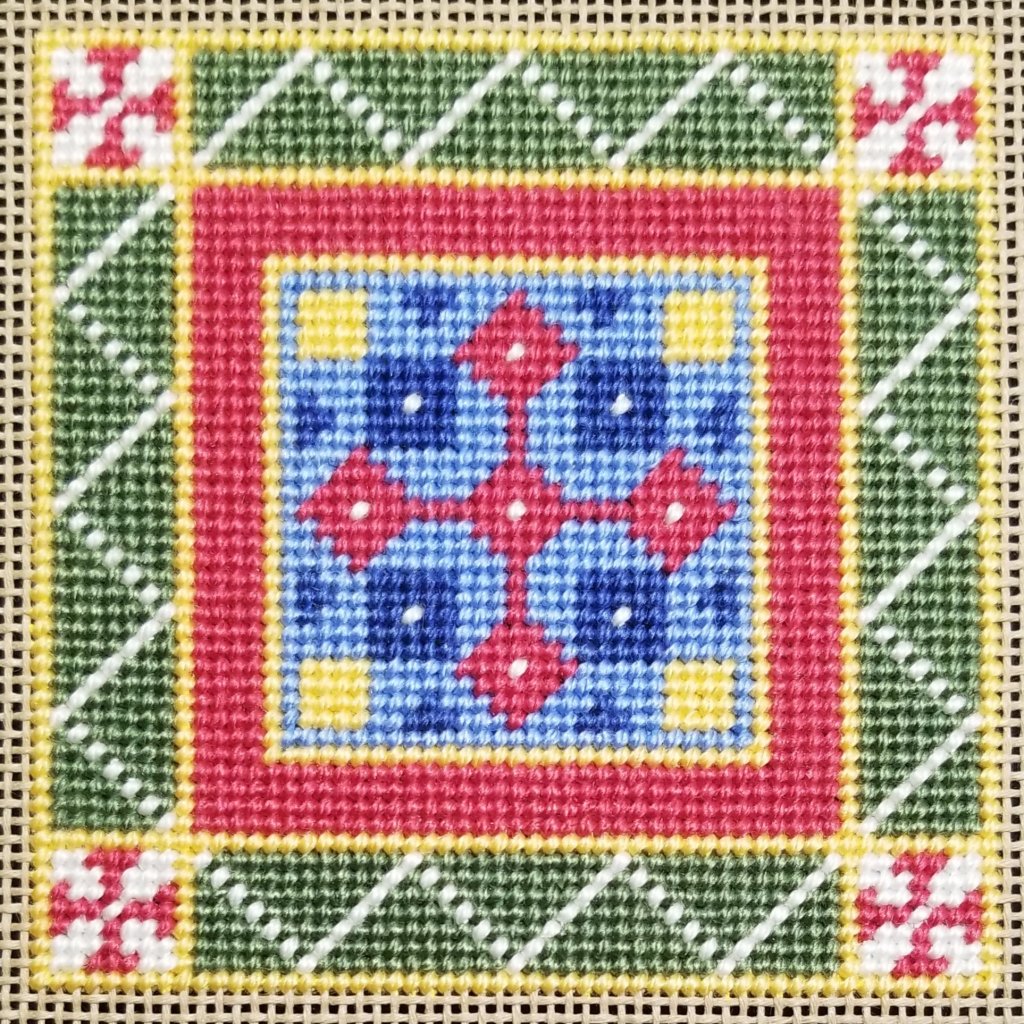
Step 3 of the Canvas Master Craftsman program was diaper patterns and my piece passed with distinction again and will be sent for display at EGA National Seminar in 2021 along with Steps 1 and 2. The instructions were to use at least 4 diaper patterns and a split complementary color combination (I selected orange, blue-green, and blue-violet).
After studying the extremely thorough book, Diaper Patterns, by Ann Strite-Kurz, I decided to make this a diaper sampler by incorporating the eight basic pattern networks (square, diamond, brick, half-drop, triangle, hexagon, scale, and ogee) into a design. I should call this piece Baby Steps because it barely touches the surface of what diaper patterns can create. Diaper patterns create strong visual diagonals in both directions.
There isn’t much open canvas but the judges commented that they did not see any visible threads through the canvas. It has good balance, excellent choices of diaper patterns and color, and the color of the canvas enhances the design where there is exposed canvas. And, I did a “fantastic job of laying threads”.
On the eve of Thanksgiving, I am thankful I passed, appreciate the judges comments, and am looking forward to Step 4 and creating a bargello design! I hope you spend this Thanksgiving being especially safe.
Read all about the program at https://egausa.org/certifications/master-craftsman-program/.

Filed under: General comments, Painting Needlepoint Canvases with Fancywork Finishing
The center V is stitched as basketweave would be normally. For the left V, I laid the Ecru DMC Perle #8 thread first, stitched over it with DMC #5, then stitched the surrounding green with DMC #5. It pinched the #8 thread slightly more than the right V where I stitched the green first, laid the Ecru #8 thread, and then stitched over it with the DMC #5.

The left and right V appear to be essentially identical but the thread is still more visible than I expected.
I had to try reversing the colors. I only needed to lay one strand of green floss after stitching the ecru surrounding area first. You can not see the floss at all and the V is so much more evident.
So, I think that this works only with dark threads and would very useful for defining dark letters in pieces.
Classes for Painting Needlepoint Canvases with Nancy of Fancywork Finishing finished up on Wednesday. The third class went over mixing paints more and a variety of questions we had. No more classes in 2020. Bummer. But, I will be busy finishing up a few of them!
Back to The Flower Cuff with Orna Willis. Our second and final class was yesterday on Saturday. When last I posted about this, it was all stitched and beads within the design had been stitched. I neglected to mention that this is now the second teacher who recommends matching the beading thread to the canvas rather than the bead. Luckily, I had a tan in my stash. What do you do?
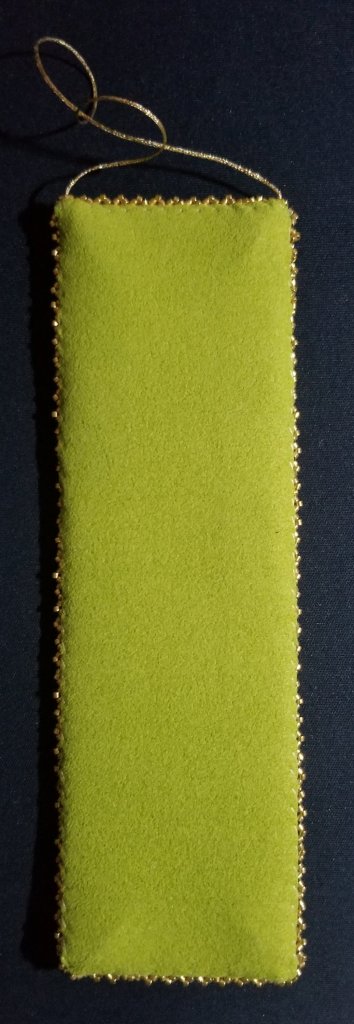
As Orna instructed, I trimmed the canvas excess, folded the edges leaving 2 canvas threads, mitered the corners (which I didn’t do for the recent EGA piece I finished). Then, I whip stitched the edges using a long enough thread to just need 2 lengths. Orna gave a tip for turning the corner which I have diagrammed.

And, since I will hang it, I attached a loop using Kreinik #16 Braid. I don’t like making cord from threads even though I have the tool. It looks ok to me!
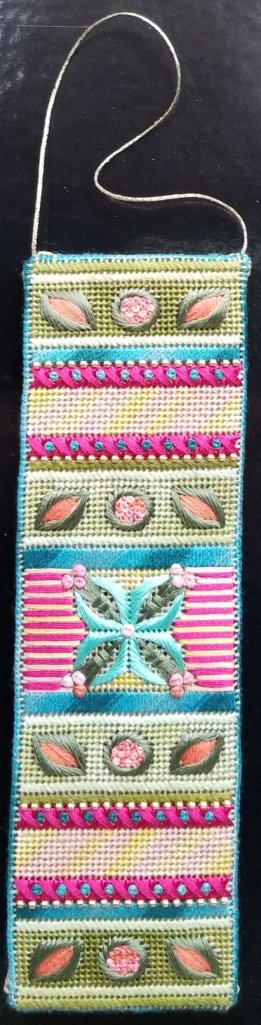
Next was the edge of Delica beads which worked up easily and looks fantastic! I love how they form little triangles. Orna showed us another step to make it more fringle-like.
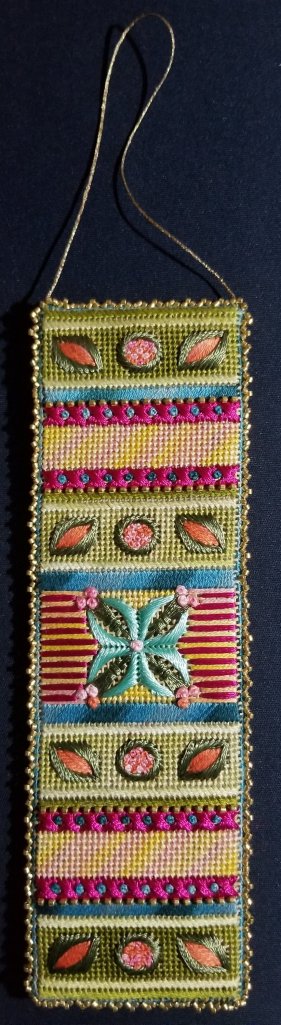

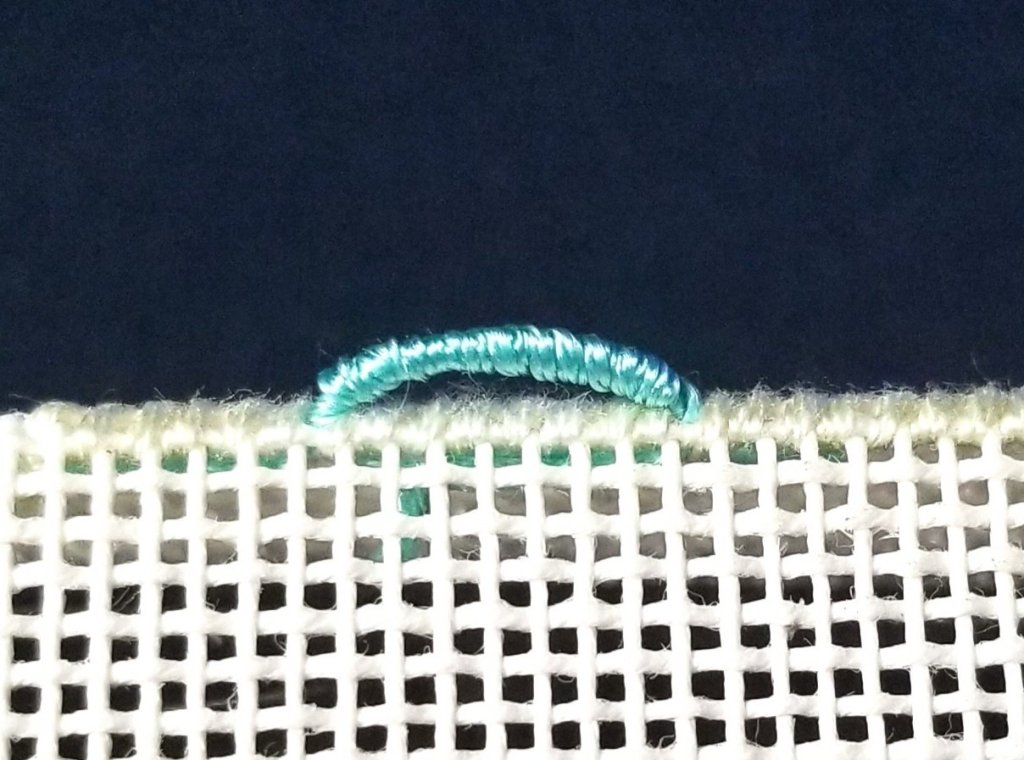
Orna also demonstrated how to make an edge of bullions using Neon Rays (her favorite thread). I gave it a try and it turned out nicely.
That left attaching the backing which I started during class. I love ultrasuede. It was getting pulled askew as I was stitching. I told Orna what was happening and once she suggested pinning it in place, I got whipping right along (whip stitch again; pun intended). The hardest part was cutting the last long side straight. And, here is the back done.
During the 3-hour class while we stitched, Orna pulled different colorways from her studio. Beautiful combinations. Thanks Orna for a great class and wonderful piece.
Filed under: General comments, Painting Needlepoint Canvases with Fancywork Finishing
I was able to get a better mix of colors when I did as Nancy suggested and selected threads before mixing colors. I didn’t worry about getting the two light pinks the right colors though because I was not going to use much anyway.

It took longer than my other 2 attempts to paint but Bill thinks that it “looks great” and so do I as far as being able to stitch the design not to sell it. But, that’s not my goal anyway. I definitely would buy the paints if I were trying to sell painted canvases. Getting the right colors is tough. And, duplicating the color would be practically impossible. That’s why some areas are not painted as well as other areas. I was running out! Creamacoat has a good range of yellow-orange colors and DMC has more yellow-orange threads that I could use.

If I stitch it with thread blending with the colors I selected to shade areas, it should turn out better than the painted version.
This is just 4″x4″ and making it larger would allow more details. It wouldn’t be the first time I stitched a design more than once!
Filed under: General comments, Painting Needlepoint Canvases with Fancywork Finishing
Well, I don’t see a dog now! Neither does Bill. But, I’m not getting the depth perception within the flower.
Filed under: Uncategorized
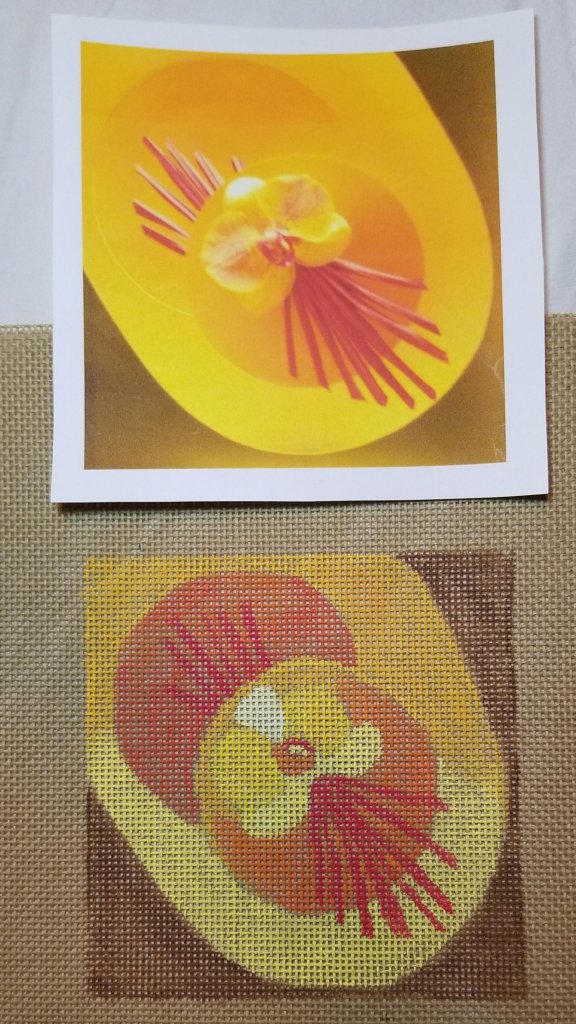
We had our second class yesterday for Painting Needlepoint Canvases with Nancy of Fancywork Finishing. She traced the basic shape of a pansy and then painted it. Looked easy when she did it! I took a photo from a past Philadelphia Flower Show I attended and tried painting it.
I got to this point and had to laugh. I see an orange dog like a poodle with hat. My husband sees an orange version of the Burl Ives snowman from Frosty! What do you see?

I will try and do something to make it more like a flower. Not sure what yet. But, I am not giving up. It’s just my first attempt. Maybe adding the red embellishments will help.
Mixing colors is not easy. If I were really planning on painting much, I’d buy the premixed colors. Creamacoat has 200+ colors.
And, this design might work better on Congress Cloth but I’m not going there.
Filed under: General comments, Painting Needlepoint Canvases with Fancywork Finishing
Today was our second class and I will paint again tomorrow. While I ponder what I want to stitch, I finished stitching the first coaster. I used Silk & Ivory (colors: 213 banana, 01 natural, 29 guacamole, 150 peony, 198, ahoy!, 36 admiral blue).
And, I finished graphing the second coaster on Excel to see how it would turn out. If this were a design that I wanted to paint again, I’d use this version (rather than my colored pencil version). And, it stores easily on my computer. I’ll stitch this one too.

Filed under: Uncategorized
At my Main Line Stitchers chapter meeting last night, Linda mentioned that finishers are running into a 6-month backlog because they are so busy. And, it may carry into next year with earlier than normal 2021 Christmas deadlines too.
That led us into a self-finishing discussion. At our last Stitch-in we got talking about finishing and Lisa graciously agreed to show me how she blocks and laces needlepoint. She uses a Lacis Blocking Grid on a pinnable board (available at https://lacis.com/catalog/) and stainless steel T pins and/or Wonder clips. Lisa mentioned the board is practically identical to foam floor mats for kids or gyms (https://www.greatmats.com/mats/foam-floor-mats.php).
The first photo shows two of Lisa’s pieces stretched on her Lacis Blocking Board. The one on the upper right is my design, Crescent Journey, in yet another colorway. Lovely!

My piece didn’t need blocking so I laced it up on a foam board. It’s an acid-free, 3/16” thick, white foam board (https://www.michaels.com/elmers-acid-free-foam-board-2-count/10390078.html). Since this is not going to be judged, I didn’t want to mat and frame it. It will be displayed on an easel in the Education area of EGA at the next National Seminar. I think I will sew a fabric onto the back to make it look nicer.


Filed under: General comments, Painting Needlepoint Canvases with Fancywork Finishing, Technique Issues
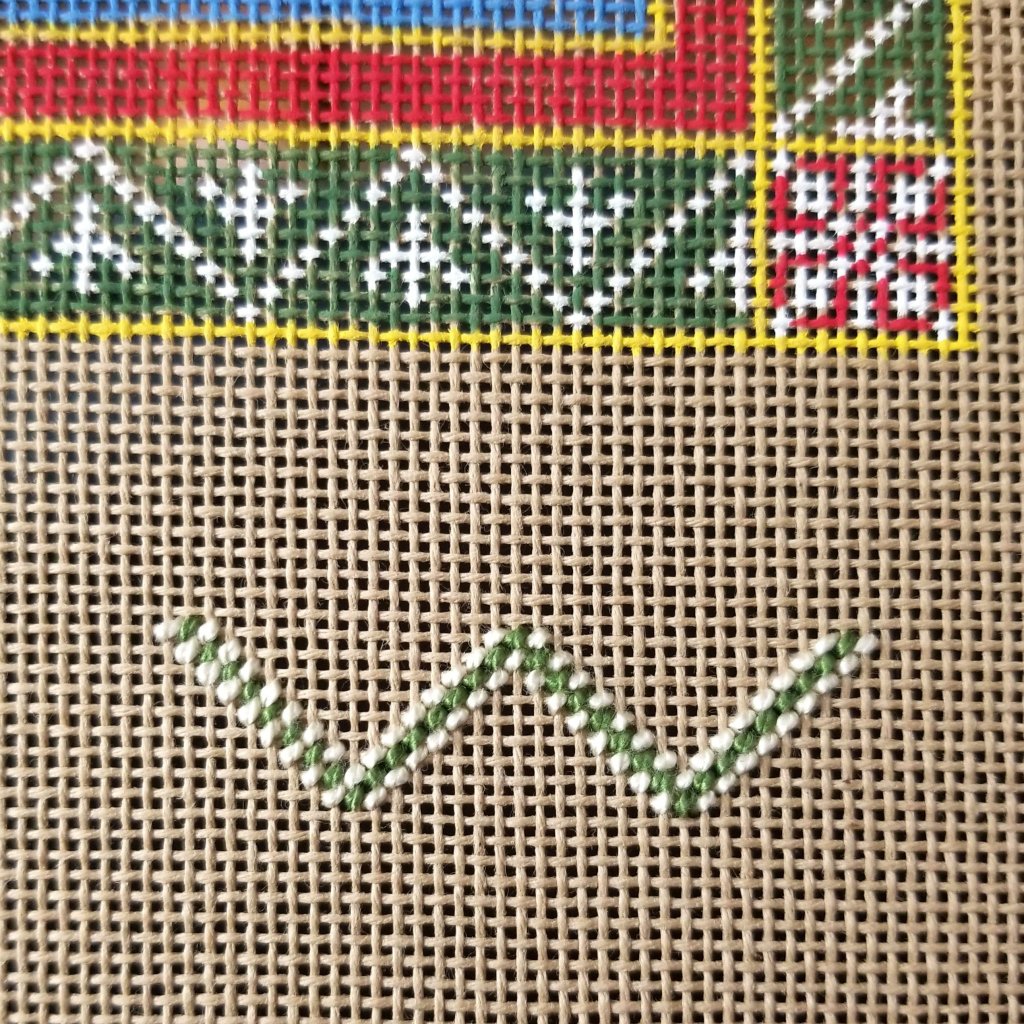
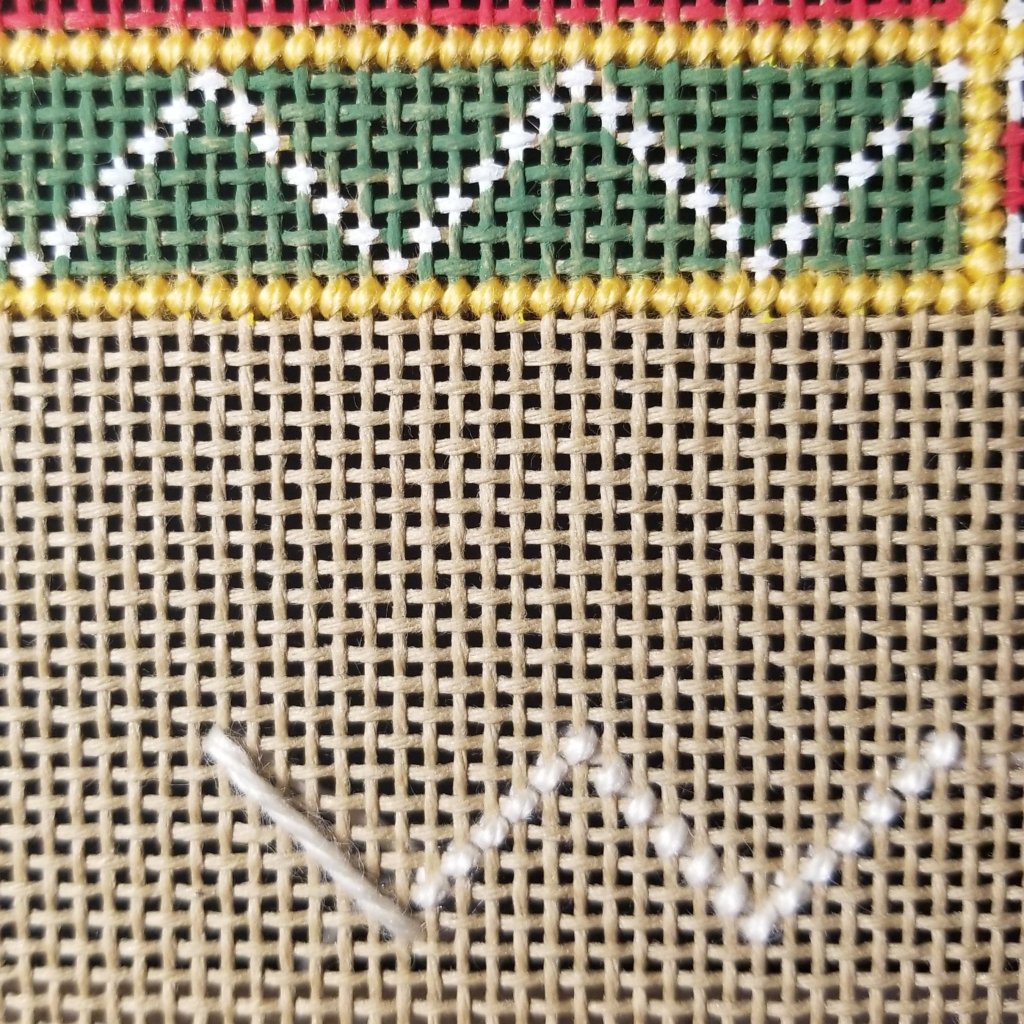
According to The Needlepoint Book by Jo Ippolito Christensen, a tent stitch is either a half cross, continental, or basketweave stitch depending on what direction you stitch it. They all look like a 1 x 1 diagonal stitch on the top of the canvas. The way I stitched the single row of the zig zag white line doesn’t appear to follow any one of these directions. So, I will just call it a tent stitch and you know I am referring to a 1 x 1 diagonal stitch going from the bottom left to the upper right.
There is an issue with a single line of tent stitch when you are moving on the diagonal of a V shape. On the right side of the V, the stitches form a connecting line. However, on the left side of the V, the stitches form something like a step ladder not touching one another. On occasion, I have laid a thread from upper left end of the V to the center of the V in the same color thread to form a connecting line on both sides of the V and make it a stronger visual. It’s like couching on the diagonal. I’m sure I learned it in a class and used it before (but can’t remember where).
I decided to see if it would work for the coaster I painted. I stitched the first V with all tent stitches (right V). The second V (left V) has Silk & Ivory laid on the left diagonal line.
Once the tent stitches were placed on top, it resulted in a thicker line than the right side of the V. It may not be visible in the photo (center V) but you can feel it. The third V (left V) has one strand of Silk & Ivory laid on the left diagonal line. Silk & Ivory is a 3-ply thread not normally split into 3 strands but it can be.

Then, tent stitches were placed on top.
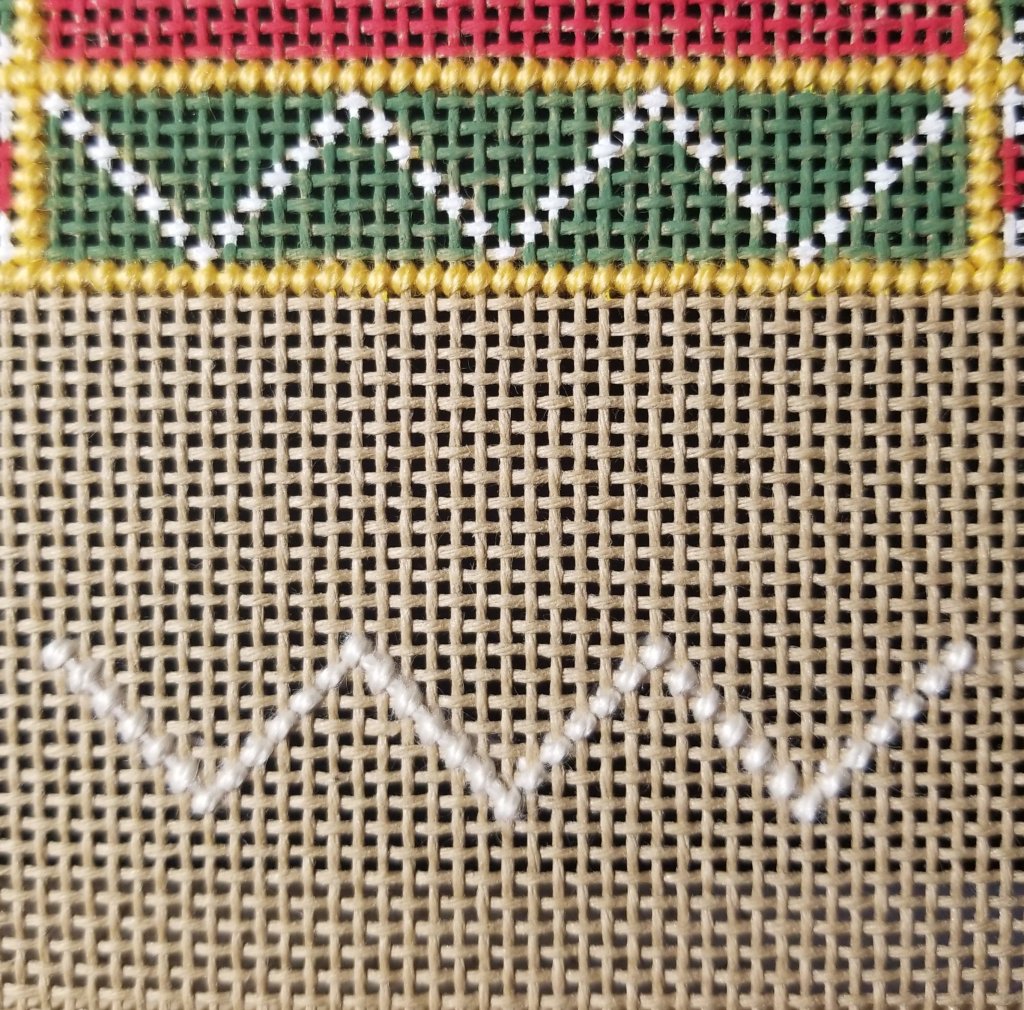
Once the green thread was added, it pinched the laid white into a very thin noticeable line.

The fourth V (on far left) has two strands of Silk & Ivory laid on the left diagonal line after I stitched the surrounding green thread first.
Then, I placed tent stitches placed on top. This was the end result of my experiment.
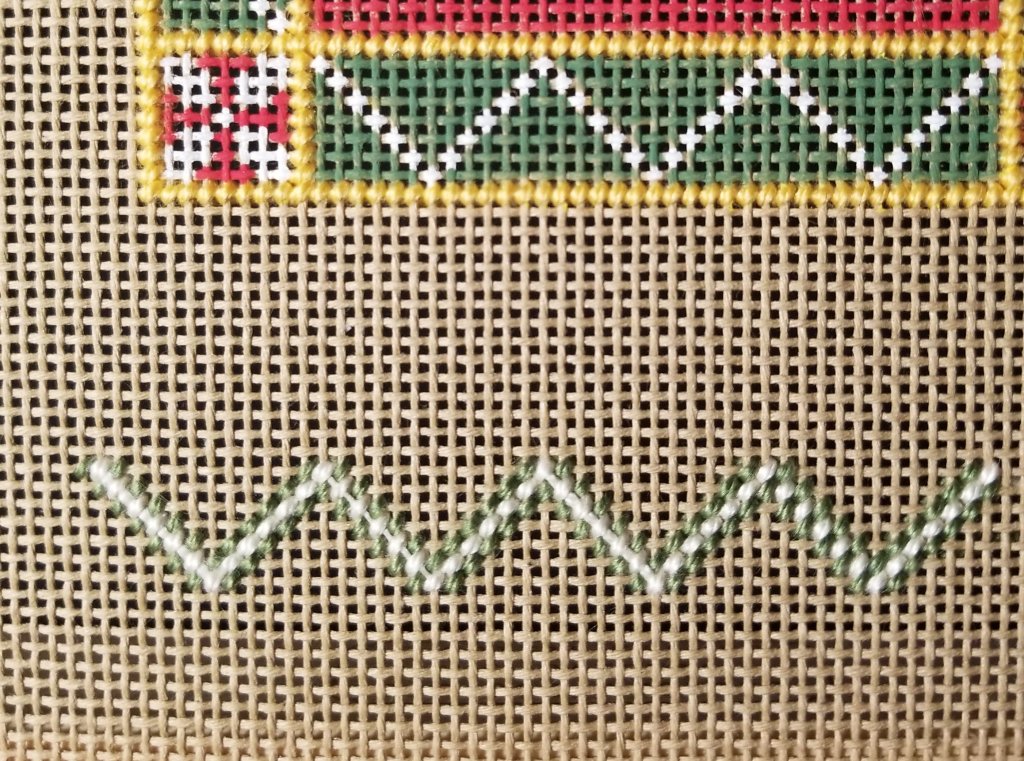
I’m glad I practiced because I decided that it didn’t work as well as I remembered. My husband likes the third V from the left. I will stick with far right V which has the tent stitches on the left side of the V without a laid thread allowing the eye to perceive it as a line even though it doesn’t actually connect as a continuous line.
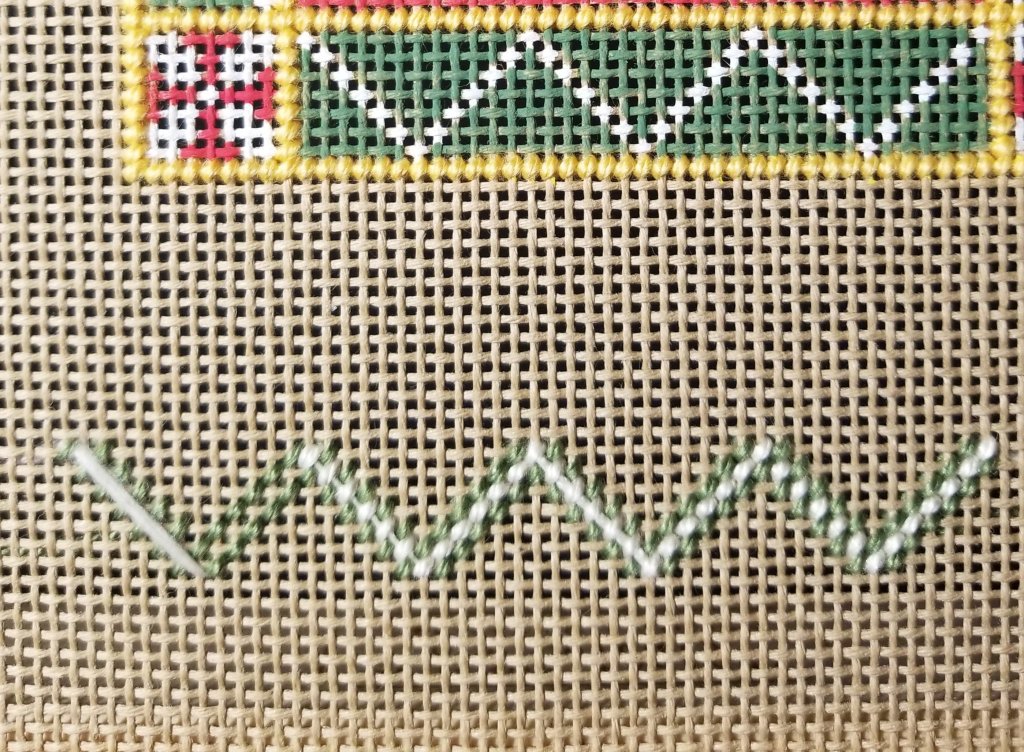
Then, it dawned on me that it might work better if the line were a darker thread surrounded by the white thread. So, I had to test my theory.
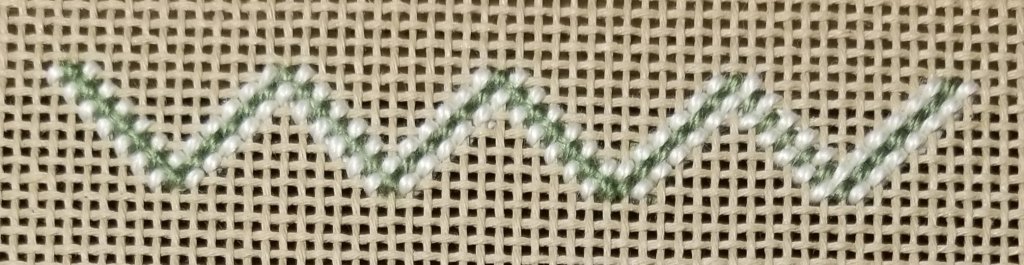
Again, my husband likes the third V from the left. I’m inclined to agree. And, I least like the V on the far right. So, my take away is the darker the thread worked better than the lighter. However, I will probably try this again on the 18 count canvas. I think it’ll work better with either color combination because the canvas threads will be closer together to begin with.
Did anyone stay with me through this discussion? What are your thoughts? Have you done or heard anything like this before?
