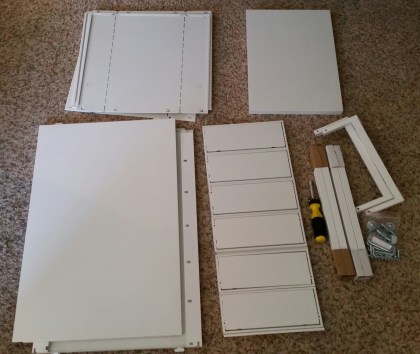
In about an hour & a half, I put the IKEA Helmer drawer unit together without swearing or bleeding! Not many screws (only for the feet and handles). Mostly, I just bent metal. Seems very sturdy too. Another day, I will put the other two together. That will give me 18 drawers for my threads.
Each drawer maximizes the available inside space compared to other units I looked at. And, there is a handle instead of an opening which could let dust in. Also, there are small gaps on each side where the drawers were bent allowing the threads to breath. I am putting the 3 cabinets side by side under a counter. But, if I need to expand, they could stack. I would just have to find somewhere else to put them. The overall dimensions are width 11″, depth 16&3/4, height 27″ (with 1″ casters); inside, each drawer measures 9″, 15″, and 3&1/4″. I should be able to use inside dividers or maybe a tray to help keep things neat. That will probably depend on what threads I have in my stash now.
I am going to arrange by color and decided to follow the DMC floss color chart. I sent more time rearranging the flosses than putting the cabinet together. But, I can see color families now which will help me with figuring out color combinations. My stitching buddy, Linda, has graciously agreed to help me sort through all my other threads! Isn’t she wonderful!
Before and after . . .

Some members of my ANG Keystone Garden Chapter wanted to stitch this for a project this year. So, I wrote up the directions and made up diagrams that they could follow. I am restitching it to see if I can improve it.
Instead of using a blue Copic marker and clear Water n’ Ice for the water in the river, I switched to the blue Water ‘n Ice (WT2).
And, instead of Splendor and Pebbly Perle for the crescents, I am using Shades of Africa Two Oceans, Au Ver a Soie, hand-dyed by Chameleon Threads. The packet has 5 wonderful shades of blue that blend smoothly. I stitched the water first with the crescents placed on top. The darker crescents are on the bottom this time and they are a little smaller this time. I made sure the threads are not showing through this time by using away knots for each crescent.
Also, the overall design shape will be rectangular instead of square.

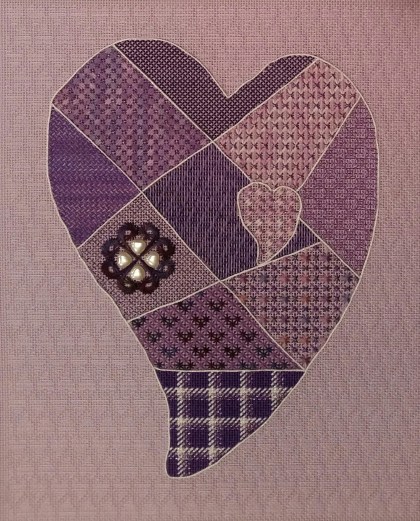
IN 2015, I took Janet Perry’s cyber class about learning to create your own stitch guide. I submitted a picture of a design which she chose for one of the class discussions. It’s Swirling Leaves (DH3825) an Elements canvas by Dream House Ventures Inc.
She suggested stitching the background first so that the focal points are on top of the rest of the stitching. However, she suggested an open Tent Stitch pattern. I didn’t realize until now that I didn’t do it correctly. It isn’t open. No wonder it took so long to stitch. Now, I will just have to stitch Alternating Continental to get the non-directional pattern that she intended. I won’t rip all that out – it just won’t be open. I’m using Elegance. Good thing I bought enough! Near the bottom left corner inside the swirl you can see where I started going the other direction.

It was tough getting the hang of the heart-shaped background pattern but it was a good choice. I matched the color of the thread to the canvas. So, it fades in the background and doesn’t conflict with the patterns in the large heart.

Filed under: General comments, Organization
All cabinets are done! No major glitches. Didn’t use the feet because I gained just enough space for 2 drawers that will fit on top of each cabinet. Heading to The Container Store tomorrow.
I’ve been sorting threads into color families for several hours on a daily basis and may be not even half done. I didn’t expect it to take this long. Within each major color like red or blue, there are so many color families (10 & more).