Filed under: A Spring Sampler, ANG Cyberworshop, ANG Seminar 2022, Making Stitches Work For You with Carolyn Mitchell, Melita's Designs, President's Award
What a wonderful surprise it was to hear A Spring Sampler got the final award of the night – The President’s Award from Janice G!

It didn’t get any ribbon from the judges but it was my first year in the professional category for original designs. Janice said that not only was it a pretty design but my Artist Statement explained how this is a result of my dedication to learning from 10 different ANG teachers who have offered design classes over the years including Making Stitches Work For You, taught by Carolyn Mitchell who challenged us to make our own band sampler.
A Spring Sampler is a symmetrical band sampler (9″ x 12″) that uses different stitches in each of the 21 bands (all my stitch choices and thread choices). To create additional symmetry, the stitches for bands on either side of the center band are related and use the same threads. This pattern of related bands continues as the bands progress outwards.
My first class at the 50th Anniversary of ANG is Mesa Triangle with Kathy Rees. I decided to make 2022 the year of the applique (my EGA Step 5 post will be coming soon).
Her advertised description: “An abstract geometric, Mesa Triangle features a triangle of batik fabric appliqued to the canvas. A variety of stitches, including couching over laid cording, are used to produce movement within the design. Compensation and placement of stitched areas will be discussed and the student will be encouraged to adapt the piece to reflect their personal interpretation.” The piece is 3.5″ x 12″ design size.
Day 1 went well despite me forgetting my lap stand. I am managing by resting it between my lap and the table.
I stayed pace with the class. Some are ahead of me, some behind, and at least one person decided to place things where they fall upon her first count (not following the diagrams accuratly at least twice from what i heard). Kathy reminded her that consistency will be important. At least 3 of the 6 people on my side of the room had to rip out something once or twice – ok – 3 times! Only one mistake irrated me because of how far I had gotten. But, it was rectified quickly enough.
Progress from the morning and afternoon 3-hour sessions. The overdyed floss is Mesa Sunset. Beautiful! No stitching in the evening. Giving my eyes a break!


Filed under: ANG Seminar 2022
We should have been here in Tucson, AZ for the ANG 2020 Seminar (cancelled due to coronavirus) and so I brought my bag along to carry stuff for my third class.

We missed 2021 in person but did online classes. This year we are back in person and got a goody bag that included the smaller 50th Anniversary Seminar bag which matches the larger zipper project bag. I’m using the for my first class tomorrow. I’ve got to take a closer look at those little gadgets. I also have to find another 50th Anniversary pin for my husband!

Our first stop after landing was to visit The West, a non-profit, volunteer based needlepoint store in Tucson. Half of a large store has needlepoint books, tools, threads, painted canvases, really everything. I had previously ordered the stitch guide written by Sundance Beads for Embracing Horses, a Danji canvas. And, I got a 50th Anniversary ornament to commemorate the occasion. This is one Seminar that I will never forget – for a couple of reasons. I also picked up a thread for a project that I didn’t bring along.

Well, nightmare is too strong. However, pulling out beads you stitch through twice is not easy.
I was trying to get full coverage with the beads. But the 8/0 seed beads were too big for clusters of 5 even on 14 count. And, it looked messy.
So, in the May/June 2021 issue of Needle Pointers, Marilyn Owen had written an excellent article on various beading techniques in needlepoint. I thought I would try beaded basketweave with the same 8/0 beads (still on 14 count). But, as Marilyn said, that stitch is only good in small areas because it gets quite cramped. So, once that happened, out they came – again and I switched to 11/0 seed beads. Finally, it wasn’t too cramped. For a self-proclaimed non-expert, Marilyn was spot on.
I wanted full coverage and it is covered! I estimate that there is about 800 beads on that one flower. I used the beaded basketweave method which employs a cross-stitch to attach the beads following the grain of the canvas to turn beads causing the vertical canvas thread to raise the beads above the adjacent horizontally placed beads. It did take some time too but I got through it ok.

Once the beads were done, the center diamond waffle got lost. So, I had stitch over it a second time. Much better.
Considering that the first flower required that many beads, I knew that I would not have enough to cover the entire second pink flower. So, I had to go in another direction. The Partial Eyelet with Crosses is from Needlepoint Dictionary of Stitches by Susan Sturgeon Roberts. I used 3 shades of pink Sparkle Rays (SR26, SR58, and SR57) to create shading. I filled in with a Raibow Gallery thread from a 6-thread card, maybe 24 Karats, possibly a discontinued color. I wanted to tie in the pink beads so I put one in each eyelet center.
As I had hoped, one project is done before I leave for Seminar where I will be starting two new ones. It’s a small one at 4″ square. Probably going to frame it. We’ll see.

Filed under: ANG CyberPointer's Chapter, Bargello Project, Hearts of Gold by Michele Roberts
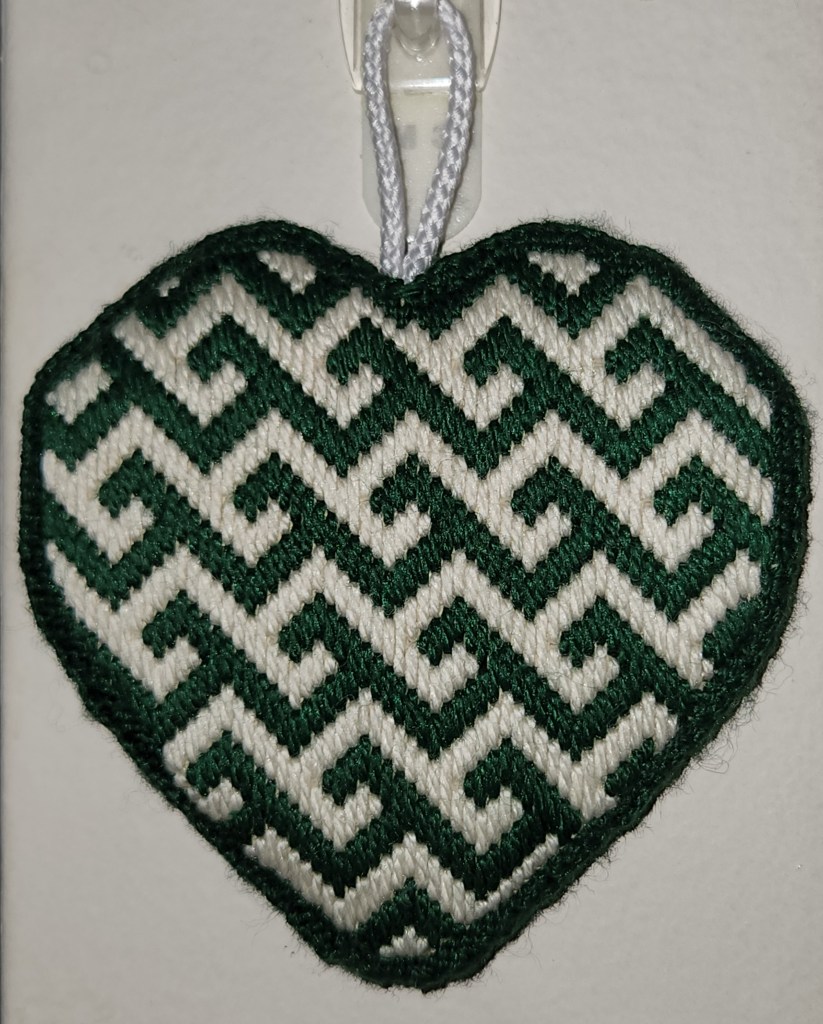
The second turned out the same as the first. I used Silk & Ivory threads maize 241 for the Palestrina stitch on the edge. The whole process seemed easier. Less angst anyway. It took about 2 hours to get to the edge and 3 hours to stitch it. Still slow going with pliers to pull the thread through on the edge. I’ll probably switch to cording which should be easier and faster to attach. I have too many more to spend that much time on each one. Based on ornaments that I have had finished professionally, it looks like they must have used something thinner which would decrease the area between the front and back sides making cording work better. What do you use for the solid backing?

Filed under: ANG CyberPointer's Chapter, ANG New Jersey Needle Artists Chapter, Bargello Project, Finishing, General comments, Hearts of Gold by Michele Roberts
Practice is supposed to make perfect. We’ll find out. This one is by no means perfect but I’m happy with my first attempt. “Finishers” really earn their money. Since I have about 8 ornaments and an eyeglass case to finish, I will not be sending them out!
I have multiple sets of finishing instructions from various sources. So, I have used some techniques from each.
I sewed the edges down on the left and Sewline stick glue to attach the ultrasuede to the foam board on the right.
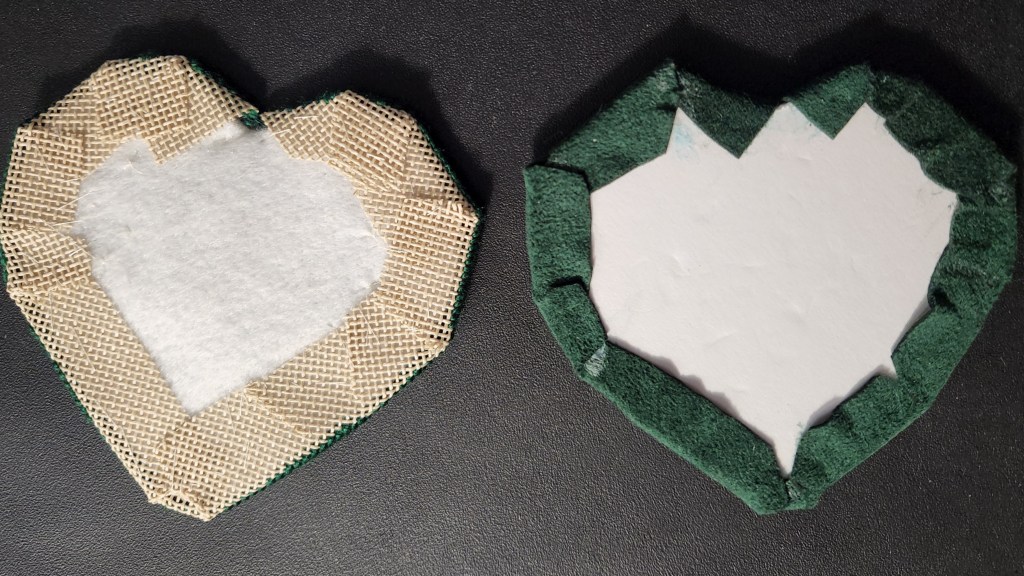

They lined up adequately.

There was a pretty decent gap between the front and back. I had just seen Mary Corbet’s post on finishing an edge with a Palestrina stitch. I am not adding any beads. But, the stitch was perfect for covering the gap. However, I had stitched 2 rows around the design because one finisher said that having long stitches on the edge would make finishing more difficult. Bargello is long stitches. Well, stitching through basketweave, folded back canvas, and ultrasuede was not easy. I pulled out my jewelry pliers. That helped pull the needle through. This first one took much, much longer than I had hoped. I did take breaks but it had to be around 6 hours.
Part of my break during the day included a stop at Michael’s to use my 40% off coupons. Two of them! With one, I got a cutting mat. Self-healing! I’ll be testing that. Hope it can survive.

The Wonder Clips are working wonderfully.
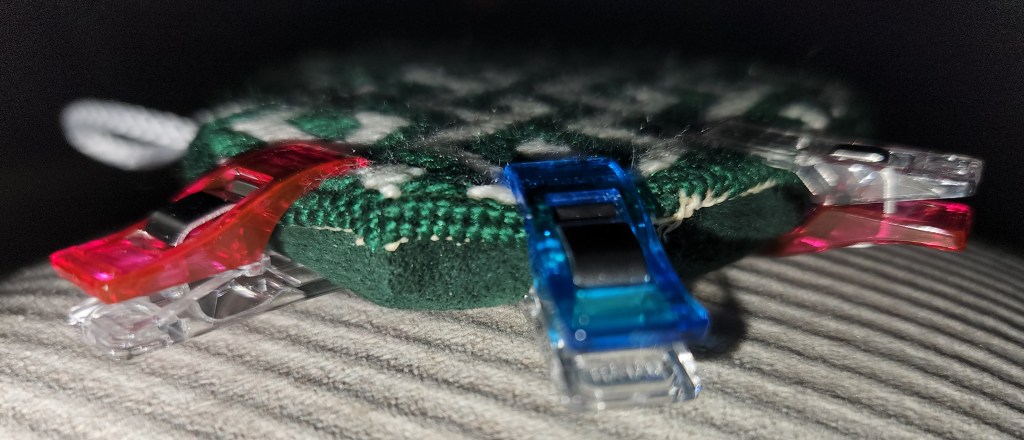
So, I am going in the edge between the two rows of basketweave and canvas. Picking up a little of the ultrasuede for the decorative edging using the same Silk & Ivory 86 Shamrock that was used on the design.

Once is was done, I was happy with it and really felt a sense of accomplishment. So, I encourage you to give it try – if you have plenty of time and want to save money. Otherwise, send it to a professional!
These samples are from a package with 25 colors that I bought from Fireside Stitchery (3 x 3 swatches) years ago. I have posted them before but not spread out like this before. They come in handy especially when starting new projects.

Rows from top to bottom (1-5) and left to right:
1: Brown, Eggshell, Sandstone, Rose Blush, Victorian Red
2: Victorian Green, Leventeen Blue, Lavender/Lilac, French Blue, Aquamarine
3: Santa Fe Sage, Black, Pewter, Antique Blue, Black/White Tweed
4: Butter, Pumpkin, White Opalescent metallic, White/Silver metallic, Eggshell/Gold metallic
5: Black Opalescent metallic; vintage colors including Sandstone/Brown, Eggshell/Brown, Blue/Blue, Sage Green/Green
Filed under: Needlework and Textile Guild of Media
Thanks to a demo last month at The Needlework and Fiber Guild of Media at the Media Arts Council in Media, PA, I decided to give English Paper Piecing a try. This will be a coaster. It was going to be a pair of coasters but I don’t think so now. More on that later.
I picked up a few supplies after watching Tula Pink’s instructional videos (thanks to Linda for telling me about her).
Joann Fabrics didn’t have any micro serrated scissors so I stopped at Early Girl Quilt Company in Audubon, NJ and they recommended Karen Kay Bradley. The 6″ felt more comfortable than the 4″. The serrated edge prevents frayed edges. It comes with a plastic shield for the pointed end which allows me to store them safely. Very nice! Early Girl Quilts also had Aurifil 50 weight cotton thread (orange top) and a Sewline glue pen. I found out after I bought them that I’ll need the scissors for my fabric applique needlepoint class at the ANG Seminar. That was fortuitous.
I didn’t find Hiroshima Tulip Applique #10 Big Eye Needle but the Fons & Porter Hand Quilting Needles with assorted sizes 7, 9, and 10) appear to have a big enough eye. Plenty big enough to thread the needle without licking the thread. Tula is against that practice because the thread end expands as it dries. Make sense. But, you could also moisten, thread the needle, pull extra through and cut that end off. But, the eye of the needle is big enough to not moisten it anyway.
I got the needles at JoAnn’s along with some fabric with a simple pattern. I didn’t want to waste good fabric practicing but why I picked such light colors for coasters is beyond me! That is why this is now a single coaster turned doily for some knickknack around the house.
All the supplies fits in my Bargello Bag from Woodlawn! Well, not the fabric. I found out a week after this post that the purse was designed by Pat Mazu for her journeyman level Master Teacher Program and named it Flowers on a Trailing Vine. Pat taught it 3 times, once in the Potomac/Washington DC area. No wonder I fell in love with it. Pat’s designs are amazing!

I “fussy cut” the fabric which means selecting a specific part of the design from the fabric. I needed 6 hexagons to go around a center white hexagon. Now that I lay them out, I see they aren’t exactly the same all around the edge. Of the 8, you should be able to spot the really odd one of the group. You don’t have to iron them even though you might have cut on a fabric fold line which I did on one to see for myself that you’ll never see the fold after you glue it to the paper. Yes, glue. That’s what Tula recommends. I thought it would be hard to get the paper out after you stitch them together but it wasn’t. That seems faster than basting the fabric in place and allows for a crisper corner.

Answer: The swirl is moving counterclockwise on the upper left hexagon. I need 6 alike to make this pattern with the swirl moving clockwise.

However, I did not succeed at my first attempt. I sewed the wrong edges to the center and my corners are not lined up great. Unlike most needlepoint mistakes, these are not something that I will unstitch because the edges probably will be weakened. This gets tossed. Plus, I have way more fabric than I need.

With attempt number 2, I took more care about where I cut my 6 pieces. They are aligned and sewn the way I wanted. See how the swirl starts in the same place now. This is much better.
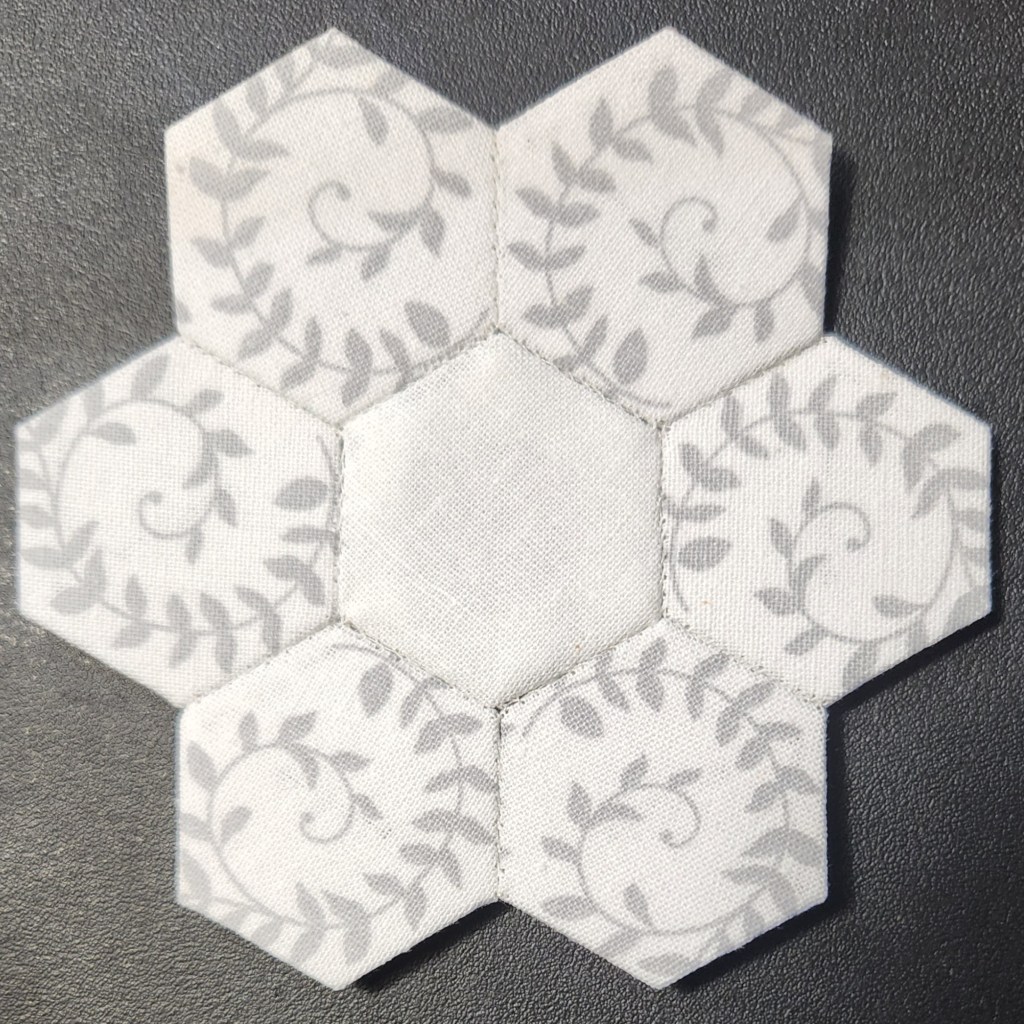
The center white hexagon allows the background to show. So, I cut another small hexagon and placed it inside the center without sewing – just pushed it into place. Then, I pulled out my fusible fabric and ultrasuede. I cut the fusible fabric slightly smaller than the shape, and basted it in place. I am not getting that stuff on my iron again!! Placed that on top of the ultrasuede and ironed for 15 seconds. Lastly, I cut away the edges just slightly smaller than the shape. I will not take the time to sew the edges. That fusible fabric works and I have other things to get to!!

Having a variety of colors would be fun to play with. But, I didn’t see a particular project that called to me. It boggles my mind to think of doing a quilt with 5,000+ pieces like Mary Corbet is doing (google mary corbet paper piecing). I’m glad I tried it though. And, I would not be adverse to doing more of it (especially with Linda’s scraps – hint hint – she has beautiful fabrics). For now, I would prefer to do another weaving piece over English Paper Piecing.
So, judge Melita scores Darning 2, English Paper Piecing 7, Tapestry Weaving 8, and the winner and still undisputed top preferred craft, Needlepoint!
This will be my Show & Tell item along with my finished tapestry at Tuesday’s 7 pm meeting of the Needlework & Fiber Guild of Media at the Media Arts Council (11 E State Street) in Media, PA. I’ll also demo needle felting on canvas and walk people through the Orna Willis and ANG Main Line Stitchers needlepoint exhibit. Join us if you are in the area.
Filed under: ANG Main Line Stitchers Chapter, Cards and Needles by Orna Willis, Media Arts Council Exhibit
We had the Media Arts Council exhibit opening last night. There was a good turnout. There were also 2 other artists displaying paintings. So it was a nice mix of people. I had some very interesting conversations with other artists and people interested in our needlepoint. Six other members of the Main Line Stitchers attended as did my husband, another member’s husband, a member’s sister, and friends of mine from Delaware. My husband had to remind me to tell people I was wearing Orna’s earrings – they were a hit!! Orna Willis spoke first, I spoke next, and then the other 2 artists. I relayed Patrick’s comments which summarized were: “Orna’s color choices and the way she combines threads and layers them is simply genius. Her designs speak for themselves. Orna is an excellent instructor, generous with her ideas and just fun to be around. You can’t ask for much more than that in Life.” Then, I discussed 3 classes from Orna in which she explained how she selects colors during the Color Inspirations class, how she designs in the Come Dance with Me class, and finally walks us through how to find a design within ourselves through drawing and painting in her Dare to Design class. There are only a handful of teachers who make the effort to share how they design which really contributes to the growth of our art form.
This is the other Cards and Needles piece I stitched which was designed by Orna and is one of 13 pieces on display from our chapter members. Each design is 2″ x 1.25″ that is stitched three times in 2 colorways (orange/fuchia-shown previously and purple/green-shown here) although colors repeat within a colorway and across each colorway. These could easily be created in a variety of colorways. The frame measures 9″ x 15″. The other colorway will be raffled to raise money for Media Arts Council as my way of thanking them for letting us join the exhibit. Raffle tickets for the orange/fuchia piece will be on sale all month long at the gallery. Be sure to visit the MAC gallery (11 E State Street in Media, PA; open Wed – Sat from 10 am – 2 pm and Sunday 12 – 4 pm) in July.
FYI: The talks were recorded and available on You Tube at CLICK HERE.

Gifted to cousin Steve and wife Fran Ivester on March 3, 2025.
