Filed under: ANG Seminar 2025, Nights in White Satin by Jennifer Riefenberg
I switched over to Nights in White Satin also by Jennifer Riefenberg to stitch Areas 6 and 15 in order to get rid of the basting. Then I finished all areas begun during class which included Areas 4, 9, 12, and 13.
This is the first time I’ve used Radiance. Jennifer had issues getting Kreinik and substituted Radiance for some kits. It feels more like thread and the ends do fray but nothing terrible. The sparkle does not show up as much from a distance in the photo.
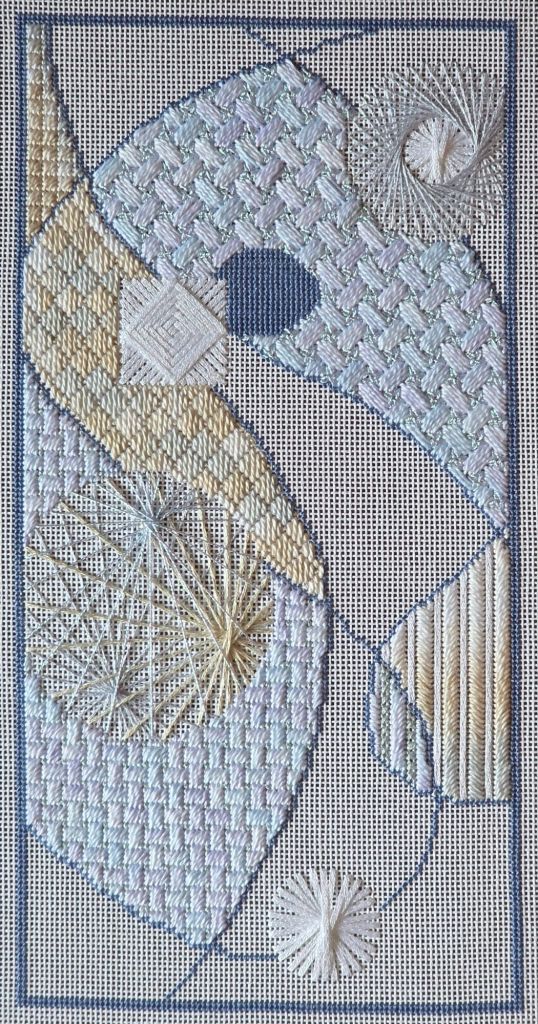
Only 7 areas left to stitch. I’ll probably stitch on this at our ANG Main Line Stitchers Stitch-in on Saturday at Fireside Stitchery.
I’m going to pick up a Kreinik #8 to compare sparkle to Radiance. I want the colors to be similar and I only have Kreinik 194 in a #4 Braid.
Filed under: ANG Central Jersey Chapter, Winter Lights by Jennifer Jennifer Riefenberg
The ANG Central Jersey Chapter (CJC) is hosting a Zoom class (this past Thursday and next Thursday) with Jennifer Riefenberg for Winter Lights.
I picked up the kit in August-wow that was only last month-seems longer. It’s 7.5″ x 6″ design area. I pulled it out to read through the instructions. Seems straightforward although I was curious to hear her suggested order of stitching. She teaches in a different order than they are written. And, I’m not following either way. I’m leaving the candles for last.
There are lots of threads, mostly partial skeins (Bella Lusso, Wildflowers, Gloriana, Kreiniks, Needlepoint Inc Silk, Pepper Pot Silk, Petite Silk Lame Braid, Petite Sparkle Rays, and Sparkle Rays). But, we did get full skeins/spools of DMC Floss, Bijoux, Accentuate, and more Bella Lusso. The new thread for me is Sulky Holoshimmer. And, I have not added mesh tubing to a piece before.

The canvas has a few pencil lines marking various areas. I’m glad there isn’t a lot of pencil because it can show. But, I needed to define these areas better so I basted the candle outlines to be ready for Thursday. Then, I decided to stitch on it and got on a roll.
Basting did help me compensate Area 2. Area 1 should have extended left by 2 canvas threads but it’s easily compensated.
I wanted to get to easy stitching areas where counting won’t be needed because I joined the chapter for stitching at the September meeting in Colonia, NJ on Saturday. The areas each seemed to work up quickly and I left myself 2 areas for the stitch-in which I got done.
Finishing the blue on blue for the sky had to wait for my lamp at home and the Eagles game on Sunday. I only had 21″ left of Wildflowers which was used in the sky. Talk about close! So was that Eagle win. I might just get this done in 2 weeks!
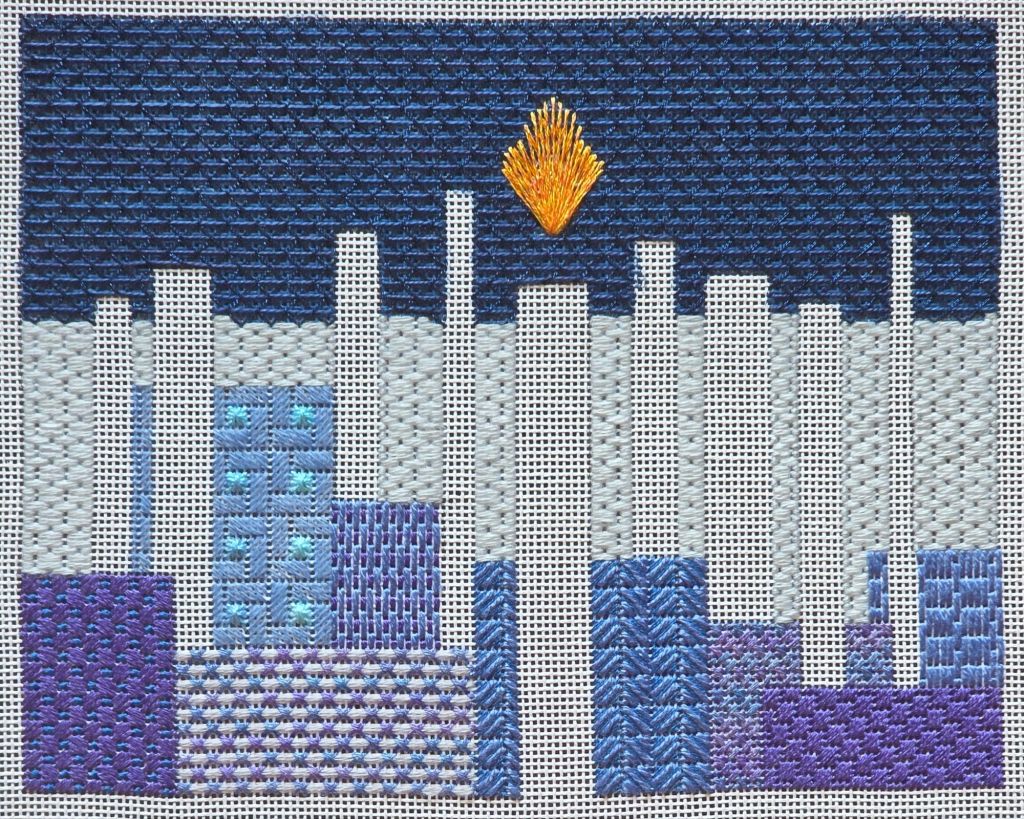
Only someone who knows this design would see the one block where I added an extra thread to get full coverage for that block. One open block was bothering me. And, as everyone knows, once you purchase the piece, it’s up to you to be happy with it.
What I may have to redo is that center flame. Two things are bothering me. It’s not symmetrical which is what Jennifer charted and I didn’t get correct. But, her chart covers up completely the lovely iridescent gold ribbon in the center. I’m not going to do anything unless or until I get more of that particular Petite Silk Lame Braid. It IS possible for me to live with a flickering irregular flame! So, we’ll see how it looks with the rest of the flames.
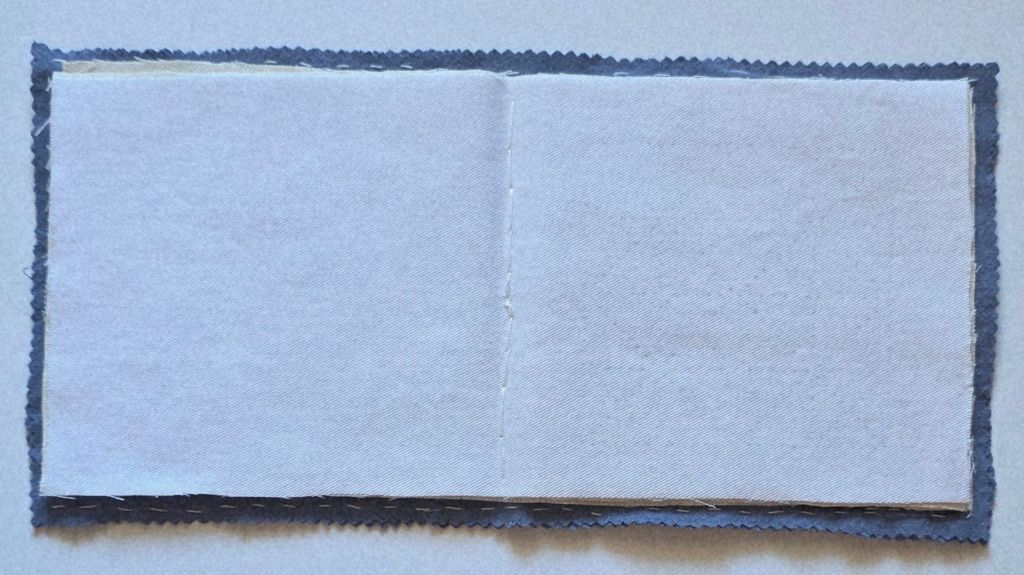
Filed under: Beaded Super Duo Tape Measure Cover Kit by Carole Ohl, Brandywine Chapter, Embroidery Guild of America, Mid-Atlantic Region, Zokins
The 3rd session of the 3rd quarter for my EGA Brandywine Guild meetings led by Kathy A and Karen S was well attended yesterday by about a dozen members many of us hanging out even after lunch.
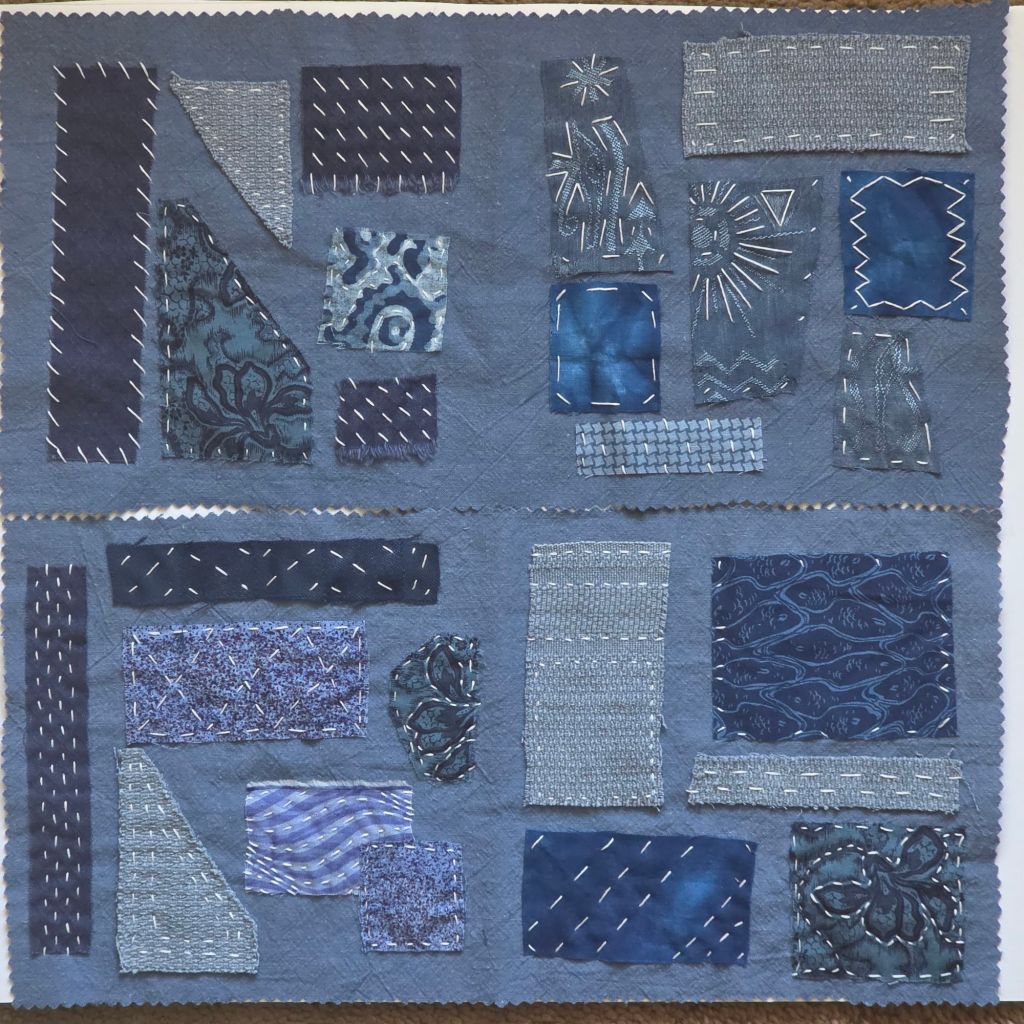
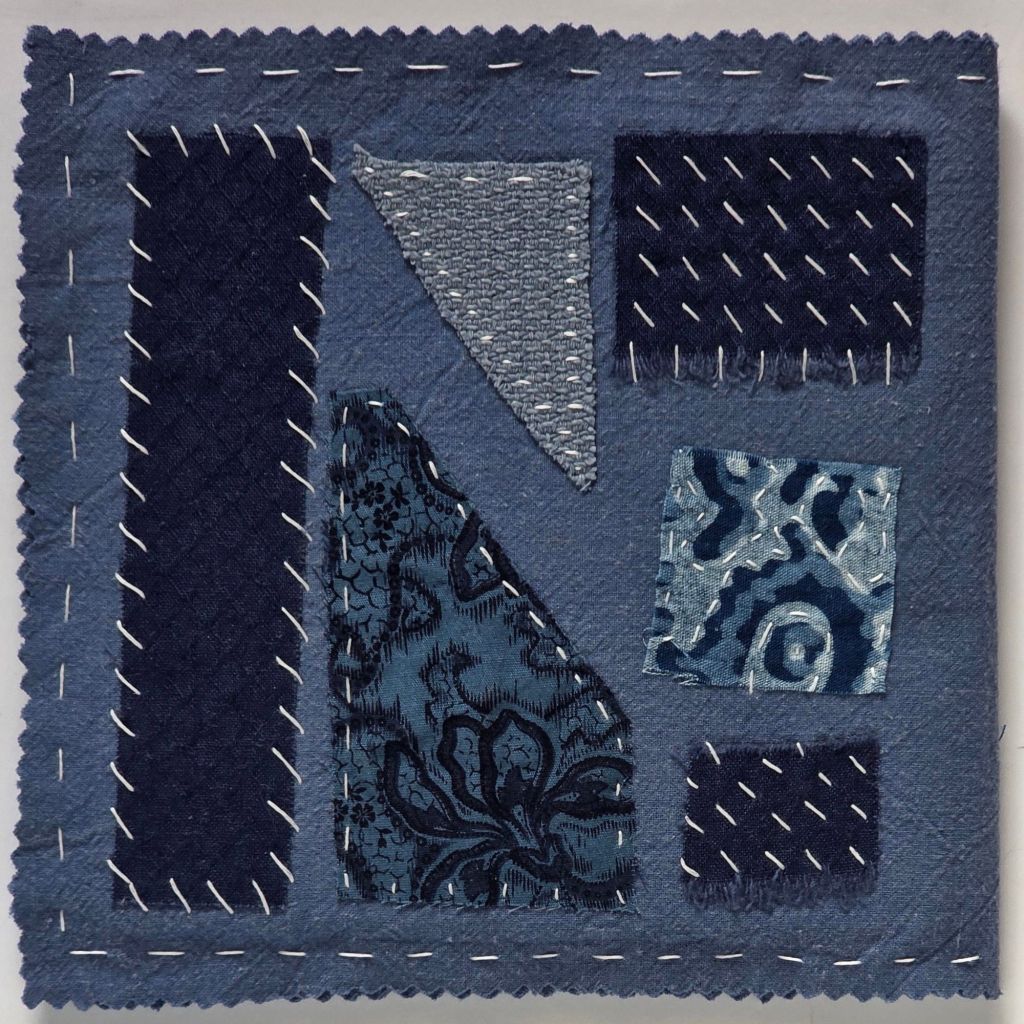
Adding the cloth pages were easier than I expected especially when I focused on reading the directions! Amazing how well that helps. I prefer visual instructions but they work better when explained in text.

At least Joanne M and I prefer canvaswork more because getting precise lines in this free form stitching is nearly impossible. Others found the freedom enjoyable. What do you prefer?
Joanne M made a bucket drawstring kind of purse – really nice and the lines looked straight! Nancy G sized her cover to fit over her booklet of needles. Patrick B found a few fabrics with sayings for his. Others were still piecing theirs together. Everyone’s turning out different and it was fun to look at them all.
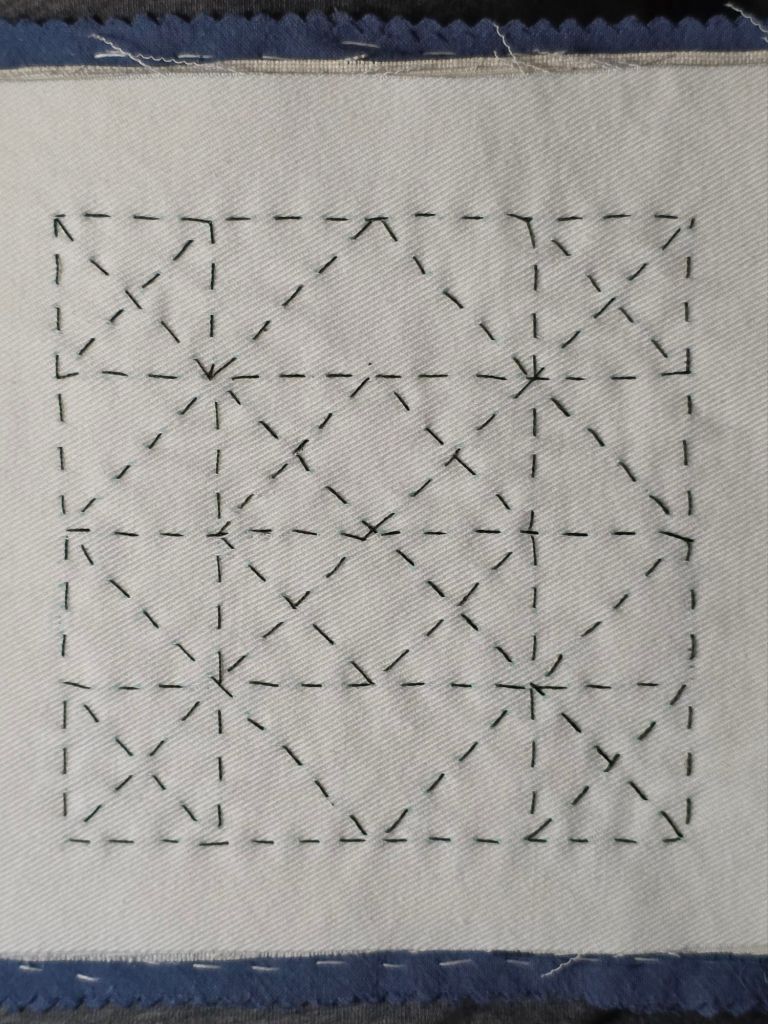
Kathy A talked about the related Sashiko embroidery and brought several books and tons of stencils. So, I transferred a couple of patterns with a borrowed a Sewline mechanical pencil with 5 different colors that can be used. Karen S has had her pencil quite awhile and I would need to buy each color pencil separately. But, after a discussion with Linda from Main Line Stitchers about the few quilt stores left in our area where Sewline products are likely to be found, she is giving me one of her extra Sewline air erasable fabric pens. I look forward to playing with that!
Here is my completed booklet ready to sew over my stencils. You can just about see this pattern but I can see it under my lamp. At least with the stencil, the stitching should be more precise.
This pattern is easier to see. I’m thinking that I’ll add little motifs inside each scallop.

The running stitch with long Sashiko needles allows for faster stitching than the stabbing method of stitching but there is still room for improvement where threads come together at intersections. But, this is a doodle booklet. Also, I can’t say I love all those little fraying threads but it’s a doodle booklet. And, having the pages in a booklet makes stitching a little more logistically challenging. The pages could come out and get reattached but it’s a doodle booklet. Bottom line, it’s all good enough.
As usual, I come away with more to do! When we split up the gift baskets Sue won at the EGA MAR Regional Seminar in Gettysburg, I had expressed interest in this beaded Carole Ohl Tape Measure Cover kit but so had Kathy A. Well, this month she gave it to me because she found she already had one in her stash. So, now it’s in my stash! So pretty. I love how the beads fit precisely packed together. Hopefully, mine will look this good (when I get to it).

Filed under: ANG Needle Pointer's Timeless Treasures From the Archives
The last of the articles gathering heart projects is in the September/October 2025 issue of Needle Pointers. Hearts abound after 2000 with 29 projects published between 2000 and 2020.
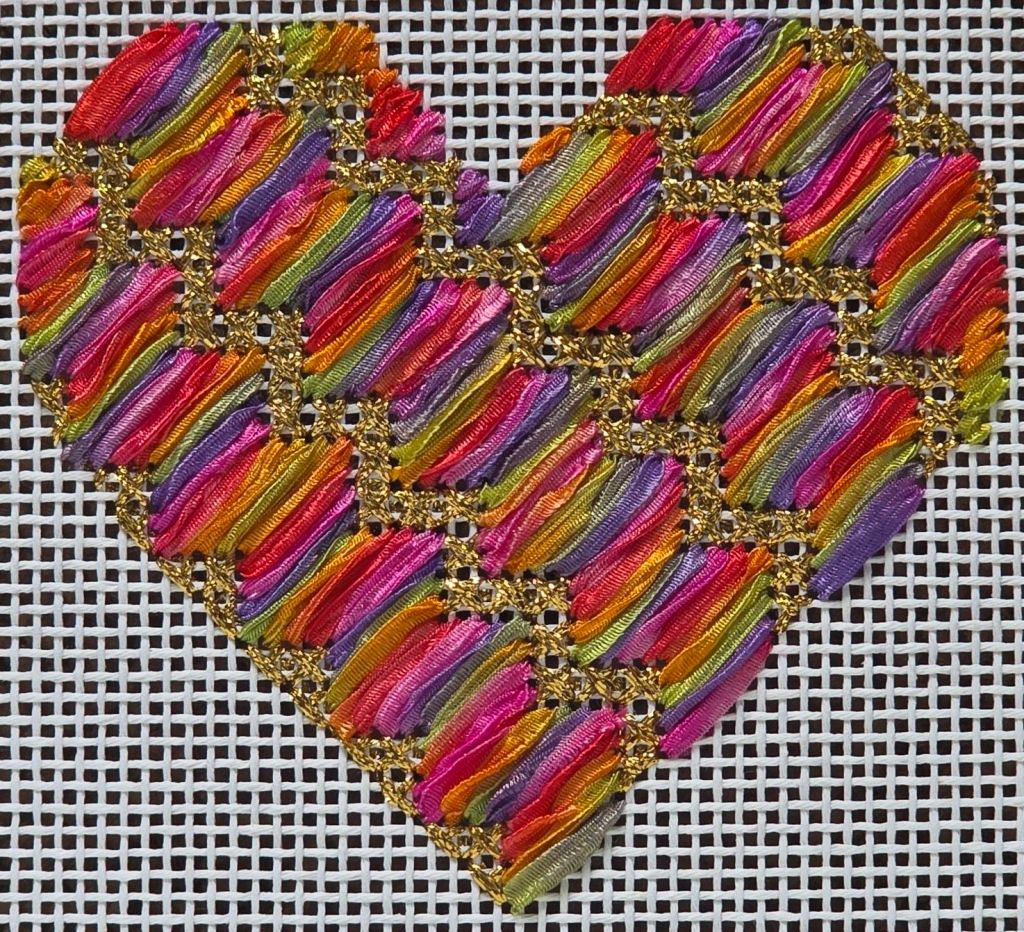
My favorite has to be the one by Michelle Roberts using ribbon. This is one of four colors that I did. It’s on 10 count and worked up quickly using Lion Brand Incredible Ribbon Yarn as suggested by Michele Roberts. I was so sorry to hear that she passed away recently. I couldn’t buy just one color, I had to buy three and must have enough ribbon to make about 40 more! But, that means more finishing has piled up on me! See the other hearts in the current issue of Needle Pointers. My paper copy just arrived!
Get access to all ANG has to offer for only $60/year (that’s just $10/ issue) plus other free designs exclusively available to members. If you are 35 or younger, ANG offers a 50% discount to new members when they join ANG for online access to all digital issues (no physical magazine is mailed). This is a great opportunity for younger stitchers to join the ANG community of needlepointers! I have alerted ANG that the discounted rate is not mentioned at https://www.needlepoint.org/page/MembershipOverview. Hopefully, once you get past that page, the option to join at that rate becomes apparent. Since I am already a member, I can’t view the registration steps.
Kathy A and Karen S are leading members in making Zokins. They didn’t think we’d want a traditional Japanese Zokin (layered pieces of fabric to use for cleaning). So, we made covers for a stitch booklet. Both sides get stitched together to make a lined cover. Then fabric pages attached.
I was going to stitch a diagonal grid going in both directions to stitch the small swatches in place. However, the 2 lines I started with were not straight so I ripped them out and attached each one uniquely.
I placed a layer of Craftex to each side held in place with fusible interfacing to make the cover stiff but with a gap in the center to attach the pages. It is not too thick and still will be flexible and not heavy. If I used magazine board, it could get bent. Foam board would be too thick and hard.
I am ready for Wednesday September 17 and the EGA Brandywine Guild session to add the pages and maybe add some stitches!


Besides working on my National Academy of Needlearts (NAN) which I won’t show until after the exhibit in March 2026, I will alternate stitching between three ANG Seminar projects. First up is Nautilus with Kay Stanis.
As this was a 1-day class, I didn’t get the basting finished. So that was first to stitch. Some of the basting lines were so close that getting the tissue paper off was tedious. I needed my Uncle Bill’s tweezers.
I wrote Mr. Bill’s tweezers first but realized that was wrong. Do you remember Mr. Bill?
Kay had us unstrand Trebizond to lay over the padding. I didn’t know you could do that and I’ve used Trebizond before (as supplied). So, this part was a completely new learning experience. I can’t say it is easy to work with but it is creating a smooth surface. Kay explained a little about different silks. Mary Corbet discusses them in great detail on her website and I’ll summarize her thoughts with, Trebizond is not meant to be taken apart but the three plies of flat silk can be separated. We also learned about using a sugar rub to remove any roughness from our hands and which lotions Kay likes for handling these silk strands. It’s not so much my hands causing a problem rather it was the Congress Cloth. I had to hold it as I passed it up and down with each stitch. I won’t be doing this too often! But, I am happy to have learned about it and even happier to have completed this part of the piece. And, it’s all going to get covered anyway. You would never guess this is Trebizond.
Everyone who exhibits gets the Judge’s Score sheet although the points vary by category (this is for original design). A summary of the critique which follows does cost $25 but is worth it to hear their thoughts about the piece. Always thoughtful, supportive, and offers constructive feedback.
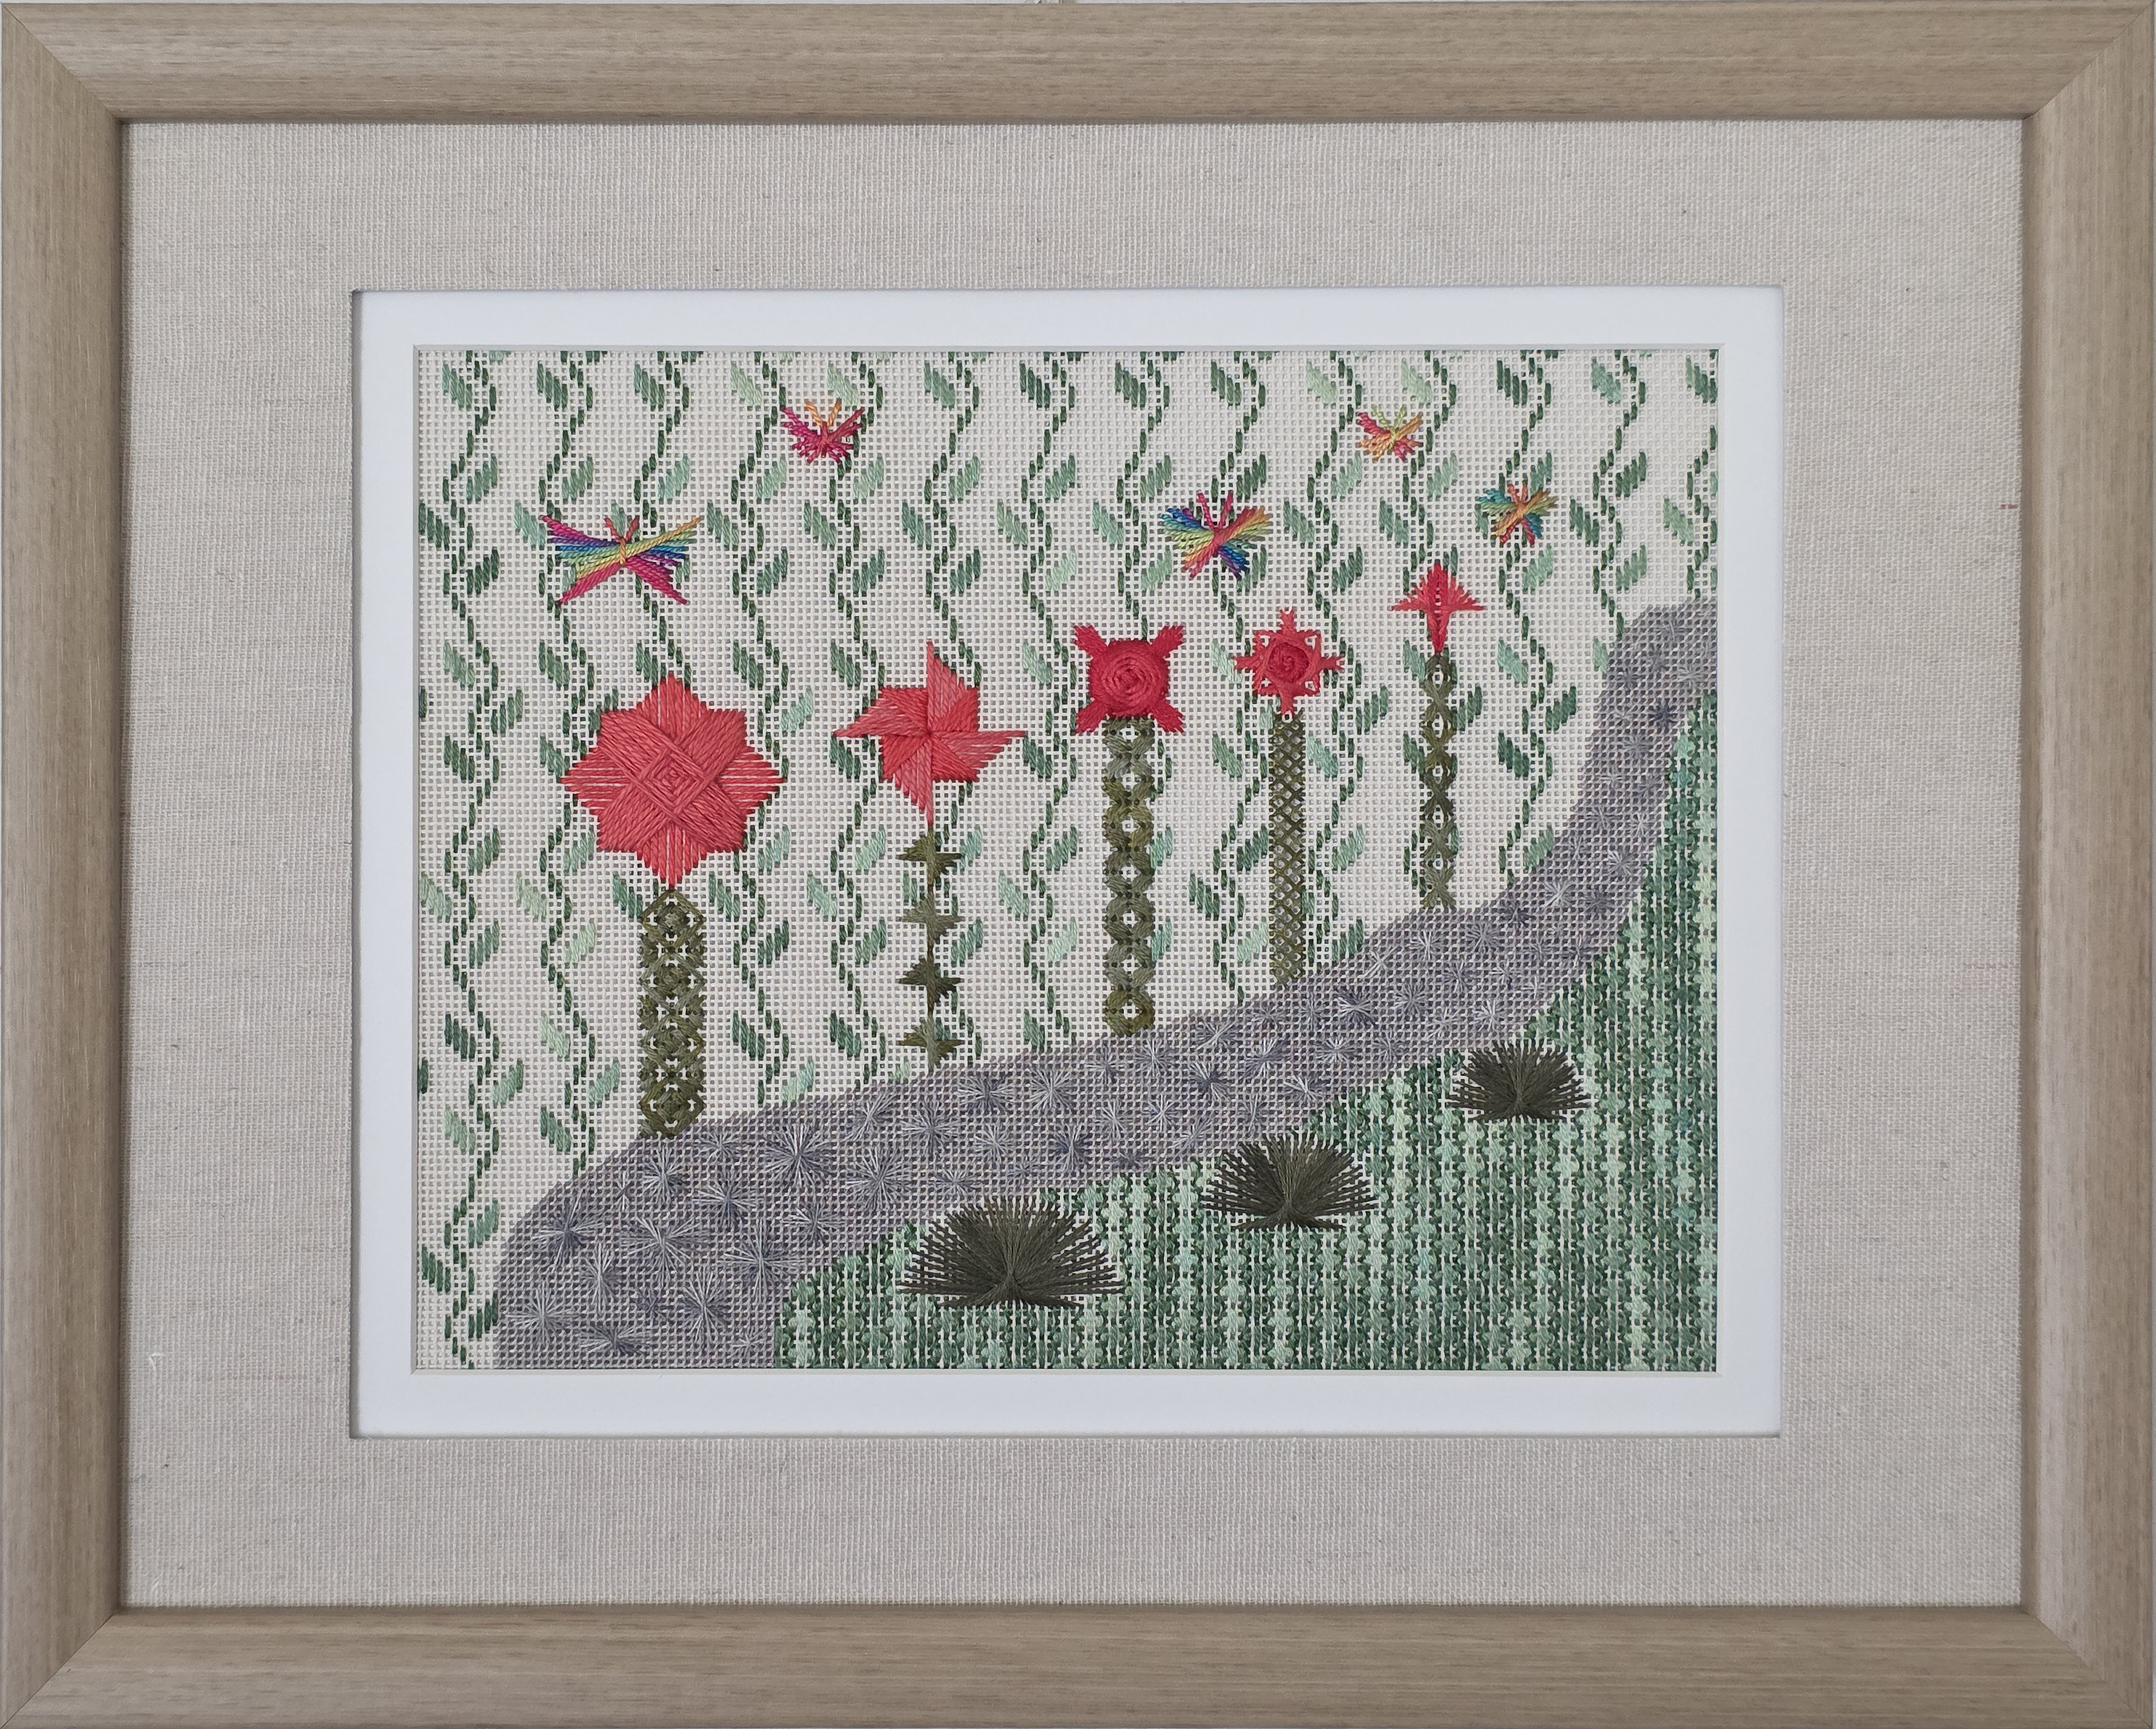

The judge’s main comment on the design was that the curves at the start and the end are too abrupt which I can see. Also, the values of the greens do not have enough contrast. That is also a good point. I did not take the black and white photo of the threads before stitching (the judge did). The other comments on the framer (me) needed to align the top border – it’s off just a tad on one side. Getting 8 out of 10 is actually good – I usually get a 7 (even when I am not the framer)! There were plenty of positives such as:
- “The quiet color and sizes of the mats pull the viewer’s eye into the piece.”
- “The variety of threads and stitches are suitable for this canvas. They are controlled, evenly stitched, and very appropriate.”
- “The bright pink (I call them coral) stylized flowers are fun! Your stitching shows your mastery of those specialty stitches.”
If you submit a piece for judging, I highly recommend getting a critique. And consider sharing it with your chapter members as a learning experience.
For the artist statement and to see the lovely Creative Inspiration Ribbon, go to:

Filed under: General comments, Radiance Metallics by The Meredith Collection, Threads
I had plenty of Radiance left from Nights in White Satin by Jennifer Riefenberg so I cut one length. It was more difficult to get the first strand out and each one got easier to remove. I needed to gently massage small bits at a time but I got it separated. Then I tested three strands unironed and ironed. The strands did get smoother with ironing.
It’s like stitching with Accentuate which I find difficult to handle. Ironing improved my ability to get the strands to lay nicely. The ironed strands are used in the stitches on the left. As you would expect, longer stitches reflect more light and are shinier than shorter ones. They would make great snowflakes or window panes (Scotch Stitches).
So, you could separate this thread into strands, iron or not, and you could also couch with it.
Overall it’s a nice thread and I would use it again. It really sparkles in person and does in close up photos too.