Filed under: ANG Central Jersey Chapter, Winter Lights by Jennifer Jennifer Riefenberg
Jennifer Riefenberg put together a lovely design in Winter Lights. I am glad I left the candles and flames for last.
Once I got 3 magnets positioned on the canvas properly for Candle 1, I was able to park needles/threads alternating from the laid foundation thread to either one of two cross stitches. It took some concentration.
I learned how to compensate a Rhodes fan on Candle 2.
Candle 3 (on the right) is my design because I trimmed, burnt, and over trimmed the piece of mesh tubing Jennifer provided (what’s left is shown in the border of the canvas on the left). And, truth be told, I tried using it but I didn’t like the mesh anyway (did I burn it accidentally but subconsciously on purpose). So I improvised and mimicked the crosses of the mesh and love it. I placed 4 strands of Sulky Holoshimmer 6017 vertically in the center and placed 2 long strands of Tiara T117 on each side. Then, I criss-crossed twice with Petite Treasure Braid PB10 and once with 2 strands of Sulky Holoshimmer 6017.
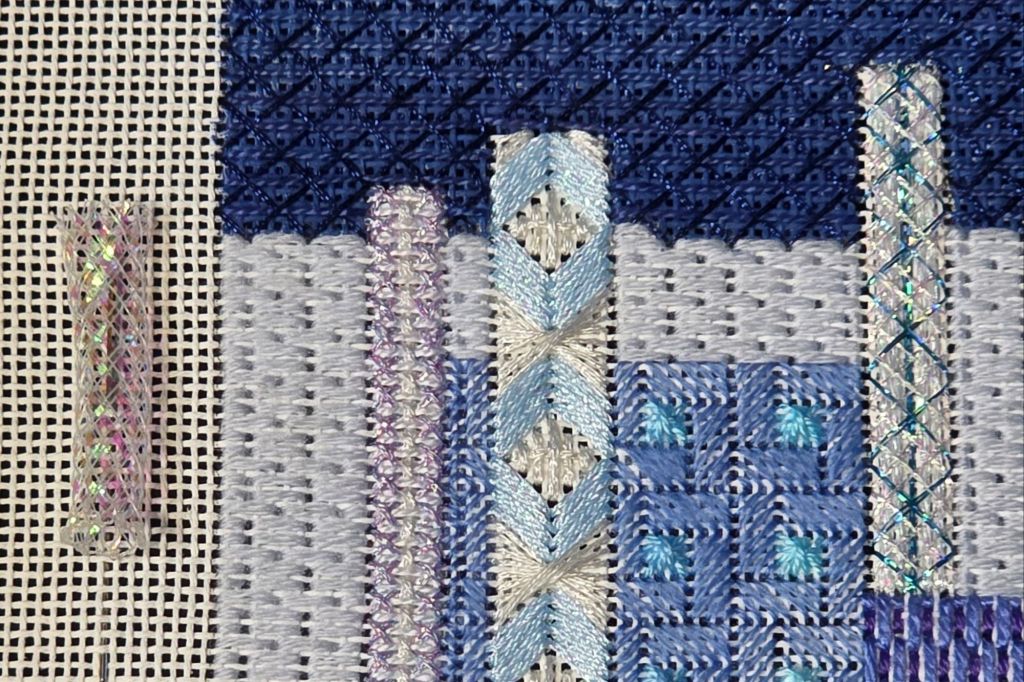
The little dimples make Candle 4 interesting.
I also love the center Candle 5 even though it took 2 tries to get correct. I was off one canvas thread in the 5th of the 10 paths.
Jennifer is correct to suggest laying, couching, laying, etc across Candle 6 so you can see the holes as you stitch. That’s probably true whenever couching.
Offset crosses in Candle 7 were something new to try.
I figured out how to compensate a Waffle Stitch for Candle 8.
And, oblique crosses finished up Candle 9.
The outlining of the candles and flames were stitched as the Phillies went up in flames exiting the playoffs with little offense and a ridiculous blunder. Finishing this lovely design was the highlight the day!

Filed under: ANG Seminar 2025, Nights in White Satin by Jennifer Riefenberg
Nights in White Satin by Jennifer Riefenberg was fun to stitch although several areas had some tricky compensation to work out. The soft pale blues with neutral colors is very calming. That completes Goal 21.
Both Howard L and I shared out finished pieces at the San Bernadino Chapter’s Show & Tell this month.

There are 8 goals left for 2025 and it’s looking like a few will carry over to next year which is OK especially because I did some other pieces throughout the year.
Once you get the stitching done and lining in place on the Folding Ort Box and the Ort Box with a Twist (Pockets), the final step is to do the binding stitch to attach the pieces. My thought throughout the process of creating these has been that Marilyn Owen was really so ingenious to have constructed this to begin with. I had a lot of time pondering that as each side gets attached to the bottom, then side to side, and finally the top edge times and I did that times two!
Check your layout – you don’t want to be wrong now.
Also, check your thread. I used Pearl #8 for binding on the Folding Ort Box and it is a tad thicker than the three strands of floss. Mine does lie flat but it would be flatter had I used floss as Marilyn instructed. By the time I realized it, I wasn’t going back.

At least two of my chapter members are finished and several more are getting close. Thanks again Marilyn!
