Linda found another winner with the matching Mad for Plaid project bags (10x13x3 and 6x9x1) in the color, Pumpkin.

It includes a motif to stitch and various DMC Perle #5 threads to use. Or, I can do whatever pleases me!

The design is cute and would probably be less complicated than whatever I would think to do. I’m leaning towards using the design as supplied on the large bag and doing something else on the smaller bag. So, I have to ponder on this one for a bit!
As I recall, Jim Wurth retired when I was early into canvaswork and felt his pieces would be too difficult for me. But, I did like them. Now, I’ll finally get to stitch one of his designs, Silken Sonata, thanks to Linda. It’s a lovely 4″x4″ piece on a green canvas with copper and beige threads. It’s a lovely design with colors I love. Linda even included the needles! She’s so thoughtful. This is the second posting in my special Birthday Bonanza! The mug was the first.
For a small piece, it is packed with Jean Hilton type stitches, including Sprats and Jessicas of different sizes with Smyrnas and Eyelets. Some overlaying of threads is needed, which will be interesting as well.

I’m excited to start this.
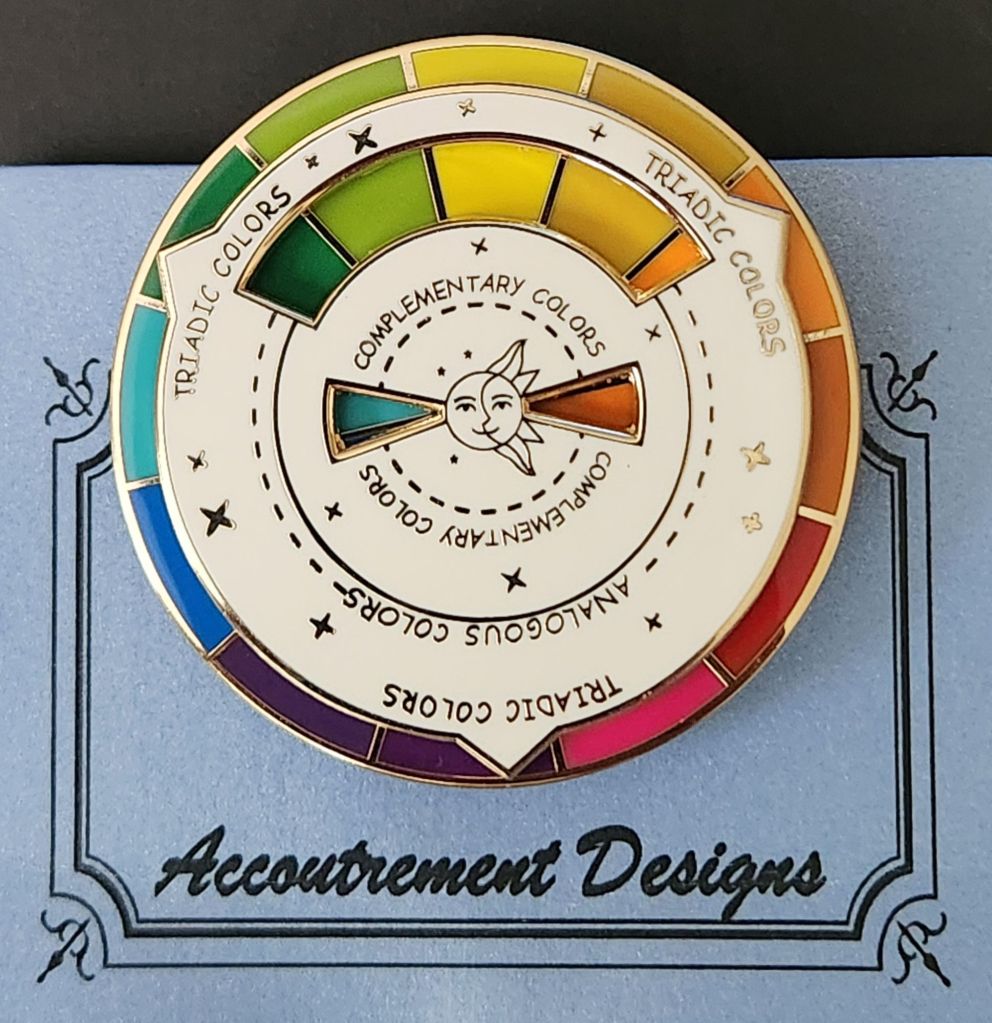
Look at this amazing magnet. The white to part actually turns! It’s 2″ across and so strong. Accoutrement Designs has excellent magnets. Such good quality. Birthday gift to myself.
I’m using my new mug, Taking it one STITCH at a time, from Linda to help me get organized. This is only one of a few gifts for my birthday, which is one of the big ones as far as birthdays go! Thanks to Linda for thinking of me and for the fun new projects (subjects of future posts).
The mug clears up some table space next to where I stitch. The tall wooden holder outgrew my needs and would periodically tip over. But it’s great for holding my skinny tools and scissors. So, I put the wooden holder inside the mug and added the stuff that had been laying flat.
One of my goals is to get organized. It’s tough to get my mind around this, but taking one area at a time is like taking one stitch at a time – right!?! The rest of the table space still needs to be organized, so I am posting only the mug! But, I am going back to my table space now.

Filed under: All That Simmers by Sundance Beads, ANG Main Line Stitchers Chapter
I had the stitching all done prior to our Stitch-in yesterday. I manipulated the overdyed so that the dark areas fell on the outer edge and the light portion of ThreadworX 1006 appeared in the full diamonds to emphasize the diamond motifs in Ribbon 2.
With a little push, the Silver Square (MA006) metallic accent fit perfectly into the bed of beads, which was then anchored into place with another bead. I used 2 strands of beading thread. Believe it or not, that’s the beading needle laying in the yellow area looking mangled! It started out straight.

I would have gotten it done during our Stitch-in, but since we were at Fireside Stitchery, I spent some time buzzing around the threads for my butterfly. I found some good ones, but that is for another post.
Filed under: ANG Main Line Stitchers Chapter, Laurel Burch Rainbow Butterfly by Danji, Serendipity - Stitching Club with Ellen Johnson
I fell in love with this canvas at NJ Needle Fest a couple of years ago, and Linda had it in her stash and gave hers to me for my birthday! Thanks again, Linda. I’m finally getting to it. Kristen has the canvas, too, and we are going to stitch it for discussion at our ANG Main Line Stitchers chapter meetings. I introduced the canvas at our Monday night meeting earlier this month.
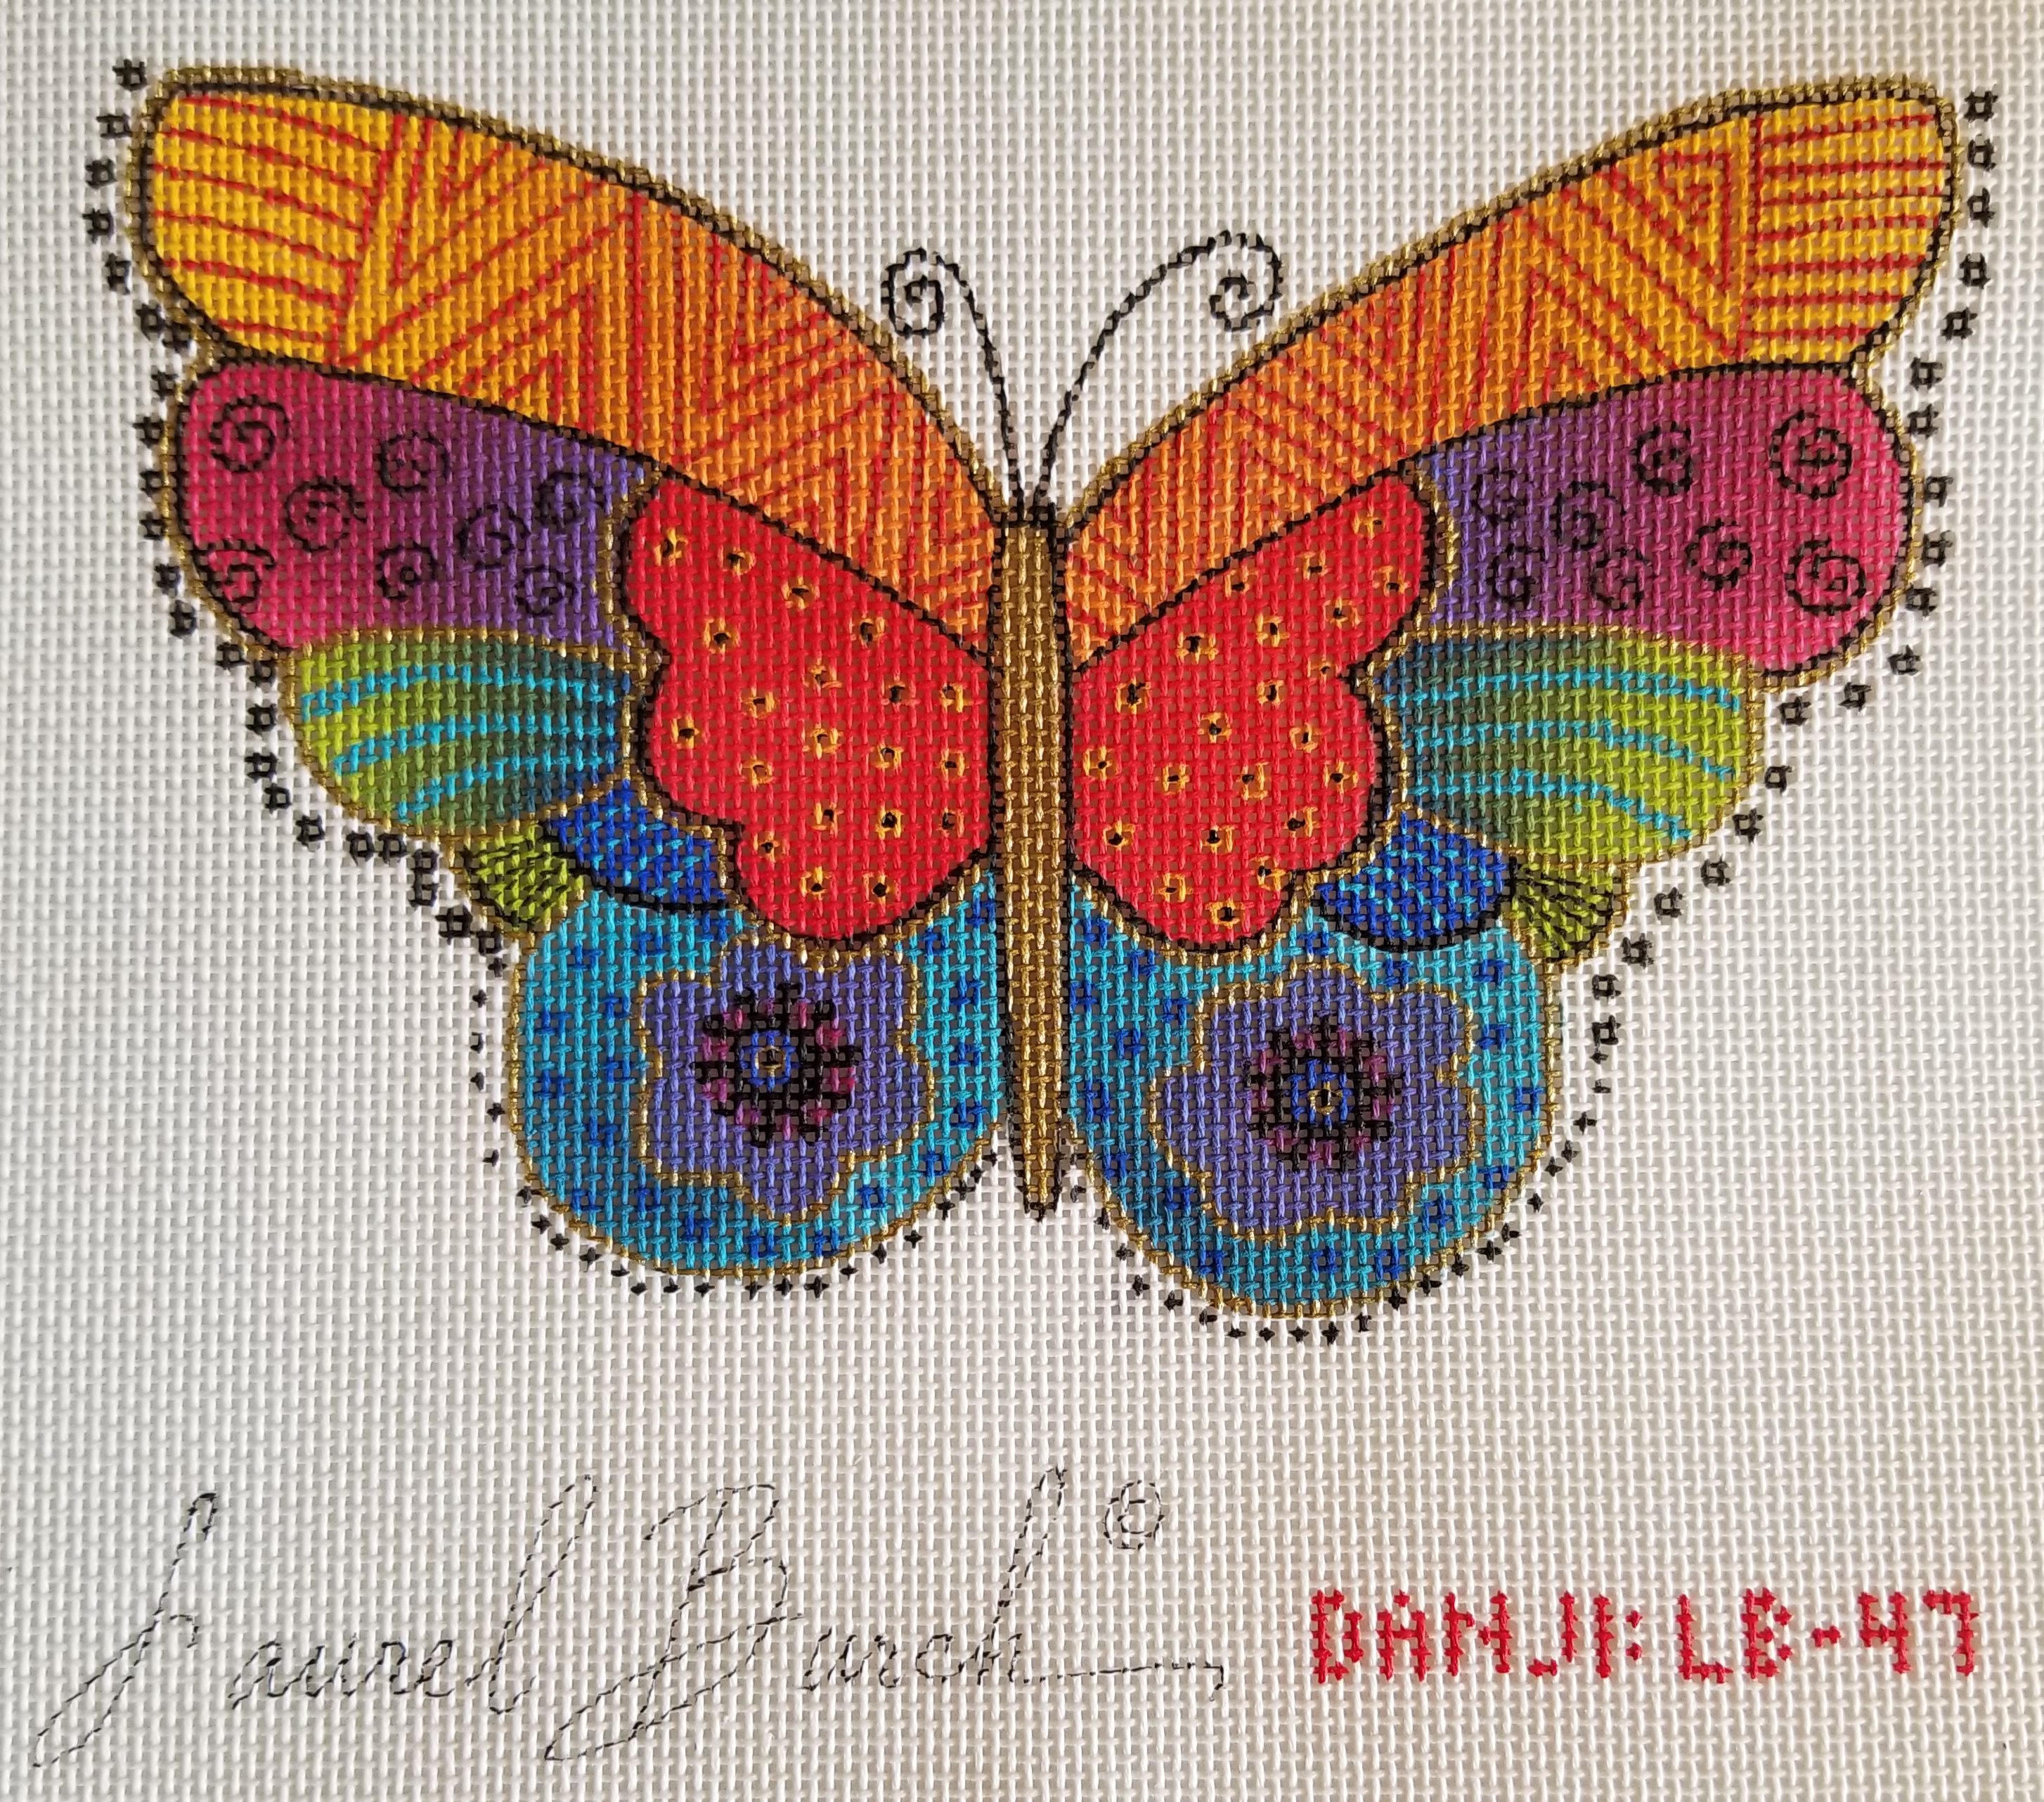
There is so much going on this 6.5″ wide x 4.5″ tall canvas that it is kind of tough to decide where to start. I joined Ellen Johnson’s Stitching Club where she has amassed a series of videos on “Evaluating Your Canvas”. I went through them and immediately knew that I was learning to read my canvas better.
I want this to be a flat ornament hanging at an angle like it is flying.
I decided the focal is the red and orange portions on the wings – not the whole butterfly as I thought initially. Those areas contrast in temperature (warmest) and are completely outlined in black compared to the transition area where red changes to purple (warmer to cooler) and which is partially outlined in black. The opening along the bottom takes you into the cooler portions of the lower part of the wings.
I also read up on butterflies. Butterflies have 4 wings – not 2 wings as I thought initially! The 2 top wings are the forewings and the 2 lower are the hindwings.
The body may be the entry point that takes you to the antennae, which leads you to the wings. It may be a focal point, too.
There is balance within the design. The right and left sides are symmetrical (alike on left and right sides) but there is also some asymmetrical balance between the larger forewings on the top and the smaller hindwings below because of the large flower motifs.
My research also found that there is texture to the butterfly’s wings – not smooth and flat as I initially thought. The wings are covered in tiny scales that possess a microscopic texture that can produce iridescent colors by reflective interference. That sounds like what we see when stitching alternating scotch or cashmere with silks.
Possible textured stitches include Rhodes, French Knots, couching, surface embroidery, beading, and sequins. Possible thread suggestions from members of my chapter included memory wire, Petite Facets, and fuzzy threads. Kristen expects hers will be so embellished it will be too heavy to fly!
For the body, possible ideas include stuffing beads inside Flair, chipping with goldwork (would look good but would tarnish), and padding with kid leather.
I’ll be selecting threads tomorrow at our chapter’s monthly Saturday Stitch-in and the first time at Fireside Stitchery!
Filed under: Uncategorized
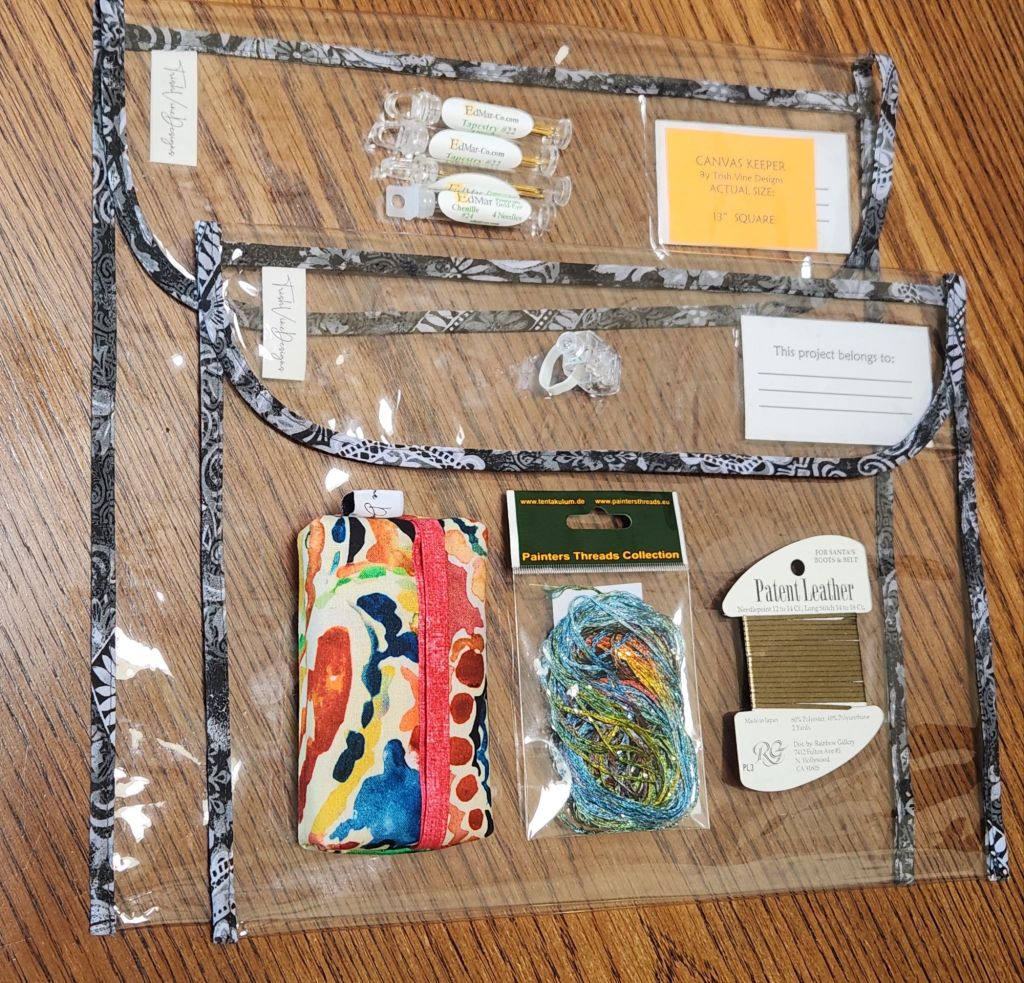
I was close enough today to Edwardian Needle to take advantage of a special 3-hour sale of Trish Vine products while Bill was golfing! I got to see her, Candace, Pam, and a few members of the ANG New Jersey Needle Artists Chapter. Nice turnout. Some ladies decided to sit outside on lawn chairs and stitch.
I picked up a couple of project bags and a tissue holder from Trish. The 2 threads, finger light, and Ed-Mar needles are from the store.
Filed under: ANG New Jersey Needle Artists Chapter, Tumbling Stripes by Marilyn Owen
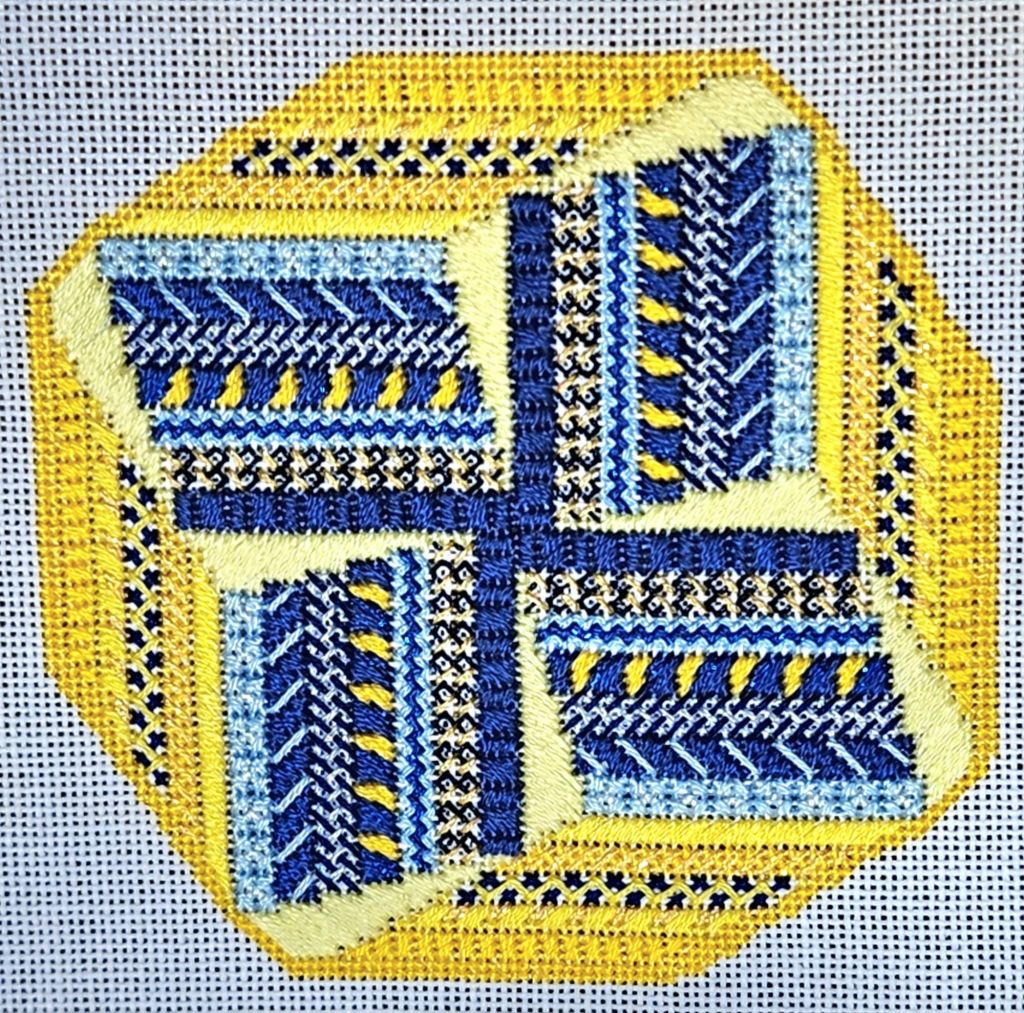
For April’s New Jersey Needle Artists’ chapter meeting, Jacqui continued Tumbling Stripes by Marilyn Owen by going over Stripes A-E (bottom 5 rows).
I see now that the top 7 rows are mostly blue with a touch of yellow and the bottom are yellow with a touch of blue.
I decreased to 2 strands of floss again because I am working on 24 count Congress Cloth.
Since I am finishing this into an ornament, I won’t be doing the 3 outer borders framing it into a square. Instead, I backed out a few of the light yellow fill in stitches and evened out the corners to create an octagon that will be easier to finish.
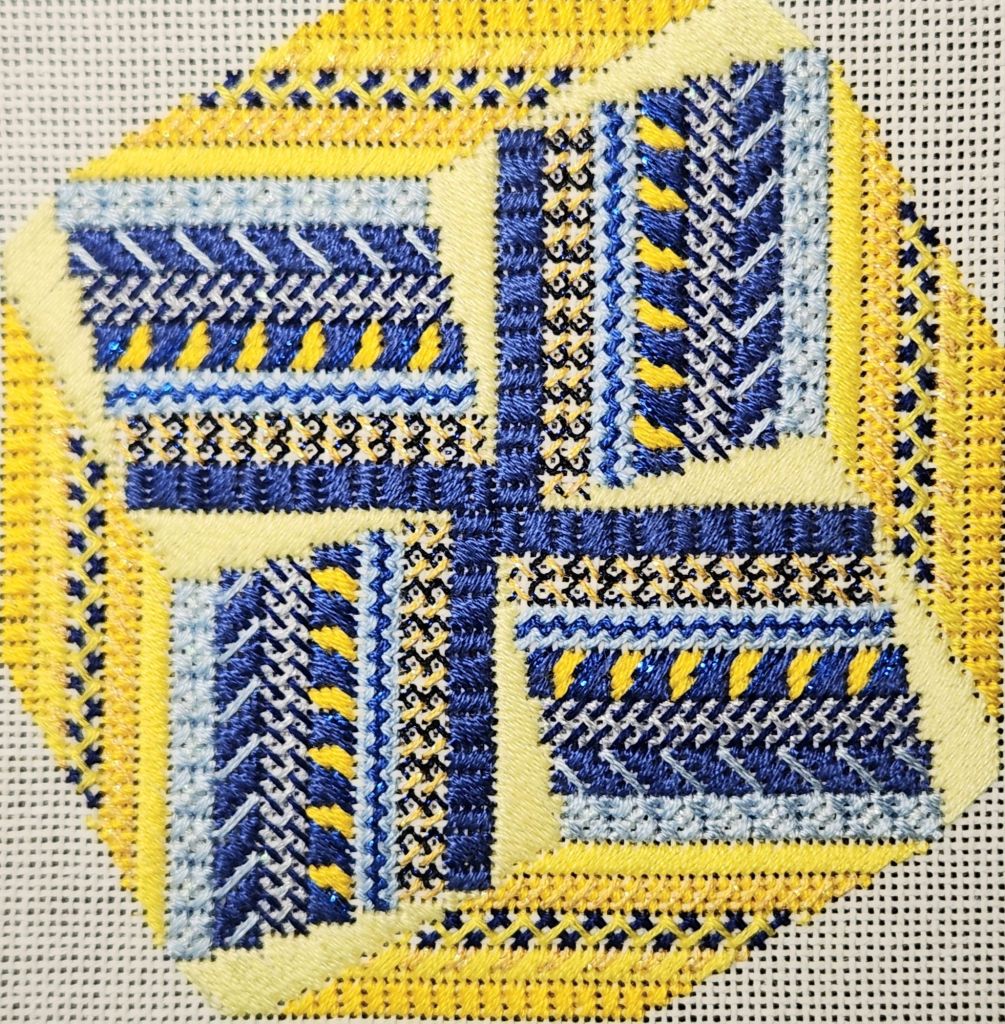
Then, I tent stitched around the outer edge to make finishing easier and retain the full design.
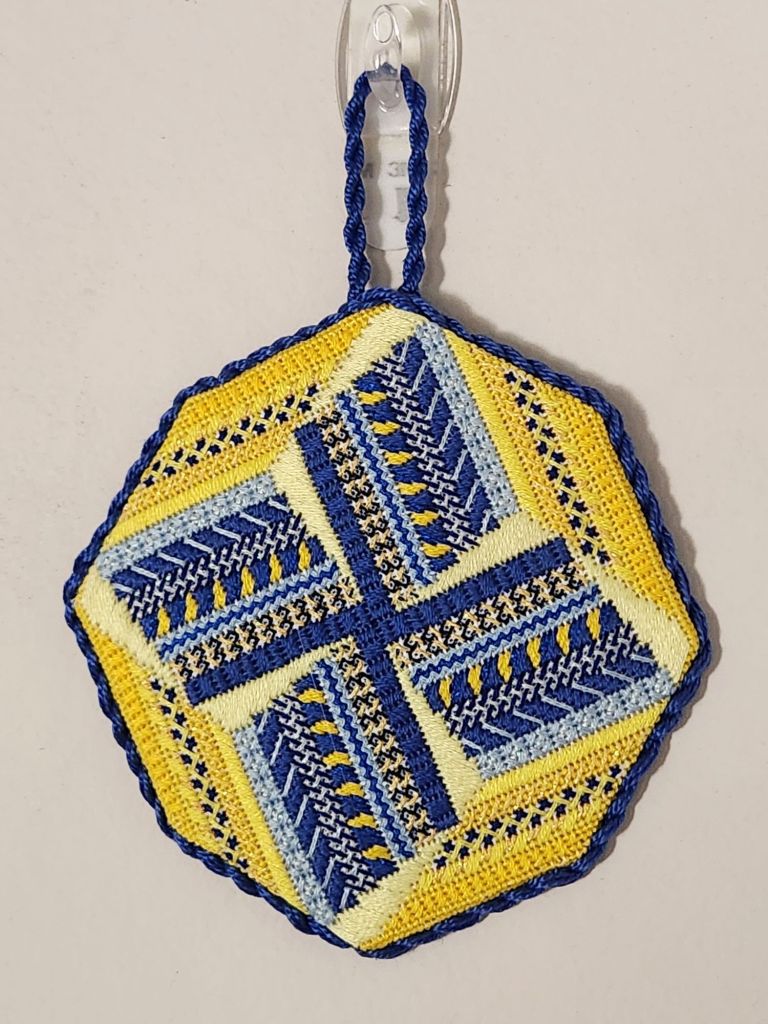
I got my finishing done ready for Show and Tell at this month’s New Jersey Needle Artists Chapter meeting Wednesday night! I’m attending in person. In fact, I am posting from the meeting room.
Filed under: ANG CyberPointer's Chapter, Landscape Features: A Notebook Class by Gail Stafford
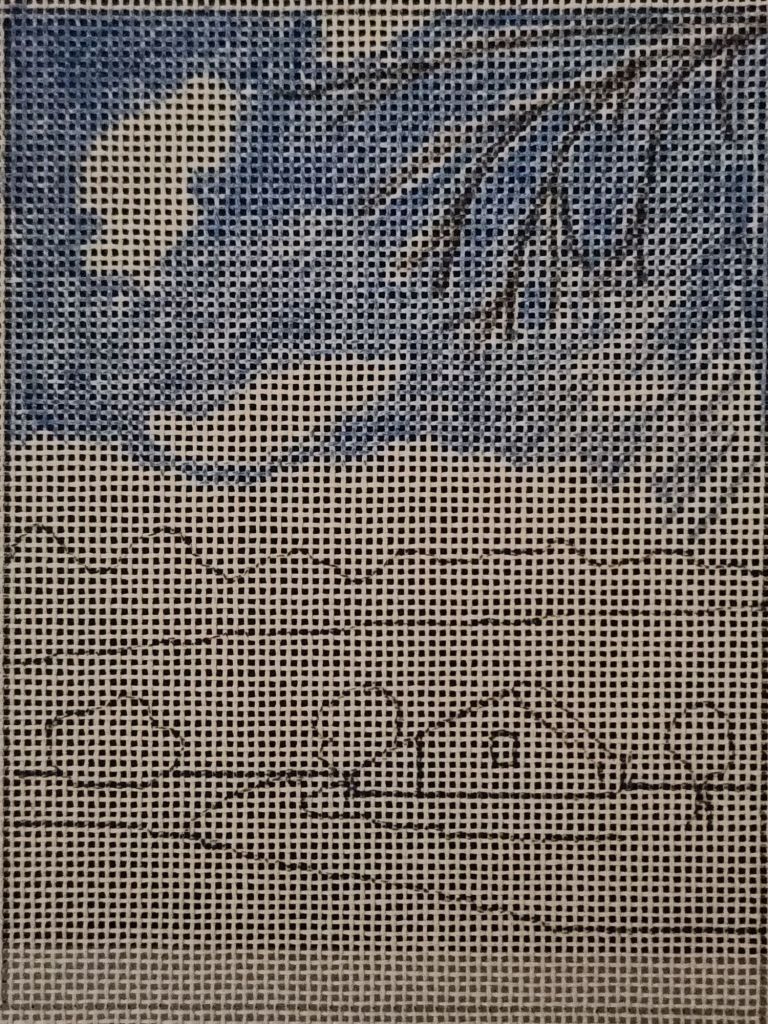
The ANG Cyberpointers Chapter online workshop, Landscape Features: A Notebook Class Kit, with Gail Stafford, is only 4 weeks. So, I want to focus on this, although I am sure Gail will answer questions afterward.
I left the bottom and a couple of areas unpainted.
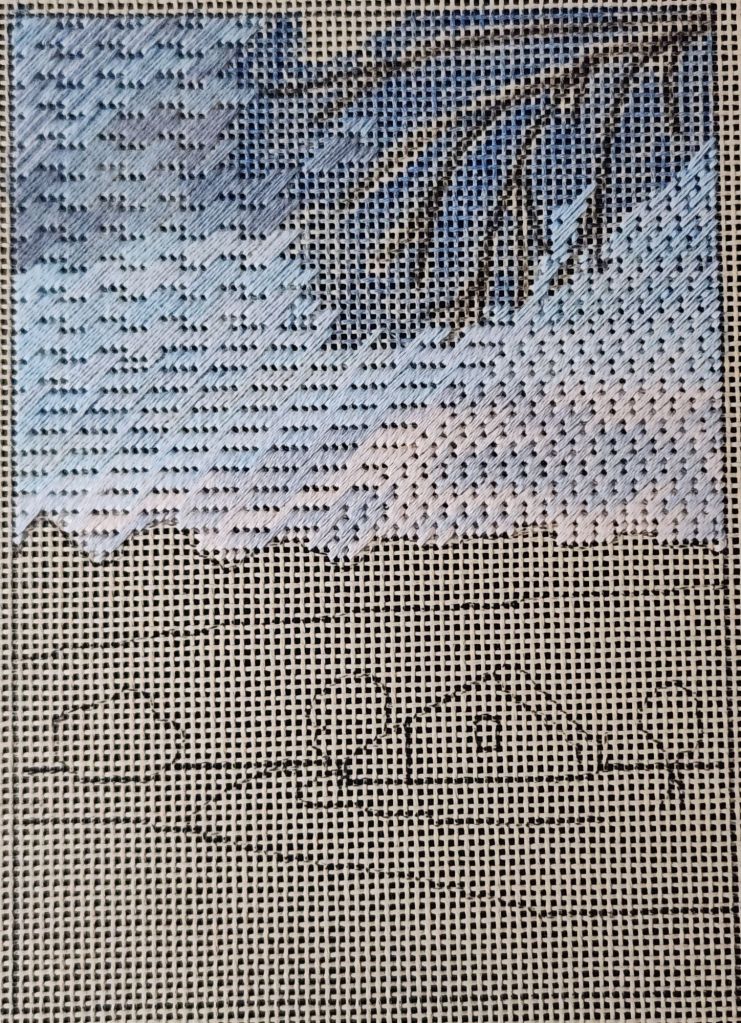
I tested more sky stitches and thread weights (3 strands along the bottom and 2 strands higher up). They all lie on the true diagonal.
Bottom right is Nobuko (smaller)
Bottom left is Diagonal Victorian Step (middle size).
Top left is Triple Nobuko (largest)
I used WDW 1161, 2109, and 1155 some areas 3 strands, some 2 strands, some combinations of 2 colors.
Not painting some areas didn’t make much of a difference even with 2 strands because the strands are laid on the diagonal.
My ranking for the order of the stitches that I like for a sky are Nobuko is best (there is no direction to the pattern), Triple Nobuko is second (I see columns formed by the holes where threads go in and out but I do like the horizontal flow of the pattern), and Diagonal Victorian Step is third (ridges and the holes are too evident).
Filed under: Uncategorized
Gail Stafford’s Landscape Features class began officially on Friday.
Before Friday’s class notes came out, I wanted to make a 2″ test of the three Weeks Dye Works threads using the random Satin stitch. I’m using Copic markers rather than paint to cover the canvas.

I can see the value of stitching in a real design as Gail suggests rather than this type of swatch stitching because I don’t think I learned much, except I like the colors together and think thread blending these would make an interesting sky. Perhaps a storm moving in using the left and right threads. A sunrise using the left 2 threads.
So, I moved to the line drawn canvas to test stitches on a painted area and unpainted area this time with Impressions. Before I covered all the paint on the left half, I decided to change to a random split stitch which smoothed out the appearance. I stayed with split stitch on the non-painted center right area and then returned to the Satin stitch on the far right side. The paint definitely makes a difference now. I can visualize what the lighter coverage as from the swatch with the light coverage of the Impressions.

As you can see, I painted half of the distant trees and water and one of the bushes to test more stitches. I don’t have another green marker to color the grassy area (yet).
