Filed under: ANG Main Line Stitchers Chapter, Fibonacci Swirls by Olivia Hartshorn
Last month, Linda got our ANG Main Line Stitchers chapter started on Fibonacci Swirls by Olivia Hartshorn (from Needle Pointers Mar/Apr 2022).
I’m doing one on Congress Cloth with a single overdyed thread, Sheep’s Silk Autumn Bouquet, that has 4 different colors (mauve, golden, green, and khaki starting at north, east, south, and west, respectively). I decided tent stitches with Perle #8 were plenty on Congress Cloth (rather than cross stitches over 1 canvas thread).
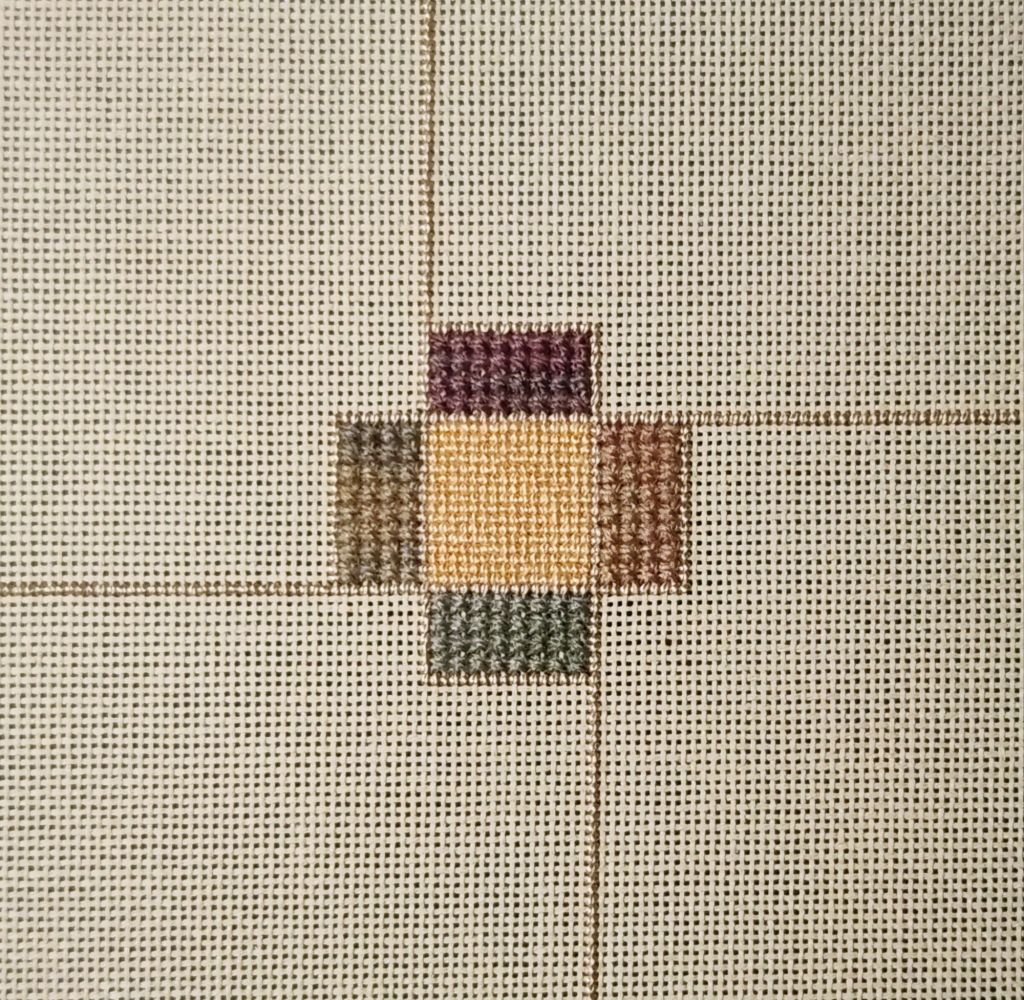
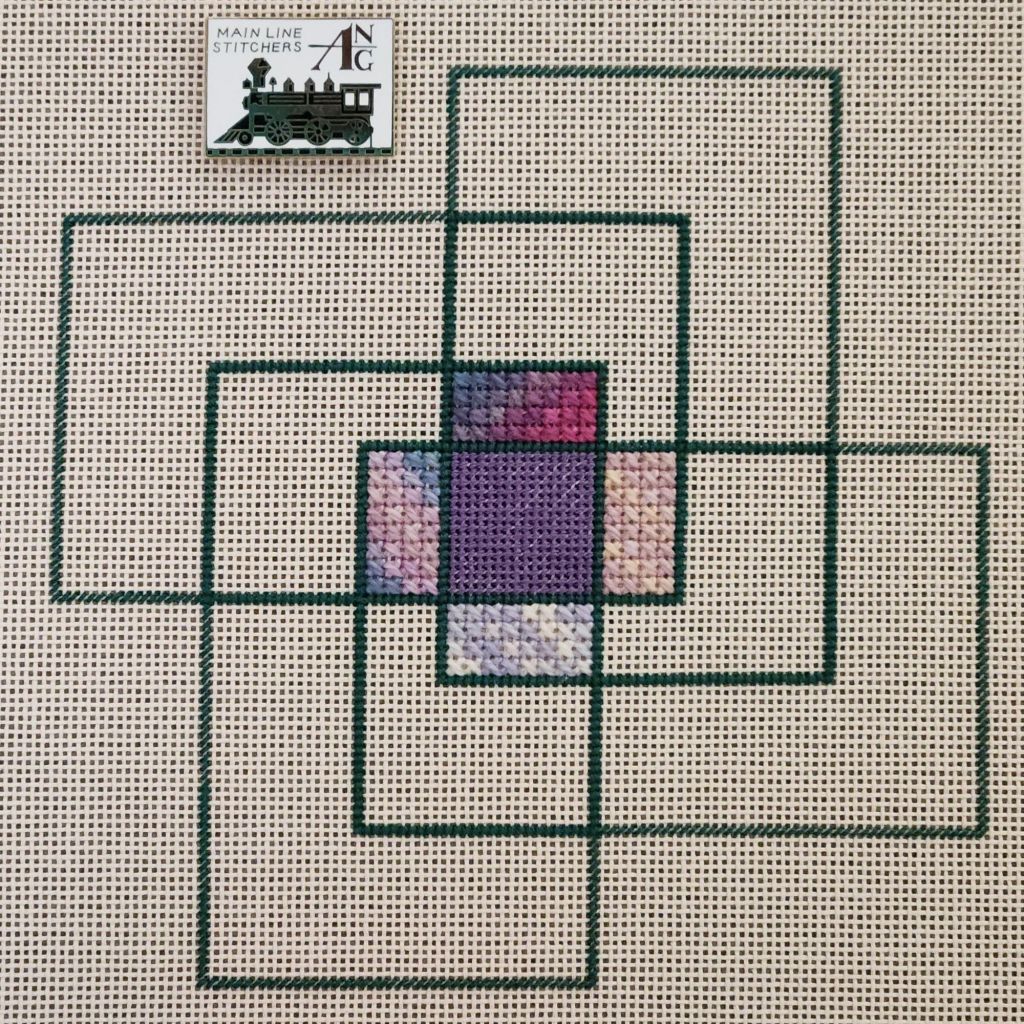
Once I got to the 18 count canvas, I changed my mind on the Watercolours for a third time. These look more different from each other than the last 3 skeins (especially after they are unwound). I kept 605 Sunset and the other threads.

I was almost done with all the borders when I realized that I had a whole card and a lot of the green Elegance leftover. Then, it dawned on me that I hadn’t done the border in over 1 cross stitches, and being on 18 count, that would be better than tent stitches. Elegance is comparable to #8 Perle. So, I went all around the inside border (Area Cs) again with reverse tent stitches to make the cross stitches. You can see the outer edges are not crosses yet. I cut the thread 605 Sunset so the rose/peach color is on the right and the rose/blue on the left.
This is ready for our meeting in 2 weeks.
Filed under: Brandywine Chapter, Embroidery Guild of America, Roman Ruins by Joan Rinehart
My EGA Brandywine Chapter decided to try Casalguidoli embroidery, which turned out to be easy enough thanks to Joan Rinehart’s design, Roman Ruins, an EGA Petite Project. There is a Group Correspondence Course of a dragon that would be tougher because the width varies from head to tail.
Roman Ruins is good for beginners in this technique but takes more than “a few” hours to complete. I worked on it 3 nights for quite a few hours each night. But it’s not a difficult project (5″ x 7″). It’s diagrammed like a cross stitch pattern, which now that I’ve been away from large cross stitch pieces for some time, I got off count slightly but not significantly.

Then, it was decided to teach it on linen because one of the board members found this project, Casalguidi Flower by Becky Quine, on Etsy. So, I found a piece of Lugana 28 count (yellow) in my stash (the model was on blue), purchased the piece, and stitched it. One of the challenges was the padding under the column, but the rest of the embroidery stitches were even more challenging. I learned the curl stitch for stems and woven picot (attached and detached). For a first attempt with these types of stitches, it’s good.

I am glad the board agreed I could teach it on canvas because it’s so much easier on 18 count canvas. Then, people can stitch a project on canvas, linen, or just store the stitch away for reference. These stitches could all be done on canvas. We just did a 2″ sample to get the hang of it.
Roman Ruins uses a running stitch along the sides that isn’t used in Casalguidi Flower, doesn’t incorporate the typical four sided stitch seen in the background of Casalguidi Flower, and the columns in Roman Ruins are not padded but it is padded in Casalguidi Flower.
Further investigation on the technique from Mary Corbet’s website reveals that Roman Ruins is probably more accurately called a raised stem stitch. See needlenthread.com/raised-stem-stitch and needlenthread.com/casalguidi-stitch. Mary has great photos and instructions. Give it a go!
Since there were so many threads in the kit, the second thing I did (first was place on Evertites) was divide threads by area. Gail Stafford does a great write-up for placement. Besides the finished photo, she also provides 2 different color coded maps for general thread placement.
The third thing was to clean up the spaghetti threads that had been left on there since class. I had a clump of away waste knots that I thought were badly done French Knots!
Then, I wandered between the background areas and along the path. Once that was done, I was able to add the trees on the left side during the Central Jersey Chapter Meeting and Stitch-in on Saturday and the rest were done mostly during the British Open (golf) the following day. A few more very thin tree limbs get added as part of the finishing touches.

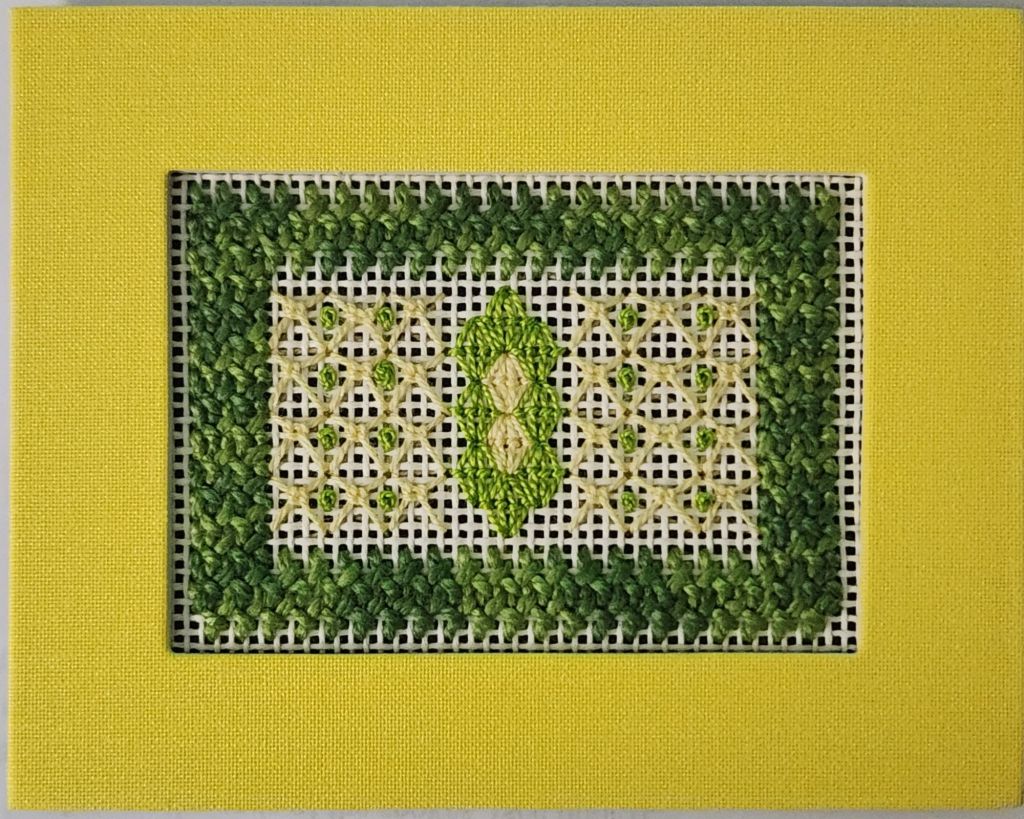
Filed under: 2024 Summer Stitch Camp, Serendipity - Stitching Club with Ellen Johnson
This yellow picture frame (4 and 3/4″ x 3 and 3/4″) has been in a drawer for years, along with 3 more. I’m glad I remembered them and could find them. It’s a Happeez product from Mayfair Lane. The back has a large sticky surface (after you remove the protective liner) that adheres to refrigerators, mirrors, glass, and more that apparently can be revived if needed.
These last 4 stitches complete the last 2 badges from Ellen Johnson’s Summer Stitch Camp. I knew these stitches wouldn’t be great for coasters, thus the frame. I just cut the canvas larger than the opening (no finishing edge) and layed it on top of the removable insert (intended to hold a photo). It slipped in easily, and I nudged it into place. It should stay put. I used Planet Earth Silk (Lettuce V052, a lovely variegated thread), DMC Perle #8, and Impressions.
Filed under: All That Simmers by Sundance Beads, ANG Main Line Stitchers Chapter
Once again, I used my ANG Main Line Stitchers chapter Stitch-in (last month) to work on All That Shimmers. I finished the beads for ribbon 4, which is the green one with orange beads. I’m behind on posting this!
The way the stitch guide is written, the metallic bicone would be anchored into place right on top of a strand of Silk Lame Braid and wobbled unless you pierced a canvas thread and returned through the bicone and pierced into same place. The single beads are right on top of a thread, too. So, I used 2 strands, stitched a 2×1 stitch catching a bead, came back up, and lassoed the bead (place strands around each side of the bead and under the bead). So, no wobbling at all.
Ribbon 3 is the orange one with magenta beads. I shifted the squares to create a symmetrical arrangement. Top is how the stitch guide had it. My diagram and my stitched piece is pictured below.

You can see now the color of the beads used in one ribbon are adjacent to the color of a ribbon of the same color. It adds interest in my opinion.
Filed under: 2024 Summer Stitch Camp, Serendipity - Stitching Club with Ellen Johnson
Here’s a second coaster that is square to eliminate compensation using 6 stitches from Ellen Johnson’s Summer Stitch Camp. With this, I have completed 4 of the 6 badges!
I used Rainbow Gallery’s Persian, Silk & Cream (2 colors), and Vineyard Silk Shimmer.
Filed under: 2024 Summer Stitch Camp, Serendipity - Stitching Club with Ellen Johnson
It was a fantastic day to join Ellen Johnson from Serendipity for a day-long stitch camp (in AC) because it was too hot to do anything else yesterday!
The kit arrived on Tuesday and was filled with lots of goodies. That Zee Zees was tasty.
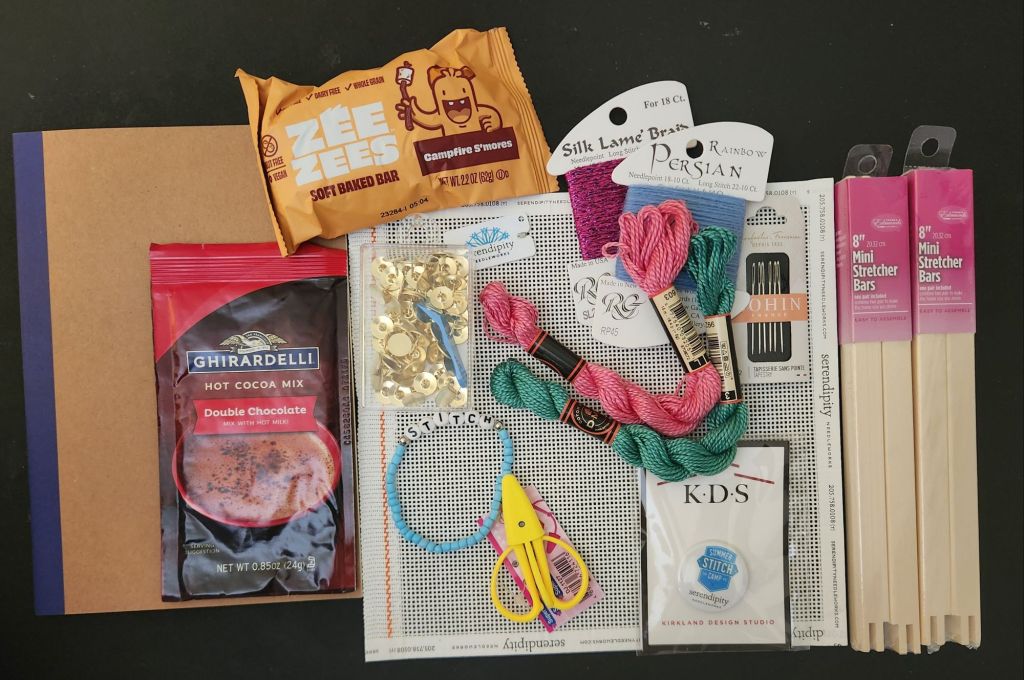
We dove into 6 stitch families, and I earned my first badge as I used the day to stitch 3 rows of the first 3 stitches Ellen discussed.
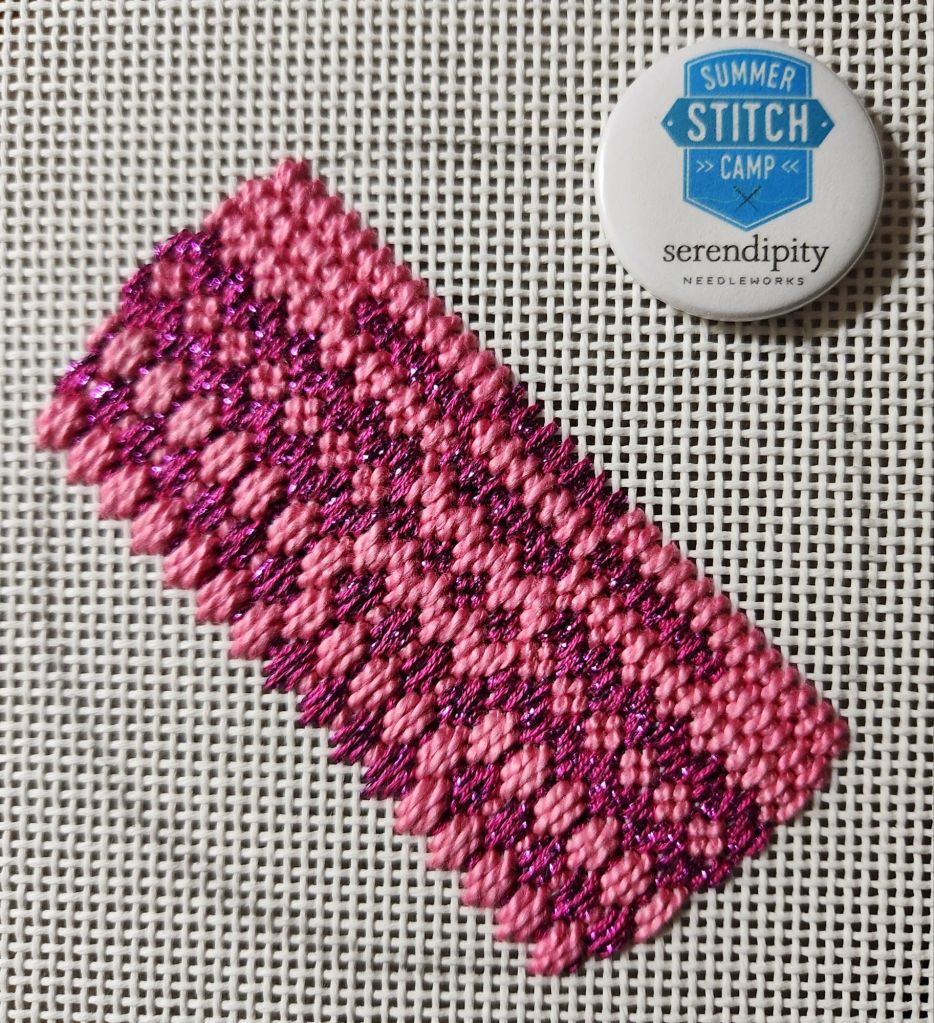
Today, I earned 2/3 of a badge by finishing off both sides.
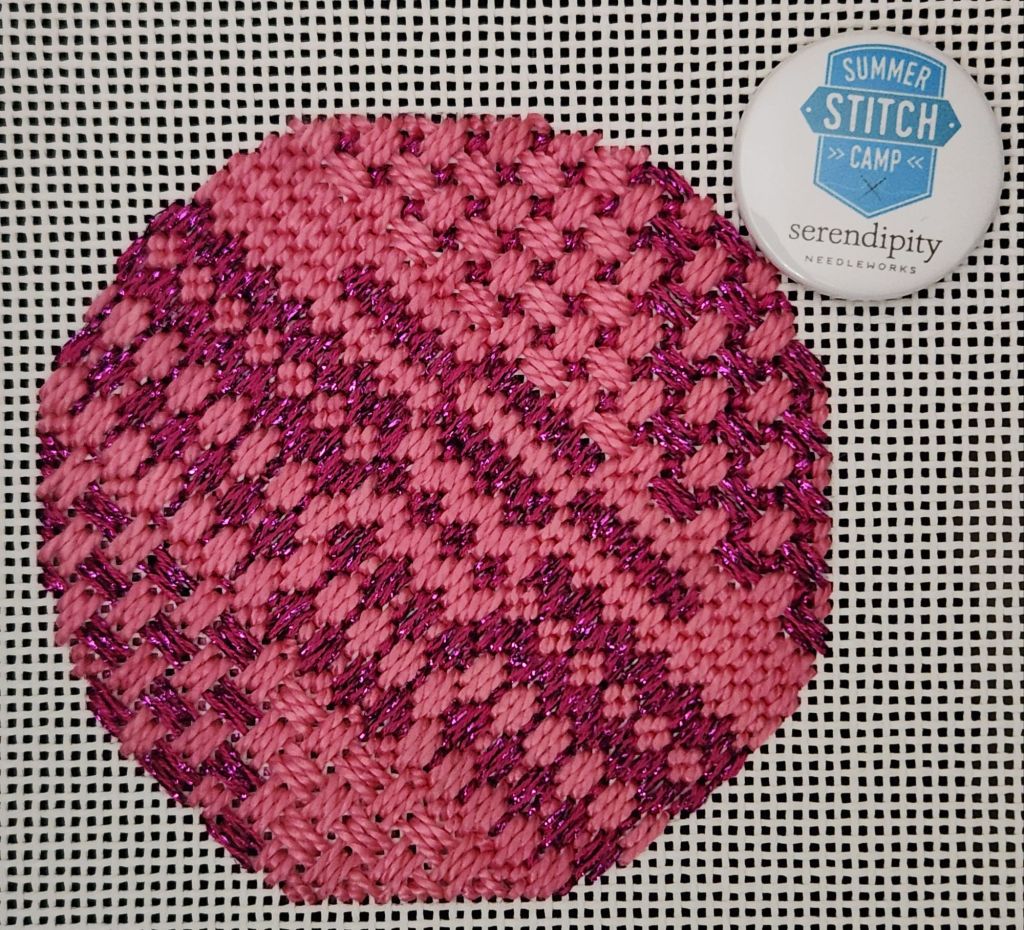
Besides teaching stitches, Ellen discussed which stitches combine well together. Very enjoyable day.
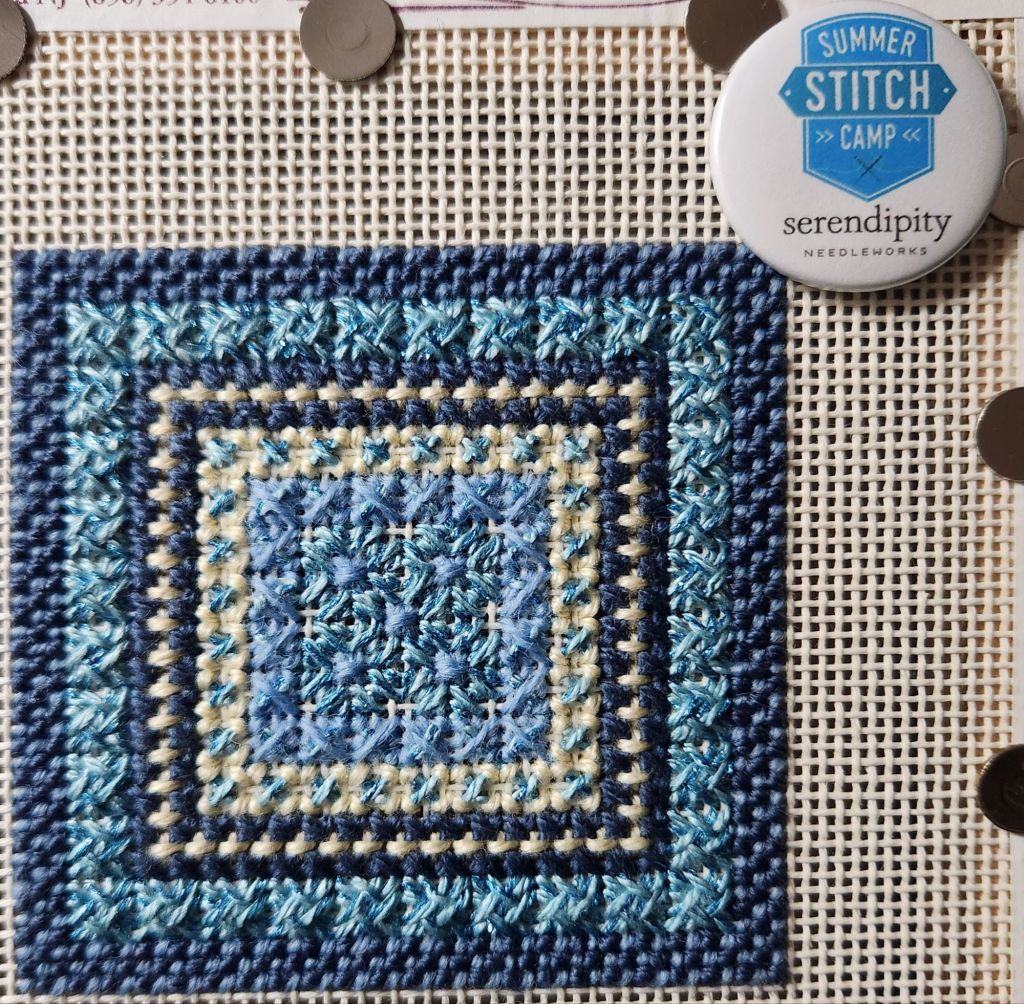
It’s 13 count canvas and I used DMC Perle #3 and Silk Lame Braid for 18 ct (about 3 and 1/2″ round).
Silken Sonata by Jim Wurth is done. I do love a counted project! Thanks again, Linda.
Compensation with 4-way Continental was tricky in the small areas.
The overlay stitches were new for me. It took me 2 tries to get them right. I looked at the piece the following morning and thought 2 were wonky. After carefully looking, I realized that 2 were wrong one way and 2 were wrong a different way! The smaller Jessicas are 3×4, and the large ones are 5×4 (which was oddly difficult for me too-not sure why). So, the overlays are off center on the large one, which is what messed me up. But, I got it. Those eyelet holes had to be that big to get the threads to lay around the hole.

Normally, I see Jessicas and think about filling them with beads. Now, I can about filling with 4-way Continental (or other small stitch) and/or overlays.
Silken Sonata by Jim Wurth is fun to work on. Jim must have been influenced by Jean Hilton. Between the Smyrna outline stitches and the multiple sized Jessicas, you can’t help but think of Jean Hilton.
Those 4 large Sprats Heads worked up quickly and look great. I hadn’t used Hi-lights before and probably won’t again because it is discontinued but I liked it. The Coronet Braid (size 8) I probably won’t use again because I didn’t like it. It’s stiff, and I didn’t like the feel of it. It’s polyester and rayon. But, it is iridescent and looks good.

Filed under: ANG Needle Pointer's Timeless Treasures From the Archives
This is a Romanian stitch executed differently in the 2 halves. Read all about it and explore 11 basic stitches with two variations, a background, and a border, including a corner for each basic stitch by Mindy English. How & where? You’ll have to join the American Needlepoint Guild (ANG) since I discuss it in the Timeless Treasures from the Archives article in the current issue of Needle Pointers (July/August 2024). Read about all the ANG member benefits at: Click here.
I made it into a coaster with 3 tent stitch rows surrounding the 2 areas, Craf-tex liner, cork backing, and a 3 strand cord glued into place (process has been explained in more detail previously in my Compensation Coaster post).

