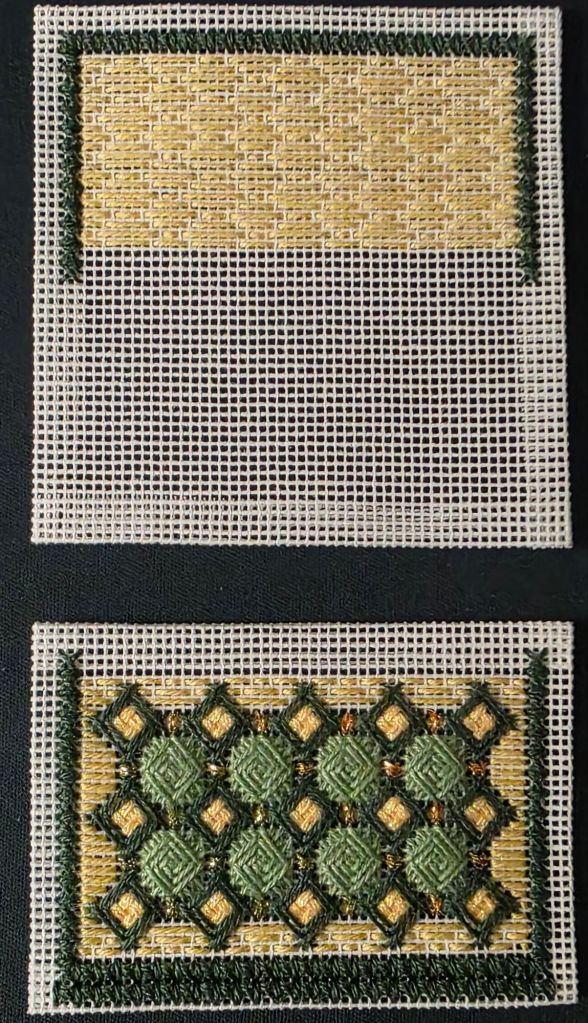
Nights in White Satin by Jennifer Riefenberg had a little pre-work. The tent stitch outlines inner motifs and for the border outline, I chose to do two wide.
This 2-day class is only 3 weeks away! It will be my third class of ANG’s 2025 Seminar consisting of canvaswork stitches – my comfort zone.
Charity is the 2nd in the Cabochon Series by Susan Portra. All designs are based off a Rhapsody, a discontinued Rainbow Gallery thread. This one is R18. This card says, “Try running other yarns thru this.” I ran an overdyed thread thru white Flair for a nice effect in Beautiful Ohio, a technique that I learned from teacher, David McCaskill. It helped me win the ANG Princess Grace Award (https://melitastitches4fun.com/category/melitas-adaptations/ohio-star/).
This card of Rhapsody is too dark but a solid color through a lighter one would be nice to try. Learning/Sharing #1.
I did change to the Diagonal Greek stitch from French Knots that were supposed to go above the 5 diamonds. I found the pattern in Painted Canvas Embellishment by Carole Lake and Michael Boren. The French Knots were supposed to be on every Canvas thread with 5 strands of floss. It seemed to heavy. I used 2 strands for Diagonal Greek (3 strands were still too heavy). It really fits the design and reminds me it’s ok to change a stitch to what you prefer. I’ve heard more than one teacher say that once you purchase their piece, you can do what pleases you. Learning/Sharing #2.
I stitched on Charity last month and this month at our ANG MLS Stitch-in. Although I spent over an hour shopping for threads to fill in the kits for the other designs in the series, I did finally sit and stitch. That’s when I learned from Linda M (who learned it from teacher, Toni Gerdes) that using glue stick on the end of Tiara will control that from splitting apart. And, it really does the trick. Linda and Toni to the rescue! But, I will not seek opportunities to use this thread. I don’t see an advantage to it over other threads not requiring special handling. Learning/Sharing #3.

That leaves the bugle beads and Cabochons to do. Here I got the location of the prongs established and enlarged the holes with a large needle to ensure placement looks consistent. Learning/Sharing #4.

We talked bead trays and at least one person didn’t know that the square sticky bead tray with a cover can rest on the canvas while stitching with the cover bent backwards. Another reason this wasn’t a favorite bead holder was because you can’t turn the canvas over without it falling which I agree is a bother. So, I added a magnet inside the box. Problem solved. Lesson/Sharing #5.

I can’t take time now to do the finishing but I had to finish the bugle beads and attach the cabochons.
The directions show this finished sideways.

I stitched it thinking I’d finish it this way with the center motif looking like a heart.

Then, I solicited opinions from everyone yesterday and my husband today. I think it was unanimous to go this way.
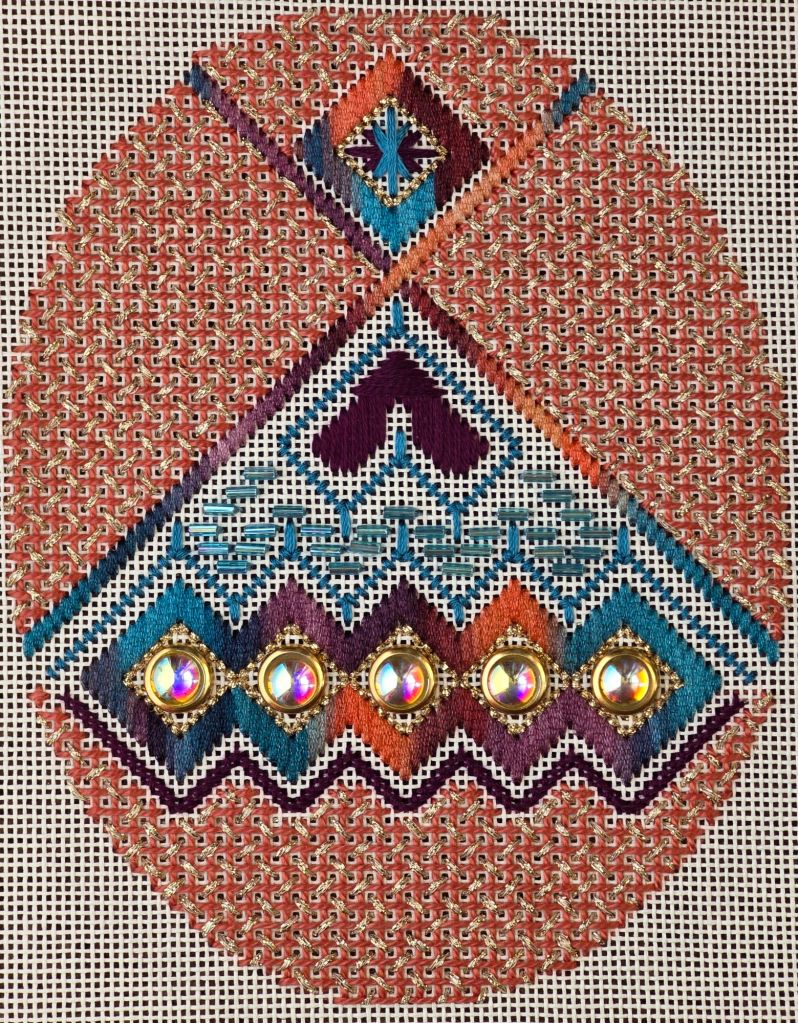
What do you prefer?
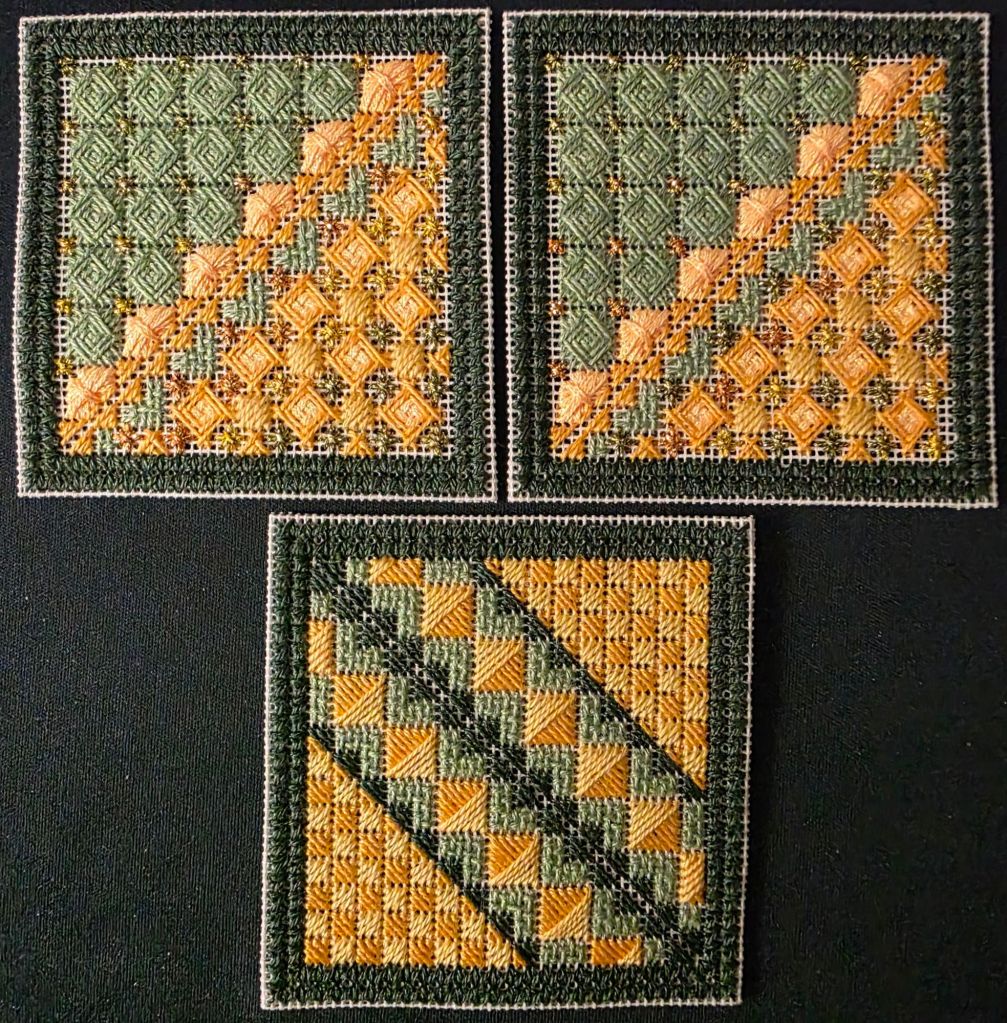
There were 4 patterns to use or not as we saw fit for the bottom of the Folding Ort Box by Marilyn Owen. I modified the bargello pattern by adding the short red rows. The color matching is pretty close.
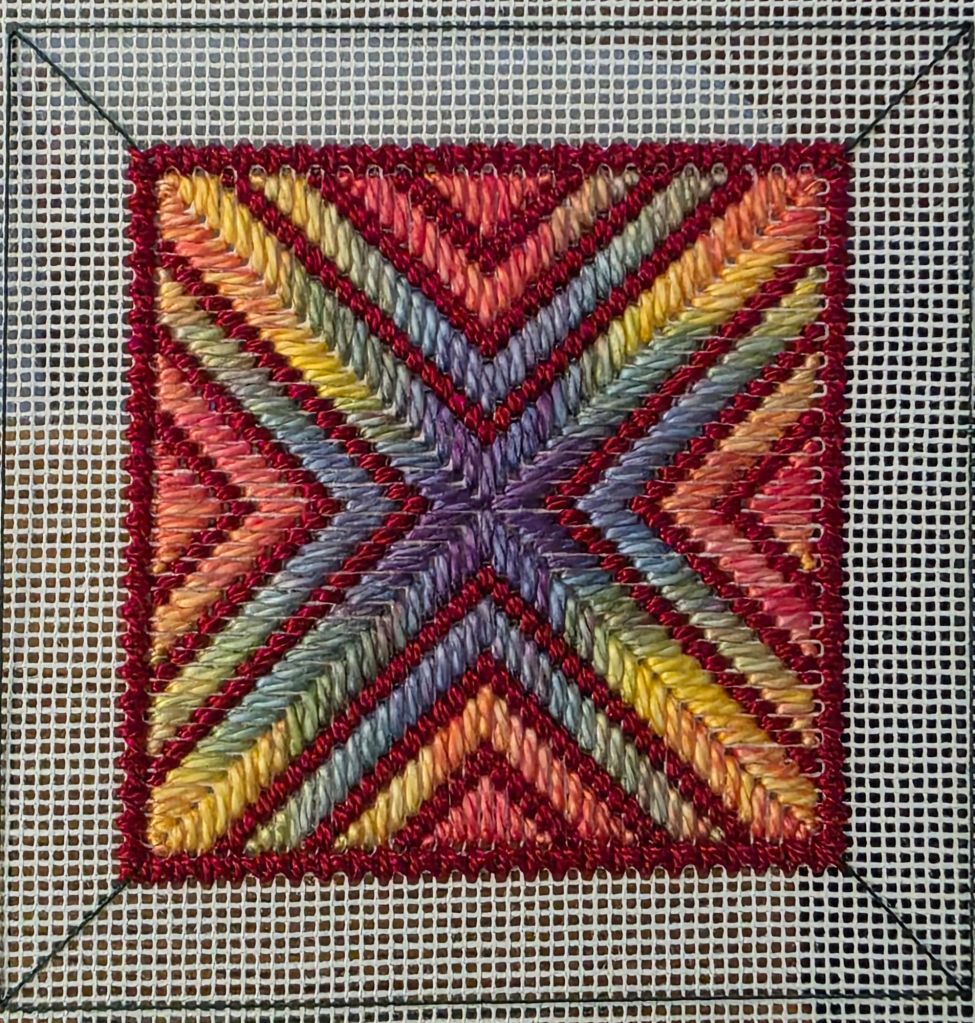
I’ve already used solid red for the inner borders and decided another red border and red binding will not be exciting enough. So, I tied in the Watercolours used on the bottom for the outer borders. Then, for the binding, I will go back to red.

The Ort Box with Pockets also needed to be cut apart, edges folded back, and lots of cross stitches for the borders. The holes all have to line up to stitch the borders correctly.
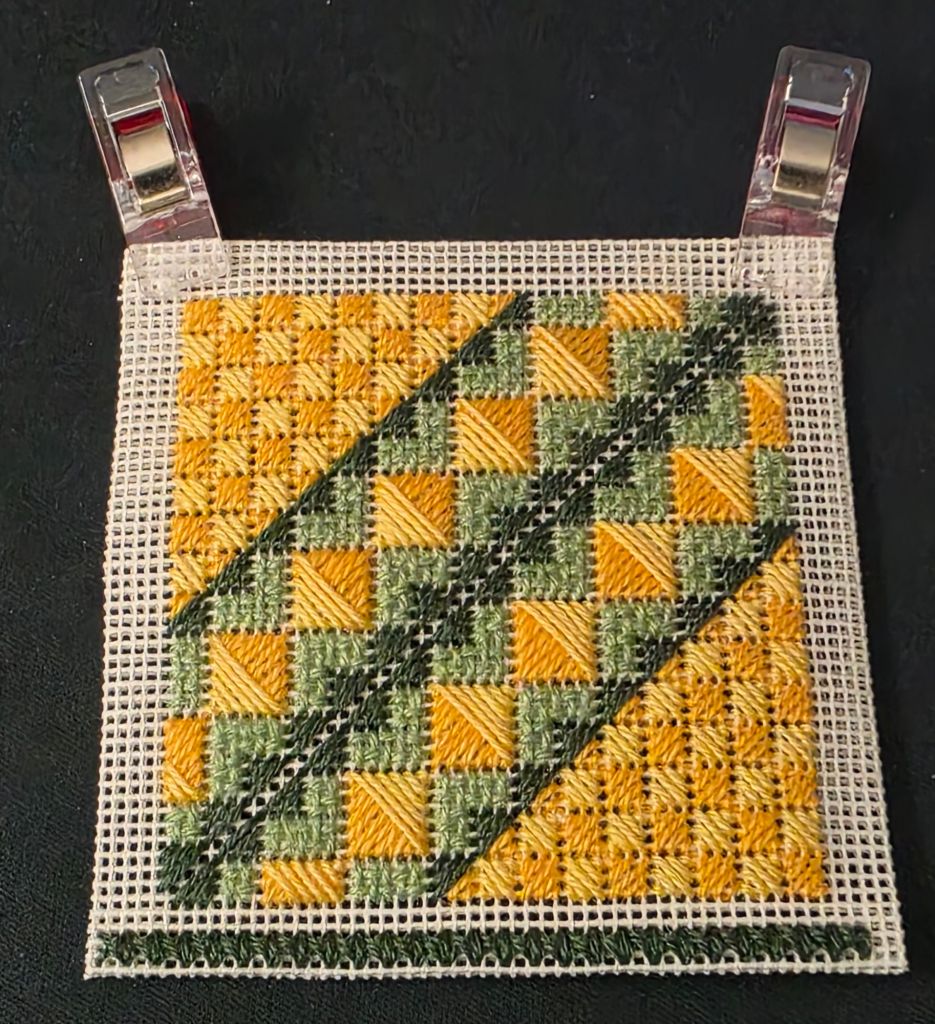
Next up is how to do the lining by August 11, our next ANG Main Line Stitchers Chapter meeting!
Filed under: 2025, Flowering Maple with Celeste Chalasani, National Academy of Needlearts (NAN)
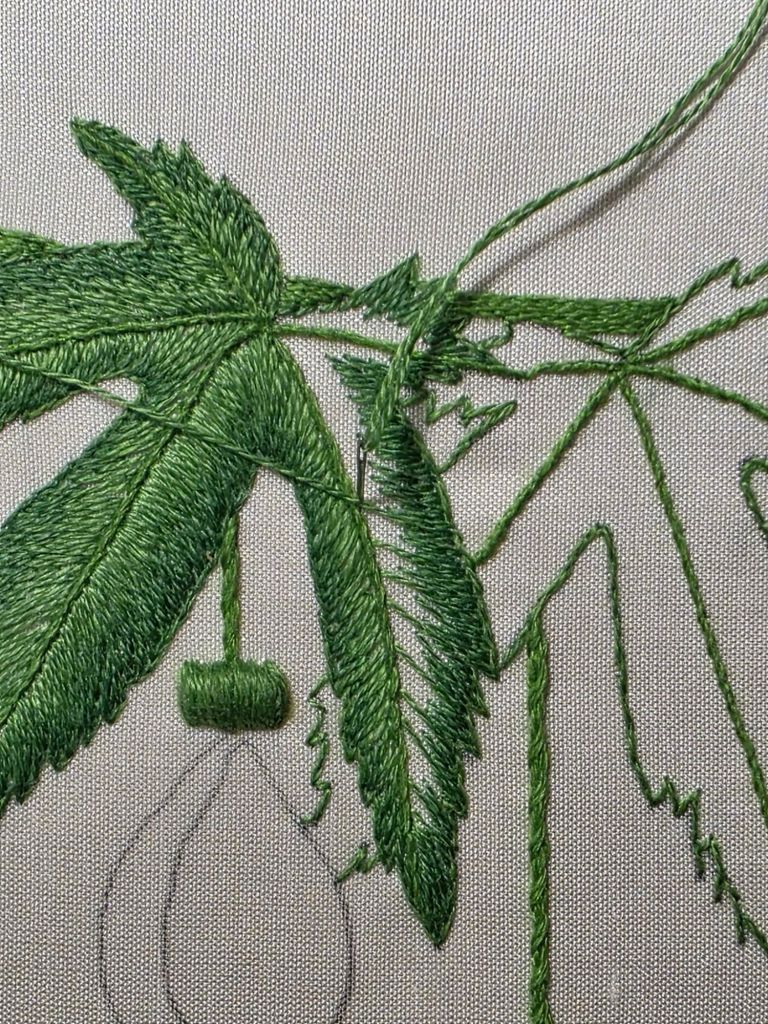
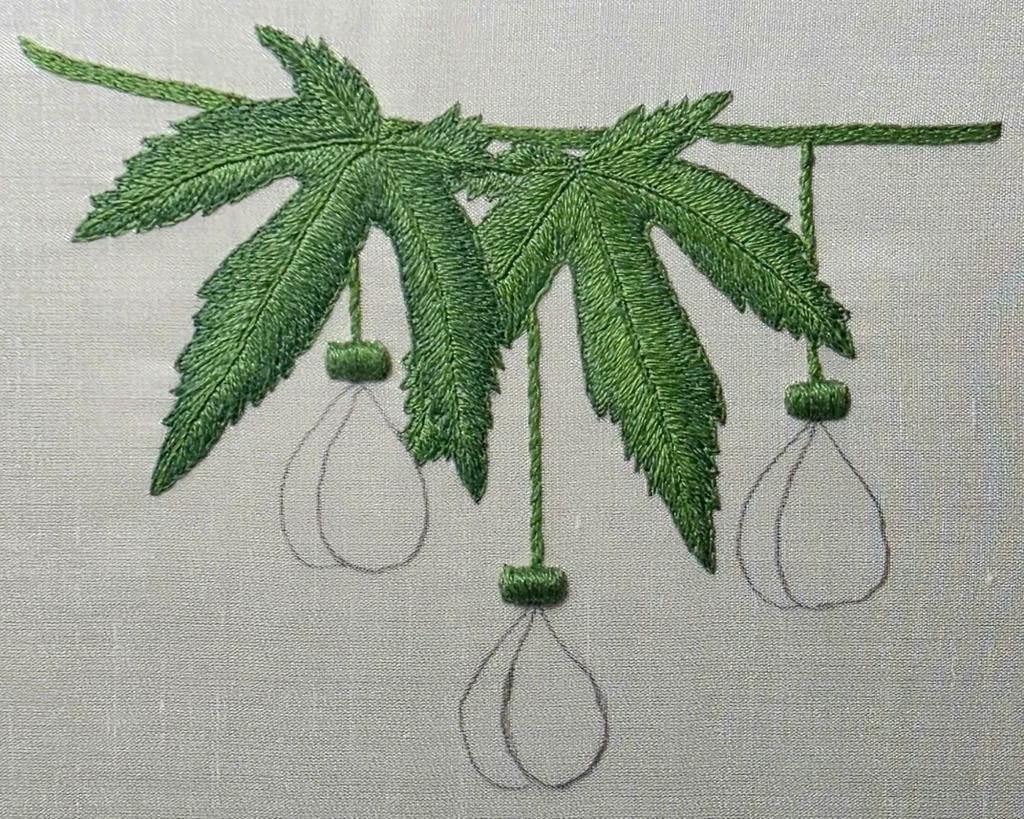
Flowering Maple with Celeste Chalasani began in March at National Needlearts Academy (NAN). I worked on it some in April but then it took a back seat until now.
It moved up in the queue so that I could get my 12″ bars available for ANG Seminar classes in August. If I can’t get it done, I can thank Linda’s Boutique because she let me know she has them available!
I am reminded why I prefer canvaswork after working on this over the past few days. I’m using one strand of floss in a small embroidery needle, size 10. The repetition of pressing against my middle finger hurts so much I had to pull out a finger pad. I’m stitching through 2 layers. The background fabric is silk shantung and we were instructed to stitch it to a cotton backing as part of our pre-work assignment. It not really thick it’s just that the needle keeps pressing the same spot.
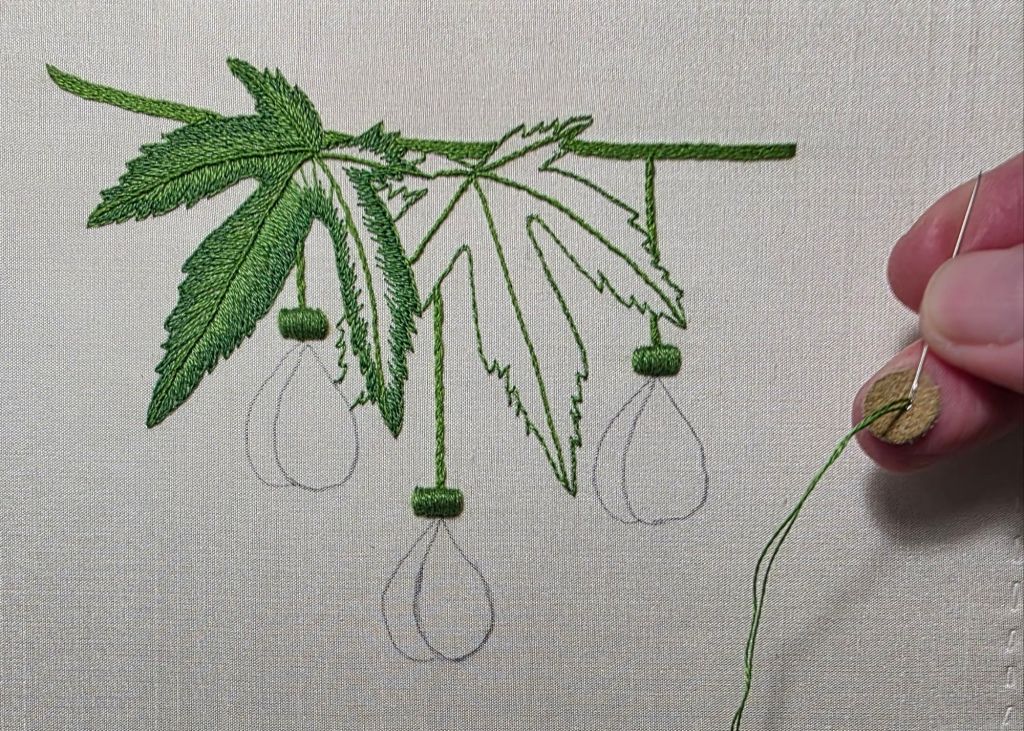
I like previewing the direction of the stitch and placing them along the route and going back to fill them in – good tip from Celeste.
A rainy weekend, the PGA Open Championship, Phillies, and PBS Sunday night TV (Patience and Grandchester) makes for great stitching time! I needed this time because Seminar is less than a month away.
The small needle was starting to bother my index finger too. Petals are next but I’ll give my fingers a few days rest. I did 3 in class and need 6 more. Then, there is cutting (the scary part) and attaching them.
Filed under: Brandywine Chapter, Embroidery Guild of America, General comments, Needles, Tools, Zokins
Lots to share about my EGA Brandywine Guild meeting earlier this week!
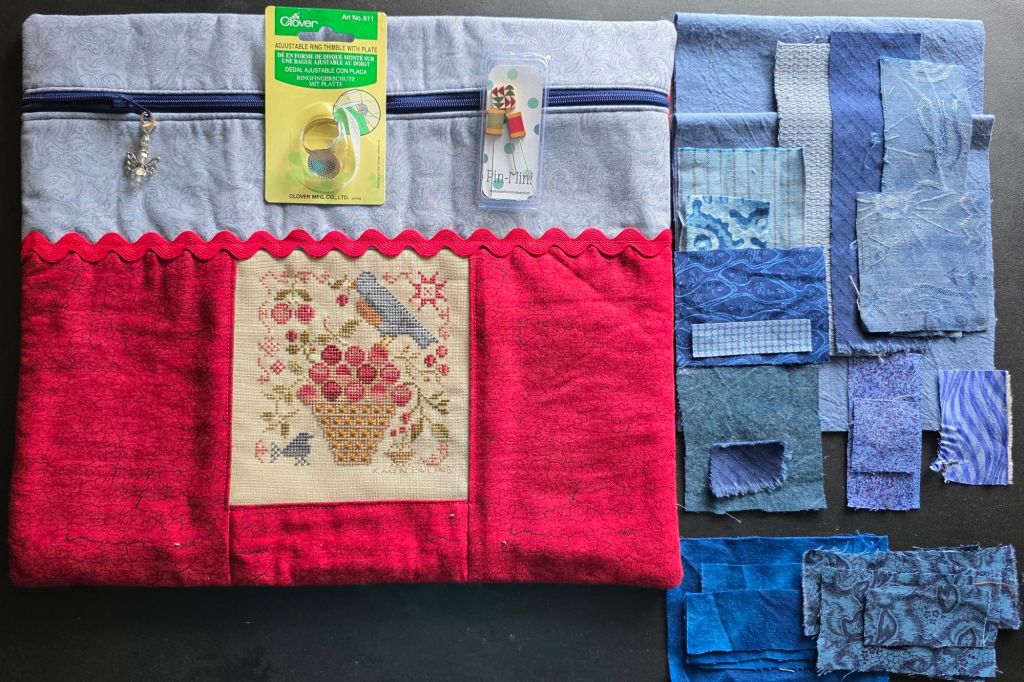
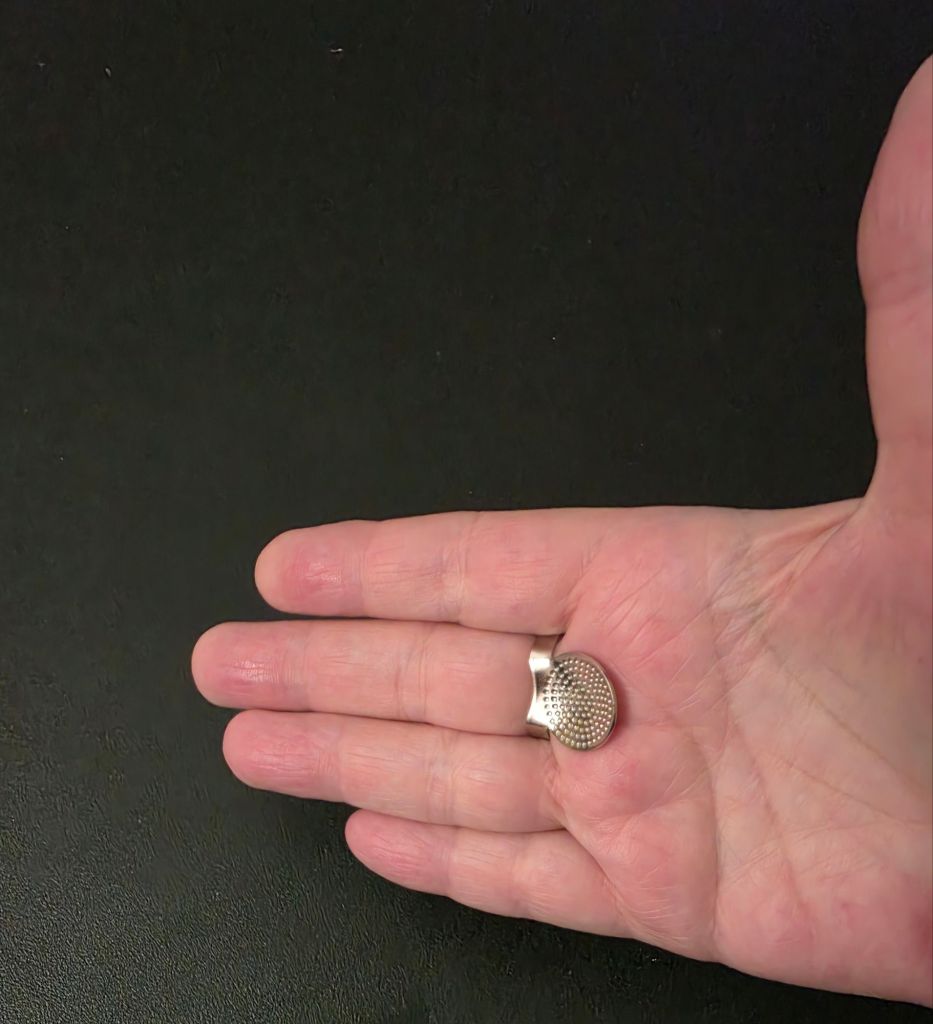
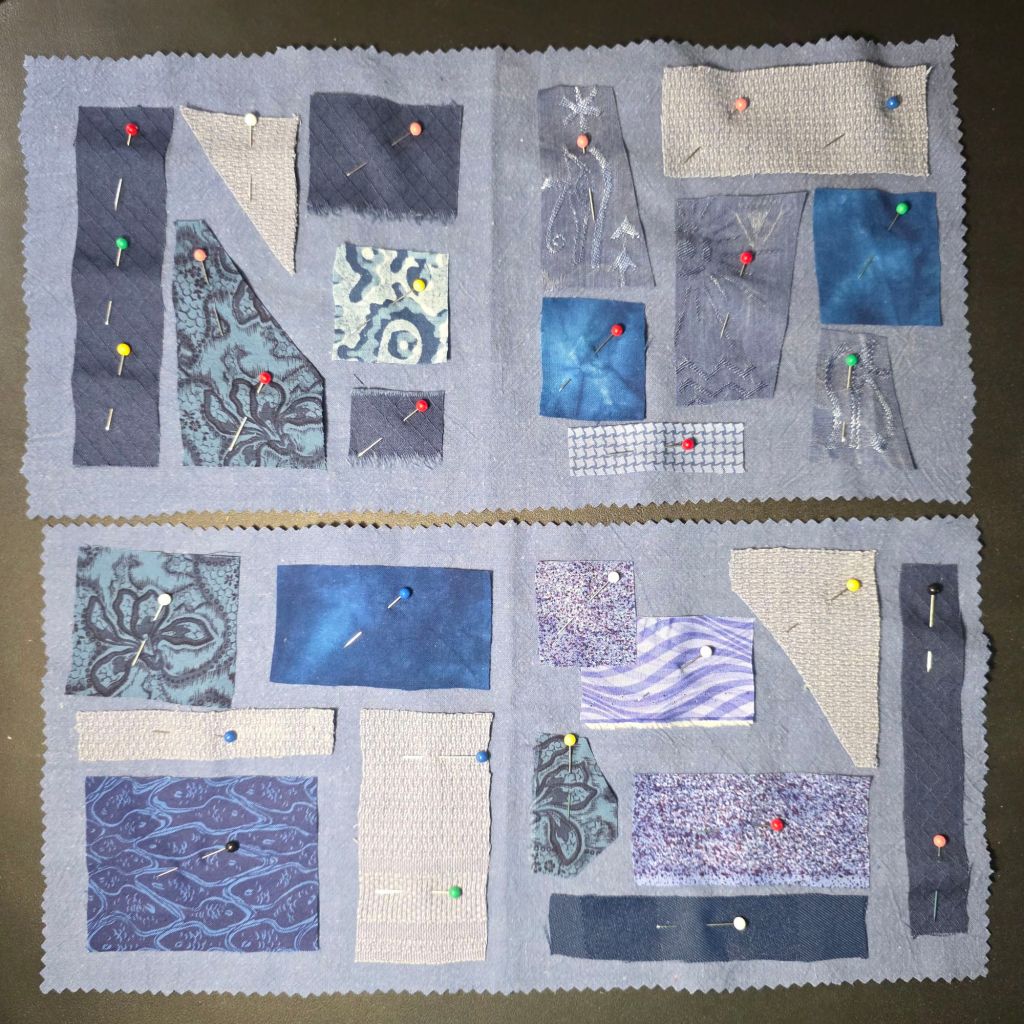
Kathy A and Karen S had prepared pieces of blue cloth and scraps of various fabrics for us to select. The right side of photo are the pieces I took. There were 12 of us. There could have 12 more and still had fabric left over! They also purchased a Clover adjustable ring thimble with plate for everyone. A new tool. It feels comfortable. Looking forward to trying it.
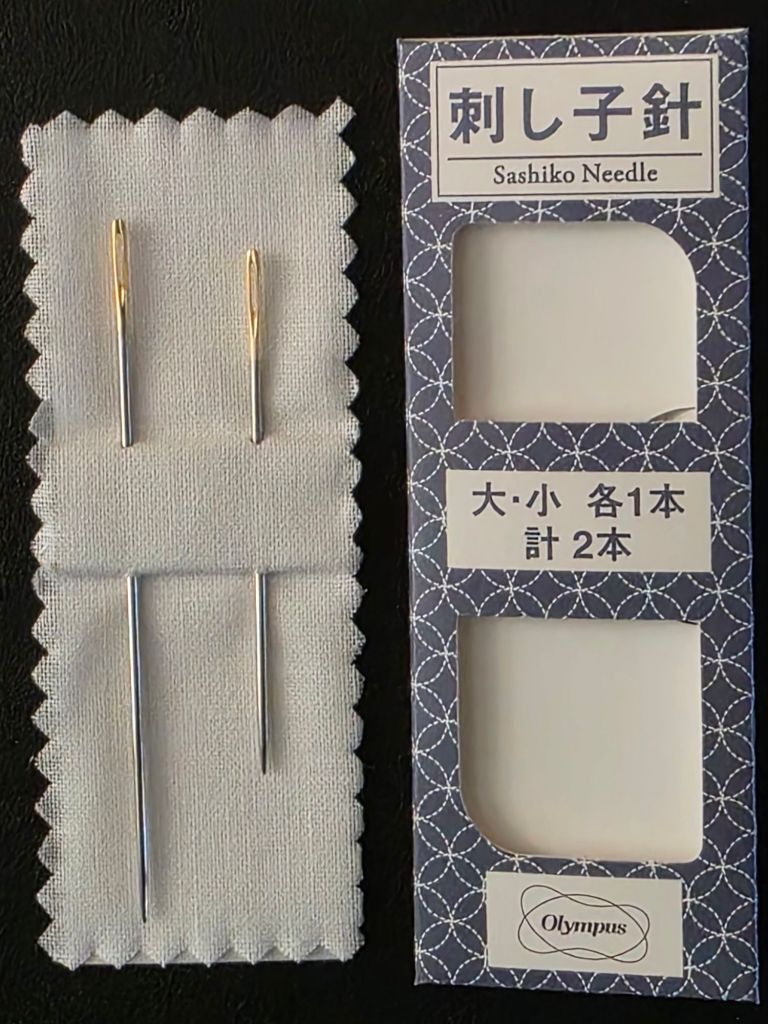
You stitch boro like you stitch Sashiko. So, I can use my Sashiko needles! I have a 2 pack. They have large eye for easy threading. The shorter (almost 1″) needles are for smaller, decorative designs while the longer needles (a little over 1.5″) are for straight stitches and basting. So, I will use the long one.
And, we got to share in the two opportunity baskets that Sue S, our Chapter’s MAR Rep won at the EGA-MAR Regional Seminar in Gettysburg! One of the baskets was from the EGA Molly Pitcher Stitchers Chapter in Carlisle, PA who are celebrating their 40th anniversary as a chapter. Congratulations and thank you for your generous contribution – it was a huge basket! Between the two baskets everyone got multiple gems. Not pictured are three red kitchen towels that I took.
I wanted and needed the project bag for the blue fabrics since I had intended to work with my fabrics and still will. Karen R from Molly Pitcher Stitchers stitched a lovely design and finished in coordinating colors. The Mollies have stitched two of my designs, Overdyed Spools and A Spring Sampler. I visited them after Overdyed Spools was posted as a Petite Project. So, I really appreciate having something of theirs. The counting pins are cute and came from them too! These will be perfect to carry in my travel tool bag.
Here’s the arrangement of my fabrics ready to stitch into place. I used all the straight pins I own!
We have until September to stitch the small pieces onto the larger ones when we finish them into a cloth booklet (back to back with pages).
Kathy A and Karen S are leading the next 3 events (July 16, August 12-looking at the EGA Study Box on Surface Embroidery, and September 17-finishing what we start in July) for my EGA Brandywine Guild.
I really do not have remnants of fabric from clothes or rags which would be traditional materials for boro, a Japanese mending method of patching. I do have some lovely swatches of fabrics and a piece of blue fabric for the base. I won’t need all these but I like options! I’m upgrading from cotton thread to Planet Earth 6-ply Silk for stitching the swatches to the fabric, thus creating a zokin. I believe that is an accurate description of what I am getting into!

I believe running stitches will be used to attach small pieces of fabric to the base cloth. The cloth will cover a small lined notebook (5.5″ wide x 8″ high) I had sitting around.
It’s going to be a fantastic opportunity to use my self-threading needles. They are sharp.

Looking forward to what is now later today!!!
There may be alot of controversy over AI (Google in Chrome browser) but it’s sure easy and quick to get answers!
While handling Soie d’Alger right after Splendor in a project, I realized that Soie d’Alger is softer. They are both 100% silk. So, why the difference? Here’s what AI Overview provided:
The perception of Soie d’Alger being softer than Splendor is mainly due to differences in their manufacturing processes and fiber characteristics.
Soie d’Alger
Spun Silk: Soie d’Alger is a stranded spun silk made from “strusas,” a high-quality spun silk.
7 Plies: It is composed of seven easily divisible plies.
Softer Twist: Soie d’Alger has a slightly softer twist compared to cotton, which gives it a better “spread” when stitched and makes it feel softer.
Natural Sheen: It possesses a natural, soft sheen, unlike the chemically produced sheen of mercerized cotton.
Versatile: It’s suitable for various embroidery stitches and is known for its beautiful satin stitch and long and short stitch.
Splendor
Spun Silk: Splendor is also a spun silk, with 12 plies, according to Rainbow Gallery.
Tighter Twist: The twist of each individual strand in Splendor is tighter than many other silks, making it easier to handle and potentially less prone to snagging.
Handles like Cotton Floss: Due to its tighter twist, it handles more like cotton floss, which some stitchers find easier to work with.
In essence, Soie d’Alger’s softer twist and inherent softness contribute to its luxurious feel, making it particularly appealing for needlework where a delicate and elegant finish is desired. Splendor, while still a high-quality silk, has a tighter twist that can make it feel slightly firmer to some users.
Very interesting and it called for a test.
Using 4 strands of each, I stitched diagonal stitches over 1, 2, 3, 4, 5, and 6 canvas threads. Coverage is excellent for both but it did seem like Soie d’alger (tan) was more difficult to lay the threads and have them stay there. They have some loft to them that Splendor (blue) does not. Splendor held snug to the canvas with each stitch.
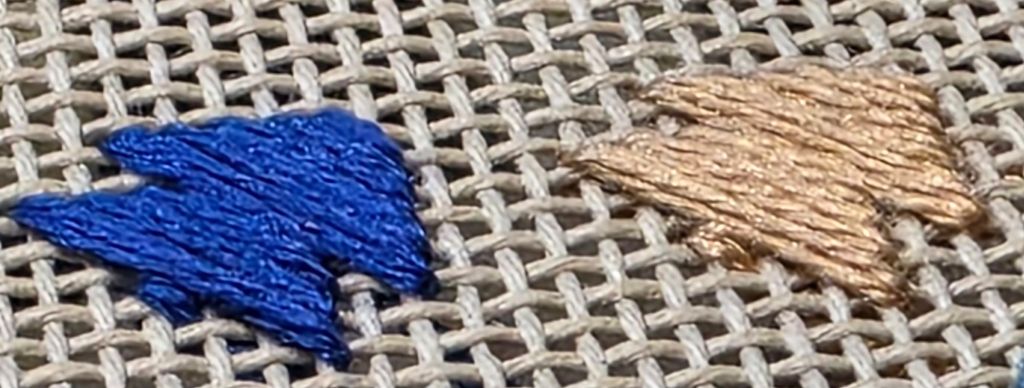
Using 3 strands of each, I found the Soie d’Alger easier to lay, stayed flatter than 4 strands, and coverage was still fantastic. It was a little harder to get the 3 strands of Splendor to cover but I did. The 3 strands of Soie d’Alger laid like 4 strands of Splendor.
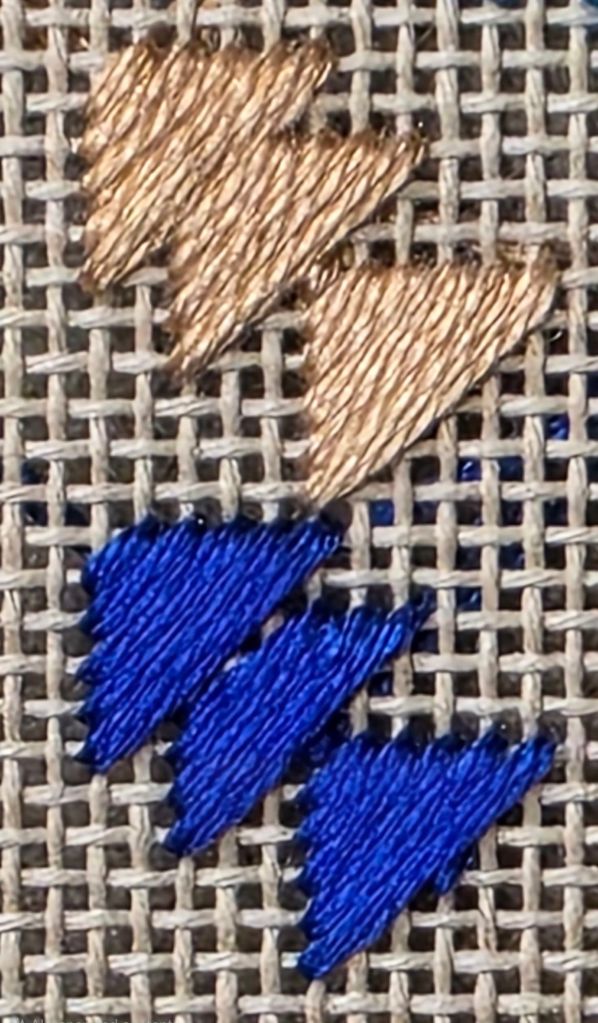
Very interesting indeed!
Filed under: ANG Needle Pointer's Article, ANG Needle Pointer's Timeless Treasures From the Archives
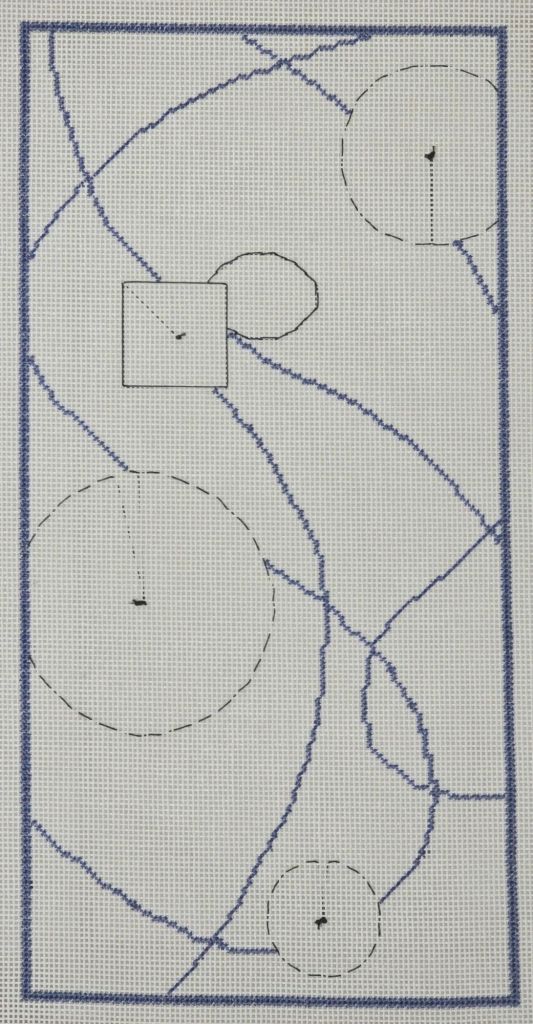
In the July/August issue of Needle Pointers in the Timeless Treasures from the Archives article, currently available online, I present hearts from the 1990s, three of the eight heart projects were finished into an octagon, diamond, and rectangle.
In one of the eight projects discussed in the article, you can learn about making thread cards and how to finish a piece into a frame weight, ornament, or needlebook.
I stitched one of the heart shaped designs, Diaper Crazy Heart by Kandace Merric, in one of my favorite monochromatic colorways. I’ll be sending this to support Hearts for Hospice.

Get access to all ANG has to offer for only $60/year (that’s just $10/ issue) plus other free designs exclusively available to members. If you are 35 or younger, ANG offers a 50% discount to new members when they join ANG for online access to all digital issues (no physical magazine is mailed). This is a great opportunity for younger stitchers to join the ANG community of needlepointers! I have alerted ANG that the discounted rate is not mentioned at https://www.needlepoint.org/page/MembershipOverview. Hopefully, once you get past that page, the option to join at that rate becomes apparent. Since I am already a member, I can’t view the registration steps.
Updated August 10, 2025: It was nice to hear from Joan K from Honolulu, HI who loved this heart and wanted to know what threads I used. Although I did not keep track, I was able to go to my stash and look at the photo since I already mailed it to ANG KC chapter. I finished this in May and am 99% sure I used:
Upper right: Vineyard Silk Classic C077 Aruba and C079 Reef Water
Middle right side, bottom left side, upper middle center: Impressions 8014 and 8092 and Treasure Braid TR277
Upper left side: Splendor S880 and S988
Thanks again Joan for reaching out. It’s great to know the articles in Needle Pointers are being read. Hope to see you in Denver next year.
In less than 2 weeks, I will be taking a finishing class with Sue Parsons of Westcoast Finishing at Fireside Stitchery. I just realized that I had finished all my round pieces. So, I went to my very limited (about 12) painted canvases stash. There was ONE round thanks to Linda who gave it to me for my birthday last year. It is a Lani canvas, 3″ diameter, and on 18 count canvas.
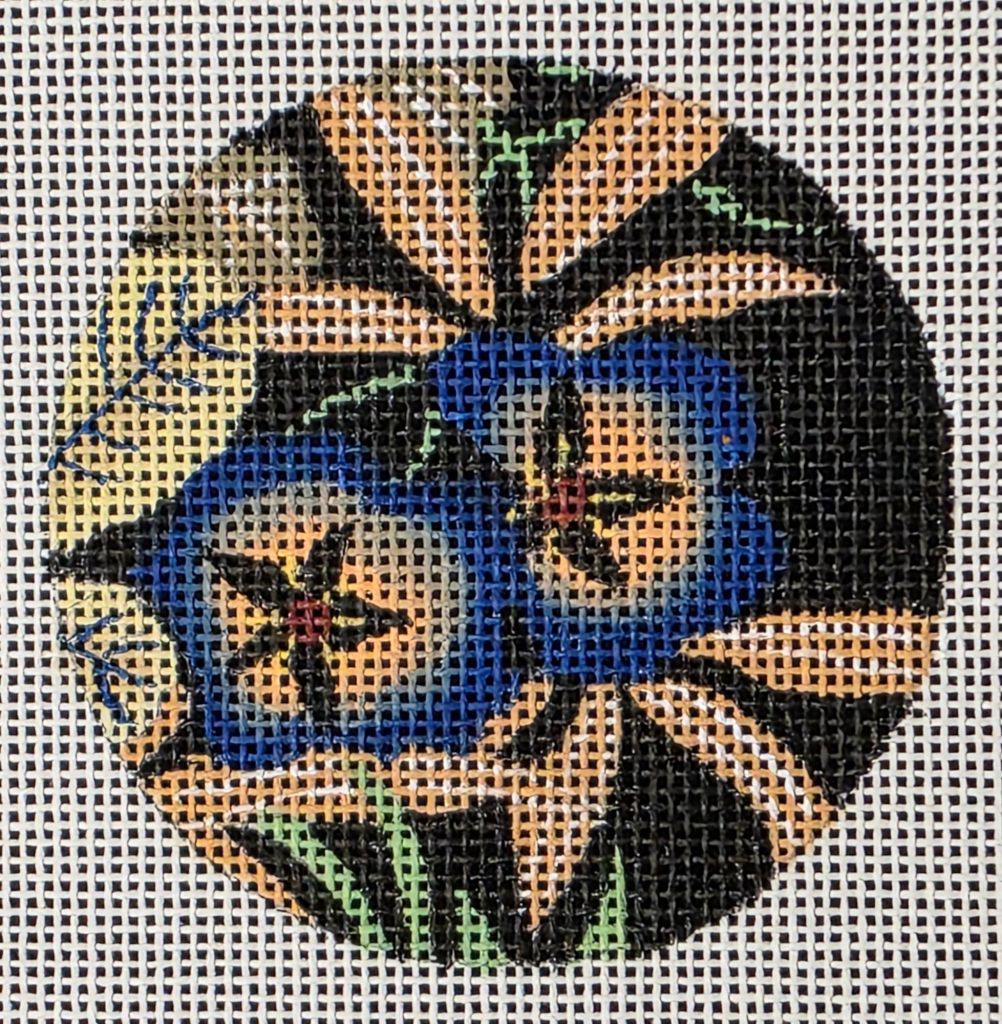
Ellen Johnson of Serendipity has a stitch guide formula that first has you identify all the parts of a painted canvas and that’s where I got stuck!! Besides recognizing these as flowers, I had no idea what type of flowers they represent. Also, the flesh colored things and the brown blobs with white veins confused me.
So, I reached out to the Serendipity community and enjoyed seeing the responses come in. I was reminded that if I don’t like the brown blobs, I could change them. Morning Glories with buds took the lead and one woman suggested I ask Lani and supplied her contact information. Within an hour of emailing Lani, stylized Morning Glories was confirmed.
Next, I selected possible threads from my stash.

In case you’re wondering, I laced 2 sides because I didn’t have any 7″ bars.
Now, to select stitches!
Filed under: Brandywine Chapter, Casalguidi Flower by Becky Quine, Embroidery Guild of America, Finishing, General comments
A lovely white lacquered tissue box from The Container Store is perfect for Casalguidi Flower by Becky Quine.
I posted about this design previously at https://melitastitches4fun.com/2024/07/25/roman-ruins-by-joan-rinehart-and-casalguidi-flower-by-becky-quine-for-ega-brandywine-chapter/
Since I have enough coasters, I thought about a tissue box for small designs/stitch samples. I initially bought a clear acrylic one but the tissue box didn’t fit. Crazy! Then, I decided clear wasn’t a good idea anyway. This one is white and 5″ wide x 6″ high, it fits a box of tissues, perfect size for small stitched pieces/samples, and is functional.
I finished it as a flat ornament wrapping the excess fabric on the back over a piece of magazine board and piece of wool felt. It is attached to the box with sticky back velcro.
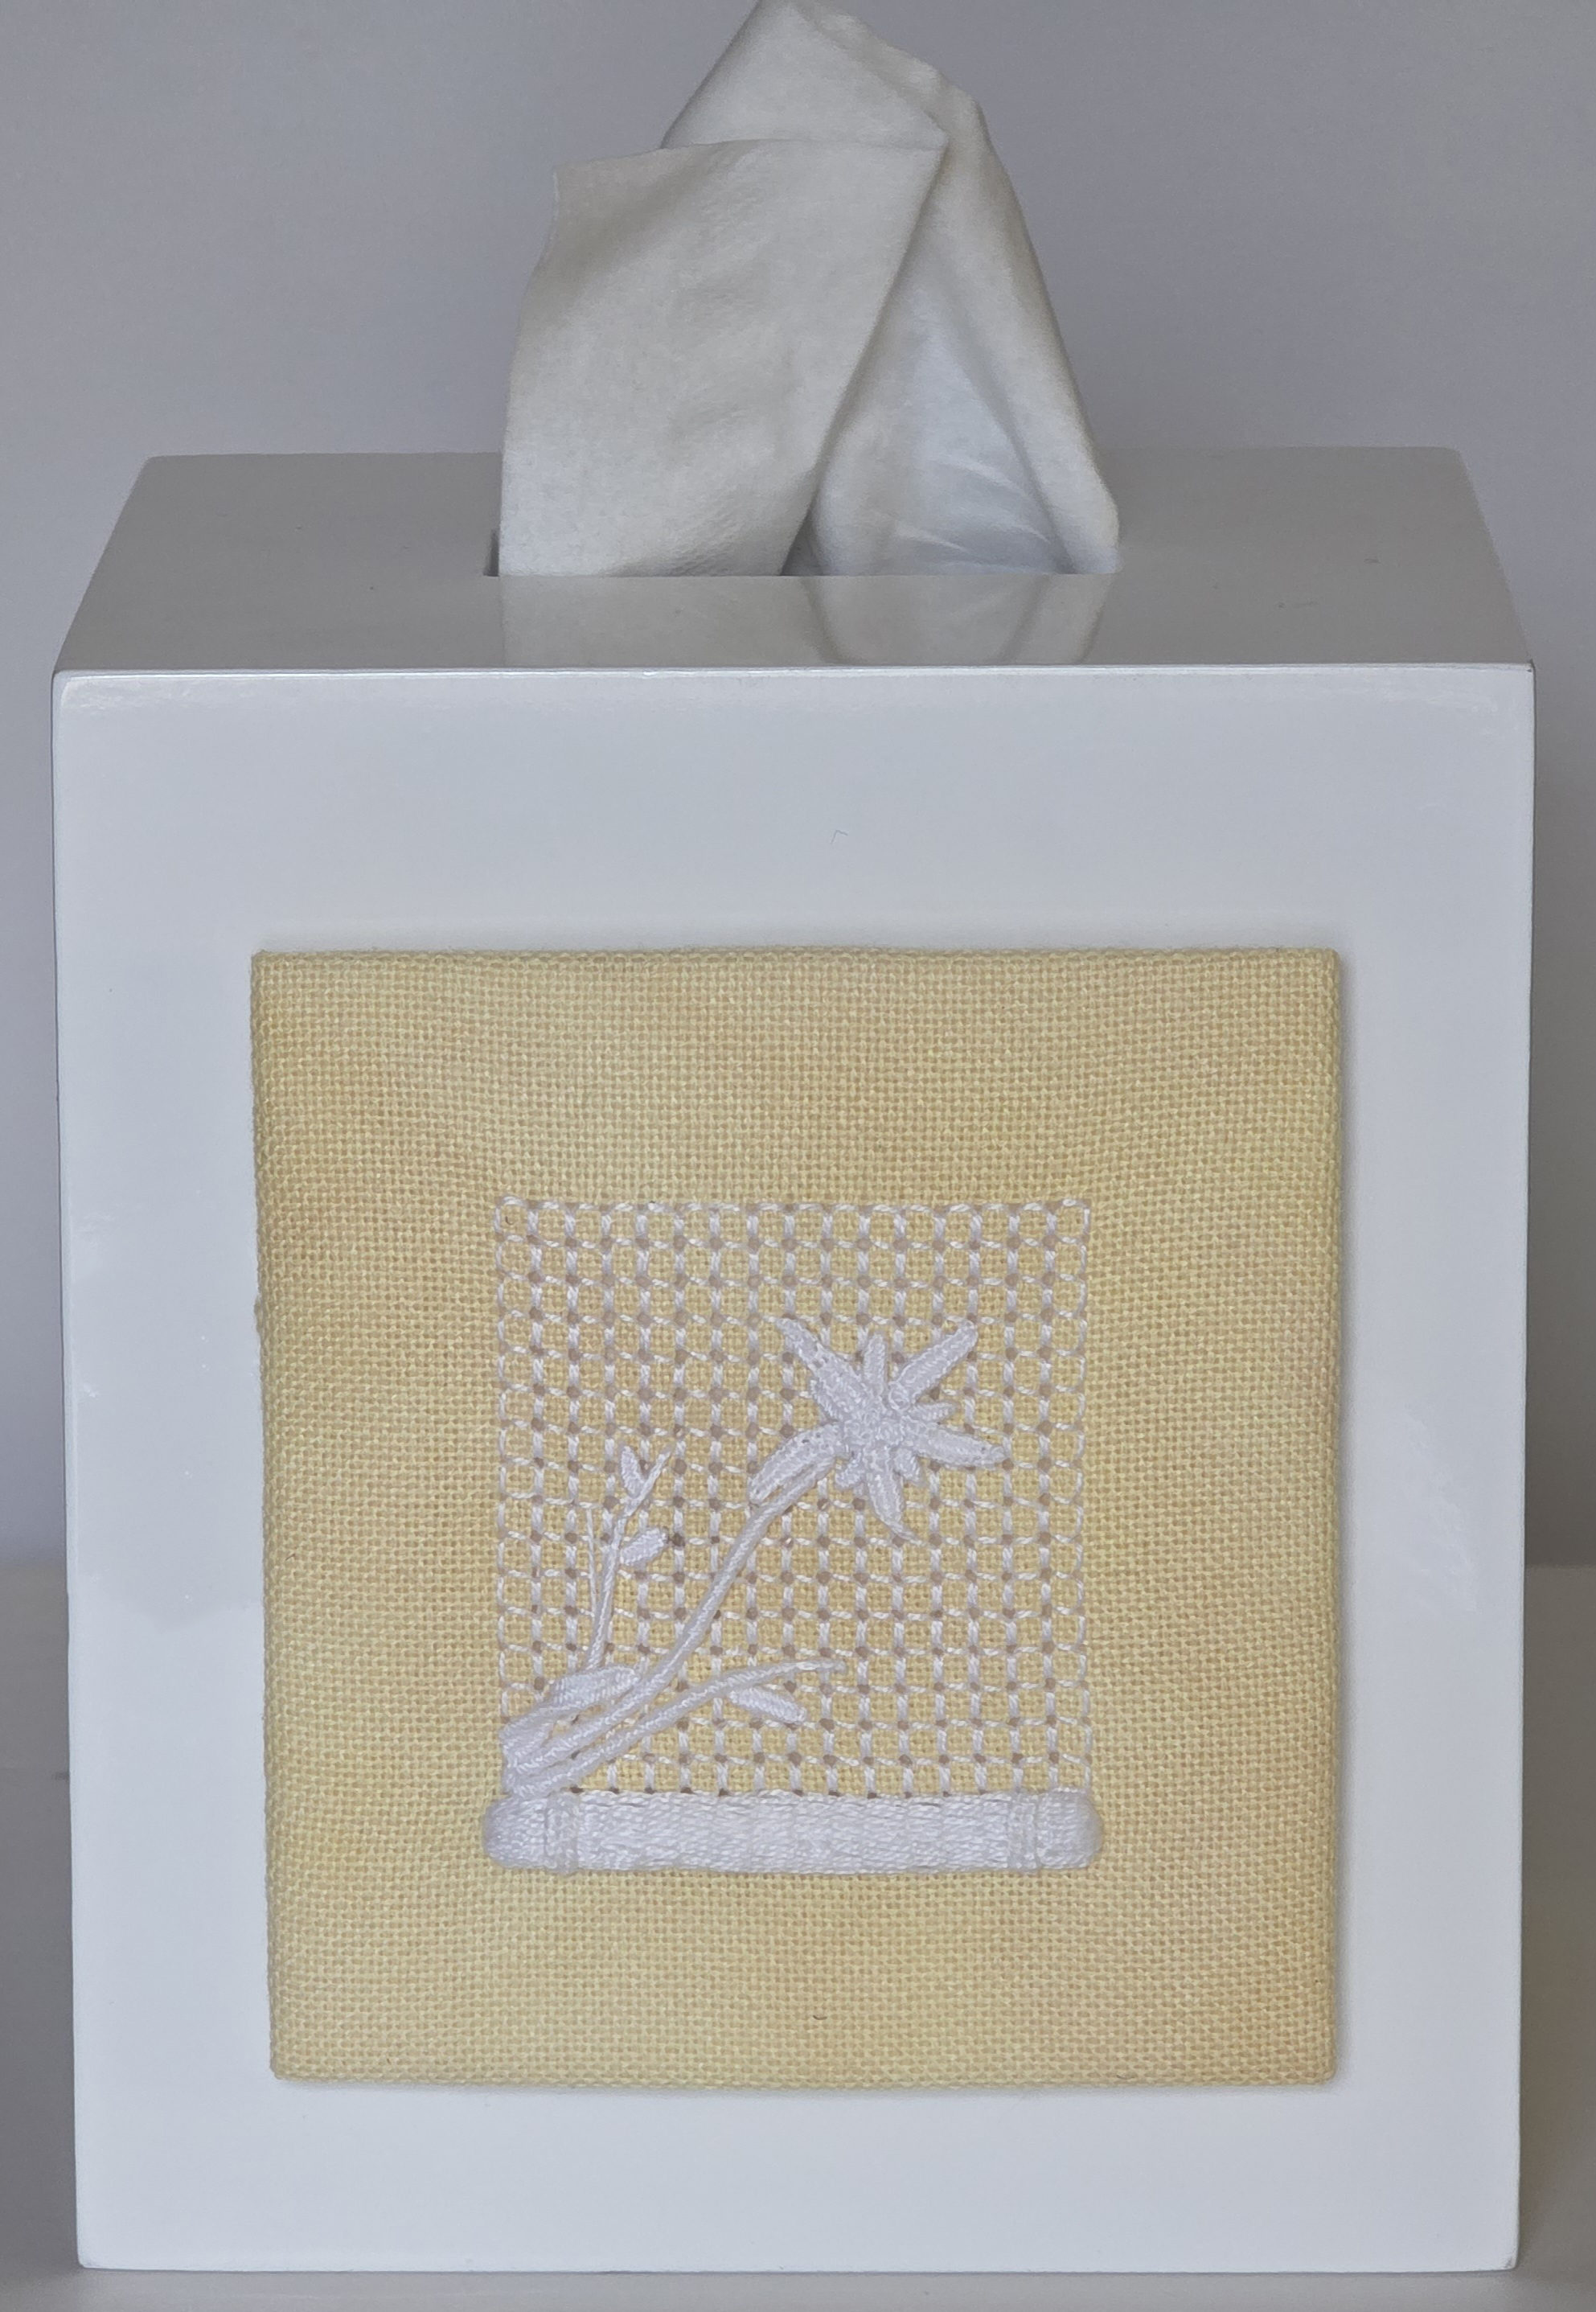
It’s near other yellow decorations in our bedroom. Love it!!
There are 3 more sides that can be decorated. And, I bought 3 more tissue boxes. Eventually, one will be in our bathroom (blues), extra bedroom (purples), and the other in the living room (whatever goes with brown/beige).
