Filed under: ANG Chapter Book Projects, Chapter Book Project, Jeannie's Windmills
In 2014, I led the Chapter Book Project from 2013-2014, Jeannie’s Windmills by Pat Mazu for ANG Main Line Stitchers chapter and I never posted the finished bag.
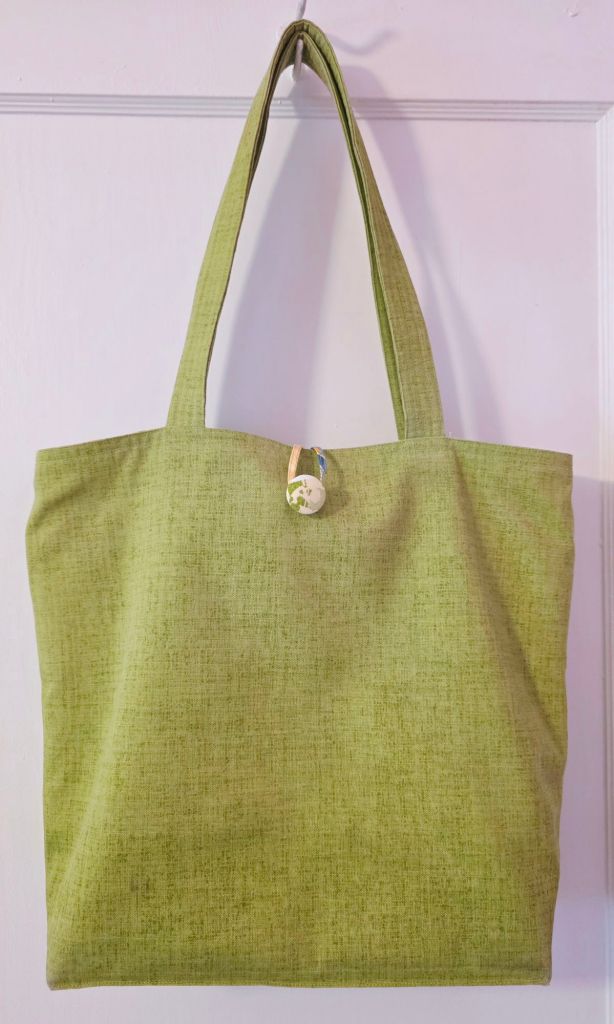
Trish Vine finished this for me since she was still in our area back then and we were both in the ANG Keystone Garden chapter. She did and does fantastic work. It’s my fault it looks a little bumpy because I stitched it on interlocking canvas and used a fabric backing to hide the traveling stitches. I have several of Trish’s project bags including the one she made for MLS’s 40th anniversary gift. She’s on Facebook under Trish Vine Designs.
ANG has been and is releasing new pieces in the Chapter Project Book (6 in 2022, 2025, and 2026). But this and other wonderful past year’s projects going back to 2007 are still available and are free to chapters. Since it is for chapter use, the access to full instructions is limited to chapter leaders.

Filed under: Florentine Fancywork by Toni McKelley, Other People's Designs
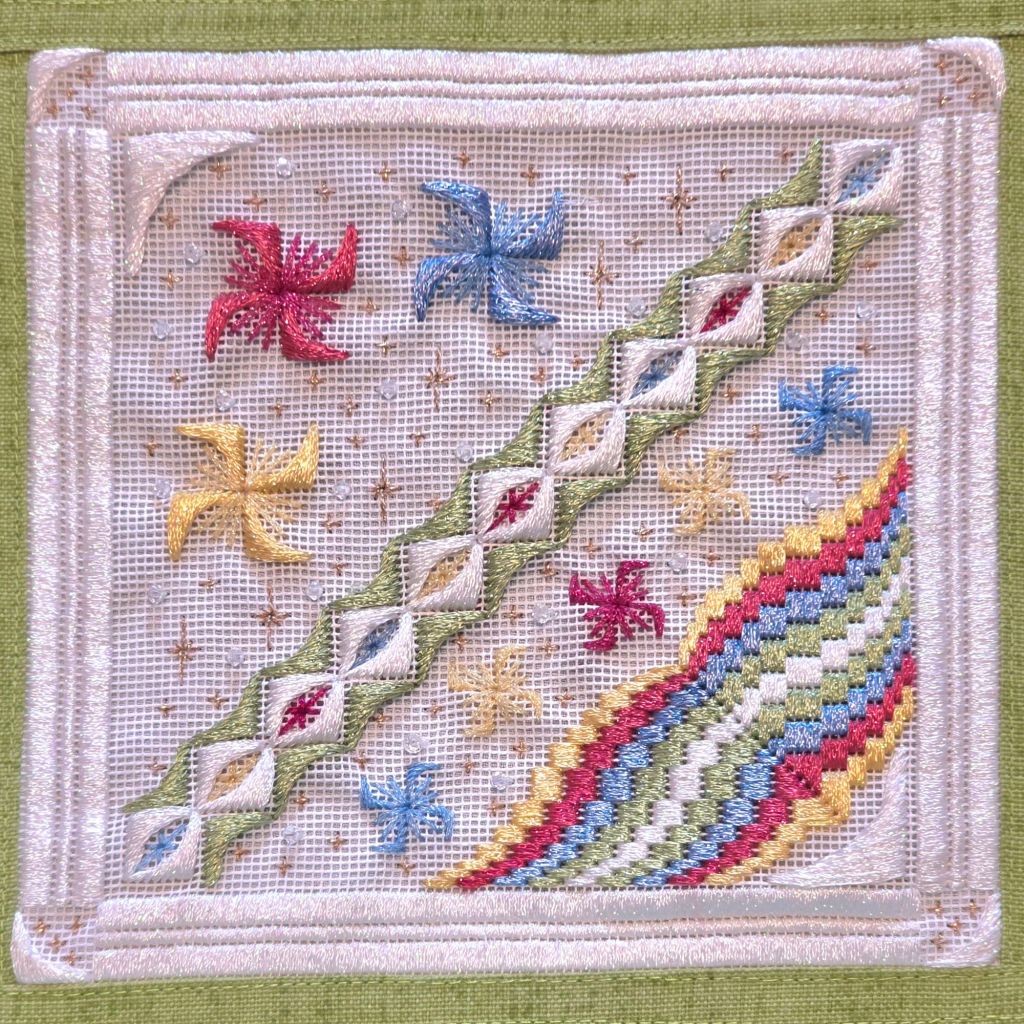
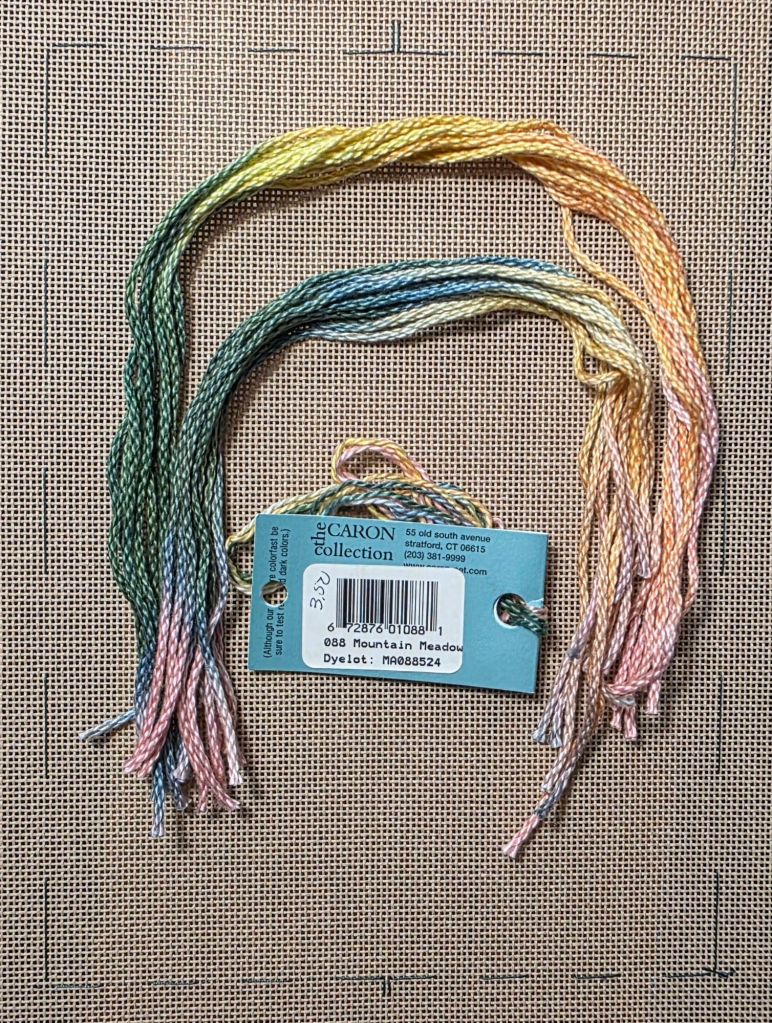
There are opportunities in this piece to use color-matched portions of Watercolours 088 Mountain Meadow in the border. I enjoy doing that.
The flowers are the yellow/peach portions while the bottoms are the green portions. I worked from the sides to the center.
And, I have another full skein of Watercolours (different lot but very similar) for the rest of the design to use as it comes off the skein.
I started in the middle of the top border with the Periwinkle in case I had basted incorrectly. But, it was fine. I did make a counting error by not looking closely enough at the Master Diagram which I did correct (after some hesitation).
Normally, I would complete the whole border and Toni recommends the top and left side be done first. However, after looking at the Master Diagram and the stitched piece on the cover, I found definite differences. It took some studying to figure out what was happening because the overall size is the same or similar. Finnally, I saw the biggest difference is the 8 flower motifs spaced 3, 1, 4 on her original stitched piece versus the 9 evenly spaced flower motifs on the Master Chart. She probably thought it would be easier for stitchers to do the 9 but I really prefer the 8. So, I will stitch the side borders later just to be sure no more variations occur.
Also, the flower motifs were not diagrammed with the green stem extending into the flower. So, I am adding an oblong cross stitch over part of the flower in the center. Here’s half done, half not done yet. Which do you prefer?

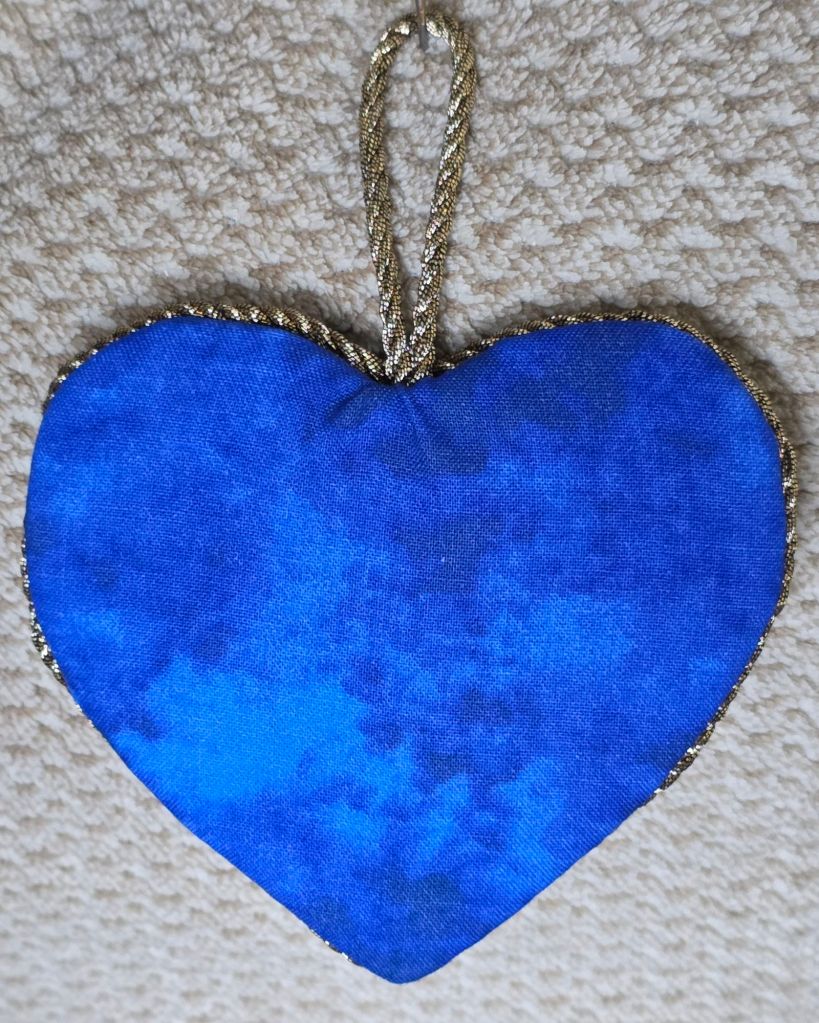
Sue S and Kathy A got us primed for next month’s penny rug project by having us work on these hearts. The materials supplied were precut felt heart shapes, floss, batting, and a button. The buttonhole stitch allowed most of us to finish prior to lunch. I attached the loop to the batting before closing the two sides.

Unfortunately, I will miss next month’s project.
Filed under: Other People's Designs
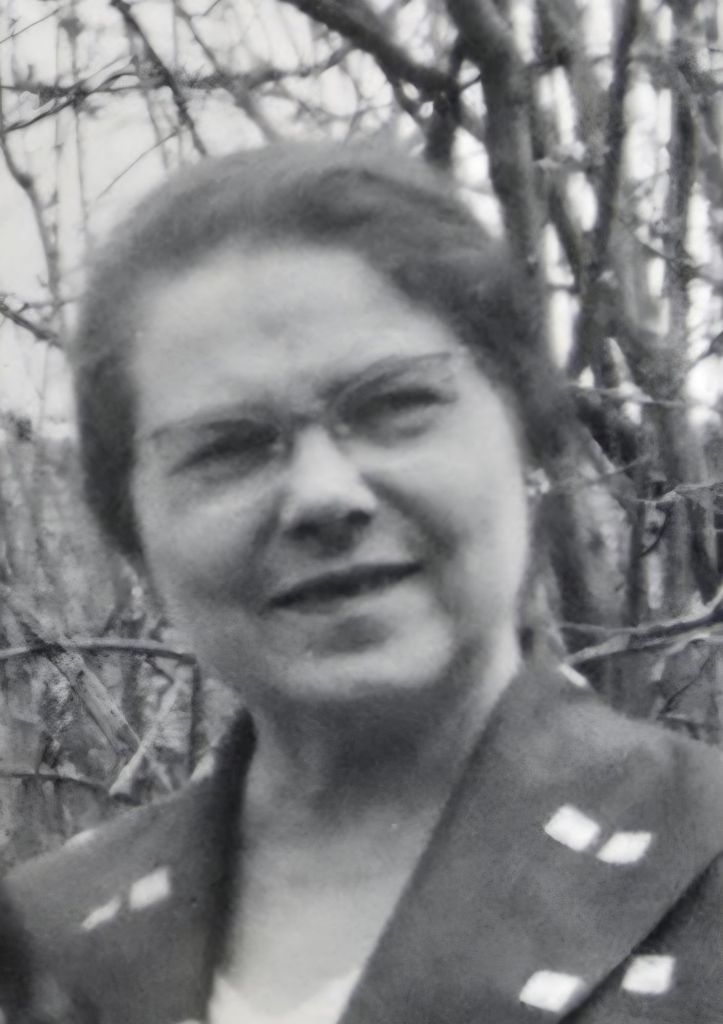
My mother’s mother, Mae – Grandma to me was very crafty – into everything (rug hooking, crochet, knitting, ceramics, leather tooling)! Here she is at 62 and it would be about 10 years later when she’d be teaching me needlework.
I’ve posted some of her pieces but realized that I have missed a few.
These appear to be crewel embroidery. And, she probably did the finishing too. The oval ones are dated 1981 (2 years prior to her death at 85 years of age). The square ones are not dated but I think they would be from the 70s.

Great memories of our time together!
I had to cut out portions of Rhapsody to get enough of the purple color to span the top wide area. I used the lighter white portions on both smaller side areas below.
Again, I swapped out French Knots for cross stitches. The 1×2 alternating cross stitches fit nicely in the area with the top cross pointing towards the center as has been done throughout this design.
This is my progress after stitching during my EGA Brandywine’s Quarterly meeting, ANG Main Line Stitchers chapter Stitch-in, and football.
I’ll save the background for another Stitch-in.
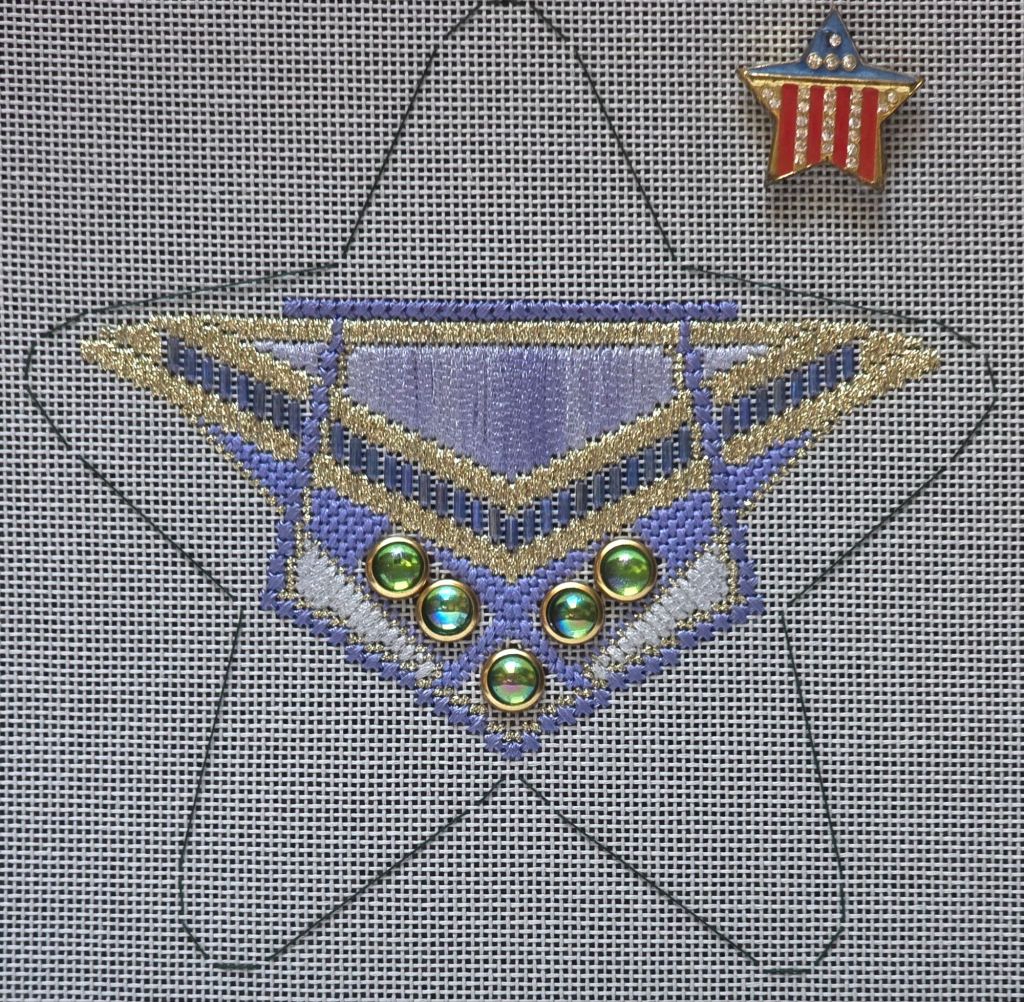
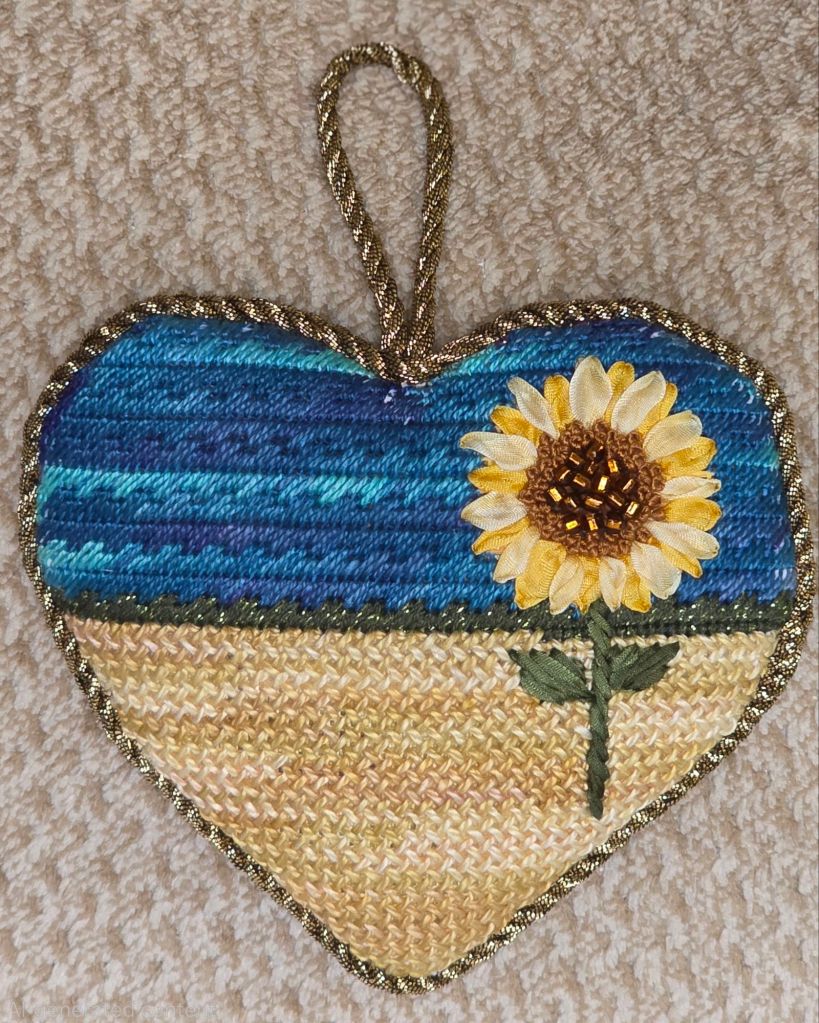
Filed under: ANG Needle Pointer's Article, Sunflower Heart by Judyann Designs
Here’s the finished Sunflower Heart by Judyann Needle Art Canvas Design (Ginny Stapleton’s stitch guide is in the July/August 2025 issue of Needle Pointers). I used her stitches and my threads.
I used the thicker stabilizer with 1/2″ padding and magazine board covered with a fabric from Walmart but there is no brand name. So, I used Google Lens to search the bar code. Instantly, it’s identified as Fabric Editions Create It Texture Twilight Fabric Creative Cuts Fat Quarter Cotton (18″ x 21″) in blue, with a texture twilight pattern. Amazing what the internet can identify.
The cording is a bronze Metallic Soft Twist Trim Cord 1/8″ by Access Commodites. For attaching it, I found Bijoux, MMT425, Pyrite in my stash. I put a note in the cording package to use that Bijoux again. I used one strand and pulled pretty good without the thread breaking. The bronze color goes well with the beads and contrasts enough from the yellow. The thickness of the cording helped me round out the edge. I was surprised that I got the two ends to mesh as well as I did. Perhaps the thicker stabilizer helped.
I am very happy with the finishing!
Something bright as we experience near record cold temps at night – single digits! Mid 20s for highs. So, the last batch of snow hasn’t melted yet which is atypical for us in Philadelphia. I’m enjoying my time indoors!
It’s snowing here today and across a large part of the US according to the news. Luckily, we can stay indoors – no appointments ot plans this week except for a friend’s birthday dinner on Thursday. Fingers crossed we’ll make it there. In the meantime, football, TV, reading, and needlepoint will keep me happily occupied. In honor of our snow . . .
Here I used a wintery fabric with white, silver, and gold snowflakes for this Christmas Ball. I centered a large white snowflake on the back.
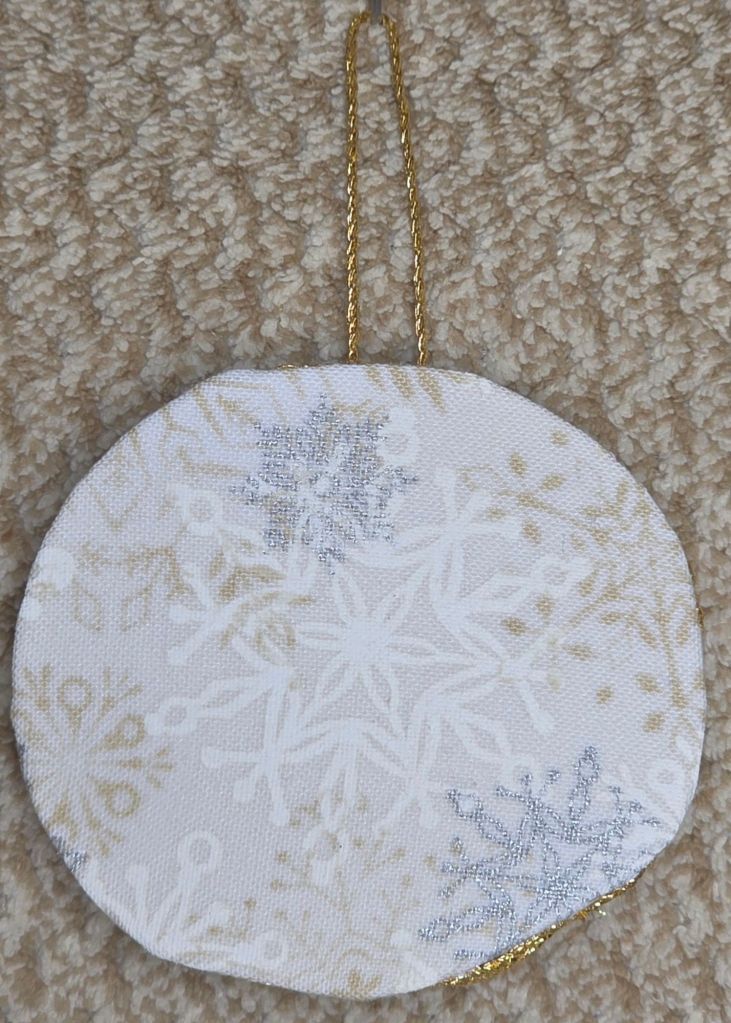
Working on a smaller piece isn’t easier! The ornament wasn’t exactly round to start with. I’d basketweaved aound the outer edge and had already stitched the outer gold ring thinking the cording would cover any irregularities but the cording is thin. One pucker is showing. I do like the loop which was stitched through the basketweave. I like the basketweave showing around the edge. But, the edges are a tad wavy. Overall, this one is ok but not as good as others. From the front, to most people, it’ll look just fine!
Stay safe all and hope you enjoy some time for stitching.
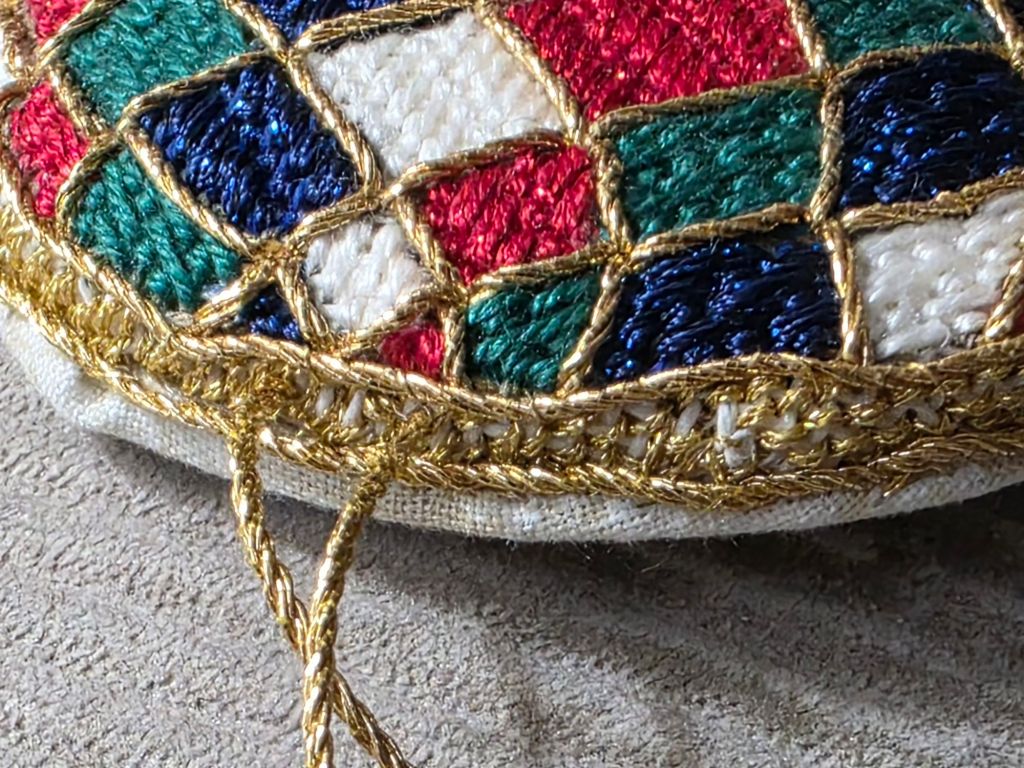
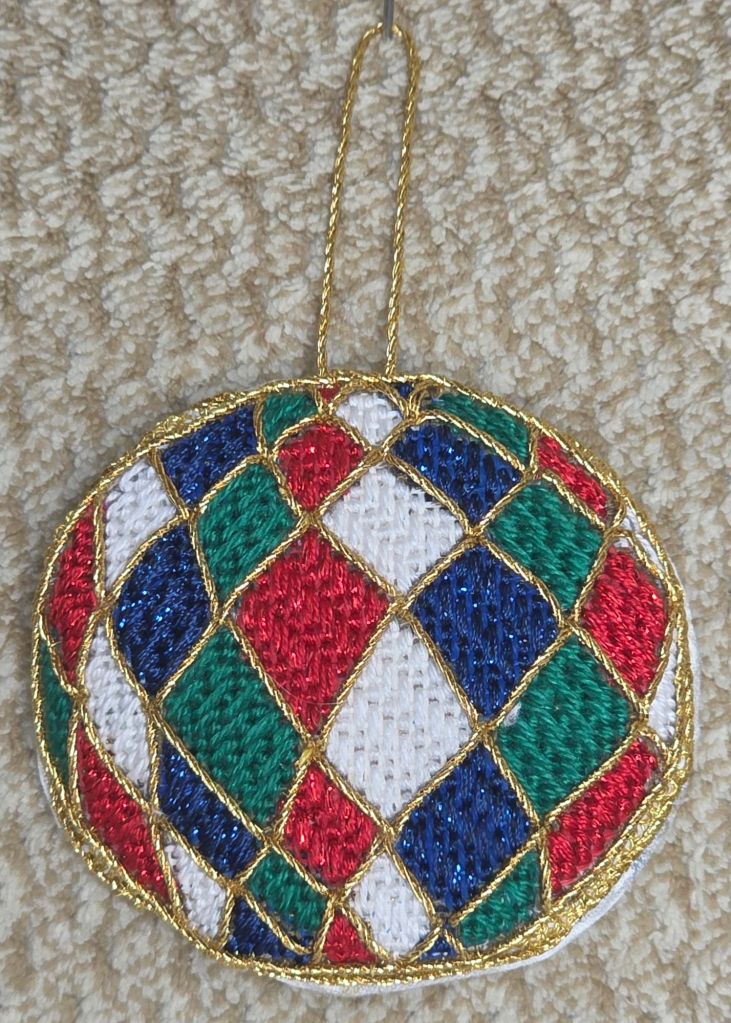
A snowy long weekend allowed me time to do some finishing work.
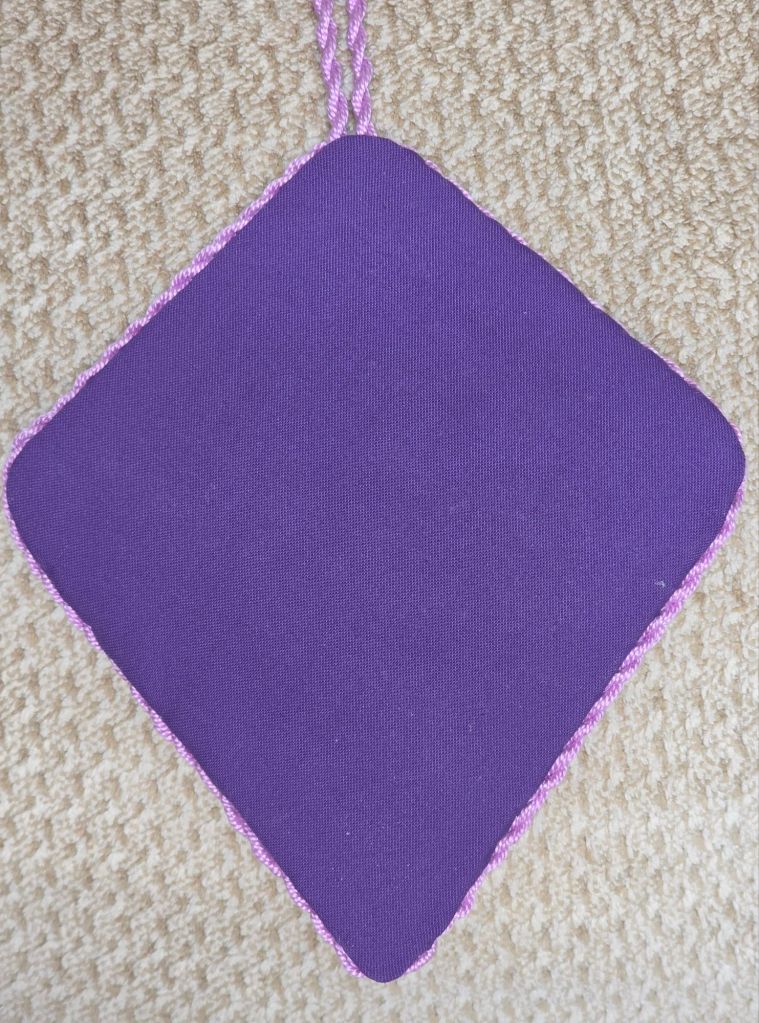
I’d had no luck finding fabric at any Michael’s recently. Initially, when JoAnn’s closed, it looked like Michael’s were stepping it up on the fabrics. But, they didn’t restock. So, when I found fat quarters (18″ x 21″) at Walmart awhile ago, I grabbed a few solid colors including the purple (solid pansy) on the back of this one. It’s a pink canvas but the one long light thread that was couched in the piece is a light purple.
My preferred finishing process is a stabilizer (tacked into place on the canvas with invisible thread) and one layer of felt glued onto magazine board. Then, I attach a loop to the stabilizer side. And, both sides are.attached to each other with cording sewed in place.
It’s taking awhile to get through the 4 pieces I’d piled up because we’ve watched a great show on BritBox called Riot Women and lots of football games. Since there are 4 pieces, I progressed in stages across each one until I got to attaching the cording. My fingers need to rest between each one.
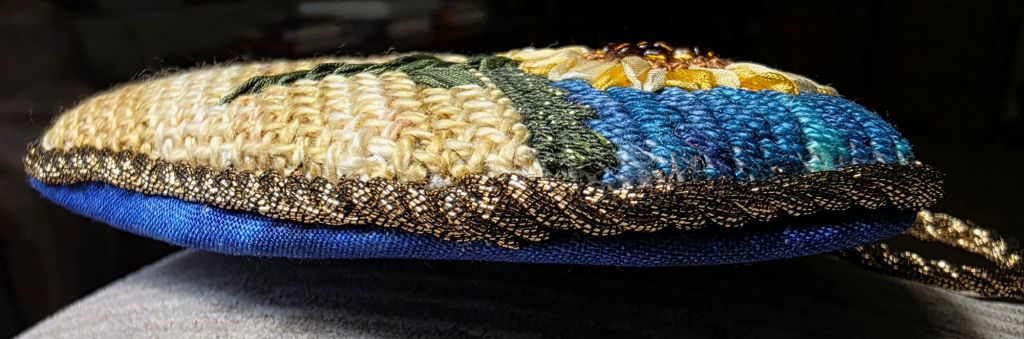
I finished Peace, 3rd in The Cabochon Series by Susan Portra first.
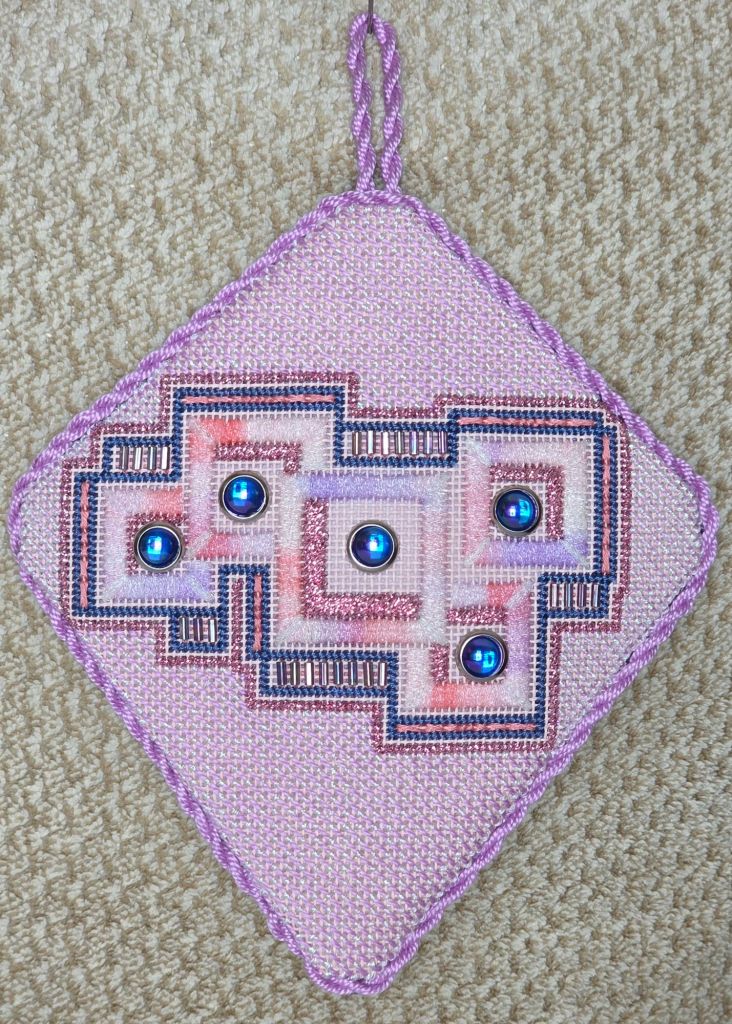
Here’s my four finished cabochons on the banister.
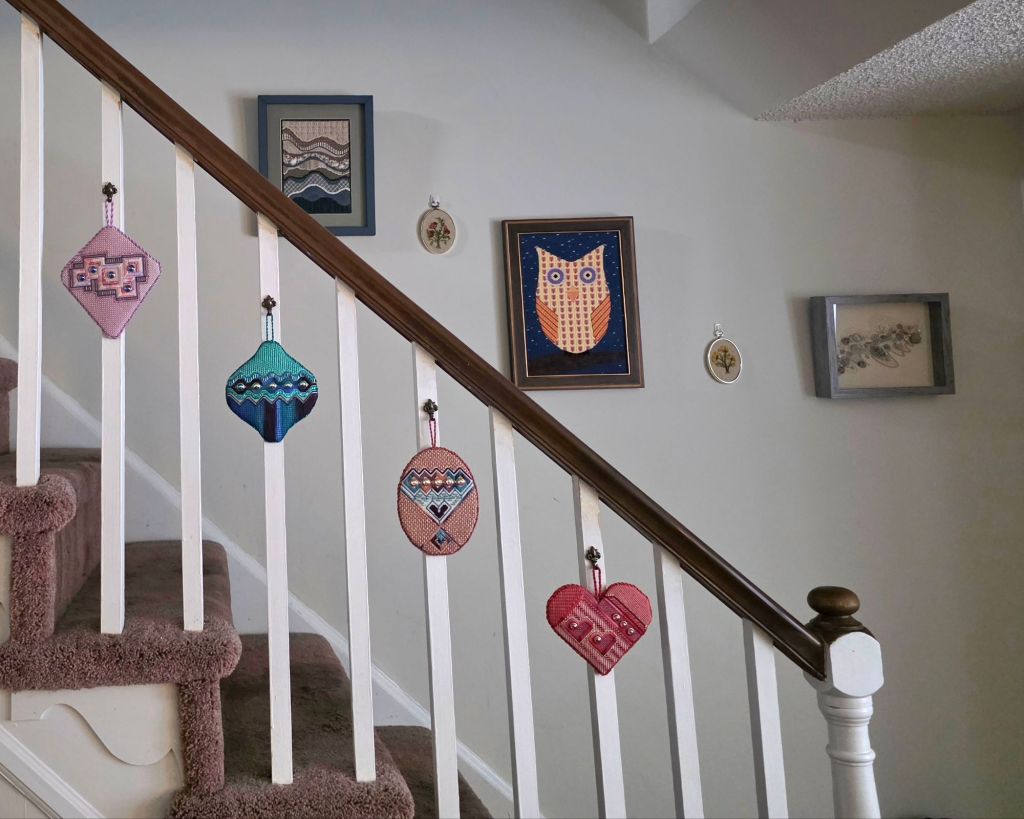
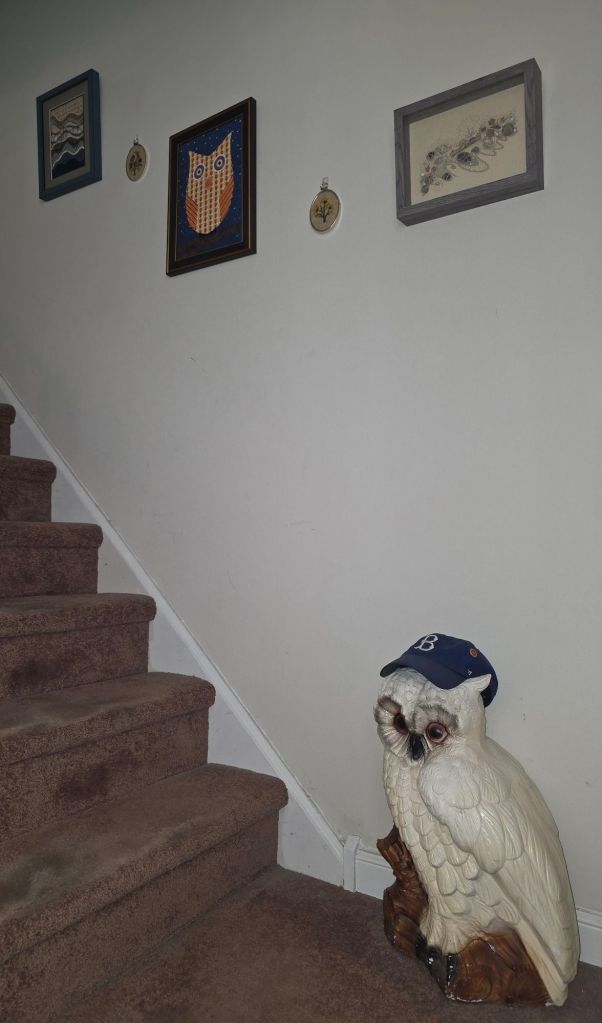
In the background, currently, two Dawn Donnelly pieces flank my owl which Bill loves! And, the owl has a buddy (gifted to Bill many years ago from the ladies in his Binks office)! I rotate among different pieces on the staircase.
The two small ornaments are my grandmother’s which I realize I have not blogged about – yet.
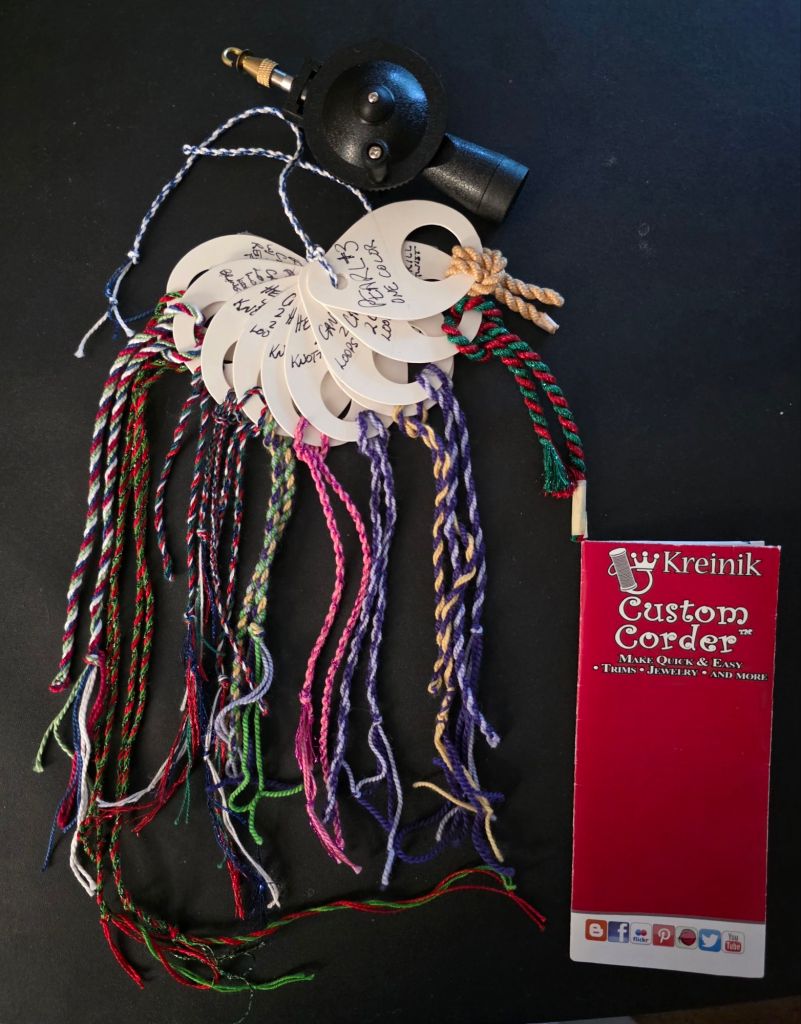
Just about everyone that I know has been shown how to make cording! This past week was my Needlework and Fiber Guild of Media.
This past Tuesday, I demonstrated the 2 color candy cane, Herringbone, and 4 color candy cane methods described in the instructions. Sally brought enough thread to cord a tree (like a ‘yarn bomb’ – google it if you’re not familiar with the term). I’d love to see a yarn bomb in person. Anyway, . . .
In preparation for the evening, I had to practice the 4 color method. Between Bill, a table, and tape I got it done. It’s too complicated to do routinely and 2 colors are fine. But, we had a nice turn out at the meeting and 4 other people had cord makers. So we broke into groups and practiced.
Prices of the Kreinik Custom Corder vary at different sites online so shop around. Or, you can put a pencil at one end and hand twist the pencil. You can also use a hand drill.
I’ve gathered quite a selection of samples of cording.
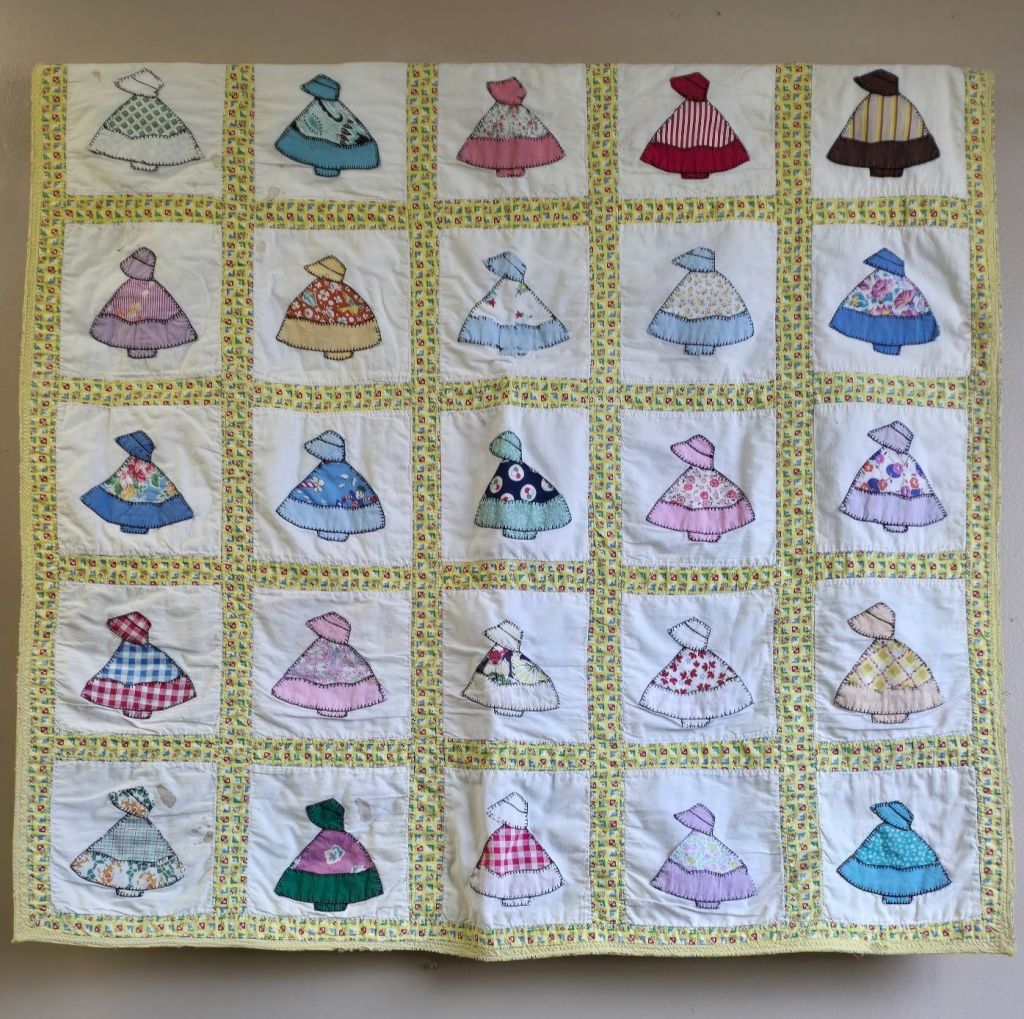
According to my sister (6 years older), my grandmother made this quilt when I was born. Does that me vintage too? No, that makes my sister ‘vintage’ but not me! She can date it because she remembers our Dad delivering library books (2nd job) in our station wagon and I would be wrapped in blankets and topped by this quilt riding in one of the library boxes in the back! That continued with my brother when he was born six years later. We loved delivering books with Dad! Car seats weren’t invented then (I’m still not considered ‘vintage’).
Apparently, it remained in Dad’s vehicles for years and used while watching the ring of fire and fireworks and/or picnicking at Conesus Lake. I can’t remember the quilt but do remember the book deliveries and stopping for a half moon cookie (half black and white chocolate icing). I remember fireworks and the ring of fire but not picnicking. Oddly enough, I remember our picnic basket but not actually ever picnicking.
The quilt was hand pieced then zig zag stitched for speed. It’s hard to believe it’s been through so much and still looks great hanging on my sister’s wall!