Filed under: Canvas Master Craftsman Program, Embroidery Guild of America, General comments, Step 5, Woodlawn Needlework Exhibition
With my last post, WordPress informed me that I have posted 1,000 times! Wow, that’s a lot but I’ve been doing this since 2010. So, I was trying to decide what my 1,001 post would be. I’ve been stitching on projects that I don’t want share until they are done (Step 6 of the EGA Master Craftsman Canvas program and pieces for future Needle Pointers magazine articles).
However, I am preparing to head to south to see the 60th Annual Woodlawn Needlework Show. I found the list of all the entrants where they include the award winners (https://www.woodlawnpopeleighey.org/2023specialawardwinners) and where you can see photos of the special award winners including a couch (!) by Nancy Buckley, Birch Forest-French Alps by Norma Campbell’s (I love her pieces), Oklahoma Gothic by Darci Lenker (my husband looked at these online and thought this one was a photo!), and Cray Cray Bird by Barbara Levy (a member of ANG NJ Needle Artists/NJNA) to name a couple. The Woodlawn Needlepoint Show runs the whole month of March in Alexandria, VA (closed Tuesdays). There are a little over 400 judged entries this year (up 100 pieces compared to last year), special exhibits (https://www.woodlawnpopeleighey.org/2023-needlework-show-exhibitions) including 3 EGA/ANG chapters celebrating milestone anniversaries, and a variety of programs (https://www.woodlawnpopeleighey.org/2023-annual-needlework-show-programs) including a couple virtual.
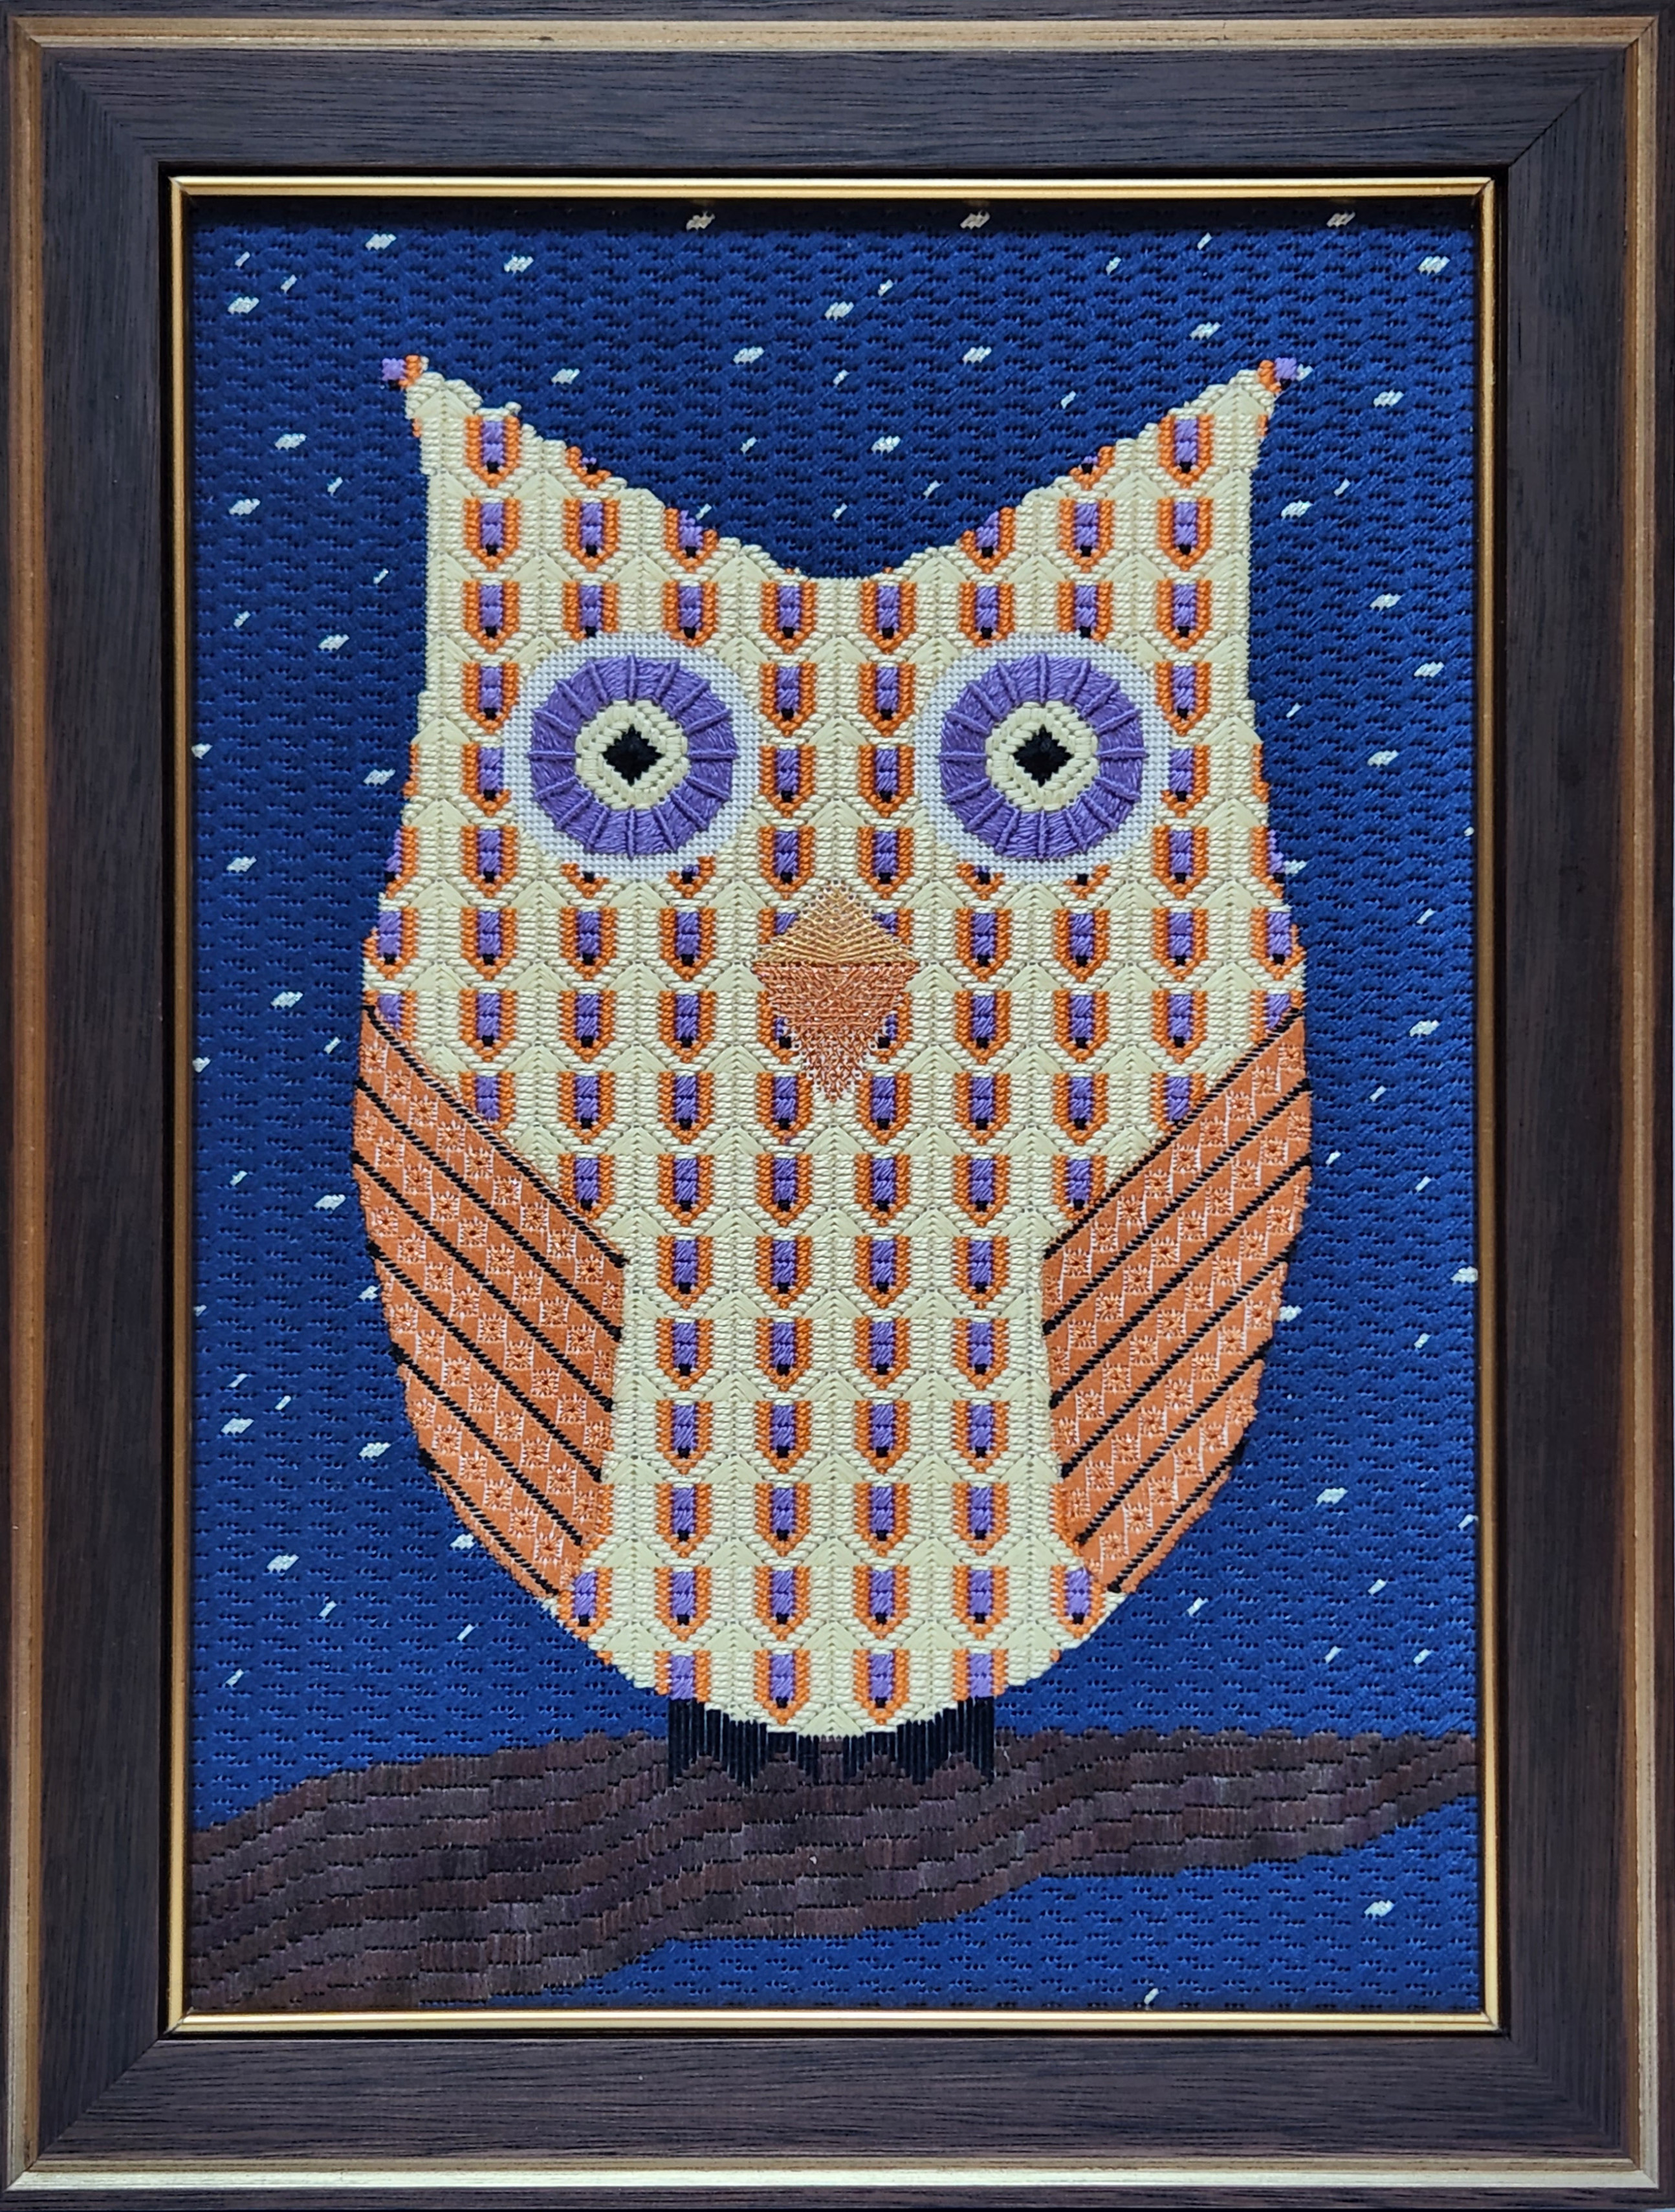
Well, my Night Owls flew south hitching a ride with other members of NJNA and was awarded Second Place in the Original Design category. I did share this piece back in August. It is my original design from Step 5 of the EGA Master Craftsman Canvas program (https://melitastitches4fun.com/2022/08/31/canvas-master-craftsman-program-step-5/). The wings are appliqued in place.
I will report more after I see the show but wanted to remind everyone that the 60th Woodlawn Needlework Show has started and is well worth the trip. Even exploring the website offers some opportunities and eye catching pieces.
A few members of my ANG Main Line Stitchers chapter had a class to make a basket last Saturday. Only one of us had made baskets with Karen before, so we made this beginner style basket called Cathead’s Basket and was woven with reed. I didn’t add a handle because I am just going to place a lid on top with the Circles design (2008 ANG Stitch of the Month) we’re stitching as a chapter project.

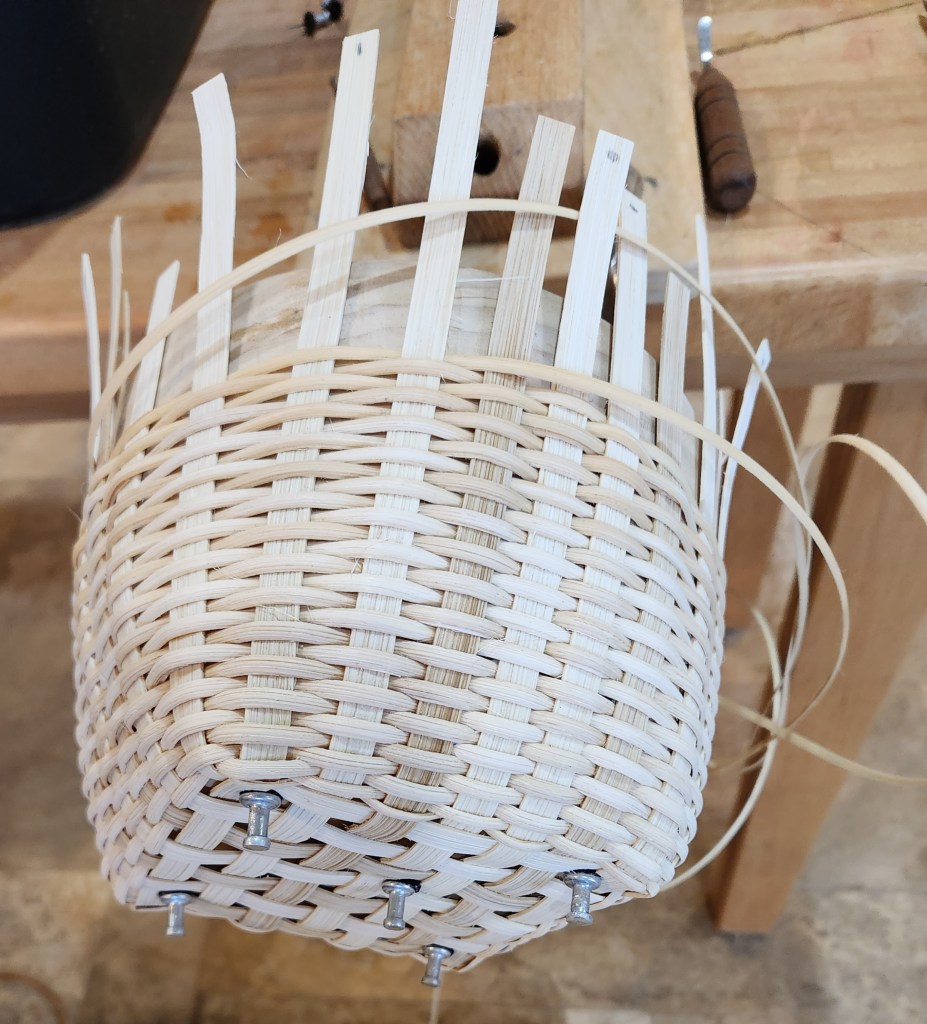

I could use a wood stain on the basket but probably won’t because the white will look better with my blue Circles top. Karen has some lovely designs at https://www.karenwychock.com/
Filed under: ANG Seminar 2017, JP Bird of Paradise & Bamboo, Orange Orchid & Bamboo
The JP canvases, Bird of Paradise with Bamboo and Orchid with Bamboo are sitting proudly on our living room couch!
Linda and I found a lovely green satin fabric at Calico in Strafford, PA (area next to Wayne on Rte 30 near Berwyn – shout out to Svengoolie fans!) in January. I think the sheen is fantastic and the green is perfect.
I decided to let them do the finishing and Linda and I picked them up yesterday. They turned out great. I am thrilled and excited to see them on my couch. They are my “summer” pillows making an early debut because we’ve been in the 60s – in February!

Filed under: Books in My Library, Needlepoint 101 by Ruth Dilts, Needlepoint Books
Previously, I reported on Needlepoint 202 by Ruth Dilts which is A Guide to 12 Different Techniques with Illustrations for Embellishment of the Painted Canvas.
Of course that book led me on a quest for Needlepoint 101. Well, I found it!
Needlepoint 101 Guide to Painted Canvases is also by Ruth Dilts. This book (from 2005) provides a list of 21 stitchs and a stitch effect guide (beards, bushes, clouds, etc) and provides stitch guides for another 12 painted canvases of which I easily found 4 are still available (online google search) including: Puma Coaster by Kathy Schenkel, Lady Bug by JP Needlepoint, and Cowboy Santa by Needle Graphics.
Even without having the canvas, this book suggests stitches for components of lots of canvases such as clothing, flowers, pots, sky, tree, hair, stonework, paving, and more.
Each stitch has a brief description and list of suggested uses and where the stitch was used in the 12 canvases. Excellent cross referencing.
I just read the article Bookshelf by Elizabeth Bozievich in the Jan/Feb issue of Needlepoint Now and most of her favorite needlepoint books are the smaller 5″ x 8″ ones. This one is a small one too. Hopefully, she enjoys her retirement from owning and editing the magazine. I look forward to future articles from her. And, best of luck to Andrea Santiamo, the new owner and editor of Needlepoint Now.

Filed under: Uncategorized
I’ve got multiple small Pocket Color Wheels and a large one by The Color Wheel Company that I have used for years. In the past year, I picked up a small Pick, Point and Match Rainbow Color Selector from K1C2. I finally sat down and read the accompanying booklet. The little window is surrounded by 7 values.
Their discussion on values leaves me realizing there is more to value than just the lightness or darkness of a color! In one place they say that a balanced harmonious combination will be most successful if all the colors in the combination are also grayed to the same value. Yet they also say that mixing values can be quite effective when 2 colors are used disproportionately. However, mixing values of three or more colors results in a spotty and distracting look. So, what to do? For me, it means take more classes and reread my books on color (when I can find the time). Keep learning!

The ANG Central Jersey Chapter (CJC) had to change the Autumn 3-Ways Workshop with Toni Gerdes to an online class and I picked up the kit on November 19. It teaches fabric applique and needle felting. I love the matching needle minder.

Well, I didn’t want to ruin my iron again. So, I took everything with me to my November Main Line Stitchers chapter Stitch-in. I had the leaf outline cut out, the leaf window, and felt cut ready to go. The fusible web went on the felt (pressed not ironed onto place on the canvas) and then on the fabric (pressed onto the felt). Linda assisted me in the process and the applique turned out great and the iron is fine. Thanks Linda for your help and to Toni for easy to follow instructions.
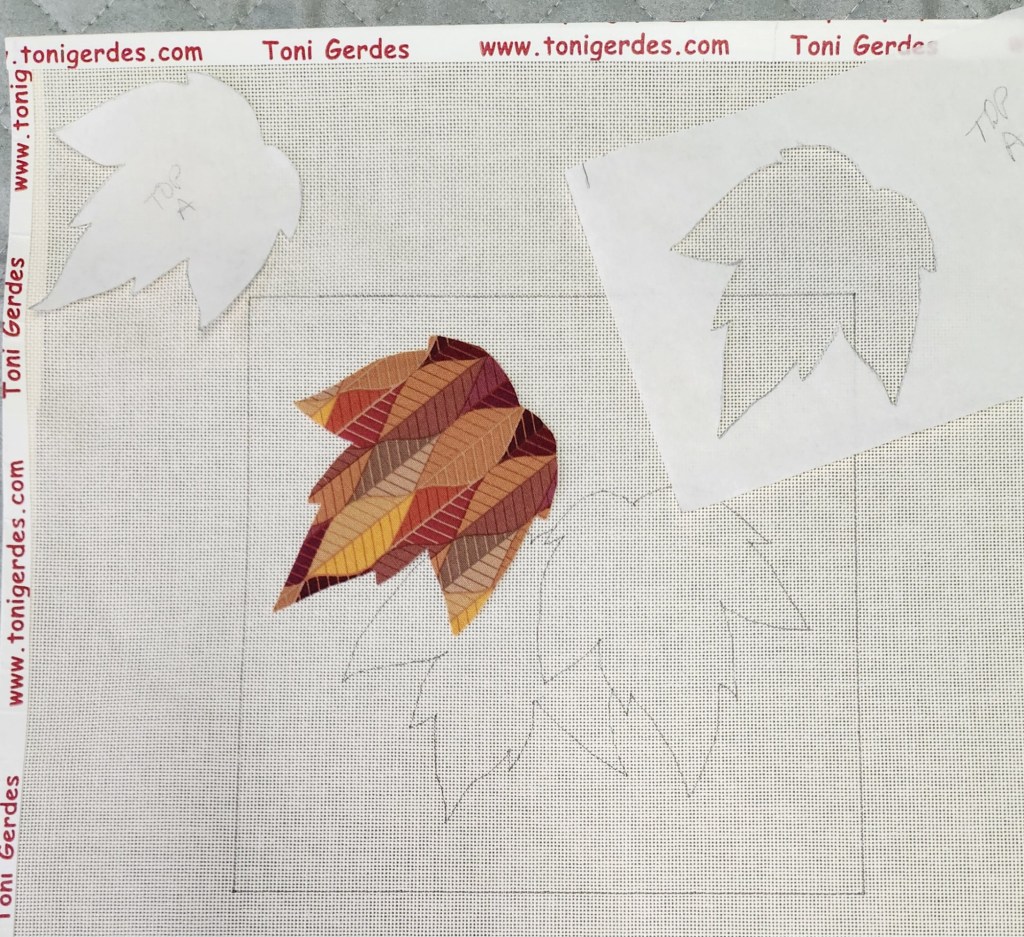
The buttonhole stitches were easy enough! The stems and veins go in after the 3 leaves are done.
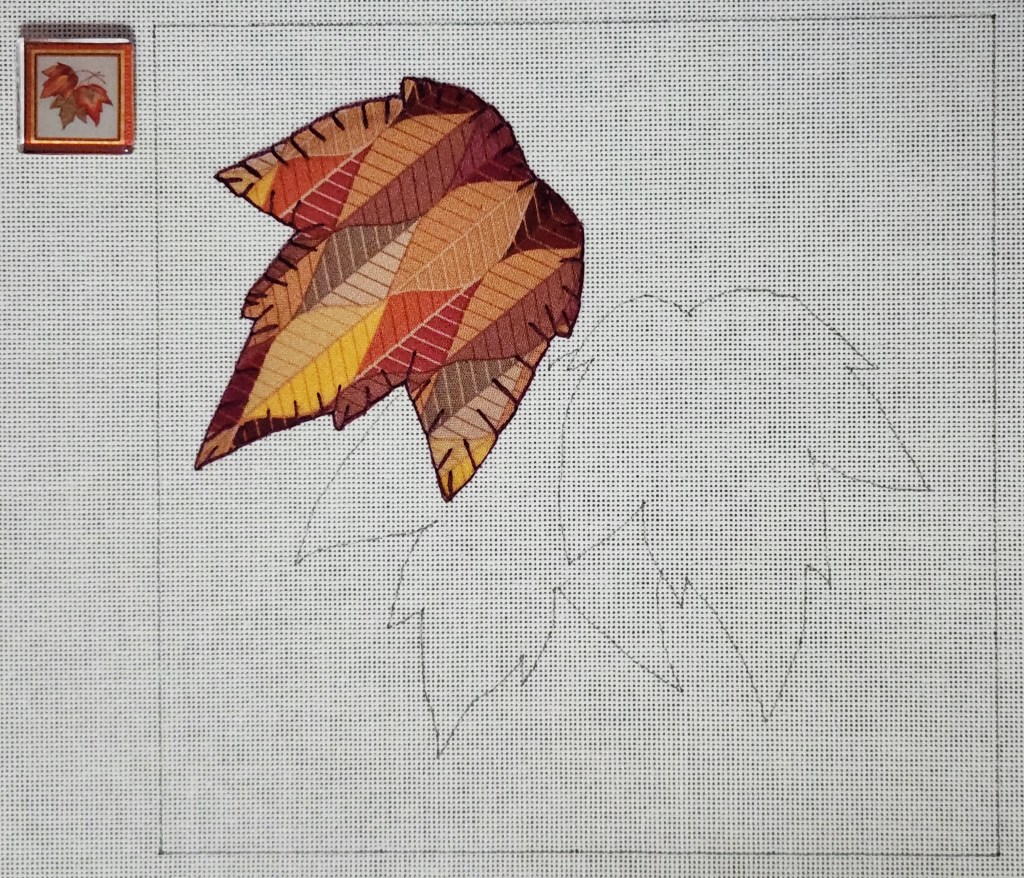
The needle felting leaf could have been done next or later. So, I worked on the stitched leaf instead. Got part of that leaf done and then needed something easy to stitch and worked on the borders for several stitching occasions away from home.
The class notes and 2 videos that were sent out in advance of our first Zoom class which is Thursday Feb 9 at 7 pm have been watched and read. While I would have enjoyed seeing Toni in person, her instructions are excellent and I am enjoying the piece.

Top billing should be Magifest but this is a needlepoint blog! We drove out Tuesday to avoid snow/rain on Wednesday and break up the 7.5 hour drive to Columbus, OH into 2 legs to be sure we wouldn’t miss any of Bill’s 3-day magic convention (which I attend too-I am his assistant and a mentalist-no not a mental case). What with stops to stretch legs and lunch, we took 9 hours. Wednesday morning looked like it was going to get bad but I think we drove out of it.
We stayed near enough to the hotel where we’d stayed in 2010 for my first ANG Seminar (Bill was with me then too) that we knew to go to the North Market. Great spot.
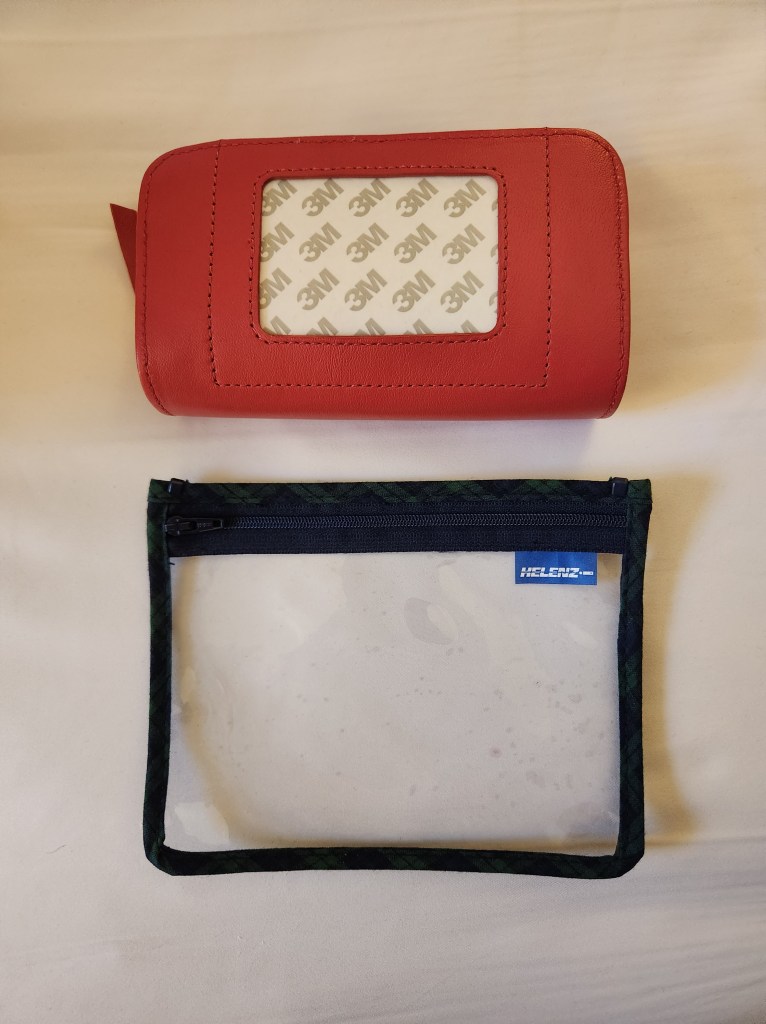
These Magicians are night owls! Thursday’s events started at 5:00 pm and ended at 11 pm. That gave us time during the day so we could shop a little. And, I dropped Bill at Half Price Books and I went to What’s the Point and joined 6 ladies for a Stitch-in for about 2 hours! Karen was advising them on painted canvases. Some had less experience than others and Karen watched over them all. Very nice store. I picked up a notions bag and a small clear bag maybe to hold some magic that we’ll be getting at the dealer tables. I enjoyed dropping in and chatting with them.
Except for the hours, this is quite a bit like a needlepoint seminar. There are tables set up to sit and share their passion between lectures. People congregate in the bar and lobby. This event has been going on for years! Lots of first timers and they support the youth with special events. There must be over 750 people here. Two performers said 1,000 but I think that’s an exaggeration.
Filed under: ANG Main Line Stitchers Chapter, ANG Stitch of the Month, 2008
My ANG Main Line Stitchers chapter is stitching Circles by Lois Kershner, the ANG 2008 Stitch of the Month.
We tackled Spider stitches in November (I forgot to post). The Ribbed Spider was first up. I’ve done Spider stitches before so I was surprised to see that Lois recommended making the spokes go from one side of the circle’s perimeter to the opposite side. Instead of crossing side to side I went into the center hole. I believe the spokes will stay straighter. And, other sources show the spokes going into the center hole.
The overview shows the N, E, S, and W spokes each going over 10 canvas threads and the 4 diagonal spokes over 7 canvas threads. Perfect location to get the same number of wraps on all spokes. When I got to the end of the spokes and didn’t think another wrap would fit, I added one last wrap.
Lois showed a multicolored Spider and Lisa stitched both hers that way. I had never tried switching threads mid-spider. So, I had to try it. It would be quite dramatic to see the colors radiate outward. A bit tedious to switch threads too often the way I imagine radiating and my blues won’t work because they are too close or too far apart in color difference. But I did use light blue in the center, a medium, medium-dark, and back to light to try switching. I love how wrapping these differently makes them so different. Very happy with both.

Daryl Lancaster, her daughter, and the Jockey Hollow Weavers Guild sponsored a Learn to Weave class Saturday in Mendham, NJ. Thanks to Dee L who kept me posted about this beginner class and to her and other guild members who floated around helping the students throughout the day.
There were 15 students and we were each working on a 4 huddle shaft loom. Daryl has collected 30 of them! Learning terms started at 9:30 am and several set up steps took us into the afternoon with a lunch break.

We passed the yarn through the Reed one at a time. That’s 90 strands!

You turn the machine around. . .

Then, you feed each strand though the eye on a Heddle, a metal wire that reaches top to bottom on each of the 4 shafts/ harness/ frames. This holds the warp threads. Each shaft (1-4) moves up and down using levers which shift the threads allowing the weft/horizontal threads to interlace with the warp threads in different patterns.
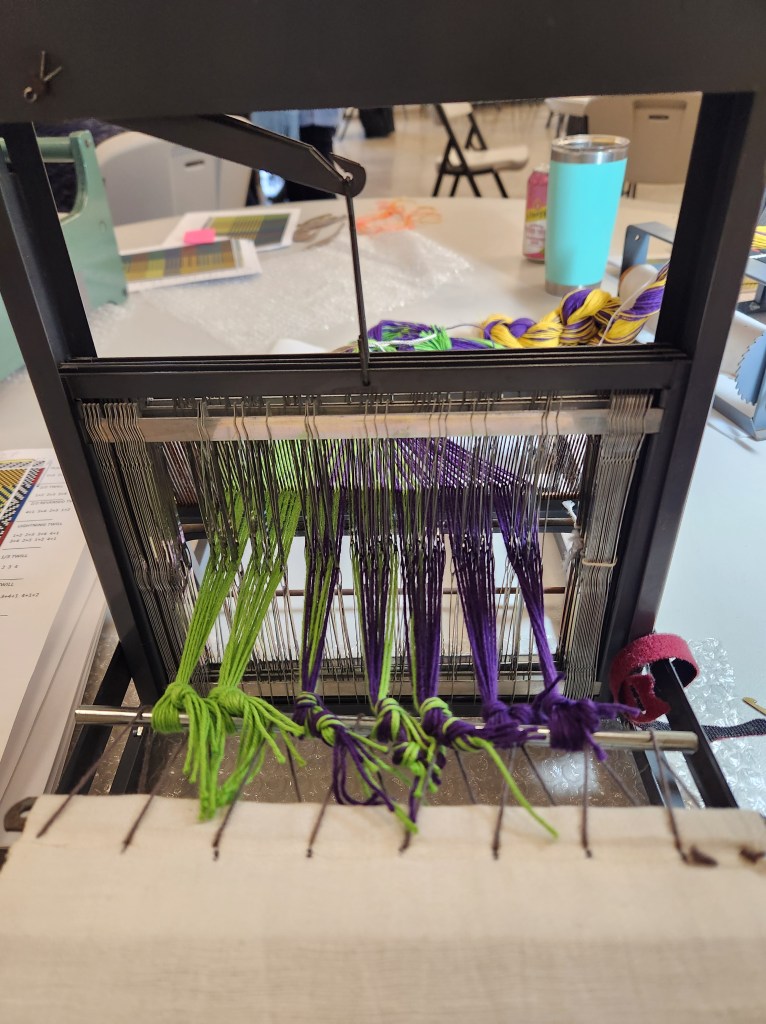
The ends got tied to the front and back beams to create tension – this is when I forget to get photos until I was done! It was around 2:30 pm with 2 hours left, when we got to the fun part and started weaving!
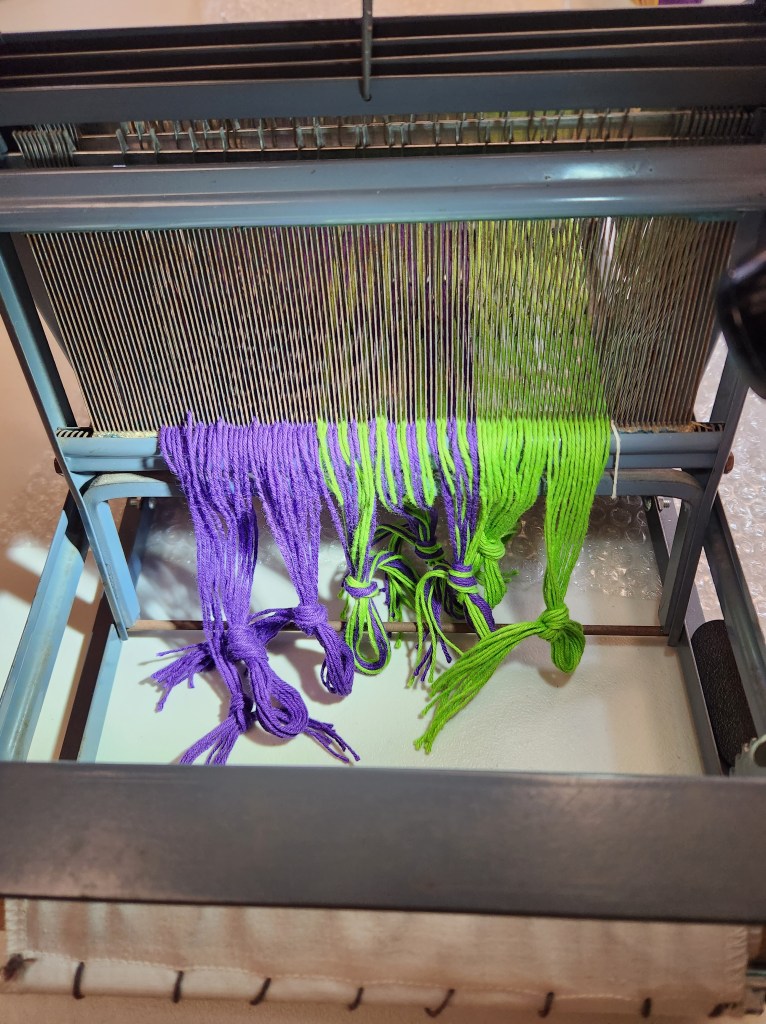
We wove (from top to bottom): Plain weave (1+3 2+4), 2/2 Twill (1+2 2+3 3+4 4+1), 2/2 Reversed Twill (4+1 3+4 2+3 1+2), Lightening Twill (1+2 2+3 3+4 4+1 3+4 2+3 1+2 4+1), 1/3 Twill (1 2 3 4), 3/1 Twill (2+3+4 3+4+1 4+1+2 1+2+3), Rib Weave (Color A: 1 Color B: 2+3+4), Basketweave (1+2 two times 3+4 two times), Color and Weave (same color as your warp Color A: 1+3 2+4 Color B: 1+3 2+4).
As you can see, it is a very mathematically inclined craft which is appealing to me and I would try another class but I don’t see buying a loom in my future. The teacher’s work is incredibly beautiful. Check Daryl’s work out at weaversew (.com, /wordblog, and on YouTube).
The set up involved 3 warp patterns shown in vertical columns and we created 8 weft patterns resulting in the final sample:

My neighbor, Alisa, made much more even width of the various patterns and had better tension throughout and gave me permission to post hers (her last two patterns are in reversed order from mine).

Fray check can be applied to the top and bottom ends or tassels tied off as desired.
I can’t thank Sue C enough for dinners and letting me arrive Friday night and stay over Saturday night. That was a long class day sitting in an unnatural position to work (chairs should adjust to height of the loom). My back felt it and I was too tired to drive 1 hour 45 minutes home. We enjoyed chatting, mysteries and stitching both evenings!

Filed under: General comments, Woodlawn Needlework Exhibition
Bill and I made it to Woodlawn early this year. The main exhibit has a little over 400 pieces. One lady said they will be placing photos of the pieces in an online exhibit (probably in mid-April) but another thought it was too cost prohibitive based on the number who paid to see it last year and how much the professional photographer charged. Hopefully, they do; and so, I am going to limit the photos I show in hopes you support them online. My photos did not turn out great this year anyway – no close ups allowed (enlarging blurred them) and the light was bright in the windows casting shadows. A good number of them are above eye level making photos long distance anyway.
I found out more about the couch that you can see on Woodlawn’s website. It’s all Nancy B’s original design, and took her 20 years to complete (during the 70-90s). She’s in her 80s now. It must be on Penelope canvas because there is Petite point (small stitches for the motifs) and Gros point (large stitches for the background). It got our vote for the People’s Choice award. Her scenes are amazing front and back! Even the pattern incorporated into the background is interesting (but was impossible to photograph).
Three people (Patti Lynn T, Mary L, and Louise W) stitched and entered my design Overdyed Spools which I taught at the EGA Mid-Atlantic Regional Fall meeting in 2021. It uses an overdyed thread of their choice. Patti Lynn replaced the center spools for a nametag and placed it on a bag. Mary added a black inner border for pop and Louise added beads. I’ve see quite a number of the finished pieces from a variety of EGA chapters and am so glad people are enjoying the piece and making it their own. In fact, I’ll be joining a joint meeting of the EGA chapters Susquehanna/Molly Pitcher Stitchers this coming weekend. Sherri G is teaching it and I will discuss several pieces of mine that manipulated overdyed threads.
The original pieces by other people (which I won’t show without permission) were quite amazing. The surface embroidery of snowflakes captured in negative and positive space by Tina T was stunning. Ekaterina S’s Snowy Evening was stitched on artist’s canvas (docents said she was new to this country and didn’t know what “canvas” meant). Hers was originally placed in the “canvaswork multi-stitch” category but later must have been switched to “surface embroidery” because artist’s canvas is not a countable ground. Her piece titled Autumn is on the same artist’s canvas and is stunning with mist appearing to float up into the hills of green, yellow, and red trees.
I recognized quite a few designs and can name the designer (google will find their websites): Royal Kimono by Toni Gerdes, American Beauty by DebBee’s Design, 3 versions of Stratigraphy by Jennifer Riefenberg (ANG Stitch of the Month 2021), 2 versions of Long Time Gone Stitching by Ann-Marie Anderson-Mayes of Beautiful Stitches), Fibonacci Swirls by Olivia Hartshorn (Needle Pointers Mar/Apr 2022), Star of Stitches (Stitch of the Month 2020), Winter Logs and Serenity by Kathy Rees, Anasazi Dream/Song/Spirit by Carole Lake, Stacked Rectangles by Susan Hoekstra, Gordian Knot by Rachel Atkinson (past ANG Correspondence Course), Pyramids by Wendy Moore, 2 versions of Circles of Life by Lorraine Salt, Woven Ribbons (May/June 1999 Needlepoint Now magazine), Candles Bright by Mary Knapp, Patchwork Evergreen by Janet Casey. There are even a few more I’ve seen but I’m not sure of the designer.
I hope my Main Line Stitchers select Fibonacci Swirls next year. Sue C did a lovely job selecting her own threads.
Linda M of ANG Main Line Stitchers stitched Rainbow Butterflies (a Laurel Burch canvas) for a chapter program discussion of selecting threads for a painted canvas last year and I was thrilled to see it in the exhibit! Congratulations to Linda on a blue ribbon for the Stratigraphy she stitched with threads selected from her stash.
Cecilia, one of the members of ANG Main Line Stitchers, recently contacted me about potential stitches for The Plague Doctor (a full length robed piece). So, I was surprised to see a different version by Stephanie St.C appear at Woodlawn. Cecilia shared the story behind these pieces (wiki it for the details) but that pointed thing is a mask. A Google search reveals its popularity is widespread.
The number of blackwork pieces were more than I remember from last year and they were all amazing. Abigail’s Sampler by Claudia K is impressive because it is reversible and framed on a stand so you can see both sides. The Flower Basket by Michael Ann B is so crisp and bright with the gold outlines. Save the Stitches by Cheryl W is a sampler of all different (130+) patterns intertwined with hints of a rosy-purple adding more interest throughout the piece. It is designed by Liz Almond. And, German Sampler 1661 by Sally P hangs like a large bellpull consisting of band after band of various blackwork patterns. I really am hard pressed to select my favorite in this category but the complexity of the large number of interlocking patterns seen in Save the Stitches edged out the others.
The Japanese Embroidery is beautiful but my favorite is Weeping Cherry by Mary Louise S because of the gentleness of the colors and falling leaves.
Not as much goldwork on exhibit as in past years but a simple and elegant blue ribbon winner of goldwork by Alison K called Queen Anne’s Lace gets my vote for favorite goldwork piece.
Samplers range in variety as usual from traditional to more modern and my featured sampler is by Linda M from NJ Needle Artists who puts a lot of effort into supporting Woodlawn. Congrats to Linda for a Blue Ribbon with Thanksgiving Sampler.
Cross-stitch was not forgotten this year. The geometrics (both designed by Ink Circles), Circular Lights by Jill B and Tangled Fire by C Tobias are beautiful. You can practically smell the Blue Hydrangeas by Lauren B. Bravery by Sumira O is a huge lion head mounted on a shield with a sword piercing his head on a diamond background. But the shading obtained by Tiffany in A Mother’s Love Sepia Elephants (designed by Carolyn Thornton) is lovely and despite being much smaller than the lion, I am partial to elephants.
I wish I could go through all the categories but there is so much diversity, I’d never get back to stitching!
The EGA Constellation chapter and Oatlands chapter celebrated their 50th and 40th anniversaries while the ANG Shenandoah Valley celebrated their 20th anniversary with quite a prolific and diverse collection of needlework. Congratulations to all 3 chapters! I couldn’t tell which pieces were with each chapter but my 3 selections are Asymmetrical Copper by Jeff Kulick (love this colorway; instructions are in the Nov/December 2020 issue of Needle Pointers magazine), Ruby Razzle Dazzle by Ann Strite-Kurz (so intense looking and instructions are in my stash), and a saying that about sums it all up (designer unkown; perhaps a Victorian motto).