This class offered an interesting approach to designing. And, Kurdy gave us so many interesting shapes in supplementary pages to the class that I could be playing with these for days. I do have a design started with some of the interesting and different shapes that I have not seen before. But, that’s all for another post.
For now, I am sharing my finished geometric all beaded and completed. Certain motifs I like better than others. And, experimenting was a big part of the point of the class. Having all 4 quadrants be different appeals to me because it looks more interesting and is more fun to stitch. Colors balanced out well. Very good class!
The 4 mm crystal bicone beads seemed too bulky for some areas. So, I used 2 mm clear crystal bicones and small bugle beads from my stash. They don’t show up really well in the photos so I added close up for each area.


I didn’t work on this since last Saturday’s class with Orna Willis and EGA’s Mid-Atlantic Region members. Between this Saturday’s Stitch-in with members of my ANG Main Line Stitchers chapter, baseball, and football this weekend, I got a lot done.
I followed fellow classmate, Donna’s, idea to place the dark blue overdyed thread in opposite corners. I selected the yellow for the center basketweave stitch since there was enough pink there already. And, I selected the lighter portions of the green overdyed for the 2 rows of Gobelin over 2, the darker portions for the outer row of Gobelin over 2, and the medium portions for the basketweave in between.
Because it called for 3 strands of DMC floss for the reverse basketweave area (yellow and pink overdyed thread), I was able to use 3 strands in the bottom area working left to right. Using the other 3 strands, I worked the top area working from opposite corners. As I needed another thread, I continued with the next color of the skein to maintain the rhythm of color flow of the overdyed thread and used 3 strands in each area to mirror the effect.
This is 2″ wide and 5″ long. There is 1″ more to add on each end and French Knots to add and some beads.
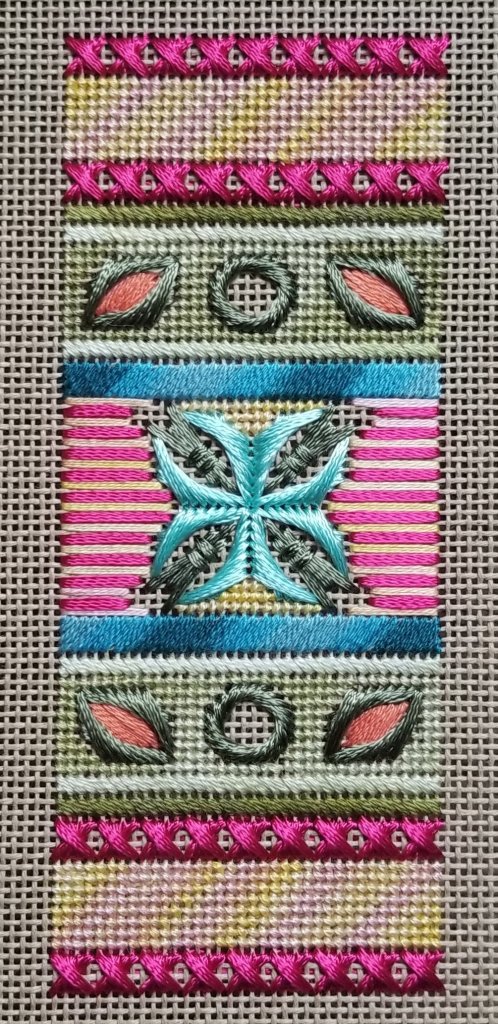
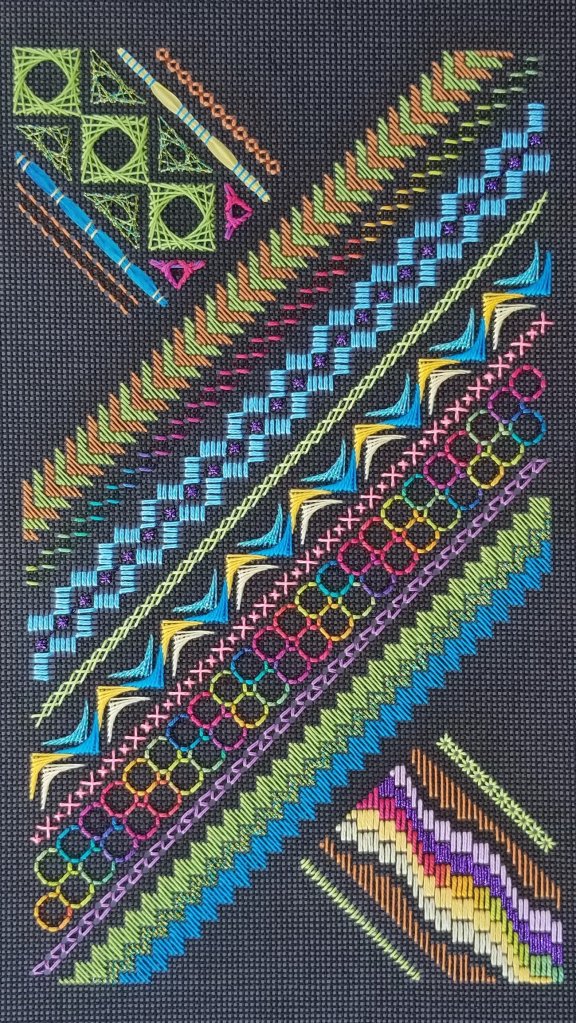
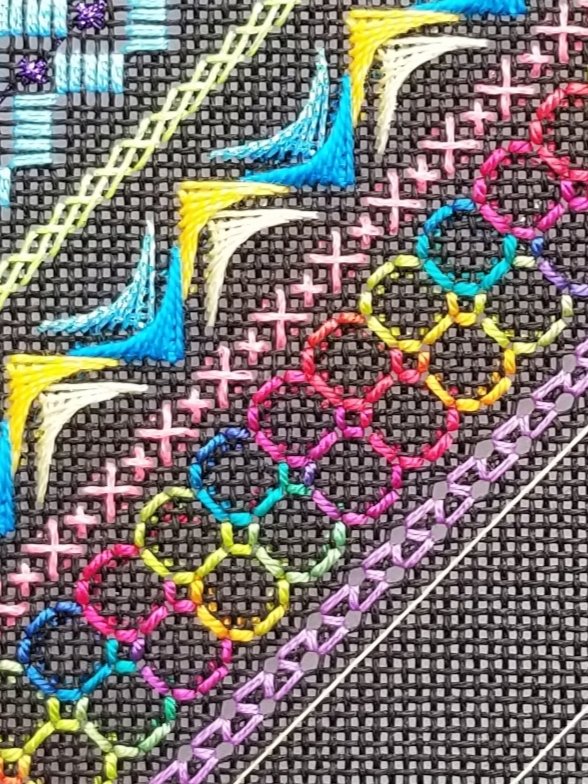
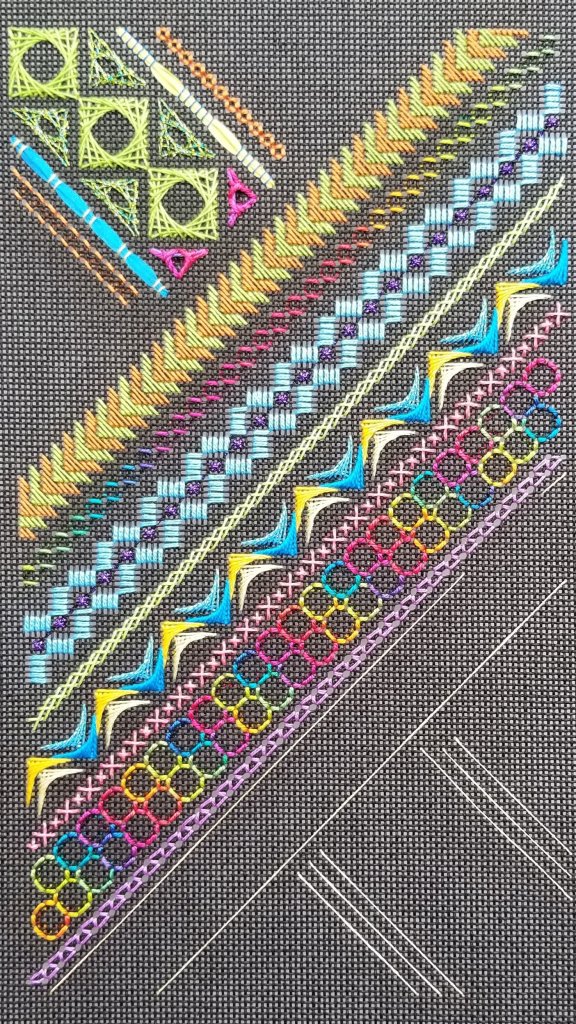
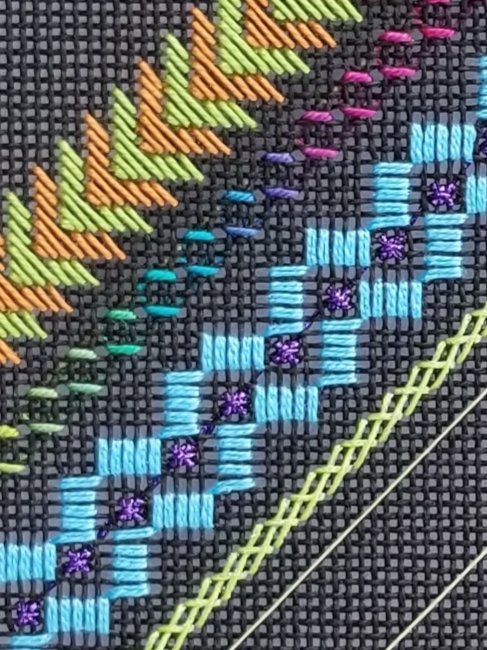
My ANG Main Line Stitchers chapter is stitching Rainbow Ribbons by Kam Wenzloff published in Nov/Dec 2019 issue of Needlepoint Now. I’m well ahead of schedule for our November 9 meeting (via Zoom).
Band 3 is a variation of a Byzantine stitch called Jacquard. It has a row of Continental between the rows of 4 x 4 over 2 Byzantine.
This was an excellent stitch to do while watching baseball playoffs and the World Series.


I would have attended the Embroiderer’s Guild of America (EGA) Mid-Atlantic Region (MAR) meeting in person in Wilmington, DE this month. But, it was canceled due to coronavirus, what didn’t!
But, Orna Willis agreed to hold the class through Zoom in 2 parts. The Flower Cuff measures 2″ wide and however long each person needs to make a comfortable fitting bracelet. I don’t wear bracelets or a watch. Can’t stand them or necklaces. So, why am I doing this? I really wanted to experience an EGA MAR event and Orna’s pieces are such fun colors and she’s teaching how to finish this ourselves. Instead of finishing as a bracelet, I will finish as a flat ornament for a small wall hanging.
Look at the lovely threads! It’s interesting that the threads are numbered 1 through 7 and instructions are written up by number of thread. It looks like 3 Neon Ray’s (ribbon) and 4 DMC overdyed threads. Wait until you see what I do with the beads.
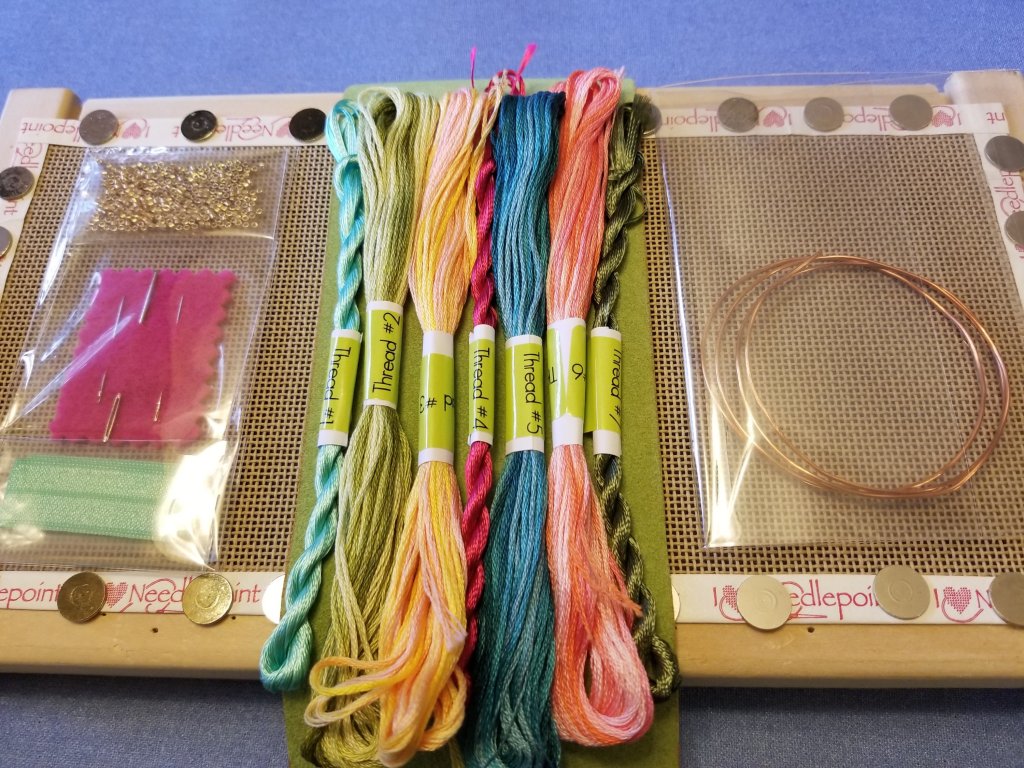
I am in Wells, ME for the week and luckily the office of our timeshare had a small ironing board and iron. I needed to iron the Neon Ray’s. And, I didn’t think to bring my curling iron. Here’s my set up! Great light coming in the window (no need for either the battery or plugged in lights that I brought). I got a head start on class in order to figure out how long the threads should be before cutting. Signing in now.
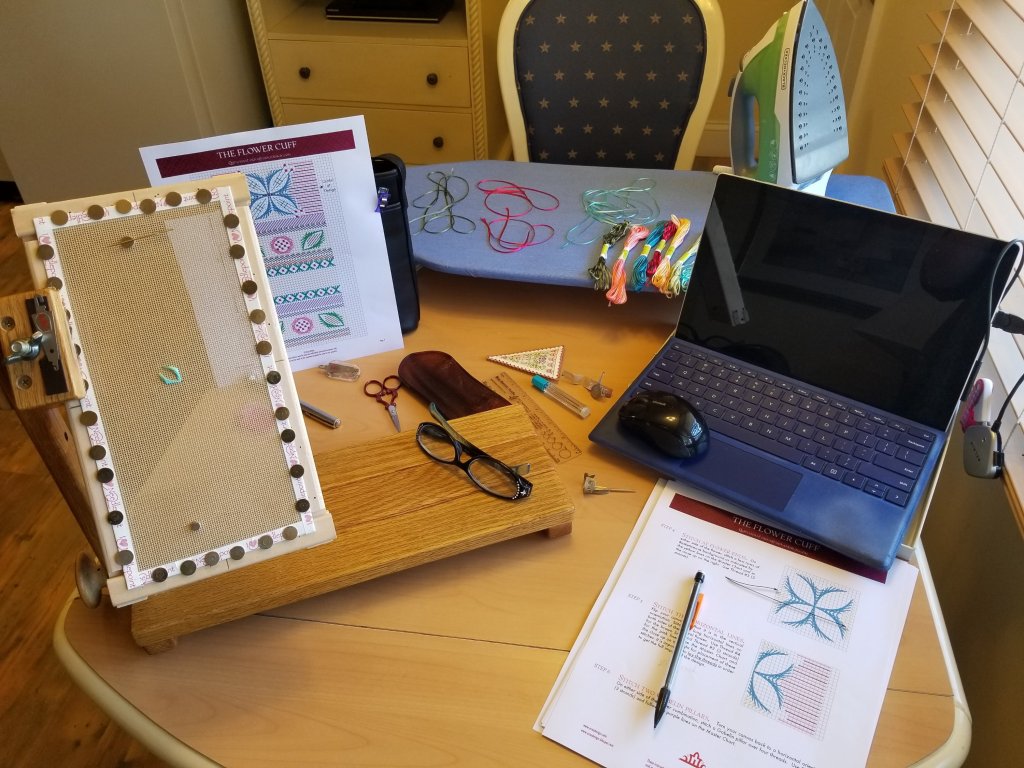
We practiced French Knots. Mine got better as I moved left.

We went over all the diagrams but I couldn’t stitch and listen and or watch. Orna demonstrated several stitches using a pre-recorded video. So, here’s what I got done in class. But, I will easily be ready for the second class in a month from now.

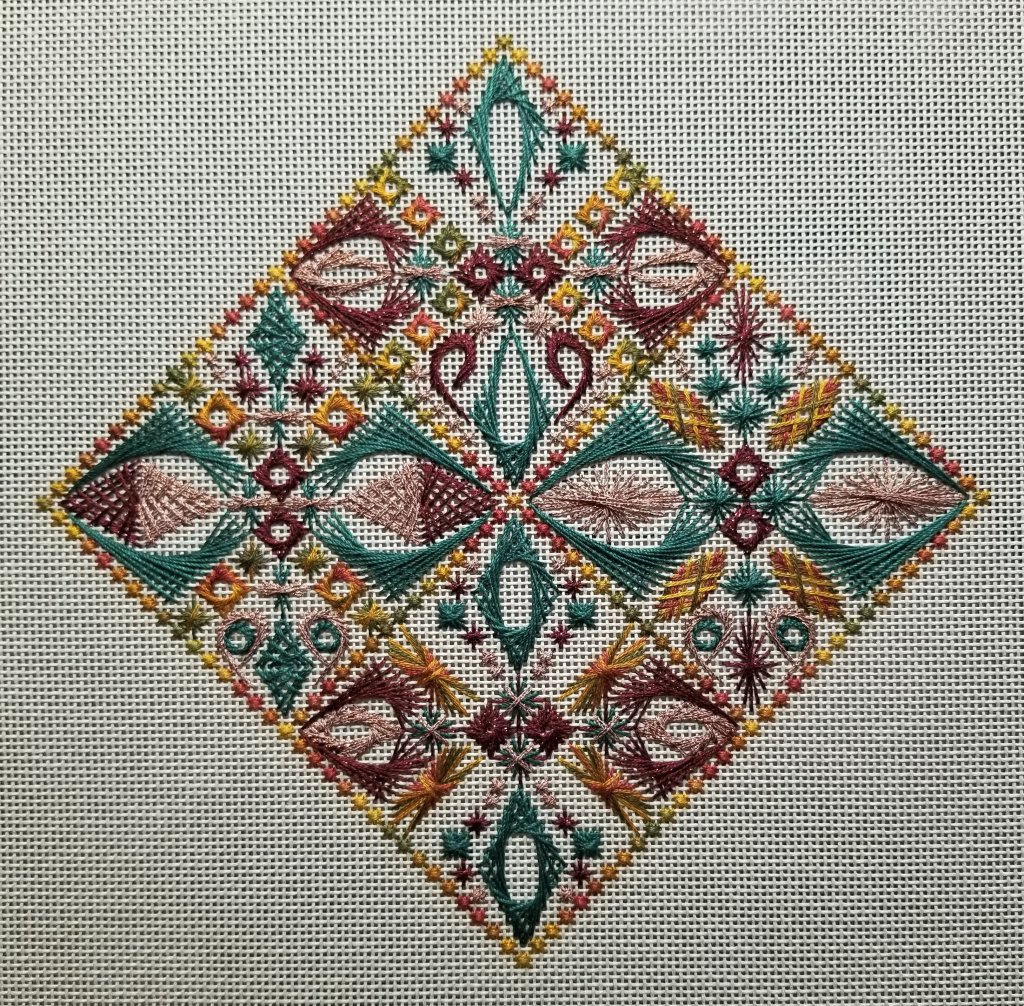
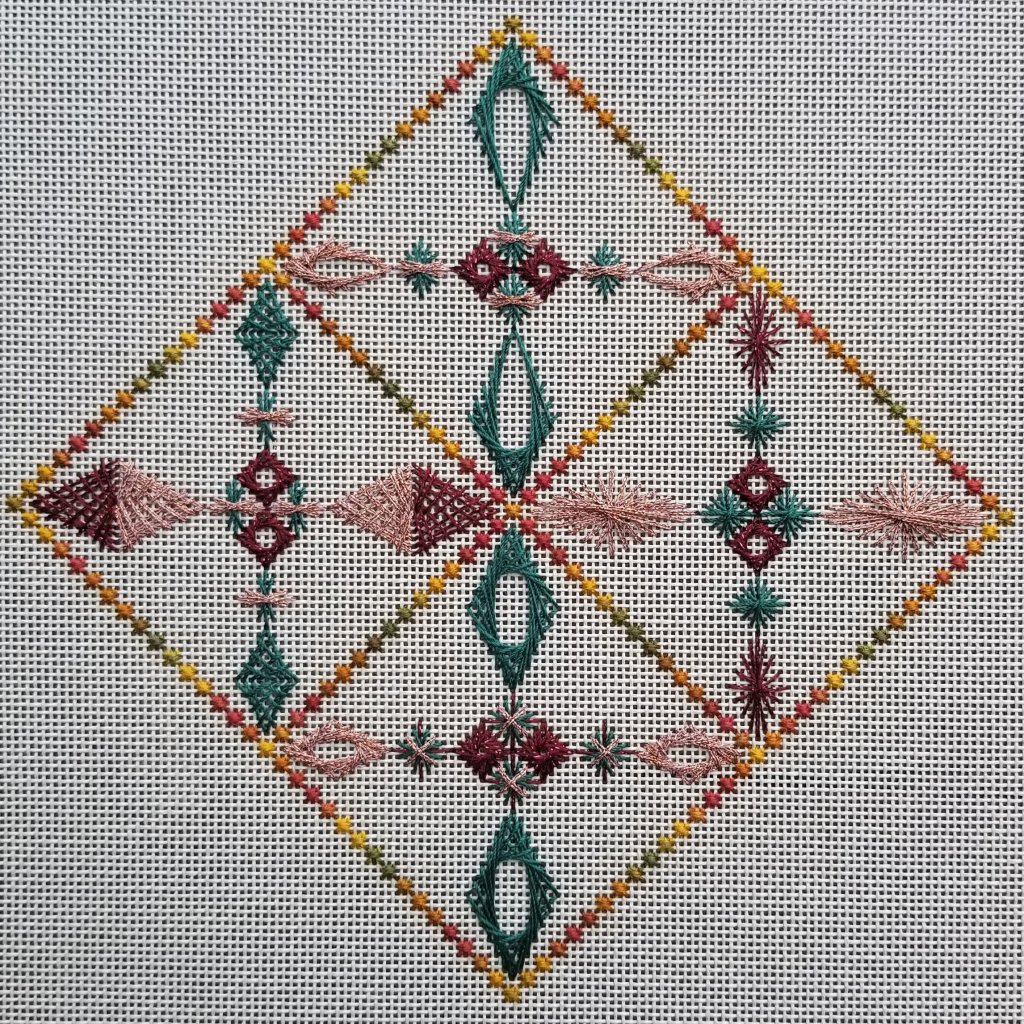
Large and small crescents surround some of the large and small points. I was able to use pin stitches to end the threads under the crescents which also keeps the last stitch taut and secure better than weaving on the back under threads (in my opinion).
The rest of the large and small points are surrounded by what Kurdy Biggs calls “fill stitches” including various sizes of Jessicas, Fleur-de-lis crescents, and Rhodes. The challenge here was that none of the combinations were explicitly diagrammed for you. Several options were shown and the basic stitches were diagrammed but I had to figure out what I wanted to fit together.
There a couple of Fleur-de-lis crescents and Sprat’s Heads that I had to adjust but it was easy enough to count out once you get started.
All the stitching is done leaving only green and red crystals to add. I left plenty of room in the north and south diamonds but less in the east and west areas but that’s fine. I didn’t want complete symmetry anyway.
Wow. Lesson 4 already done! Despite not being in person, I was very happy with my ANG 2020 Virtual Seminar class, Interchange, with Linda Reinmiller.
I like the balance that the band of Byzantine offered to the earlier band of Milanese. And, that Kreinik has both the green and blue making it very appealing band.
Bargello is always fun to stitch. I purposefully selected a portion of the overdyed Gloriana that went from green on the outside corner in to the pink to pull in the same colors used in the upper left area. This is probably the first time I laid 2 strands of Kreinik rather than using a heavier weight Kreinik. It tended to tangle easily.
It was interesting to stitch the Satin stitch with such a thin thread (#12) but it balances the lightly stitched orange area in the upper left area.
The pulled Satin isn’t particularly evident because the canvas holes don’t look bigger on either edge. Once I compared with an unpulled diagonal Satin (not shown here), I found a one millimeter difference in the over 2 canvas thread stitch. So, the pulled Satin is smaller producing a tighter stitch.
Then, we ended with the most familiar pulled technique that I have seen before, an eyelet. It’s such a pretty stitch but tough to end the thread because it is pulled so tightly.
This piece certainly has challenging issues with ending threads (except for the canvas stitches) and not having them show. Piercing was the method that worked best for me except for Kreinik where I had to bury it.
Thanks to Linda Reinmiller for making this class available in the virtual world, teaching beginning pulled work, and for answering my questions in the earlier lessons. I’m also fascinated by the use of colors repeated to create a cohesive design. It was fun to stitch with such bright colors especially that Gloriana! And, it’s not often that I finish a Seminar piece within a month of starting it! Yeah!!

Lesson 3 of my ANG 2020 Virtual Seminar class, Interchange with Linda Reinmiller began with a band of crescents. If you didn’t know how to do them, you sure would by the time you finished. As I did with the crescents in my Crescent Journey piece, I used a tuck stitch near the center in order to eliminate carrying threads below the canvas in open areas. And, I buried the threads in the center of already stitched crescents as I moved down each row.
The next band was much easier with upright cross stitches. Then, we learned pulled ring backstitch and pulled 3-sided. I had no idea there were so many variations of pulled work.
I don’t see much advantage in the pulled rings versus just stitching them. The only pulls making a difference are in the right small square areas running down the center. My hand is feeling it and need to take breaks occasionally.
The pulled 3-sided was definitely one pattern where pulled stitches create a good effect. Stitching each stitch twice (rather than doubling the thread) made cinching easy before stitching the next stitch. Also, each stitch was over 3 canvas threads not 4 as in a few previous bands.
Filed under: ANG Main Line Stitchers Chapter, Color Complements, General comments, Rainbow Ribbons, Threads
My ANG Main Line Stitchers chapter is stitching Rainbow Ribbons by Kam Wenzloff published in Nov/Dec 2019 issue of Needlepoint Now.
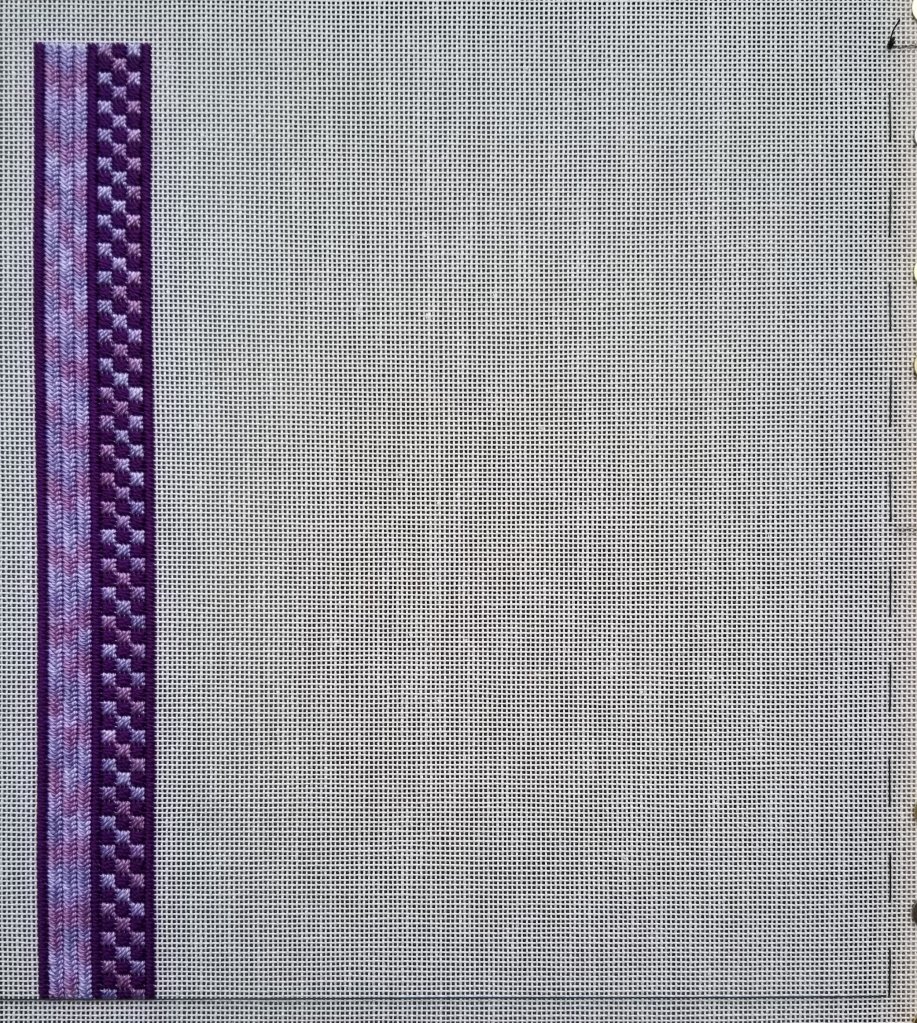
I am stitching another and last pillow for the guest bedroom. So, I have more purple threads again. This is Lavender (51) from Color Complements and DMC #5 Perle 550.
Many of us are changing the dimensions of the stitched area and we discussed enlarging the piece at our last meeting. The piece is designed to be 163 threads wide by 160 threads high. The designer suggests stitching some of each band until you get to Band 7 because there are 40 giant rice stitches from top to bottom eliminating the need to count to 160 threads and potential counting errors. You can compensate any band to any length. However, Bands 8 and 11 are also important widths to consider when deciding the length. Band 8 is stitched as a repeating unit of 20 threads and Band 11 over 10 threads. Band 12 is also over 4 threads like Band 7. Only Band 2 is over an odd number of 3 threads. So, if you want to lengthen the piece, doing so in 20 thread increments (a little over an inch on 18 count) will eliminate compensation for Bands 7, 8, 11, and 12. Then, only Band 2 gets compensated. So, I basted in increments of 10 because I want to stitch complete columns moving left to right going down 11″.
We’re going to do 2 bands each month. And, I am ready for Monday’s October 12th Zoom meeting.
Speaking of Zoom, our Starbucks location closed permanently anyway. Another casualty of 2020. Trying to look on the positive side of it, we have Zoom and plenty of time to look for another place. I don’t believe that we will be meeting face to face at least until the spring. Between coronavirus and the weather, I have to hope by spring things will be better!
Here’s Lesson 2 from my ANG 2020 Virtual Seminar class, Interchange, a band sampler with Linda Reinmiller. It’s great doing this in weekly lessons because I can definitely complete each lesson in that time frame.
After a band of Milanese, we learned Indian Drawn Ground Filling and Pulled Step Stitch with Smyrnas.
For Milanese, working with 2 needles can be tough until you get the hang of leaving the thread on the top of the canvas before completing the last stitch of each unit. If you stitch all one color first, you really have to count carefully. Why take that chance?
I am really happy that I used a long enough thread of the gorgeous Gloriana for the Indian Drawn Ground Filling for 2 reasons. The flow of the colors is smooth without interruption and goes across all the colors. And, in order to end the thread, I pierced the threads on the one edge so that they don’t show through. Starting with a second thread might be tougher to hide the thread.
The Pulled Step Stitch was interesting mostly because of the Smyrnas which filled apparent offset areas despite them being on the true diagonal. You can see this best in the close up photo.
Then, we finished Lesson 2 with Diagonal Long-armed Cross Stitch which took some counting to start but then was easy to keep going! I like it a lot mostly because it too progresses on the true diagonal but looks oblique.

Back in mid July, I stitched the Smyrna border and put it aside waiting for the next lesson. But, I didn’t get back to it until now. One more lesson gets posted October 1. So, I still have plenty of time to ask questions as I get back into this.
I carefully selected adequate lengths of the Gloriana so that the colors would be symmetrical as I worked each area of the border.
For the centers, I selected different Rhodes stitches and Jessicas. It was bothering me that there isn’t any Sparkle Braid in the right center area but I balanced out the right diamond area by adding more Sparkle Braid in the large points. Smaller Rhodes and Jessicas are in the small points off each center.
Our kit included 2 cards each of Elegance, Silk Lame Braid Petite, and Sparkle Braid in 3 different colors. The overdyed Gloriana and beads are also included. That’s all. Initially, I was going to add more threads. But, I decided to not complicate this small piece. It’s 5″ x 5″ along each border and as viewed in a diamond almost 7.5″ x 7.5″.
I’ve got 4 diamond quadrants and I don’t want complete symmetry. The top and bottom are quite symmetrical in color and shape so far but the left and right sides are different from the others. I did not plan the colors for these areas in advance. Once I finished the centers, I decided what to stitch with next for the large points. Once I saw them in place, I decided on the smaller points. There are only 3 colors to choose from because I am holding off on using the overdyed for a particular section.
I won’t be able to stitch on this at our Main Line Stitchers Stitch-in today because these stitches require too much counting. But, I have other projects that I can stitch!
